

Ever crave that velvety smooth, irresistibly flavorful dip that’s both healthy and satisfying? Look no further than classic hummus! My family, being the enthusiastic snackers they are, are always on the lookout for something delicious and wholesome. Store-bought hummus is convenient, sure, but it often lacks that fresh, vibrant taste and perfect texture. So, I embarked on a mission to create the ultimate homemade hummus, and let me tell you, this recipe is a game-changer. From the first creamy bite to the last crispy pita chip dipped in its savory goodness, this hummus has become a staple in our home. It’s incredibly easy to make, bursting with flavor, and so much better than anything you can buy pre-made. Get ready to experience hummus like never before – smooth, creamy, and utterly addictive!
Ingredients: The Building Blocks of Delicious Hummus
Creating exceptional hummus starts with quality ingredients. Each component plays a vital role in achieving that perfect balance of flavor and texture. Here’s what you’ll need for this smooth and creamy classic hummus:
For the Hummus:
- 1 ½ cups cooked chickpeas (garbanzo beans): This is the heart of our hummus. You can either use canned chickpeas, thoroughly rinsed and drained, or cook your own from dried. Cooking your own chickpeas from scratch, while requiring a bit more time, often results in an even creamier hummus and allows you to control the sodium content. If using canned, opt for low-sodium or no-salt-added varieties.
- ½ cup tahini (sesame seed paste): Tahini is a crucial ingredient for authentic hummus, providing a nutty, slightly bitter depth of flavor and contributing to the creamy texture. Look for tahini that is smooth and runny, not thick and dry. Good quality tahini will have a rich, sesame aroma. Stir it well before measuring as the oil tends to separate.
- ¼ cup freshly squeezed lemon juice: Lemon juice brightens the hummus, adds a tangy zest, and balances the richness of the tahini and chickpeas. Freshly squeezed lemon juice is significantly better than bottled juice, offering a brighter and more vibrant flavor.
- 2-3 cloves garlic, minced: Garlic adds a pungent, savory kick to the hummus. Start with 2 cloves and add another if you prefer a stronger garlic flavor. Minced garlic releases its flavor more effectively than whole cloves, ensuring it infuses the hummus evenly.
- ¼ cup ice water: Ice water is the secret ingredient to achieving incredibly smooth and creamy hummus. It helps to lighten the texture and creates an emulsification, resulting in a velvety consistency. Don’t skip this!
- 2 tablespoons extra virgin olive oil, plus more for drizzling: Olive oil adds richness, flavor, and contributes to the smooth texture. Use good quality extra virgin olive oil for the best flavor. We’ll use it in the hummus and for drizzling on top for serving.
- ½ teaspoon ground cumin: Cumin adds a warm, earthy spice that complements the other flavors beautifully. Freshly ground cumin is always preferable for a more aromatic and potent flavor.
- ½ teaspoon salt, or to taste: Salt enhances all the flavors in the hummus. Start with ½ teaspoon and adjust to your preference. Remember that canned chickpeas might already contain some salt.
For the Pita Chips:
- 4-5 pita breads: You can use white or whole wheat pita bread. Day-old pita bread works best as it’s slightly drier and crisps up better in the oven.
- 2 tablespoons olive oil: Olive oil will help the pita chips crisp up and adds flavor.
- ½ teaspoon salt: Salt enhances the flavor of the pita chips.
- Optional seasonings: Feel free to get creative with seasonings for your pita chips. Consider adding paprika, garlic powder, onion powder, dried oregano, za’atar, or cumin for extra flavor.
Instructions: Crafting the Perfect Smooth Hummus and Crispy Pita Chips
Now, let’s get to the fun part – making the hummus and pita chips! Follow these step-by-step instructions for hummus perfection and crispy, golden pita chips:
Making the Smooth & Creamy Hummus:
- Prepare the Chickpeas (Optional, if starting from dried): If using dried chickpeas, soak them overnight or for at least 8 hours in plenty of water. Drain and rinse them. Place the soaked chickpeas in a pot and cover with fresh water. Bring to a boil, then reduce heat and simmer for 1-1.5 hours, or until the chickpeas are very tender and easily mashed. Skimming off any foam that rises to the surface during cooking can improve the texture. Drain the cooked chickpeas and let them cool slightly. For extra smooth hummus, you can peel the chickpea skins after cooking. This is a bit time-consuming but results in an even silkier texture. Simply pinch each chickpea and the skin should slip off.
- Combine Tahini and Lemon Juice: In a food processor, combine the tahini and lemon juice. Process for 1-2 minutes until the mixture is light and creamy, almost whipped. This step is crucial for creating a smooth and emulsified base for your hummus. Scraping down the sides of the bowl occasionally ensures everything is well incorporated.
- Add Garlic and Cumin: Add the minced garlic and cumin to the food processor with the tahini and lemon juice mixture. Process again for about 30 seconds until fragrant and well combined.
- Add Chickpeas: Add about half of the chickpeas to the food processor. Process for 1-2 minutes, until the mixture is very smooth. Then add the remaining chickpeas and continue processing. Stop and scrape down the sides of the bowl as needed to ensure all the chickpeas are incorporated and the mixture is consistently smooth.
- Incorporate Ice Water: With the food processor running, slowly drizzle in the ice water. Continue processing for another 1-2 minutes. The hummus will lighten in color and become even creamier as the ice water emulsifies with the other ingredients. The cold water also helps to prevent the hummus from overheating in the food processor, which can affect the texture.
- Add Olive Oil and Salt: Add the olive oil and salt to the food processor. Process for a final 30 seconds to a minute until everything is perfectly combined and the hummus is incredibly smooth and creamy. Taste and adjust salt and lemon juice if needed. You might want to add a touch more lemon juice for brightness or salt for flavor balance.
- Chill (Optional but Recommended): Transfer the hummus to a bowl, cover with plastic wrap pressing it directly onto the surface to prevent a skin from forming, and refrigerate for at least 30 minutes. Chilling allows the flavors to meld together and the hummus to thicken slightly, resulting in an even better taste and texture.
Making the Crispy Pita Chips:
- Preheat Oven and Prepare Pita Bread: Preheat your oven to 375°F (190°C). Stack the pita breads and cut them into wedges. You can cut each pita into 8 wedges for classic chips or smaller wedges for bite-sized snacks.
- Toss with Olive Oil and Seasoning: In a large bowl, toss the pita wedges with olive oil and salt (and any other desired seasonings). Make sure each wedge is lightly coated with oil.
- Arrange on Baking Sheet: Spread the pita wedges in a single layer on a baking sheet. Avoid overcrowding the pan, as this will steam the chips instead of baking them crisp. You may need to use two baking sheets or bake in batches.
- Bake until Crispy: Bake for 10-15 minutes, or until the pita chips are golden brown and crispy. Keep an eye on them as they can burn quickly. Flip them halfway through baking to ensure even crisping.
- Cool and Serve: Remove the pita chips from the oven and let them cool completely on the baking sheet. They will crisp up further as they cool. Once cooled, they are ready to serve with your delicious homemade hummus!
Nutrition Facts: A Healthy and Delicious Dip
Hummus is not only incredibly tasty but also packed with nutrients. Here’s a general nutritional breakdown for this classic hummus recipe. Please note that these are estimates and can vary slightly depending on the specific ingredients used and serving sizes.
Servings: Approximately 10-12 servings (based on 2 tablespoons per serving)
Calories per Serving (approximately): 150-180 calories
Approximate Nutritional Breakdown per Serving:
- Fat: 10-12 grams
- Healthy fats from olive oil and tahini
- Saturated Fat: 1-2 grams
- Cholesterol: 0 mg
Key Nutritional Benefits of Hummus:
- Good source of plant-based protein: Chickpeas are a great source of protein, making hummus a satisfying and filling snack or appetizer.
- High in fiber: The fiber content in chickpeas aids in digestion, promotes satiety, and helps regulate blood sugar levels.
- Rich in healthy fats: Olive oil and tahini provide monounsaturated and polyunsaturated fats, which are beneficial for heart health.
- Source of vitamins and minerals: Hummus contains various vitamins and minerals, including iron, folate, phosphorus, and manganese.
- Vegan and Gluten-Free (naturally): Hummus is naturally vegan and gluten-free, making it suitable for a wide range of dietary needs.
Pita Chips Nutrition (per serving, approximately 4-5 chips):
- Calories: 100-120 calories
- Fat: 4-5 grams
- Carbohydrates: 15-18 grams
- Protein: 2-3 grams
Note: Pita chips are generally higher in carbohydrates and lower in nutrients compared to hummus. Consider serving hummus with vegetable sticks like carrots, cucumbers, and bell peppers for a lower-carb and more nutrient-dense option.
Preparation Time: Quick and Easy Homemade Goodness
This recipe is surprisingly quick and easy to prepare, making it perfect for weeknight snacks, last-minute gatherings, or meal prepping.
- Prep Time: 15-20 minutes (excluding chickpea soaking and cooking time if starting from dried)
- Cook Time (Pita Chips): 10-15 minutes
- Total Time: 25-35 minutes (plus chickpea soaking and cooking time if applicable)
If using canned chickpeas, the total active preparation time is minimal, and you can have fresh, homemade hummus and pita chips ready in under 30 minutes! Cooking chickpeas from scratch adds about 1.5-2 hours total time due to soaking and simmering, but it can be done ahead of time.
How to Serve: Versatile Ways to Enjoy Hummus and Pita Chips
Hummus and pita chips are incredibly versatile and can be served in countless ways. Here are some delicious serving suggestions:
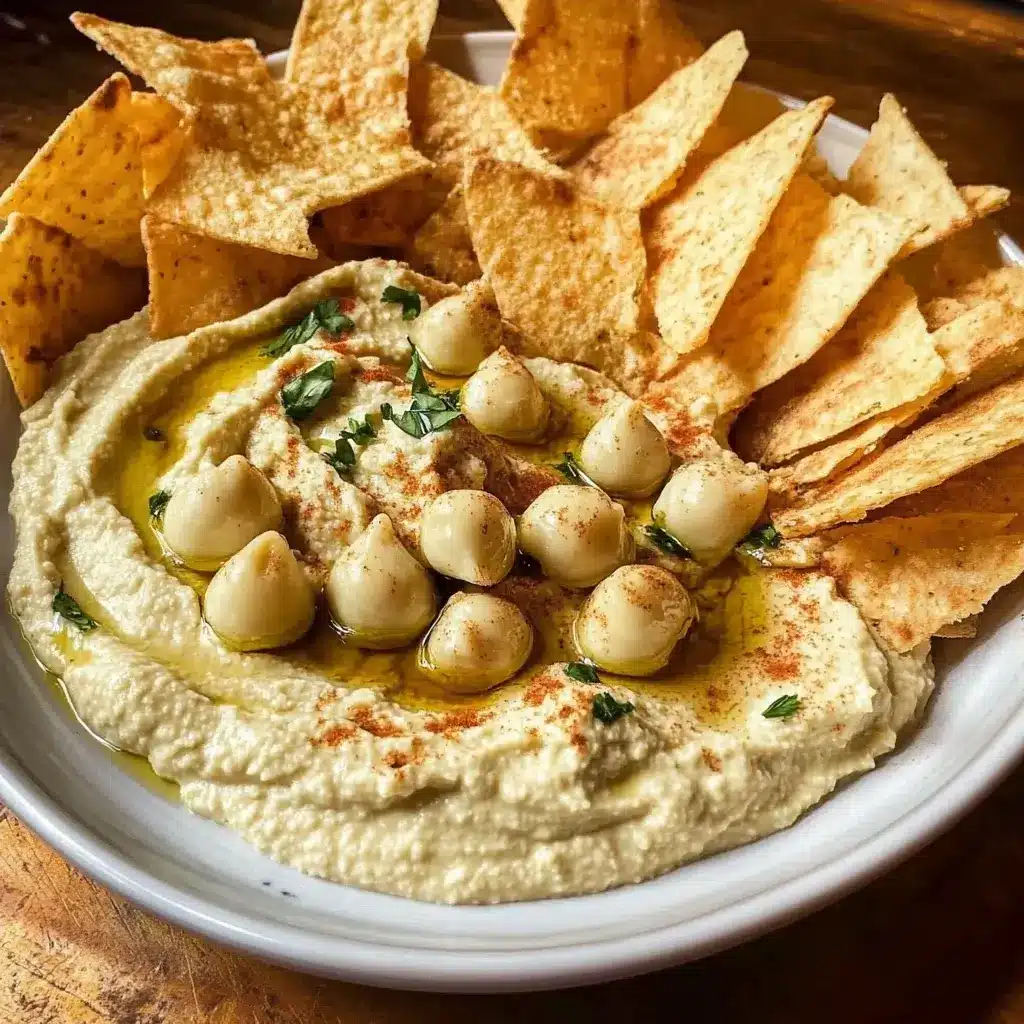
- Classic Appetizer:
- Arrange hummus in a shallow bowl.
- Drizzle generously with extra virgin olive oil.
- Sprinkle with paprika, chopped fresh parsley, or a pinch of cumin for garnish.
- Serve alongside crispy pita chips for dipping.
- Mezze Platter Centerpiece:
- Include hummus as part of a larger mezze platter with other Middle Eastern dips like baba ghanoush or muhammara.
- Add olives, feta cheese, stuffed grape leaves, falafel, and fresh vegetables like cucumber slices, carrot sticks, bell pepper strips, and cherry tomatoes.
- Serve with pita bread (both chips and soft pita wedges), and warm flatbread.
- Healthy Snack:
- Enjoy hummus with a variety of raw vegetables for a healthy and satisfying snack.
- Pair it with carrot sticks, celery sticks, cucumber spears, bell pepper strips, broccoli florets, snap peas, and cherry tomatoes.
- Spread for Sandwiches and Wraps:
- Use hummus as a flavorful and creamy spread in sandwiches and wraps instead of mayonnaise or other condiments.
- It pairs wonderfully with falafel, grilled vegetables, chicken, or turkey.
- Base for Bowls:
- Spread a layer of hummus at the bottom of a bowl.
- Top with roasted vegetables, grilled chicken or chickpeas, quinoa or couscous, and a drizzle of tahini dressing for a complete and nutritious meal bowl.
- Pizza Topping:
- Get creative and use hummus as a base for pizza instead of traditional tomato sauce.
- Top with Mediterranean-inspired ingredients like olives, feta cheese, sun-dried tomatoes, artichoke hearts, and spinach.
- Baked Potato Topping:
- Instead of butter or sour cream, top a baked potato with a dollop of hummus for a healthier and flavorful alternative.
Additional Tips for Hummus Perfection
Elevate your hummus game with these helpful tips to ensure smooth, creamy, and flavorful results every time:
- Use High-Quality Tahini: The quality of tahini significantly impacts the flavor of your hummus. Invest in good quality tahini that is smooth, runny, and has a rich sesame flavor. Avoid tahini that is thick, dry, or bitter.
- Don’t Skimp on Lemon Juice: Lemon juice is essential for brightening the flavor and balancing the richness of the tahini. Freshly squeezed lemon juice is always best. Start with the recommended amount and adjust to your taste, adding a little more for extra tanginess if desired.
- Ice Water is Key for Smoothness: Don’t skip the ice water! It’s the secret ingredient to achieving that incredibly smooth and creamy texture. The cold water helps emulsify the ingredients and lightens the hummus.
- Process for Long Enough: Don’t rush the blending process. Process the tahini and lemon juice first until creamy, then blend the chickpeas thoroughly, and finally incorporate the ice water and olive oil. Longer processing time results in smoother hummus.
- Adjust Consistency to Your Preference: If you prefer a thinner hummus, add a tablespoon or two more ice water. If you like it thicker, use slightly less ice water. You can always adjust the consistency as you go.
FAQ: Your Hummus Questions Answered
Here are some frequently asked questions about making hummus and pita chips:
Q1: Can I use canned chickpeas for hummus?
A: Yes, absolutely! Canned chickpeas are a convenient and perfectly acceptable option for making hummus. Just be sure to rinse and drain them thoroughly before using. Opt for low-sodium or no-salt-added varieties to control the salt content.
Q2: Can I make hummus without tahini?
A: While you can technically make hummus without tahini, it won’t be truly authentic and will lack the characteristic nutty flavor and creamy texture. Tahini is a key ingredient in classic hummus. If you need a substitute, you could try using a different nut butter like almond butter or cashew butter, but the flavor profile will be different.
Q3: How long does homemade hummus last in the refrigerator?
A: Homemade hummus will typically last for 3-5 days in the refrigerator when stored properly in an airtight container. Make sure to store it promptly after making it and keep it refrigerated.
Q4: Can I freeze hummus?
A: Yes, hummus can be frozen, although the texture might change slightly upon thawing. To freeze hummus, transfer it to an airtight, freezer-safe container, leaving a little headspace as it may expand. Thaw it in the refrigerator overnight and stir well before serving. You might need to add a tablespoon or two of olive oil or water to restore its creamy texture after thawing.
Q5: What are some variations I can try with this hummus recipe?
A: The possibilities are endless! Here are a few variations to try:
- Roasted Red Pepper Hummus: Add roasted red peppers (from a jar or roasted yourself) to the food processor along with the chickpeas.
- Spicy Hummus: Add a pinch of cayenne pepper, a chopped jalapeño, or a drizzle of hot sauce to the hummus for a spicy kick.
- Sun-Dried Tomato Hummus: Add oil-packed sun-dried tomatoes (drained) to the food processor for a tangy and flavorful twist.
- Garlic Roasted Hummus: Roast the garlic cloves before adding them to the hummus for a milder, sweeter garlic flavor.
- Herb Hummus: Add fresh herbs like parsley, cilantro, or dill to the food processor for a fresh and vibrant hummus.

Smooth & Creamy Classic Hummus with Pita Chips
Ingredients
Creating exceptional hummus starts with quality ingredients. Each component plays a vital role in achieving that perfect balance of flavor and texture. Here’s what you’ll need for this smooth and creamy classic hummus:
For the Hummus:
- 1 ½ cups cooked chickpeas (garbanzo beans): This is the heart of our hummus. You can either use canned chickpeas, thoroughly rinsed and drained, or cook your own from dried. Cooking your own chickpeas from scratch, while requiring a bit more time, often results in an even creamier hummus and allows you to control the sodium content. If using canned, opt for low-sodium or no-salt-added varieties.
- ½ cup tahini (sesame seed paste): Tahini is a crucial ingredient for authentic hummus, providing a nutty, slightly bitter depth of flavor and contributing to the creamy texture. Look for tahini that is smooth and runny, not thick and dry. Good quality tahini will have a rich, sesame aroma. Stir it well before measuring as the oil tends to separate.
- ¼ cup freshly squeezed lemon juice: Lemon juice brightens the hummus, adds a tangy zest, and balances the richness of the tahini and chickpeas. Freshly squeezed lemon juice is significantly better than bottled juice, offering a brighter and more vibrant flavor.
- 2–3 cloves garlic, minced: Garlic adds a pungent, savory kick to the hummus. Start with 2 cloves and add another if you prefer a stronger garlic flavor. Minced garlic releases its flavor more effectively than whole cloves, ensuring it infuses the hummus evenly.
- ¼ cup ice water: Ice water is the secret ingredient to achieving incredibly smooth and creamy hummus. It helps to lighten the texture and creates an emulsification, resulting in a velvety consistency. Don’t skip this!
- 2 tablespoons extra virgin olive oil, plus more for drizzling: Olive oil adds richness, flavor, and contributes to the smooth texture. Use good quality extra virgin olive oil for the best flavor. We’ll use it in the hummus and for drizzling on top for serving.
- ½ teaspoon ground cumin: Cumin adds a warm, earthy spice that complements the other flavors beautifully. Freshly ground cumin is always preferable for a more aromatic and potent flavor.
- ½ teaspoon salt, or to taste: Salt enhances all the flavors in the hummus. Start with ½ teaspoon and adjust to your preference. Remember that canned chickpeas might already contain some salt.
For the Pita Chips:
- 4–5 pita breads: You can use white or whole wheat pita bread. Day-old pita bread works best as it’s slightly drier and crisps up better in the oven.
- 2 tablespoons olive oil: Olive oil will help the pita chips crisp up and adds flavor.
- ½ teaspoon salt: Salt enhances the flavor of the pita chips.
- Optional seasonings: Feel free to get creative with seasonings for your pita chips. Consider adding paprika, garlic powder, onion powder, dried oregano, za’atar, or cumin for extra flavor.
Instructions
Now, let’s get to the fun part – making the hummus and pita chips! Follow these step-by-step instructions for hummus perfection and crispy, golden pita chips:
Making the Smooth & Creamy Hummus:
- Prepare the Chickpeas (Optional, if starting from dried): If using dried chickpeas, soak them overnight or for at least 8 hours in plenty of water. Drain and rinse them. Place the soaked chickpeas in a pot and cover with fresh water. Bring to a boil, then reduce heat and simmer for 1-1.5 hours, or until the chickpeas are very tender and easily mashed. Skimming off any foam that rises to the surface during cooking can improve the texture. Drain the cooked chickpeas and let them cool slightly. For extra smooth hummus, you can peel the chickpea skins after cooking. This is a bit time-consuming but results in an even silkier texture. Simply pinch each chickpea and the skin should slip off.
- Combine Tahini and Lemon Juice: In a food processor, combine the tahini and lemon juice. Process for 1-2 minutes until the mixture is light and creamy, almost whipped. This step is crucial for creating a smooth and emulsified base for your hummus. Scraping down the sides of the bowl occasionally ensures everything is well incorporated.
- Add Garlic and Cumin: Add the minced garlic and cumin to the food processor with the tahini and lemon juice mixture. Process again for about 30 seconds until fragrant and well combined.
- Add Chickpeas: Add about half of the chickpeas to the food processor. Process for 1-2 minutes, until the mixture is very smooth. Then add the remaining chickpeas and continue processing. Stop and scrape down the sides of the bowl as needed to ensure all the chickpeas are incorporated and the mixture is consistently smooth.
- Incorporate Ice Water: With the food processor running, slowly drizzle in the ice water. Continue processing for another 1-2 minutes. The hummus will lighten in color and become even creamier as the ice water emulsifies with the other ingredients. The cold water also helps to prevent the hummus from overheating in the food processor, which can affect the texture.
- Add Olive Oil and Salt: Add the olive oil and salt to the food processor. Process for a final 30 seconds to a minute until everything is perfectly combined and the hummus is incredibly smooth and creamy. Taste and adjust salt and lemon juice if needed. You might want to add a touch more lemon juice for brightness or salt for flavor balance.
- Chill (Optional but Recommended): Transfer the hummus to a bowl, cover with plastic wrap pressing it directly onto the surface to prevent a skin from forming, and refrigerate for at least 30 minutes. Chilling allows the flavors to meld together and the hummus to thicken slightly, resulting in an even better taste and texture.
Making the Crispy Pita Chips:
- Preheat Oven and Prepare Pita Bread: Preheat your oven to 375°F (190°C). Stack the pita breads and cut them into wedges. You can cut each pita into 8 wedges for classic chips or smaller wedges for bite-sized snacks.
- Toss with Olive Oil and Seasoning: In a large bowl, toss the pita wedges with olive oil and salt (and any other desired seasonings). Make sure each wedge is lightly coated with oil.
- Arrange on Baking Sheet: Spread the pita wedges in a single layer on a baking sheet. Avoid overcrowding the pan, as this will steam the chips instead of baking them crisp. You may need to use two baking sheets or bake in batches.
- Bake until Crispy: Bake for 10-15 minutes, or until the pita chips are golden brown and crispy. Keep an eye on them as they can burn quickly. Flip them halfway through baking to ensure even crisping.
- Cool and Serve: Remove the pita chips from the oven and let them cool completely on the baking sheet. They will crisp up further as they cool. Once cooled, they are ready to serve with your delicious homemade hummus!
Nutrition
- Serving Size: one normal portion
- Calories: 180
- Fat: 12 grams
- Saturated Fat: 2 grams
- Cholesterol: 0 mg


