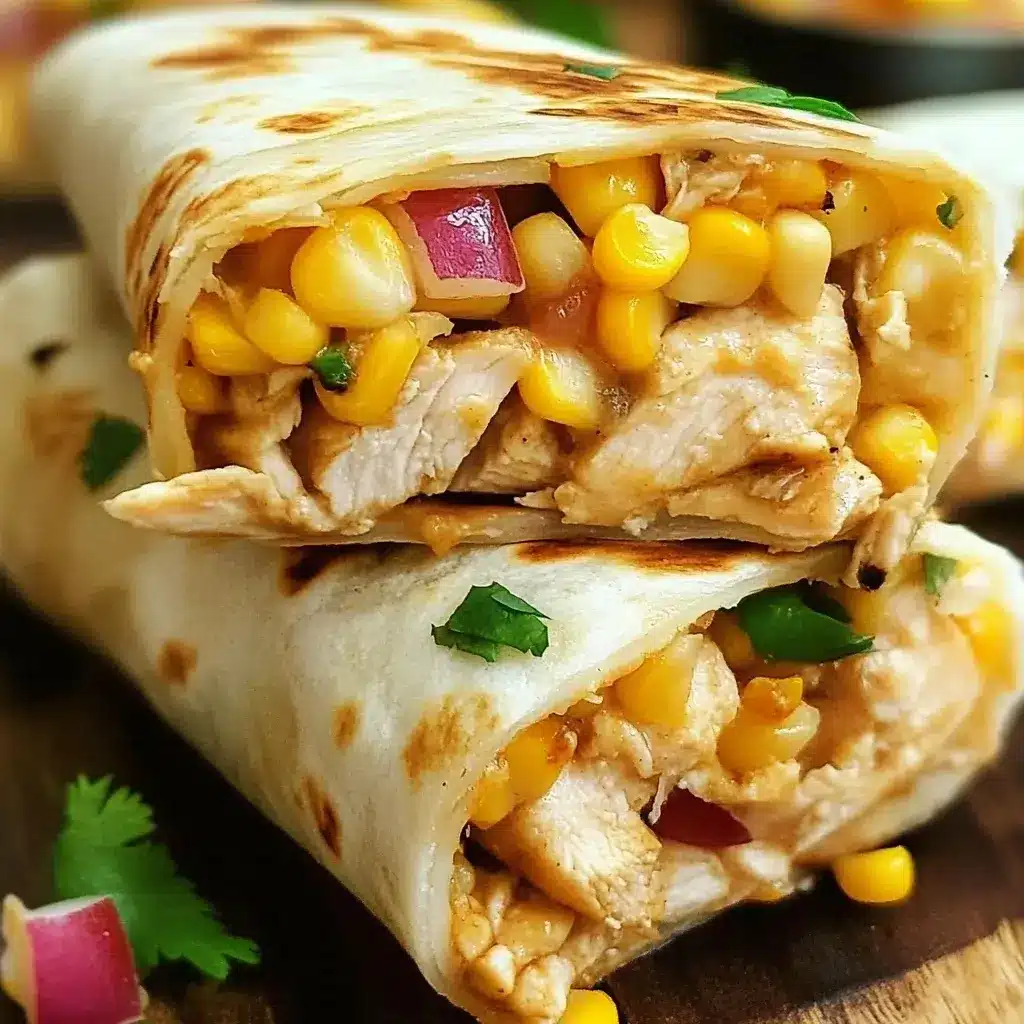

It was one of those Tuesday evenings – you know the kind. Work ran late, traffic was a nightmare, and the thought of cooking an elaborate meal felt utterly exhausting. My family was hungry, bordering on hangry, and takeout menus were starting to look dangerously appealing. But then I remembered this gem: the Simple Chicken and Corn Wrap. I’d bookmarked it ages ago, drawn by its promise of speed and simplicity. Skeptical but desperate, I decided to give it a whirl. I pulled out a rotisserie chicken I’d grabbed earlier (lifesaver!), a can of corn, some tortillas, and a few pantry staples. Within twenty minutes, genuinely twenty minutes, we were sitting down to eat. The wraps were surprisingly delicious – creamy, slightly tangy, with bursts of sweet corn and savory chicken, all bundled in a soft tortilla. My partner, usually a discerning critic, polished off two without a word, then declared them “surprisingly awesome.” Even my picky teenager, who typically eyes anything containing vegetables with suspicion, conceded that the corn “wasn’t bad” and actually finished her portion. Since that chaotic Tuesday, these Simple Chicken and Corn Wraps have become a regular lifesaver in our meal rotation. They’re perfect for busy weeknights, easy lunches, and even casual get-togethers. They prove that delicious, satisfying meals don’t always require hours of effort or a mountain of dishes. This recipe isn’t just food; it’s a solution – a tasty, quick, and crowd-pleasing answer to the perennial “What’s for dinner?” dilemma.
Ingredients
Here’s what you’ll need to create these delicious and easy wraps. The beauty of this recipe lies in its simplicity and the accessibility of its components.
- Shredded Cooked Chicken (2 cups): Provides the hearty protein base. Using leftover roasted chicken or a store-bought rotisserie chicken makes this incredibly fast. Ensure it’s shredded into bite-sized pieces for easy mixing and wrapping.
- Canned Corn (1 can, approx. 15 oz), drained: Adds bursts of sweetness and a pleasant textural contrast. Make sure to drain it well to avoid a watery filling. Sweet corn varieties work best.
- Mayonnaise (1/2 cup): Acts as the creamy binder for the filling. Use your favorite brand; full-fat offers the richest flavor, but light mayonnaise can be substituted for a lower-calorie option.
- Fresh Cilantro (1/4 cup, chopped): Introduces a bright, fresh, herbaceous flavor that cuts through the richness of the mayonnaise. If you’re not a cilantro fan, parsley or even chopped green onions can be used as alternatives.
- Lime Juice (1 tablespoon, fresh): Adds a crucial tangy kick that balances the creaminess and enhances the other flavors. Freshly squeezed lime juice offers the best taste.
- Chili Powder (1 teaspoon): Provides a gentle warmth and smoky depth. Adjust the amount based on your preference for spice.
- Cumin Powder (1/2 teaspoon): Offers an earthy, warm spice note that complements the chicken and corn beautifully.
- Salt (1/4 teaspoon, or to taste): Enhances all the flavors in the filling. Adjust based on the saltiness of your cooked chicken.
- Black Pepper (1/4 teaspoon, or to taste): Adds a subtle pungent heat. Freshly ground black pepper is always recommended for the best flavor.
- Large Flour Tortillas (4-6): The vessel for your delicious filling. Choose large burrito-size tortillas (around 10-12 inches) for easier wrapping. Whole wheat or low-carb options work well too.
Instructions
Follow these simple steps to assemble your delicious Chicken and Corn Wraps. This process is designed to be quick and straightforward, perfect for any skill level.
- Prepare the Chicken: If you haven’t already, shred your cooked chicken. If using a rotisserie chicken, remove the skin and bones, then shred the meat using two forks or your fingers. You should aim for roughly 2 cups of shredded chicken. Place the shredded chicken in a medium-sized mixing bowl. This bowl should be large enough to comfortably hold all the filling ingredients and allow for easy stirring.
- Drain the Corn: Open the can of corn and pour it into a colander or sieve. Rinse the corn under cold water if desired (this can help remove some of the canning liquid sodium) and allow it to drain thoroughly. Shake the colander gently to remove excess water. Adding wet corn will make your filling soggy, so proper draining is key. Add the drained corn to the mixing bowl with the chicken.
- Chop the Cilantro: Wash the fresh cilantro thoroughly and pat it dry. Finely chop the leaves and tender stems. You’ll need about 1/4 cup of chopped cilantro. Add this to the bowl. Remember, you can substitute parsley or green onions if cilantro isn’t your preference.
- Combine Filling Ingredients: To the bowl containing the chicken, corn, and cilantro, add the mayonnaise, fresh lime juice, chili powder, cumin powder, salt, and black pepper.
- Mix Thoroughly: Using a spoon or spatula, gently stir all the ingredients together until everything is well combined. Ensure the chicken and corn are evenly coated with the mayonnaise dressing and the spices are distributed throughout. Be careful not to overmix into a paste; you want to retain some texture. Taste the filling at this point and adjust seasonings if necessary – perhaps more salt, pepper, lime juice, or chili powder according to your preference.
- Warm the Tortillas (Optional but Recommended): Warming the tortillas makes them softer, more pliable, and less likely to tear when wrapping. You can do this in a few ways:
- Microwave: Wrap the stack of tortillas in a slightly damp paper towel and microwave on high for 20-30 seconds, or until warm and flexible.
- Stovetop: Heat a dry skillet (no oil needed) over medium heat. Place one tortilla in the pan and heat for about 15-20 seconds per side, just until warmed through and slightly puffed. Repeat with remaining tortillas.
- Oven: Wrap the stack of tortillas in aluminum foil and warm in a preheated oven at 300°F (150°C) for about 5-10 minutes.
- Assemble the Wraps: Lay one warm tortilla flat on a clean work surface. Spoon a generous portion of the chicken and corn filling onto the center of the tortilla, typically about 1/4 to 1/6 of the total mixture depending on the size of your tortillas and how many wraps you’re making. Arrange the filling in a rough line down the center, leaving some space at the edges.
- Fold the Wraps: There are a couple of common ways to fold a wrap or burrito to keep the filling secure:
- Method 1 (Classic Burrito Fold): Fold the bottom edge of the tortilla up over the filling. Then, fold in the two sides snugly towards the center. Finally, tightly roll the wrap upwards from the bottom, enclosing the filling completely.
- Method 2 (Envelope Fold): Fold the two sides of the tortilla inwards over the filling first. Then, fold the bottom edge up and roll tightly towards the top edge.
Choose the method you find easiest. The goal is a tightly sealed wrap that holds its contents.
- Repeat: Continue assembling the remaining wraps with the rest of the filling and tortillas.
- Serve Immediately or Prepare for Later: The wraps can be served immediately as is. Alternatively, you can enhance them further (see “How to Serve” and “Additional Tips”) or store them for later consumption. If serving immediately, you might want to slice them in half diagonally for a nicer presentation.
Nutrition Facts
This information provides an approximate nutritional overview per serving. Actual values may vary based on specific ingredients used (e.g., type of mayonnaise, size of tortillas).
- Servings: This recipe typically makes 4-6 wraps, depending on the size of your tortillas and how generously you fill them. We’ll estimate nutrition based on 1 wrap (assuming recipe makes 5 wraps).
- Calories per Serving: Approximately 350-450 kcal. This range accounts for variations in tortilla size and mayonnaise type. It’s a reasonably balanced calorie count for a satisfying lunch or light dinner.
- Protein: Approximately 20-25g per serving. Chicken is the primary source, making this wrap a good option for meeting daily protein needs, which are crucial for muscle repair, satiety, and overall body function.
- Fiber: Approximately 3-5g per serving. Primarily from the corn and potentially whole wheat tortillas (if used). Fiber aids digestion and contributes to feeling full.
- Fat: Approximately 15-25g per serving. Mostly from the mayonnaise and potentially cheese (if added). Choosing light mayonnaise or Greek yogurt can significantly reduce this. Some fat is necessary for nutrient absorption and energy.
(Note: These are estimates. For precise nutritional information, consider using an online calculator with your specific ingredient brands and quantities.)
Preparation Time
This recipe is designed for speed and convenience, making it ideal for busy schedules.
- Preparation Time: Approximately 15 minutes. This includes shredding pre-cooked chicken (or opening the package!), draining the corn, chopping cilantro, mixing the filling, and warming the tortillas. If you need to cook chicken from scratch, this time will increase significantly.
- Assembly Time: Approximately 5 minutes. This covers the time needed to portion the filling onto the tortillas and fold them.
- Total Time: Approximately 20 minutes. From start to finish, assuming you begin with cooked chicken, you can have these wraps ready to eat in about 20 minutes, making it a genuine quick-meal solution.
How to Serve
These Simple Chicken and Corn Wraps are versatile and can be served in various ways to suit different occasions and preferences. Here are some ideas:
- Classic Lunch/Dinner:
- Serve the wraps whole or sliced in half diagonally immediately after making them.
- Pair with a simple side salad dressed with a light vinaigrette.
- Offer a side of crunchy tortilla chips and salsa or guacamole.
- A cup of soup (like tomato soup or black bean soup) makes it a more substantial meal, especially in cooler weather.
- Lunchbox Friendly:
- Wrap tightly in plastic wrap or beeswax wrap to maintain freshness and prevent sogginess.
- Include an ice pack in the lunchbox to keep the wrap cool, especially since it contains mayonnaise.
- Pack alongside easy-to-eat sides like baby carrots, celery sticks, grapes, or a small yogurt cup.
- Appetizer Style (Pinwheels):
- Spread the filling evenly over the entire tortilla, leaving a small border at one edge.
- Roll the tortilla up tightly.
- For best results, wrap the rolled tortilla tightly in plastic wrap and chill for at least 30 minutes. This helps it hold its shape.
- Unwrap and slice the roll into 1-inch thick pinwheels.
- Arrange on a platter for parties or gatherings.
- Warm & Toasted:
- Assemble the wraps as instructed.
- Lightly brush the outside of the wraps with melted butter or oil.
- Heat a large skillet or panini press over medium heat.
- Grill the wraps for 2-3 minutes per side, or until golden brown and slightly crispy, and the filling is warmed through (if desired). This adds a lovely texture and warmth.
- Buffet or Potluck Feature:
- Prepare a large batch of the filling and keep it chilled.
- Set out a stack of warm tortillas and let guests assemble their own wraps.
- Alternatively, pre-make the wraps and slice them in half for easier handling on a buffet line.
- Accompaniments & Garnishes:
- Serve with extra lime wedges for squeezing over the wraps.
- Offer hot sauce or a dollop of sour cream or Greek yogurt on the side.
- A sprinkle of extra chopped cilantro or green onions on top before serving adds visual appeal and freshness.
Additional Tips
Enhance your Chicken and Corn Wrap experience with these handy tips and variations:
- Protein Power-Up: While cooked chicken is standard, feel free to substitute other proteins. Shredded turkey (great after holidays!), canned tuna (drained well), chickpeas (mashed slightly for a vegetarian option), or even seasoned black beans work wonderfully. Adjust seasonings accordingly based on your chosen protein.
- Veggie Variations: Don’t stop at corn! Boost the nutritional value and flavor by adding other finely chopped vegetables to the filling. Diced red bell pepper, chopped celery, finely shredded carrots, sliced black olives, or diced red onion add crunch, color, and different flavor notes. Just ensure they are chopped small enough to incorporate well.
- Creamy Base Swaps: If mayonnaise isn’t your favorite, or you’re looking for a lighter or tangier alternative, try using plain Greek yogurt (adds protein and tang), sour cream, or even mashed avocado for a different kind of creaminess and healthy fats. You might need to adjust salt and lime juice when swapping.
- Spice It Up or Down: Control the heat level easily. For more spice, increase the chili powder, add a pinch of cayenne pepper, finely diced jalapeños (seeds removed for less heat), or a dash of your favorite hot sauce directly into the filling. For a milder version, reduce or omit the chili powder.
- Make-Ahead Magic: The chicken and corn filling can be prepared up to 2-3 days in advance and stored in an airtight container in the refrigerator. This makes assembly incredibly fast when you’re ready to eat. Just give it a quick stir before using. Avoid assembling the wraps too far ahead if you want to prevent soggy tortillas, unless you plan to eat them cold soon after.
- Cheese Please: Adding shredded cheese takes these wraps to another level of deliciousness. Cheddar, Monterey Jack, Pepper Jack (for a kick), or a Mexican blend work well. You can mix the cheese directly into the filling or sprinkle it over the filling before folding the wrap. If grilling the wraps, the melted cheese is especially satisfying.
- Tortilla Choices Matter: Experiment with different types of tortillas. Whole wheat tortillas add extra fiber and a nuttier flavor. Spinach or sun-dried tomato wraps offer color and subtle taste variations. For a gluten-free option, use certified gluten-free tortillas or large lettuce leaves (like iceberg or butter lettuce) for a carb-free “wrap.” Corn tortillas can be used, but they are generally smaller and more prone to tearing unless very fresh and well-warmed; double-layering might be necessary.
- Preventing Sogginess: If packing for lunch or making ahead, take steps to avoid soggy bottoms. Ensure the corn is very well-drained. You can also create a moisture barrier by spreading a very thin layer of mayonnaise or softened cream cheese directly on the tortilla before adding the filling, or by placing large lettuce leaves (like romaine or iceberg) down first and then spooning the filling onto the lettuce.
FAQ Section
Here are answers to some frequently asked questions about the Simple Chicken and Corn Wrap recipe:
- Q: Can I use frozen or fresh corn instead of canned?
- A: Absolutely! If using frozen corn, thaw it completely according to package directions and drain any excess water before adding it to the filling. If using fresh corn, you’ll need to cook it first. You can boil or steam corn on the cob until tender (about 5-7 minutes), then carefully cut the kernels off the cob. You’ll need about 1.5 to 2 cups of fresh kernels to equal a 15 oz can. Both options work well and can offer a slightly fresher taste than canned.
- Q: How long can I store the leftover chicken and corn filling?
- A: The prepared filling, stored in an airtight container in the refrigerator, should stay fresh for about 3-4 days. Make sure your cooked chicken was fresh when you started. Do not leave the filling at room temperature for extended periods due to the mayonnaise.
- Q: Can I freeze these chicken and corn wraps?
- A: It’s generally not recommended to freeze assembled wraps containing mayonnaise, as it can separate and become oily upon thawing, leading to an unpleasant texture and potentially soggy tortillas. The filling itself (without mayonnaise, perhaps using a yogurt base if freezing is intended) might freeze okay, but the texture will likely change. It’s best to make the filling fresh or store it in the fridge for a few days and assemble wraps as needed.
- Q: How can I make this recipe vegetarian or vegan?
- A: For a vegetarian version, replace the chicken with an equal amount of rinsed and drained chickpeas (mash about half of them slightly) or seasoned black beans. For a vegan version, use the chickpea/bean substitute and replace the mayonnaise with a vegan mayo alternative. Ensure your tortillas are also vegan (most flour tortillas are, but check ingredients).
- Q: My tortillas keep tearing when I try to wrap them. What am I doing wrong?
- A: This usually happens if the tortillas are cold or dry. Make sure you warm the tortillas properly before filling (see Step 6 in Instructions). Warming makes them pliable. Also, avoid overfilling the wraps, as this puts stress on the tortilla. If your tortillas seem particularly brittle, try a different brand or ensure they are fresh.
- Q: What kind of cooked chicken is best for this recipe?
- A: Rotisserie chicken is incredibly convenient and flavorful. Leftover roasted or grilled chicken breast or thighs also work perfectly. You could even use canned chicken (drained well), though the texture and flavor will be different. The key is to have cooked, shreddable chicken ready to go.
- Q: Can I add other spices or herbs to the filling?
- A: Definitely! This recipe is a great base for experimentation. Consider adding smoked paprika for extra smokiness, a pinch of garlic powder or onion powder for more savory depth, or different fresh herbs like chopped parsley or dill if you’re not using cilantro. A dash of adobo seasoning or taco seasoning could also work well for a different flavor profile.
- Q: Is this recipe suitable for meal prepping lunches for the week?
- A: Yes, with caveats. The filling itself is excellent for meal prep – make a batch on Sunday and store it in the fridge. You can then assemble wraps fresh each morning or the night before. As mentioned in the tips, to prevent sogginess for packed lunches, consider lining the tortilla with lettuce or packing the filling and tortilla separately and assembling just before eating, if possible. Pre-assembling all wraps on Sunday might lead to less-than-ideal texture by midweek.

Simple Chicken and Corn Wrap
Ingredients
Here’s what you’ll need to create these delicious and easy wraps. The beauty of this recipe lies in its simplicity and the accessibility of its components.
- Shredded Cooked Chicken (2 cups): Provides the hearty protein base. Using leftover roasted chicken or a store-bought rotisserie chicken makes this incredibly fast. Ensure it’s shredded into bite-sized pieces for easy mixing and wrapping.
- Canned Corn (1 can, approx. 15 oz), drained: Adds bursts of sweetness and a pleasant textural contrast. Make sure to drain it well to avoid a watery filling. Sweet corn varieties work best.
- Mayonnaise (1/2 cup): Acts as the creamy binder for the filling. Use your favorite brand; full-fat offers the richest flavor, but light mayonnaise can be substituted for a lower-calorie option.
- Fresh Cilantro (1/4 cup, chopped): Introduces a bright, fresh, herbaceous flavor that cuts through the richness of the mayonnaise. If you’re not a cilantro fan, parsley or even chopped green onions can be used as alternatives.
- Lime Juice (1 tablespoon, fresh): Adds a crucial tangy kick that balances the creaminess and enhances the other flavors. Freshly squeezed lime juice offers the best taste.
- Chili Powder (1 teaspoon): Provides a gentle warmth and smoky depth. Adjust the amount based on your preference for spice.
- Cumin Powder (1/2 teaspoon): Offers an earthy, warm spice note that complements the chicken and corn beautifully.
- Salt (1/4 teaspoon, or to taste): Enhances all the flavors in the filling. Adjust based on the saltiness of your cooked chicken.
- Black Pepper (1/4 teaspoon, or to taste): Adds a subtle pungent heat. Freshly ground black pepper is always recommended for the best flavor.
- Large Flour Tortillas (4-6): The vessel for your delicious filling. Choose large burrito-size tortillas (around 10-12 inches) for easier wrapping. Whole wheat or low-carb options work well too.
Instructions
Follow these simple steps to assemble your delicious Chicken and Corn Wraps. This process is designed to be quick and straightforward, perfect for any skill level.
- Prepare the Chicken: If you haven’t already, shred your cooked chicken. If using a rotisserie chicken, remove the skin and bones, then shred the meat using two forks or your fingers. You should aim for roughly 2 cups of shredded chicken. Place the shredded chicken in a medium-sized mixing bowl. This bowl should be large enough to comfortably hold all the filling ingredients and allow for easy stirring.
- Drain the Corn: Open the can of corn and pour it into a colander or sieve. Rinse the corn under cold water if desired (this can help remove some of the canning liquid sodium) and allow it to drain thoroughly. Shake the colander gently to remove excess water. Adding wet corn will make your filling soggy, so proper draining is key. Add the drained corn to the mixing bowl with the chicken.
- Chop the Cilantro: Wash the fresh cilantro thoroughly and pat it dry. Finely chop the leaves and tender stems. You’ll need about 1/4 cup of chopped cilantro. Add this to the bowl. Remember, you can substitute parsley or green onions if cilantro isn’t your preference.
- Combine Filling Ingredients: To the bowl containing the chicken, corn, and cilantro, add the mayonnaise, fresh lime juice, chili powder, cumin powder, salt, and black pepper.
- Mix Thoroughly: Using a spoon or spatula, gently stir all the ingredients together until everything is well combined. Ensure the chicken and corn are evenly coated with the mayonnaise dressing and the spices are distributed throughout. Be careful not to overmix into a paste; you want to retain some texture. Taste the filling at this point and adjust seasonings if necessary – perhaps more salt, pepper, lime juice, or chili powder according to your preference.
- Warm the Tortillas (Optional but Recommended): Warming the tortillas makes them softer, more pliable, and less likely to tear when wrapping. You can do this in a few ways:
- Microwave: Wrap the stack of tortillas in a slightly damp paper towel and microwave on high for 20-30 seconds, or until warm and flexible.
- Stovetop: Heat a dry skillet (no oil needed) over medium heat. Place one tortilla in the pan and heat for about 15-20 seconds per side, just until warmed through and slightly puffed. Repeat with remaining tortillas.
- Oven: Wrap the stack of tortillas in aluminum foil and warm in a preheated oven at 300°F (150°C) for about 5-10 minutes.
- Assemble the Wraps: Lay one warm tortilla flat on a clean work surface. Spoon a generous portion of the chicken and corn filling onto the center of the tortilla, typically about 1/4 to 1/6 of the total mixture depending on the size of your tortillas and how many wraps you’re making. Arrange the filling in a rough line down the center, leaving some space at the edges.
- Fold the Wraps: There are a couple of common ways to fold a wrap or burrito to keep the filling secure:
- Method 1 (Classic Burrito Fold): Fold the bottom edge of the tortilla up over the filling. Then, fold in the two sides snugly towards the center. Finally, tightly roll the wrap upwards from the bottom, enclosing the filling completely.
- Method 2 (Envelope Fold): Fold the two sides of the tortilla inwards over the filling first. Then, fold the bottom edge up and roll tightly towards the top edge.
Choose the method you find easiest. The goal is a tightly sealed wrap that holds its contents.
- Repeat: Continue assembling the remaining wraps with the rest of the filling and tortillas.
- Serve Immediately or Prepare for Later: The wraps can be served immediately as is. Alternatively, you can enhance them further (see “How to Serve” and “Additional Tips”) or store them for later consumption. If serving immediately, you might want to slice them in half diagonally for a nicer presentation.
Nutrition
- Serving Size: one normal portion
- Calories: 450
- Fat: 25g
- Fiber: 5g
- Protein: 25g