


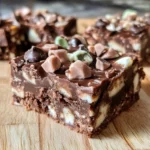
There are some desserts that just scream comfort, nostalgia, and pure, unadulterated joy. For my family, and especially for me, these Rocky Road Fudge Bars are exactly that. I first whipped up a batch for a neighborhood potluck, a little unsure if my somewhat “old-fashioned” contribution would stand out amongst more elaborate cakes and pies. The moment I set them down, however, they started disappearing. First, the kids, their eyes wide with delight at the sight of marshmallows and chocolate, then the adults, drawn in by the rich aroma. By the end of the evening, the plate was practically licked clean, and I had a handful of requests for the recipe. Since then, these bars have become a staple for everything from birthday parties to cozy movie nights, and even as a special “just because” treat. What I love most is their incredible texture – the smooth, decadent fudge base, the gooey chew of marshmallows, and the satisfying crunch of toasted nuts. It’s a symphony of textures and rich chocolate flavor that’s surprisingly easy to achieve. They look impressive, taste even better, and bring a smile to everyone’s face. Honestly, they’re my go-to for a guaranteed crowd-pleaser!
Ingredients
Here’s what you’ll need to create these incredibly delicious Rocky Road Fudge Bars:
- 3 cups (about 18 oz / 510g) semi-sweet chocolate chips: The star of the show, providing the deep, rich chocolate flavor. Quality matters here, so use a brand you enjoy eating on its own. You can also use a mix of semi-sweet and dark chocolate for a more complex flavor.
- 1 can (14 oz / 397g) sweetened condensed milk: This is the magic ingredient that creates a smooth, no-fail fudge texture without needing a candy thermometer. Do not substitute with evaporated milk.
- 1/4 cup (2 oz / 57g) unsalted butter, cut into pieces: Adds richness, flavor, and helps create a silky smooth fudge.
- 1 teaspoon pure vanilla extract: Enhances the chocolate flavor and adds a warm, aromatic note.
- 1/4 teaspoon salt (optional but recommended): A small amount of salt balances the sweetness and intensifies the chocolate flavor.
- 4 cups (about 8 oz / 225g) mini marshmallows: These provide the classic chewy, gooey texture synonymous with rocky road. Mini marshmallows distribute more evenly than large ones.
- 1 ½ cups (about 6 oz / 170g) walnuts or pecans, roughly chopped and lightly toasted (optional): Adds a wonderful crunch and nutty flavor. Toasting the nuts beforehand significantly enhances their taste. Almonds or even peanuts can also be used.
Instructions
Follow these simple steps to fudgy, rocky road perfection:
- Prepare the Pan: Line a 9×13 inch baking pan with parchment paper, leaving an overhang on two opposite sides. This will act as “handles” to easily lift the fudge out later for cutting. Lightly grease the parchment paper or spray with non-stick cooking spray. This step is crucial for easy removal and clean squares.
- Melt Chocolate Base: In a large, heavy-bottomed saucepan, combine the semi-sweet chocolate chips, sweetened condensed milk, and butter. Place the saucepan over low to medium-low heat.
- Stir Constantly: Stir the mixture continuously with a heat-resistant spatula or wooden spoon until the chocolate chips and butter are fully melted and the mixture is smooth and glossy. It’s important to use low heat and stir constantly to prevent the chocolate from scorching or seizing. This process usually takes about 5-8 minutes.
- Remove from Heat & Add Flavor: Once the mixture is completely smooth, remove the saucepan from the heat. Immediately stir in the vanilla extract and salt (if using) until well combined.
- Cool Slightly (Briefly!): Let the fudge mixture cool for just 2-3 minutes. You don’t want it too hot when adding the marshmallows, as they might melt completely. However, don’t let it cool too much, or it will start to set, making it difficult to incorporate the add-ins.
- Fold in Add-Ins: Add 3 cups of the mini marshmallows and all of the chopped, toasted nuts to the saucepan. Gently fold them into the chocolate mixture using a spatula until they are evenly distributed. Be careful not to overmix, as you want distinct pieces of marshmallow and nut throughout the fudge.
- Transfer to Pan: Pour the fudge mixture into the prepared baking pan. Use the spatula to spread it evenly into all corners, creating a level surface.
- Top with Remaining Marshmallows: Sprinkle the remaining 1 cup of mini marshmallows evenly over the top of the fudge. Gently press them down into the surface of the fudge so they adhere. This creates that classic, appealing rocky road look.
- Chill to Set: Cover the pan loosely with plastic wrap (try not to let it touch the sticky marshmallows on top) or aluminum foil. Refrigerate for at least 2-4 hours, or preferably overnight, until the fudge is firm and fully set. The longer it chills, the easier it will be to cut cleanly.
- Cut and Serve: Once the fudge is firm, use the parchment paper overhangs to lift the entire slab out of the pan and onto a cutting board. Use a large, sharp knife to cut the fudge into squares or bars. For cleaner cuts, you can dip the knife in hot water and wipe it dry between each cut.
Nutrition Facts
Understanding the nutritional aspect can be helpful. Here’s an approximate breakdown:
- Servings: This recipe typically yields 24-36 squares, depending on how large you cut them. For this estimation, we’ll assume 30 medium-sized squares.
- Calories per serving (1 square): Approximately 180-220 kcal. This can vary based on the exact brands of ingredients used and the final size of your squares.
- Total Fat: Approximately 10-14g. A significant portion comes from the chocolate, butter, and nuts, providing richness and flavor.
- Saturated Fat: Approximately 5-7g. Primarily from the butter and some types of chocolate.
- Carbohydrates: Approximately 20-25g. Mainly from the sweetened condensed milk, chocolate, and marshmallows.
- Sugar: Approximately 18-22g. A sweet treat, with sugar coming from the condensed milk, chocolate, and marshmallows.
Disclaimer: These are estimates. Actual nutritional values may vary based on specific ingredients and portion sizes.
Preparation Time
Getting these delicious bars ready is quicker than you might think!
- Active Preparation Time: Approximately 15-20 minutes. This includes gathering ingredients, toasting nuts (if you choose to), melting the chocolate mixture, and assembling the bars in the pan.
- Chilling Time: Minimum 2-4 hours, but overnight is highly recommended for the best texture and easiest cutting.
- Total Time (excluding chilling): Around 20 minutes.
- Total Time (including minimum chilling): Approximately 2 hours 20 minutes to 4 hours 20 minutes.
This makes it a fantastic recipe for when you need an impressive dessert without spending hours in the kitchen actively cooking. The majority of the time is hands-off chilling.
How to Serve
Rocky Road Fudge Bars are delightful on their own, but here are some ideas to elevate their presentation and enjoyment:
- Classic Squares:
- Simply cut into uniform squares and arrange them on a platter. This is perfect for parties, potlucks, or everyday treats.
- Dessert Platter Star:
- Include them as part of a larger dessert platter with cookies, brownies, and fresh fruit for a variety of textures and flavors.
- With a Hot Beverage:
- Pair a square with a hot cup of coffee, tea, or a rich hot chocolate for an afternoon pick-me-up or a cozy evening indulgence. The warmth of the drink complements the rich fudge beautifully.
- Ice Cream Topping (Deconstructed):
- Crumble a bar over a scoop of vanilla bean or chocolate ice cream. The different textures of the fudge, marshmallows, and nuts make for an amazing topping.
- Gift Giving:
- Stack a few squares and tie them with a pretty ribbon, or place them in a decorative tin or box. They make wonderful homemade gifts for holidays, birthdays, or as a thank-you gesture.
- Party Favors:
- Individually wrap squares in cellophane and tie with a ribbon for charming party favors for weddings, baby showers, or kids’ parties.
- Slightly Warmed:
- For an extra gooey experience, you can very briefly microwave a square for about 5-7 seconds. The marshmallows will become incredibly soft and the chocolate slightly molten. Enjoy immediately!
- Kid-Friendly Fun:
- Cut into smaller, bite-sized pieces for little hands. They are always a hit at children’s parties.
Additional Tips
To ensure your Rocky Road Fudge Bars turn out perfectly every time, here are eight valuable tips:
- Quality Chocolate is Key: The flavor of your fudge heavily relies on the chocolate. Use good quality semi-sweet chocolate chips or bars that you enjoy eating. A blend of dark and semi-sweet can also add depth.
- Toast Your Nuts: Don’t skip toasting the nuts if you’re using them! Toasting brings out their natural oils and intensifies their flavor, adding a significant improvement to the overall taste and crunch of the bars. Spread them on a baking sheet and toast at 350°F (175°C) for 5-8 minutes, until fragrant.
- Don’t Overheat the Chocolate: Melt the chocolate, condensed milk, and butter over low heat and stir constantly. If the mixture gets too hot, the chocolate can scorch or seize, resulting in a grainy texture. Patience is key here.
- Work Quickly with Add-Ins: Once the fudge base is ready and slightly cooled, fold in the marshmallows and nuts quickly. The fudge will start to set as it cools, so you want to ensure everything is evenly distributed before it becomes too stiff.
- Marshmallow Management: If you want very distinct, whole marshmallows in your fudge, ensure the chocolate mixture has cooled slightly before adding them. If it’s too hot, they’ll melt significantly. Using some marshmallows mixed in and some sprinkled on top gives the best of both worlds – gooey melted bits inside and pretty whole ones on top.
- Achieving Clean Cuts: For beautifully neat squares, make sure the fudge is thoroughly chilled and firm. Use a large, sharp knife. Wiping the knife blade clean with a damp, hot cloth between cuts helps prevent dragging and ensures sharp edges.
- Storage Savvy: Store your Rocky Road Fudge Bars in an airtight container at room temperature for up to 3-4 days, or in the refrigerator for up to 1-2 weeks. If refrigerating, let them sit at room temperature for about 10-15 minutes before serving for the best texture. They can also be frozen for up to 2-3 months; thaw in the refrigerator.
- Experiment with Variations: Don’t be afraid to get creative!
- Different Nuts: Try almonds, peanuts, pistachios, or macadamia nuts.
- Dried Fruit: Add chopped dried cherries, cranberries, or apricots for a chewy, tart contrast.
- Candy Bits: Incorporate chopped caramels, M&M’s, or Reese’s Pieces.
- Spice it Up: A pinch of cinnamon or a tiny dash of cayenne pepper can add a surprising warmth.
- Extracts: Experiment with almond extract or peppermint extract (use sparingly) for different flavor profiles.
FAQ Section
Here are answers to some frequently asked questions about making Rocky Road Fudge Bars:
- Q: Can I use milk chocolate or dark chocolate instead of semi-sweet?
A: Yes, you absolutely can! Milk chocolate will result in a sweeter, milder fudge. Dark chocolate (60-70% cacao) will give a more intense, less sweet chocolate flavor. You can even use a combination. Be aware that using only milk chocolate might make the fudge a bit softer due to its higher sugar and milk content. - Q: My fudge didn’t set properly. What went wrong?
A: The most common reasons are:- Incorrect Sweetened Condensed Milk: Ensure you used sweetened condensed milk, not evaporated milk. They are not interchangeable in this recipe.
- Not Enough Chilling Time: The fudge needs adequate time in the refrigerator to firm up, at least 2-4 hours, but preferably longer.
- Measurement Issues: Double-check your ingredient measurements, especially the ratio of chocolate to condensed milk.
- Climate: In very hot or humid climates, it might take longer to set, or you might find it benefits from being stored in the fridge.
- Q: Can I make these Rocky Road Fudge Bars nut-free?
A: Yes, you can omit the nuts entirely for a nut-free version. To maintain some crunch, you could consider adding pretzel pieces, crispy rice cereal, or even crushed digestive biscuits/graham crackers instead. Always check labels if serving to someone with a severe allergy. - Q: Can I use large marshmallows instead of mini ones?
A: Yes, but it’s best to cut them into smaller pieces (quarters or sixths) using kitchen shears lightly greased or dipped in powdered sugar. This helps them distribute more evenly, similar to mini marshmallows. - Q: How long will these fudge bars last?
A: Stored in an airtight container, they will last for about 3-4 days at room temperature. If you want them to last longer, store them in the refrigerator for up to 2 weeks. For long-term storage, they can be frozen for up to 2-3 months. - Q: Can I freeze Rocky Road Fudge Bars?
A: Yes, they freeze quite well! Cut the set fudge into squares, then wrap them individually in plastic wrap, followed by a layer of aluminum foil, or place them in a freezer-safe airtight container or bag. Thaw them in the refrigerator overnight or on the counter for a couple of hours before serving. - Q: What if I don’t have parchment paper?
A: While parchment paper is highly recommended for easy removal, you can heavily grease the pan with butter or non-stick spray. Aluminum foil, greased well, can also work as a liner, but parchment is less likely to stick. Removing the fudge might be a bit trickier without the overhang “handles.” - Q: My chocolate seized while melting! Can I save it?
A: Seizing (when chocolate becomes thick, lumpy, and grainy) usually happens if water gets into it or if it’s overheated. In this particular recipe, the sweetened condensed milk and butter usually prevent seizing if melted slowly. If it does happen, try stirring in a tiny bit (1/2 teaspoon at a time) of vegetable oil or more melted butter off the heat. However, prevention by using low heat and constant stirring is the best approach.
Rocky Road Fudge Bars
Ingredients
Here’s what you’ll need to create these incredibly delicious Rocky Road Fudge Bars:
- 3 cups (about 18 oz / 510g) semi-sweet chocolate chips: The star of the show, providing the deep, rich chocolate flavor. Quality matters here, so use a brand you enjoy eating on its own. You can also use a mix of semi-sweet and dark chocolate for a more complex flavor.
- 1 can (14 oz / 397g) sweetened condensed milk: This is the magic ingredient that creates a smooth, no-fail fudge texture without needing a candy thermometer. Do not substitute with evaporated milk.
- 1/4 cup (2 oz / 57g) unsalted butter, cut into pieces: Adds richness, flavor, and helps create a silky smooth fudge.
- 1 teaspoon pure vanilla extract: Enhances the chocolate flavor and adds a warm, aromatic note.
- 1/4 teaspoon salt (optional but recommended): A small amount of salt balances the sweetness and intensifies the chocolate flavor.
- 4 cups (about 8 oz / 225g) mini marshmallows: These provide the classic chewy, gooey texture synonymous with rocky road. Mini marshmallows distribute more evenly than large ones.
- 1 ½ cups (about 6 oz / 170g) walnuts or pecans, roughly chopped and lightly toasted (optional): Adds a wonderful crunch and nutty flavor. Toasting the nuts beforehand significantly enhances their taste. Almonds or even peanuts can also be used.
Instructions
Follow these simple steps to fudgy, rocky road perfection:
- Prepare the Pan: Line a 9×13 inch baking pan with parchment paper, leaving an overhang on two opposite sides. This will act as “handles” to easily lift the fudge out later for cutting. Lightly grease the parchment paper or spray with non-stick cooking spray. This step is crucial for easy removal and clean squares.
- Melt Chocolate Base: In a large, heavy-bottomed saucepan, combine the semi-sweet chocolate chips, sweetened condensed milk, and butter. Place the saucepan over low to medium-low heat.
- Stir Constantly: Stir the mixture continuously with a heat-resistant spatula or wooden spoon until the chocolate chips and butter are fully melted and the mixture is smooth and glossy. It’s important to use low heat and stir constantly to prevent the chocolate from scorching or seizing. This process usually takes about 5-8 minutes.
- Remove from Heat & Add Flavor: Once the mixture is completely smooth, remove the saucepan from the heat. Immediately stir in the vanilla extract and salt (if using) until well combined.
- Cool Slightly (Briefly!): Let the fudge mixture cool for just 2-3 minutes. You don’t want it too hot when adding the marshmallows, as they might melt completely. However, don’t let it cool too much, or it will start to set, making it difficult to incorporate the add-ins.
- Fold in Add-Ins: Add 3 cups of the mini marshmallows and all of the chopped, toasted nuts to the saucepan. Gently fold them into the chocolate mixture using a spatula until they are evenly distributed. Be careful not to overmix, as you want distinct pieces of marshmallow and nut throughout the fudge.
- Transfer to Pan: Pour the fudge mixture into the prepared baking pan. Use the spatula to spread it evenly into all corners, creating a level surface.
- Top with Remaining Marshmallows: Sprinkle the remaining 1 cup of mini marshmallows evenly over the top of the fudge. Gently press them down into the surface of the fudge so they adhere. This creates that classic, appealing rocky road look.
- Chill to Set: Cover the pan loosely with plastic wrap (try not to let it touch the sticky marshmallows on top) or aluminum foil. Refrigerate for at least 2-4 hours, or preferably overnight, until the fudge is firm and fully set. The longer it chills, the easier it will be to cut cleanly.
- Cut and Serve: Once the fudge is firm, use the parchment paper overhangs to lift the entire slab out of the pan and onto a cutting board. Use a large, sharp knife to cut the fudge into squares or bars. For cleaner cuts, you can dip the knife in hot water and wipe it dry between each cut.
Nutrition
- Serving Size: one normal portion
- Calories: 220
- Sugar: 22g
- Fat: 14g
- Saturated Fat: 7g
- Carbohydrates: 25g


