Ingredients
Scale
Achieving the authentic taste of Tiramisu relies on using the right ingredients. There are no shortcuts to perfection, but sourcing these quality components is the most crucial step.
- 6 large egg yolks: These are the foundation of your creamy zabaglione-style base, providing richness, color, and a velvety texture that is simply irreplaceable. Use fresh, high-quality eggs for the best flavor.
- ¾ cup (150g) granulated sugar: This dissolves into the egg yolks to create a sweet, stable, and glossy cream base.
- 1 cup (240ml) heavy whipping cream: Chilled and whipped to stiff peaks, this adds lightness and airy volume to the dense mascarpone, creating that signature cloud-like consistency.
- 1 pound (450g or 2 cups) mascarpone cheese, at room temperature: This is the heart and soul of Tiramisu. Mascarpone is a soft, slightly sweet Italian cream cheese. Bringing it to room temperature is essential to prevent it from curdling when mixed.
- 1 ¾ cups (420ml) strong brewed coffee or espresso, cooled: The flavor of your Tiramisu is heavily influenced by your coffee. Use a high-quality, strong brew and ensure it’s completely cooled to prevent the ladyfingers from becoming mush.
- 2 tablespoons Marsala wine, dark rum, or brandy (optional): This adds a traditional, complex layer of flavor that complements the coffee and cream. While optional, a touch of Marsala wine is highly recommended for an authentic taste.
- 2 packages (about 48) Italian ladyfingers (Savoiardi): These are not the soft, cake-like ladyfingers. You need the crisp, dry, and highly absorbent Italian “Savoiardi” biscuits that soak up the coffee mixture without turning to mush.
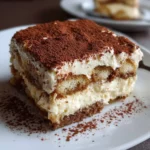
- ¼ cup (30g) unsweetened cocoa powder: For dusting. This provides a slightly bitter, chocolatey finish that perfectly balances the sweetness of the cream and the richness of the dessert.
Instructions
Follow these steps carefully to assemble your dessert. The process is divided into preparing the components and then layering them together for the final, beautiful result.
Part 1: Preparing the Creamy Mascarpone Filling
- Create the Zabaglione Base: Find a heatproof bowl (glass or stainless steel works best) that can sit comfortably over a saucepan of simmering water without touching the water. This creates a double boiler. In this bowl, add the 6 egg yolks and ¾ cup of granulated sugar. Whisk them together vigorously by hand or with an electric mixer on low speed for about a minute until combined.
- Cook the Base: Place the bowl over your saucepan of simmering water. Continue to whisk constantly and consistently for about 8-10 minutes. The mixture will slowly transform. You’re looking for it to become pale yellow, thicken significantly, and grow in volume. A key sign it’s ready is when you can lift the whisk and the mixture falls back in a thick “ribbon” that sits on the surface for a moment before dissolving. This process not only thickens the base but also gently cooks the egg yolks. Once it reaches this stage, remove the bowl from the heat and set it aside to cool down to room temperature.
- Whip the Heavy Cream: In a separate, chilled bowl, pour in the 1 cup of cold heavy whipping cream. Using an electric mixer with the whisk attachment, beat the cream starting on low and gradually increasing the speed to high. Continue whipping until stiff peaks form. This means when you lift the beaters out of the cream, the peak that forms holds its shape and doesn’t slump over. Be careful not to over-whip, or it will turn grainy.
- Combine the Mascarpone and Zabaglione: In a large third bowl, add your room-temperature mascarpone cheese. Use a spatula to briefly stir it and loosen it up. Pour the cooled egg yolk and sugar mixture (the zabaglione) over the mascarpone. Gently fold the two together with the spatula until they are just combined and no streaks remain. It’s crucial to be gentle here; over-mixing can cause the mascarpone to break and become watery.
- Fold in the Whipped Cream: Add about one-third of your whipped cream to the mascarpone mixture and gently fold it in to lighten the base. Then, add the remaining whipped cream and continue to fold gently until the mixture is smooth, airy, and uniform in color. Your Tiramisu cream is now ready.
Part 2: Assembling the Tiramisu
- Prepare the Coffee Soak: In a shallow dish or pie plate, pour your 1 ¾ cups of cooled strong coffee or espresso. If you are using alcohol, stir in the 2 tablespoons of Marsala wine, rum, or brandy now.
- The First Layer of Ladyfingers: Take one ladyfinger at a time and dip it into the coffee mixture for just 1-2 seconds per side. This is a quick dip-and-roll motion. The goal is for the exterior to be moistened, but the interior to remain slightly crisp. They will continue to soften as the dessert chills. Arrange the dipped ladyfingers in a single, snug layer at the bottom of a 9×13 inch baking dish or a similar-sized serving dish. Break some ladyfingers in half if needed to fill in any gaps.
- The First Layer of Cream: Spoon half of the prepared mascarpone cream mixture over the layer of ladyfingers. Use an offset spatula or the back of a spoon to gently spread it into an even, smooth layer, ensuring it covers all the ladyfingers to the edges of the dish.
- The Second Layer: Repeat the process. Dip the remaining ladyfingers into the coffee mixture one by one and arrange them in a second tight layer on top of the cream.
- The Final Cream Layer: Spread the remaining half of the mascarpone cream over the second layer of ladyfingers, creating another smooth, even surface. This will be the beautiful top of your dessert.
- Chill for Perfection: Cover the dish tightly with plastic wrap, making sure the wrap doesn’t touch the surface of the cream. Place the Tiramisu in the refrigerator to chill for at least 6 hours, but preferably overnight (12-24 hours). This chilling period is not optional; it is essential for the dessert to set properly and for the flavors to meld together into the classic Tiramisu taste.
- The Final Touch: Just before you are ready to serve, remove the Tiramisu from the refrigerator. Unwrap it and dust the top generously with the ¼ cup of unsweetened cocoa powder using a fine-mesh sieve for an even, professional-looking coating.
Nutrition
- Serving Size: one normal portion
- Calories: 550