Ingredients
- Ripe Bananas: The star of the show! Choose bananas that are ripe but still firm enough to hold their shape when rolled. They provide natural sweetness and a creamy texture.
- Peanut Butter (or Nut-Free Alternative): Creamy peanut butter acts as the “glue” that holds the toppings and adds a rich, nutty flavor. For allergies, sunflower seed butter, almond butter, or even cream cheese work wonderfully.
- Honey (Optional): A drizzle of honey can enhance the sweetness and add a touch of floral notes. Maple syrup or agave nectar are great vegan alternatives.
- Granola: Adds a delightful crunch and texture to the rolls. Choose your favorite granola flavor – plain, honey-oat, or even chocolate granola all work well.
- Shredded Coconut (Unsweetened or Toasted): Provides a tropical flavor and a delicate chewiness. Toasted coconut adds a richer, nuttier taste.
- Mini Chocolate Chips: A classic favorite! Mini chocolate chips offer bursts of chocolatey goodness and visual appeal.
- Sprinkles (Optional): For a festive touch and extra fun, sprinkles add color and a playful element, especially appealing to kids.
- Chopped Nuts (Optional): For added protein and crunch, chopped nuts like almonds, walnuts, or pecans can be sprinkled on. Ensure no allergies before using nuts.
- Dried Fruits (Optional): Raisins, cranberries, chopped apricots, or other dried fruits add sweetness and chewiness.
- Seeds (Optional): Chia seeds, sesame seeds, or flax seeds can be added for extra nutrition and texture.
- Cinnamon (Optional): A sprinkle of cinnamon adds warmth and enhances the banana flavor.
Instructions
Step 1: Banana Prep
Begin by peeling your ripe bananas. Ensure they are not overly ripe and mushy, as this will make them difficult to roll and slice. A slightly firm banana will hold its shape best.
Step 2: Peanut Butter Coating
Take one banana at a time and lay it on a plate or cutting board. Using a butter knife or spatula, generously spread peanut butter (or your chosen alternative) evenly over the entire surface of the banana. Make sure to coat it completely, as the peanut butter will act as the adhesive for your toppings. Don’t be shy with the peanut butter – a good coating will ensure your toppings stick well and provide a satisfying creamy layer.
Step 3: Topping Station Setup
Prepare your topping station. Place each of your chosen toppings (granola, shredded coconut, chocolate chips, sprinkles, nuts, dried fruits, seeds, cinnamon, etc.) into separate shallow bowls or plates. This will make it easy to roll your banana in the toppings without making a mess.
Step 4: Rolling in Toppings
Now comes the fun part! Take your peanut butter-coated banana and gently roll it in one of your chosen toppings. Press lightly to ensure the toppings adhere well to the peanut butter. You can choose to roll the entire banana in a single topping, or you can create sections with different toppings for a colorful and varied roll. For example, you could roll one section in granola, another in chocolate chips, and another in shredded coconut. Get creative and have fun experimenting with different combinations!
Step 5: Repeat for Remaining Bananas
Repeat steps 2-4 for each banana you wish to prepare. If you are making a variety of rolls, you can prepare several bananas with peanut butter coating and then roll them in different toppings to create a visually appealing platter.
Step 6: Chilling (Optional but Recommended)
For easier slicing and a slightly firmer texture, you can chill the topped bananas in the refrigerator for about 10-15 minutes. This step is optional, but it can make slicing cleaner, especially if the bananas are very ripe or the weather is warm. Chilling also allows the flavors to meld together slightly.
Step 7: Slicing into “Sushi” Rolls
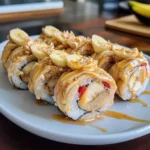
Once chilled (or directly after topping), carefully slice each banana into bite-sized “sushi” rolls. Use a sharp knife and make clean, even cuts, about 1-1.5 inches thick. You can slice them straight or at a slight angle for a more visually appealing presentation. If the peanut butter is sticky, you can lightly dampen your knife with water between slices to prevent sticking and ensure clean cuts.
Step 8: Drizzling with Honey (Optional)
If desired, drizzle a small amount of honey (or maple syrup/agave) over the sliced banana sushi rolls. This adds an extra touch of sweetness and a beautiful glossy finish.
Step 9: Serving and Enjoying!
Arrange your banana sushi rolls on a plate or platter. They are now ready to be served and enjoyed immediately! For a fun presentation, you can arrange them in a circular pattern on a plate, mimicking traditional sushi presentation.
Nutrition
- Serving Size: one normal portion
- Calories: 200
- Fat: 12g
- Saturated Fat: 3g