


In our quest to find snacks that are both healthy and exciting for the kids (and let’s be honest, for us grown-ups too!), we stumbled upon a recipe that has become an instant family favorite: Banana Sushi Rolls! Initially, I was a bit skeptical – banana and sushi in the same sentence sounded a little… unconventional. But curiosity got the better of me, and I decided to give it a try. The results? Absolutely delightful! These aren’t your typical savory sushi rolls; instead, think of them as a fun, playful, and incredibly easy dessert or snack that even the pickiest eaters will adore. My children, who are usually more inclined towards processed sugary treats, were instantly captivated by the playful presentation and the sweet, satisfying flavors. The best part? They are incredibly simple to make, requiring minimal ingredients and zero cooking time! From after-school snacks to fun party appetizers, these banana sushi rolls have become a staple in our home, and I’m thrilled to share this wonderfully versatile and healthy recipe with you. Get ready to roll your way to a delightful and guilt-free treat that’s perfect for any occasion!
Ingredients
- Ripe Bananas: The star of the show! Choose bananas that are ripe but still firm enough to hold their shape when rolled. They provide natural sweetness and a creamy texture.
- Peanut Butter (or Nut-Free Alternative): Creamy peanut butter acts as the “glue” that holds the toppings and adds a rich, nutty flavor. For allergies, sunflower seed butter, almond butter, or even cream cheese work wonderfully.
- Honey (Optional): A drizzle of honey can enhance the sweetness and add a touch of floral notes. Maple syrup or agave nectar are great vegan alternatives.
- Granola: Adds a delightful crunch and texture to the rolls. Choose your favorite granola flavor – plain, honey-oat, or even chocolate granola all work well.
- Shredded Coconut (Unsweetened or Toasted): Provides a tropical flavor and a delicate chewiness. Toasted coconut adds a richer, nuttier taste.
- Mini Chocolate Chips: A classic favorite! Mini chocolate chips offer bursts of chocolatey goodness and visual appeal.
- Sprinkles (Optional): For a festive touch and extra fun, sprinkles add color and a playful element, especially appealing to kids.
- Chopped Nuts (Optional): For added protein and crunch, chopped nuts like almonds, walnuts, or pecans can be sprinkled on. Ensure no allergies before using nuts.
- Dried Fruits (Optional): Raisins, cranberries, chopped apricots, or other dried fruits add sweetness and chewiness.
- Seeds (Optional): Chia seeds, sesame seeds, or flax seeds can be added for extra nutrition and texture.
- Cinnamon (Optional): A sprinkle of cinnamon adds warmth and enhances the banana flavor.
Instructions
Step 1: Banana Prep
Begin by peeling your ripe bananas. Ensure they are not overly ripe and mushy, as this will make them difficult to roll and slice. A slightly firm banana will hold its shape best.
Step 2: Peanut Butter Coating
Take one banana at a time and lay it on a plate or cutting board. Using a butter knife or spatula, generously spread peanut butter (or your chosen alternative) evenly over the entire surface of the banana. Make sure to coat it completely, as the peanut butter will act as the adhesive for your toppings. Don’t be shy with the peanut butter – a good coating will ensure your toppings stick well and provide a satisfying creamy layer.
Step 3: Topping Station Setup
Prepare your topping station. Place each of your chosen toppings (granola, shredded coconut, chocolate chips, sprinkles, nuts, dried fruits, seeds, cinnamon, etc.) into separate shallow bowls or plates. This will make it easy to roll your banana in the toppings without making a mess.
Step 4: Rolling in Toppings
Now comes the fun part! Take your peanut butter-coated banana and gently roll it in one of your chosen toppings. Press lightly to ensure the toppings adhere well to the peanut butter. You can choose to roll the entire banana in a single topping, or you can create sections with different toppings for a colorful and varied roll. For example, you could roll one section in granola, another in chocolate chips, and another in shredded coconut. Get creative and have fun experimenting with different combinations!
Step 5: Repeat for Remaining Bananas
Repeat steps 2-4 for each banana you wish to prepare. If you are making a variety of rolls, you can prepare several bananas with peanut butter coating and then roll them in different toppings to create a visually appealing platter.
Step 6: Chilling (Optional but Recommended)
For easier slicing and a slightly firmer texture, you can chill the topped bananas in the refrigerator for about 10-15 minutes. This step is optional, but it can make slicing cleaner, especially if the bananas are very ripe or the weather is warm. Chilling also allows the flavors to meld together slightly.
Step 7: Slicing into “Sushi” Rolls
Once chilled (or directly after topping), carefully slice each banana into bite-sized “sushi” rolls. Use a sharp knife and make clean, even cuts, about 1-1.5 inches thick. You can slice them straight or at a slight angle for a more visually appealing presentation. If the peanut butter is sticky, you can lightly dampen your knife with water between slices to prevent sticking and ensure clean cuts.
Step 8: Drizzling with Honey (Optional)
If desired, drizzle a small amount of honey (or maple syrup/agave) over the sliced banana sushi rolls. This adds an extra touch of sweetness and a beautiful glossy finish.
Step 9: Serving and Enjoying!
Arrange your banana sushi rolls on a plate or platter. They are now ready to be served and enjoyed immediately! For a fun presentation, you can arrange them in a circular pattern on a plate, mimicking traditional sushi presentation.
Nutrition Facts (Per Serving – approximately 3-4 rolls)
- Servings: 4-6 (depending on banana size and number of rolls per serving)
- Calories: Approximately 150-200 kcal (depending on toppings and peanut butter amount)
- Fat: 8-12g
- Saturated Fat: 2-3g
Note: Nutritional values are estimates and can vary based on specific ingredients used, portion sizes, and toppings. This is based on a serving of 3-4 rolls using peanut butter, granola, and a small amount of chocolate chips. For more precise nutritional information, use a nutrition calculator and input the exact ingredients and amounts used.
Preparation Time
Total Preparation Time: 15-20 minutes (including topping and slicing).
This banana sushi roll recipe is incredibly quick and easy to prepare, making it perfect for busy weeknights, last-minute snacks, or when you need a fun and healthy treat in a hurry. The majority of the time is spent coating the bananas and rolling them in toppings, which is a simple and enjoyable process, even for kids to participate in! The optional chilling step adds a few extra minutes, but overall, from start to finish, you’ll have these delightful banana sushi rolls ready to enjoy in under 20 minutes.
How to Serve Banana Sushi Rolls
Banana sushi rolls are incredibly versatile and can be served in a variety of ways, making them perfect for different occasions:
- Kid-Friendly Snack: Perfect for after-school snacks, playdates, or a healthy treat during lunchboxes. Their fun and playful presentation makes them appealing to children of all ages.
- Healthy Dessert: A lighter and healthier alternative to traditional desserts. Satisfy your sweet tooth without the guilt, especially when using naturally sweet toppings like fruit and granola.
- Party Appetizer: A unique and eye-catching appetizer for parties or gatherings. Their vibrant colors and fun shape make them a conversation starter and a crowd-pleaser.
- Breakfast or Brunch: Enjoy them as a fun and quick breakfast option, especially when paired with yogurt or a smoothie for a more complete meal.
- Picnic Treat: Easy to transport and enjoy outdoors. Pack them in a container to prevent them from getting squished and enjoy them as a refreshing picnic snack.
- Creative Platter: Arrange them on a platter alongside fresh fruit, yogurt dips, or other healthy snacks for a visually appealing and nutritious spread.
- Themed Parties: Perfect for themed parties, such as a “tropical” party, a “healthy eating” party, or a “kids’ sushi” party.
Additional Tips for Perfect Banana Sushi Rolls
- Banana Ripeness is Key: Use bananas that are ripe but still firm. Overripe bananas will be too soft and mushy, making them difficult to roll and slice. Slightly underripe bananas will be too hard and less sweet.
- Experiment with Toppings: Don’t be afraid to get creative with your toppings! Try different types of granola, nuts, seeds, dried fruits, chocolate, and even savory options like crushed pretzels or coconut flakes. Consider seasonal toppings for variety.
- Nut Butter Alternatives: If allergies are a concern or you prefer different flavors, explore nut-free alternatives to peanut butter. Sunflower seed butter, almond butter, cashew butter, or even cream cheese or yogurt can work as delicious and versatile binders.
- Make it Vegan: Ensure all your toppings are vegan-friendly if you are following a vegan diet. Use maple syrup or agave nectar instead of honey for drizzling.
- Prep Ahead (Partially): You can prepare the peanut butter-coated bananas a few hours ahead of time and keep them wrapped in plastic wrap in the refrigerator. Roll them in toppings and slice just before serving to maintain freshness and texture.
- Involve Kids in the Process: Banana sushi rolls are a fantastic recipe to make with kids! They will love spreading the peanut butter and rolling the bananas in toppings. It’s a fun and interactive way to get them involved in the kitchen and encourage healthy eating.
- Presentation Matters: Arrange the sliced banana sushi rolls attractively on a plate or platter. Garnish with fresh fruit, a drizzle of honey, or a sprinkle of extra toppings for a more visually appealing presentation.
- Storage Tips: Banana sushi rolls are best enjoyed fresh. However, if you have leftovers, store them in an airtight container in the refrigerator for up to 24 hours. The bananas may brown slightly over time, but they will still be safe to eat. To minimize browning, you can lightly brush the cut surfaces of the bananas with lemon juice.
FAQ Section: Your Banana Sushi Roll Questions Answered
Q1: Can I make banana sushi rolls ahead of time?
A: Yes, you can prepare the peanut butter-coated bananas up to a few hours in advance and store them wrapped in plastic wrap in the refrigerator. However, it’s best to roll them in toppings and slice them just before serving to maintain the best texture and prevent the bananas from browning too much.
Q2: What are some good topping variations for banana sushi rolls?
A: The possibilities are endless! Some popular topping variations include:
- Fruity: Diced strawberries, blueberries, raspberries, chopped mango, shredded apple.
- Nutty/Seedy: Chopped almonds, walnuts, pecans, sunflower seeds, pumpkin seeds, chia seeds, sesame seeds.
- Chocolatey: Mini chocolate chips (dark, milk, white), cocoa powder, shaved chocolate, chocolate sprinkles.
- Crunchy: Granola (various flavors), crushed pretzels, puffed rice cereal, chopped graham crackers.
- Sweet & Savory: Shredded coconut (sweetened or unsweetened), cinnamon sugar, a pinch of sea salt.
Q3: Can I use different types of nut butter besides peanut butter?
A: Absolutely! Feel free to experiment with other nut butters like almond butter, cashew butter, or hazelnut butter. For nut-free options, sunflower seed butter, soy butter, or even cream cheese or Greek yogurt can work well as binders.
Q4: Are banana sushi rolls a healthy snack?
A: Yes, banana sushi rolls can be a healthy and nutritious snack option. They are made with whole fruit (bananas), healthy fats and protein (from nut butter), and can be topped with wholesome ingredients like granola, nuts, seeds, and fruit. They are a good source of potassium, fiber, and vitamins. Just be mindful of added sugars in toppings and choose options like unsweetened coconut and granola when possible.
Q5: Can I make banana sushi rolls vegan?
A: Yes, banana sushi rolls can easily be made vegan. Simply use vegan-friendly toppings like vegan chocolate chips, plant-based granola, and maple syrup or agave nectar instead of honey for drizzling. Ensure your nut butter and other ingredients are also vegan.
Q6: How do I prevent the bananas from browning?
A: Bananas naturally brown when exposed to air. To minimize browning, you can:
- Chill the bananas in the refrigerator after coating them with peanut butter.
- Lightly brush the cut surfaces of the banana slices with lemon juice or orange juice (the citrus acid helps slow down oxidation).
- Consume them relatively soon after slicing.
Q7: Can I freeze banana sushi rolls?
A: Freezing banana sushi rolls is not recommended as the bananas will become mushy and the toppings may lose their texture when thawed. They are best enjoyed fresh or within a few hours of preparation.
Q8: Are banana sushi rolls suitable for people with allergies?
A: Banana sushi rolls can be adapted to accommodate various allergies. If nut allergies are a concern, use nut-free alternatives like sunflower seed butter or soy butter. Always check the ingredient labels of all toppings to ensure they are free from allergens. For gluten allergies, choose gluten-free granola and toppings. Always be mindful of cross-contamination when preparing food for people with allergies.
Print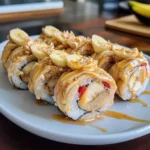
Banana Sushi Rolls Recipe
Ingredients
- Ripe Bananas: The star of the show! Choose bananas that are ripe but still firm enough to hold their shape when rolled. They provide natural sweetness and a creamy texture.
- Peanut Butter (or Nut-Free Alternative): Creamy peanut butter acts as the “glue” that holds the toppings and adds a rich, nutty flavor. For allergies, sunflower seed butter, almond butter, or even cream cheese work wonderfully.
- Honey (Optional): A drizzle of honey can enhance the sweetness and add a touch of floral notes. Maple syrup or agave nectar are great vegan alternatives.
- Granola: Adds a delightful crunch and texture to the rolls. Choose your favorite granola flavor – plain, honey-oat, or even chocolate granola all work well.
- Shredded Coconut (Unsweetened or Toasted): Provides a tropical flavor and a delicate chewiness. Toasted coconut adds a richer, nuttier taste.
- Mini Chocolate Chips: A classic favorite! Mini chocolate chips offer bursts of chocolatey goodness and visual appeal.
- Sprinkles (Optional): For a festive touch and extra fun, sprinkles add color and a playful element, especially appealing to kids.
- Chopped Nuts (Optional): For added protein and crunch, chopped nuts like almonds, walnuts, or pecans can be sprinkled on. Ensure no allergies before using nuts.
- Dried Fruits (Optional): Raisins, cranberries, chopped apricots, or other dried fruits add sweetness and chewiness.
- Seeds (Optional): Chia seeds, sesame seeds, or flax seeds can be added for extra nutrition and texture.
- Cinnamon (Optional): A sprinkle of cinnamon adds warmth and enhances the banana flavor.
Instructions
Step 1: Banana Prep
Begin by peeling your ripe bananas. Ensure they are not overly ripe and mushy, as this will make them difficult to roll and slice. A slightly firm banana will hold its shape best.
Step 2: Peanut Butter Coating
Take one banana at a time and lay it on a plate or cutting board. Using a butter knife or spatula, generously spread peanut butter (or your chosen alternative) evenly over the entire surface of the banana. Make sure to coat it completely, as the peanut butter will act as the adhesive for your toppings. Don’t be shy with the peanut butter – a good coating will ensure your toppings stick well and provide a satisfying creamy layer.
Step 3: Topping Station Setup
Prepare your topping station. Place each of your chosen toppings (granola, shredded coconut, chocolate chips, sprinkles, nuts, dried fruits, seeds, cinnamon, etc.) into separate shallow bowls or plates. This will make it easy to roll your banana in the toppings without making a mess.
Step 4: Rolling in Toppings
Now comes the fun part! Take your peanut butter-coated banana and gently roll it in one of your chosen toppings. Press lightly to ensure the toppings adhere well to the peanut butter. You can choose to roll the entire banana in a single topping, or you can create sections with different toppings for a colorful and varied roll. For example, you could roll one section in granola, another in chocolate chips, and another in shredded coconut. Get creative and have fun experimenting with different combinations!
Step 5: Repeat for Remaining Bananas
Repeat steps 2-4 for each banana you wish to prepare. If you are making a variety of rolls, you can prepare several bananas with peanut butter coating and then roll them in different toppings to create a visually appealing platter.
Step 6: Chilling (Optional but Recommended)
For easier slicing and a slightly firmer texture, you can chill the topped bananas in the refrigerator for about 10-15 minutes. This step is optional, but it can make slicing cleaner, especially if the bananas are very ripe or the weather is warm. Chilling also allows the flavors to meld together slightly.
Step 7: Slicing into “Sushi” Rolls
Once chilled (or directly after topping), carefully slice each banana into bite-sized “sushi” rolls. Use a sharp knife and make clean, even cuts, about 1-1.5 inches thick. You can slice them straight or at a slight angle for a more visually appealing presentation. If the peanut butter is sticky, you can lightly dampen your knife with water between slices to prevent sticking and ensure clean cuts.
Step 8: Drizzling with Honey (Optional)
If desired, drizzle a small amount of honey (or maple syrup/agave) over the sliced banana sushi rolls. This adds an extra touch of sweetness and a beautiful glossy finish.
Step 9: Serving and Enjoying!
Arrange your banana sushi rolls on a plate or platter. They are now ready to be served and enjoyed immediately! For a fun presentation, you can arrange them in a circular pattern on a plate, mimicking traditional sushi presentation.
Nutrition
- Serving Size: one normal portion
- Calories: 200
- Fat: 12g
- Saturated Fat: 3g


