


I still remember the first time I made a batch of this Toasted Muesli. Our kitchen, usually a whirlwind of morning chaos, suddenly fell quiet. The only sound was the gentle crackling from the oven, and the air filled with the most incredible aroma—a warm, nutty, cinnamon-infused scent that felt like a hug. My family, typically loyal to their sugary, boxed cereals, emerged one by one, drawn in by the smell. The look of surprise and delight on their faces when they took their first crunchy, satisfying bite was priceless. This wasn’t just breakfast; it was an experience. This recipe transformed our mornings from a rushed routine into a cherished ritual. It’s more than just a mix of oats and nuts; it’s a jar of pure, homemade goodness that starts the day on a note of wholesome indulgence. Now, that large glass jar on our counter is a permanent fixture, a constant invitation to a better, more delicious morning.
Ingredients
- Rolled Oats (Old-Fashioned): 4 cups (400g). These are the heart of your muesli, providing a chewy texture and toasting up beautifully. Do not use quick-cook or steel-cut oats.
- Raw Nuts, Roughly Chopped: 1 ½ cups (200g). A mix of almonds, walnuts, and pecans offers a fantastic variety of flavors and healthy fats.
- Raw Seeds: 1 cup (150g). A combination of pumpkin seeds and sunflower seeds adds a nutritional punch and a delightful crunch.
- Unsweetened Shredded or Flaked Coconut: ½ cup (40g). This adds a subtle tropical sweetness and gets wonderfully golden and fragrant when toasted.
- Chia Seeds: 2 tablespoons. These tiny powerhouses add fiber, omega-3s, and help create lovely little clusters.
- Ground Cinnamon: 2 teaspoons. For warmth and a classic, comforting aroma that fills the kitchen.
- Ground Nutmeg: ½ teaspoon. A small amount adds a complex, sweet-spicy note that complements the cinnamon perfectly.
- Fine Sea Salt: ½ teaspoon. Essential for balancing the sweetness and enhancing all the other flavors.
- Melted Coconut Oil: ½ cup (120ml). This helps the muesli toast evenly and become irresistibly crispy. You can also use another neutral-flavored oil like avocado oil.
- Pure Maple Syrup: ½ cup (120ml). Provides a natural, refined-sugar-free sweetness and helps bind the ingredients together.
- Vanilla Extract: 1 teaspoon. For an extra layer of warm, aromatic flavor.
- Dried Fruit: 1 cup (150g). A mix of cranberries, raisins, or chopped dried apricots. This is added after baking to keep it soft and chewy.
- Plant-Based Milk: For serving. Almond, oat, soy, or cashew milk all work wonderfully.
Instructions
- Preheat and Prepare: Begin by preheating your oven to 325°F (160°C). Line a large, rimmed baking sheet with parchment paper. This step is crucial for easy cleanup and prevents the muesli from sticking.
- Combine Dry Ingredients: In a very large mixing bowl, add the rolled oats, chopped nuts, pumpkin seeds, sunflower seeds, shredded coconut, chia seeds, cinnamon, nutmeg, and salt. Use a whisk or a large spoon to stir everything together thoroughly. You want to ensure the spices, seeds, and nuts are evenly distributed throughout the oats before adding the wet ingredients.
- Combine Wet Ingredients: In a separate smaller bowl or a liquid measuring cup, whisk together the melted coconut oil, pure maple syrup, and vanilla extract. Continue whisking until the mixture is well combined and slightly emulsified. This ensures that the fat and sweetener are evenly distributed, which is key for a uniformly crispy and flavorful muesli.
- Mix Everything Together: Pour the wet ingredient mixture over the dry ingredients in the large bowl. Using a spatula or a large spoon, stir until every single oat, nut, and seed is lightly coated. Take your time with this step, scraping the bottom and sides of the bowl to make sure there are no dry pockets left. The mixture should look damp and glistening, but not overly saturated.
- Spread and Bake: Pour the muesli mixture onto your prepared baking sheet. Use the spatula to spread it into a thin, even layer. An even layer is critical for even toasting. If the muesli is piled up in some areas, those spots will steam rather than toast, while thinner spots might burn.
- Toast to Perfection: Place the baking sheet in the preheated oven. Bake for 20-25 minutes, removing the pan from the oven at the halfway point (around 12 minutes) to give it a good stir. This redistributes the muesli, ensuring the edges don’t burn and the center gets a chance to toast. Continue baking until the muesli is a light golden brown and your kitchen smells wonderfully fragrant.
- Cool Completely: This is the most important step for achieving a crunchy texture! Remove the baking sheet from the oven and place it on a wire cooling rack. Let the muesli cool completely on the pan, untouched, for at least 1 hour. As it cools, the sugars and oil will harden, transforming the muesli from soft to perfectly crisp.
- Add Dried Fruit: Once the muesli is completely cool, break up any large clumps with your hands. Transfer the toasted muesli to a large bowl or container and stir in your chosen dried fruit. Adding the fruit after baking prevents it from burning and becoming hard.
- Store for Later: Transfer the finished toasted muesli into an airtight container, such as a large glass jar or a sealed plastic container. Store it at room temperature for up to one month.
Nutrition Facts
- Servings: This recipe yields approximately 20 servings.
- Calories Per Serving: Approximately 280-320 kcal per ½ cup serving (varies based on specific nuts and fruits used).
- High in Fiber: Each serving is packed with dietary fiber from oats, nuts, and seeds, which is crucial for promoting digestive health, stabilizing blood sugar levels, and keeping you feeling full and satisfied for hours.
- Excellent Source of Healthy Fats: The abundance of nuts and seeds provides monounsaturated and polyunsaturated fats, including omega-3 fatty acids, which are vital for brain health, reducing inflammation, and supporting a healthy heart.
- Rich in Plant-Based Protein: This muesli offers a significant amount of protein from its diverse ingredients, helping to build and repair tissues, support muscle mass, and contribute to sustained energy throughout your day.
- Complex Carbohydrates for Sustained Energy: The old-fashioned rolled oats are a prime source of complex carbohydrates. Unlike simple sugars that cause energy spikes and crashes, these digest slowly, providing a steady release of energy to fuel your morning.
- Packed with Micronutrients: You’ll get a healthy dose of essential vitamins and minerals like magnesium, manganese, phosphorus, and zinc, which play critical roles in everything from bone health to immune function and energy metabolism.
Preparation Time
This recipe is wonderfully efficient for the delicious reward it yields. You will need approximately 15 minutes of active preparation time to measure and mix the ingredients. The baking and cooling time is about 1 hour and 25 minutes, during which you are mostly free to attend to other things, apart from a quick stir halfway through baking. The total time from start to finish is under two hours for a month’s worth of incredible breakfasts.
How to Serve
This Toasted Muesli is incredibly versatile. While it’s perfect with a splash of plant-based milk, here are some other delicious ways to enjoy it:
- The Classic Cereal Bowl:
- Scoop a generous ½ cup of toasted muesli into a bowl.
- Pour your favorite plant-based milk over top until the muesli is just submerged. Popular choices include:
- Creamy Oat Milk: Its natural creaminess makes the breakfast feel rich and decadent.
- Nutty Almond Milk: Complements the nuts in the muesli for a double dose of nutty flavor.
- Rich Soy Milk: Adds an extra boost of plant-based protein.
- Top with fresh berries, sliced bananas, or seasonal fruit for extra nutrients and freshness.
- Yogurt Parfait Layers:
- Create a beautiful and satisfying parfait by layering the toasted muesli with a thick, plant-based yogurt (coconut or soy yogurt work well).
- In a clear glass or jar, alternate layers: a spoonful of yogurt, a sprinkle of muesli, a layer of fresh fruit (like raspberries or blueberries).
- Repeat the layers until the glass is full, finishing with a final sprinkle of muesli for crunch.
- Crunchy Smoothie Bowl Topper:
- Blend up your favorite thick smoothie and pour it into a bowl.
- Generously sprinkle the toasted muesli over the top. It adds a much-needed crunchy texture to contrast with the smooth, creamy base.
- Arrange other toppings like sliced fruit, a drizzle of nut butter, or extra seeds alongside the muesli.
- Overnight “Bircher-Style” Muesli:
- For a softer, chewier texture reminiscent of traditional Bircher muesli, combine equal parts toasted muesli and plant-based milk in a jar.
- Stir in a tablespoon of grated apple or a dollop of yogurt if desired.
- Cover and refrigerate overnight. In the morning, you’ll have a delicious, ready-to-eat, porridge-like breakfast.
- Healthy Snack On-the-Go:
- Portion the dry muesli into small bags or containers.
- Enjoy it by the handful as a healthy and satisfying alternative to trail mix during a busy day, on a hike, or as a post-workout snack.
Additional tips
- Low and Slow is the Secret to Success: Resist the urge to crank up the oven temperature to speed up the process. A lower temperature of 325°F (160°C) is key. It allows the nuts and oats to toast deeply and evenly without scorching the more delicate ingredients like coconut flakes. This slow toasting develops a richer, more complex flavor.
- Don’t Crowd the Baking Sheet: Spreading the muesli in a thin, even layer is non-negotiable. If the pan is too crowded, the ingredients will steam instead of roast, resulting in a chewy, soggy final product. If your mixture looks too thick, it’s far better to divide it between two baking sheets than to pile it all onto one.
- The Cooling Process is a Crucial Step: Do not skip the cooling time! The muesli will not feel crunchy when it first comes out of the oven. The magic happens as it cools on the baking sheet. The melted oil and maple syrup crystallize and harden, creating that signature crispiness. Let it sit, undisturbed, until it reaches room temperature.
- Customize Your Mix-Ins: This recipe is a fantastic template for creativity. Feel free to swap the nuts and seeds based on what you have or what you love. Cashews, pistachios, hemp hearts, or flax seeds are all wonderful additions. Just maintain the general ratio of oats to mix-ins for the best texture.
- Watch It Like a Hawk Near the End: Ovens can have hot spots, and the line between perfectly toasted and burnt is very fine, especially with the sugars in the maple syrup. In the last 5-7 minutes of baking, keep a close eye on it. Use your nose as a guide; when it smells nutty and fragrant, it’s likely done.
- Embrace Different Spices: While cinnamon and nutmeg are a classic combination, don’t be afraid to experiment. A pinch of cardamom can add an exotic, floral note, ground ginger can provide a gentle warmth and spice, and a dash of allspice can lend a festive, complex flavor.
- Make a Double Batch to Save Time: This muesli stores so well that it’s worth making a double batch while you have all the ingredients out. Simply double all the ingredients and use two separate baking sheets, rotating their positions in the oven (top to bottom rack) halfway through baking to ensure they cook evenly.
- For Extra Clumps, Press Down Gently: If you love granola-like clusters in your muesli, you can gently press down on the mixture with the back of a spatula after you stir it halfway through baking. This encourages some of the oats to stick together. Don’t press too hard, as you still want a loose muesli texture.
FAQ section
1. What is the main difference between toasted muesli and granola?
The primary difference lies in the amount of fat and sugar, and the resulting texture. Granola is typically much sweeter and oilier, which causes it to bake into large, hard clusters. Toasted muesli, like this recipe, uses just enough oil and sweetener to lightly coat the ingredients, resulting in a looser mix that is crispy and toasted rather than clumpy and hard. It’s often considered a lighter, less-sweet version of granola.
2. How can I make this toasted muesli recipe gluten-free?
Making this recipe gluten-free is very simple! The only ingredient that typically contains gluten is the rolled oats. To adapt the recipe, just ensure you purchase “Certified Gluten-Free Rolled Oats.” These are processed in a facility that prevents cross-contamination with wheat, barley, and rye, making the entire recipe safe for those with celiac disease or gluten sensitivity.
3. How should I store my homemade toasted muesli and how long will it last?
Proper storage is key to maintaining freshness and crunch. Once the muesli is completely cool, transfer it to a large, airtight container. A glass jar with a tight-fitting lid is ideal. Store it in a cool, dark place like a pantry or cupboard. Stored this way, the toasted muesli will stay fresh and delicious for up to one month.
4. Is homemade toasted muesli healthier than typical store-bought breakfast cereals?
Absolutely. Most commercial breakfast cereals are highly processed and loaded with refined sugars, artificial flavors, and preservatives. By making your own toasted muesli, you have complete control over the ingredients. This recipe uses whole foods like oats, nuts, and seeds, and is naturally sweetened with a modest amount of pure maple syrup. It provides lasting energy from fiber, protein, and healthy fats, unlike the quick sugar rush and subsequent crash from many boxed cereals.
5. I followed the recipe, but my muesli isn’t crunchy. What did I do wrong?
The most common culprits for non-crunchy muesli are insufficient cooling time or a crowded pan. First, ensure you let the muesli cool completely on the baking sheet without touching it for at least an hour. This is when it crisps up. Second, if the muesli was spread too thickly on the pan, it would have steamed rather than toasted. For the next batch, try using a larger pan or splitting the mixture between two pans.
6. Can I use a different sweetener instead of maple syrup?
Yes, you can substitute other liquid sweeteners. Agave nectar works well as a 1:1 replacement and is a great vegan option. Honey is another excellent choice if you are not strictly vegan; it adds a lovely floral note. Keep in mind that different sweeteners have slightly different consistencies and may alter the final flavor profile a bit.
7. What are the best dried fruits to add, and are there any I should avoid?
The best dried fruits are those that provide a chewy, sweet contrast. Dried cranberries, raisins, sultanas, chopped dried apricots, dates, and figs are all fantastic choices. It’s best to avoid very moist dried fruits (like some prunes) as they can make the muesli lose its crunch over time. Always add the dried fruit after the muesli has been baked and cooled to prevent it from burning in the oven.
8. Can I eat this toasted muesli raw, like a traditional Bircher muesli?
You certainly can! While this recipe is designed to be toasted for a crunchy texture, the base ingredients are all safe to eat raw. To enjoy it Bircher-style, simply soak the toasted muesli in plant-based milk or yogurt overnight in the refrigerator. The toasting process adds a wonderful nutty depth of flavor that makes for a uniquely delicious and complex soaked muesli.
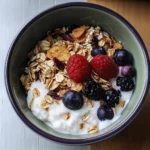
Toasted Muesli with Plant-Based Milk
Ingredients
- Rolled Oats (Old-Fashioned): 4 cups (400g). These are the heart of your muesli, providing a chewy texture and toasting up beautifully. Do not use quick-cook or steel-cut oats.
- Raw Nuts, Roughly Chopped: 1 ½ cups (200g). A mix of almonds, walnuts, and pecans offers a fantastic variety of flavors and healthy fats.
- Raw Seeds: 1 cup (150g). A combination of pumpkin seeds and sunflower seeds adds a nutritional punch and a delightful crunch.
- Unsweetened Shredded or Flaked Coconut: ½ cup (40g). This adds a subtle tropical sweetness and gets wonderfully golden and fragrant when toasted.
- Chia Seeds: 2 tablespoons. These tiny powerhouses add fiber, omega-3s, and help create lovely little clusters.
- Ground Cinnamon: 2 teaspoons. For warmth and a classic, comforting aroma that fills the kitchen.
- Ground Nutmeg: ½ teaspoon. A small amount adds a complex, sweet-spicy note that complements the cinnamon perfectly.
- Fine Sea Salt: ½ teaspoon. Essential for balancing the sweetness and enhancing all the other flavors.
- Melted Coconut Oil: ½ cup (120ml). This helps the muesli toast evenly and become irresistibly crispy. You can also use another neutral-flavored oil like avocado oil.
- Pure Maple Syrup: ½ cup (120ml). Provides a natural, refined-sugar-free sweetness and helps bind the ingredients together.
- Vanilla Extract: 1 teaspoon. For an extra layer of warm, aromatic flavor.
- Dried Fruit: 1 cup (150g). A mix of cranberries, raisins, or chopped dried apricots. This is added after baking to keep it soft and chewy.
- Plant-Based Milk: For serving. Almond, oat, soy, or cashew milk all work wonderfully.
Instructions
- Preheat and Prepare: Begin by preheating your oven to 325°F (160°C). Line a large, rimmed baking sheet with parchment paper. This step is crucial for easy cleanup and prevents the muesli from sticking.
- Combine Dry Ingredients: In a very large mixing bowl, add the rolled oats, chopped nuts, pumpkin seeds, sunflower seeds, shredded coconut, chia seeds, cinnamon, nutmeg, and salt. Use a whisk or a large spoon to stir everything together thoroughly. You want to ensure the spices, seeds, and nuts are evenly distributed throughout the oats before adding the wet ingredients.
- Combine Wet Ingredients: In a separate smaller bowl or a liquid measuring cup, whisk together the melted coconut oil, pure maple syrup, and vanilla extract. Continue whisking until the mixture is well combined and slightly emulsified. This ensures that the fat and sweetener are evenly distributed, which is key for a uniformly crispy and flavorful muesli.
- Mix Everything Together: Pour the wet ingredient mixture over the dry ingredients in the large bowl. Using a spatula or a large spoon, stir until every single oat, nut, and seed is lightly coated. Take your time with this step, scraping the bottom and sides of the bowl to make sure there are no dry pockets left. The mixture should look damp and glistening, but not overly saturated.
- Spread and Bake: Pour the muesli mixture onto your prepared baking sheet. Use the spatula to spread it into a thin, even layer. An even layer is critical for even toasting. If the muesli is piled up in some areas, those spots will steam rather than toast, while thinner spots might burn.
- Toast to Perfection: Place the baking sheet in the preheated oven. Bake for 20-25 minutes, removing the pan from the oven at the halfway point (around 12 minutes) to give it a good stir. This redistributes the muesli, ensuring the edges don’t burn and the center gets a chance to toast. Continue baking until the muesli is a light golden brown and your kitchen smells wonderfully fragrant.
- Cool Completely: This is the most important step for achieving a crunchy texture! Remove the baking sheet from the oven and place it on a wire cooling rack. Let the muesli cool completely on the pan, untouched, for at least 1 hour. As it cools, the sugars and oil will harden, transforming the muesli from soft to perfectly crisp.
- Add Dried Fruit: Once the muesli is completely cool, break up any large clumps with your hands. Transfer the toasted muesli to a large bowl or container and stir in your chosen dried fruit. Adding the fruit after baking prevents it from burning and becoming hard.
- Store for Later: Transfer the finished toasted muesli into an airtight container, such as a large glass jar or a sealed plastic container. Store it at room temperature for up to one month.
Nutrition
- Serving Size: one normal portion
- Calories: 320


