
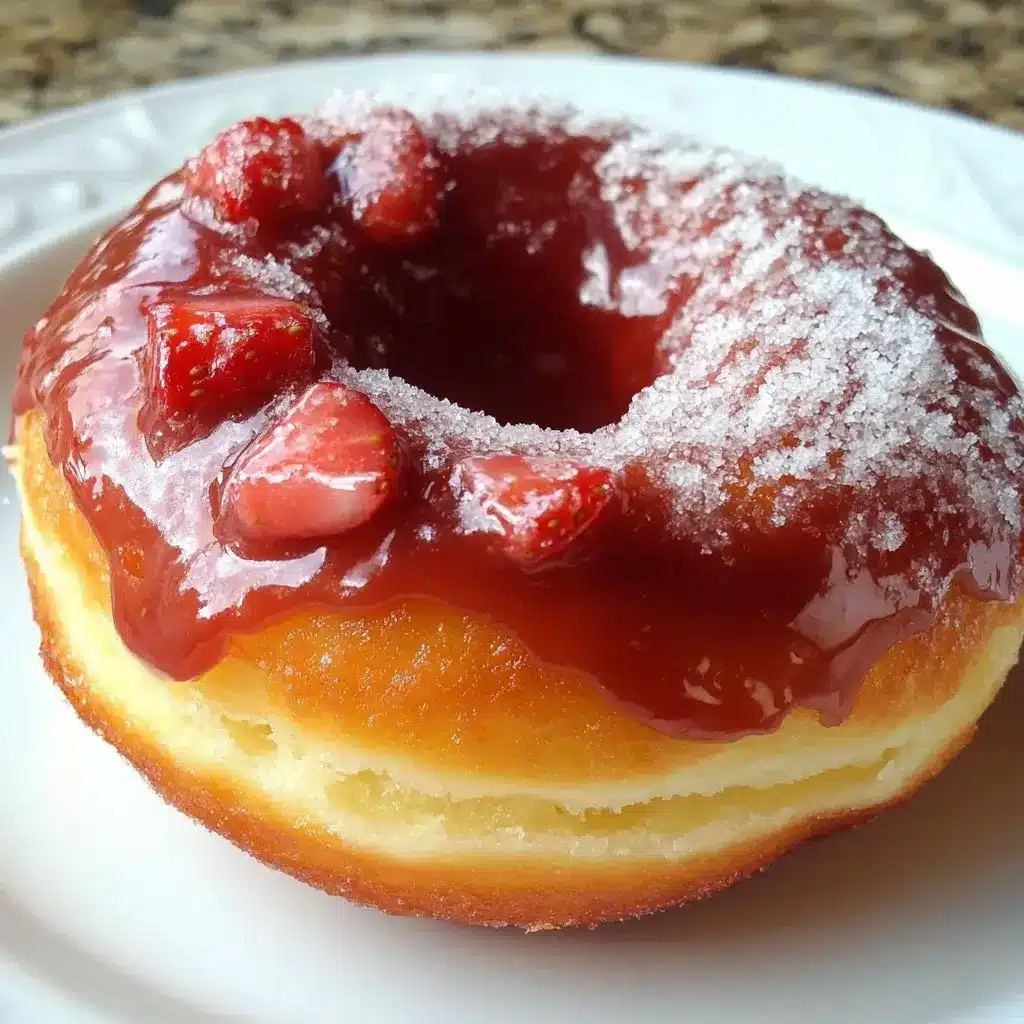

I still remember the first time I decided to tackle homemade Strawberry Filled Donuts. It was a sunny Saturday morning, and the kids were bouncing off the walls, requesting something “special.” Store-bought donuts are fine, but there’s a certain magic to making them yourself – the smell of yeast proofing, the sizzle of dough hitting hot oil, and that first bite into a warm, fluffy cloud filled with sweet, vibrant strawberry goodness. Honestly, I was a bit intimidated. Yeast doughs felt like the domain of serious bakers, and deep frying? Slightly terrifying. But the lure of those perfect, bakery-style donuts pushed me forward. When I finally presented the finished batch, dusted lightly with powdered sugar, the silence that descended as everyone took their first bite was golden. Then came the “Mmmmms” and the “Mom, these are the BEST donuts EVER!” Seeing their sticky, happy faces, beaming with delight over something I made from scratch? Pure joy. This recipe isn’t just about making donuts; it’s about creating those little moments of edible happiness. They’re pillowy soft, perfectly sweet, and the fresh strawberry filling bursts with flavor, cutting through the richness of the fried dough beautifully. They’ve become a family favorite, requested for birthdays, lazy weekends, and whenever we need a little pick-me-up. Trust me, the effort is so worth it – these homemade Strawberry Filled Donuts are a game-changer.
Ingredients
Here’s what you’ll need to create these delightful treats:
For the Donut Dough:
- 1 cup (240ml) Whole Milk: Warmed slightly (around 105-115°F or 40-46°C) to activate the yeast effectively.
- 2 ¼ teaspoons (7g) Active Dry Yeast: The leavening agent that makes the donuts light and airy. (One standard packet)
- ¼ cup (50g) Granulated Sugar: Provides sweetness and food for the yeast.
- 2 Large Eggs: At room temperature, they incorporate better and add richness and structure.
- ⅓ cup (75g) Unsalted Butter: Melted and slightly cooled; adds flavor, tenderness, and richness.
- 1 teaspoon Vanilla Extract: Enhances the overall flavor profile of the dough.
- ½ teaspoon Salt: Balances the sweetness and strengthens the gluten structure.
- 4 cups (480-500g) All-Purpose Flour: Plus more for dusting; the primary structure builder. Start with 4 cups and add slightly more only if needed. Spoon and level the flour for accuracy.
- Vegetable Oil (or other neutral high-heat oil like canola or peanut): Approximately 6-8 cups, for frying. Enough for at least 2-3 inches depth in your pot.
For the Strawberry Filling:
- 1 pound (about 4 cups or 450g) Fresh Strawberries: Hulled and roughly chopped. Frozen can be used, but fresh offers the best flavor.
- ½ cup (100g) Granulated Sugar: Adjust to your sweetness preference and the sweetness of the berries.
- 2 tablespoons Lemon Juice: Freshly squeezed brightens the flavor and helps the filling set.
- 2 tablespoons Cornstarch: Mixed with 2 tablespoons of cold water to create a slurry for thickening.
Optional Glaze/Topping:
- 1 cup (120g) Powdered Sugar: Sifted, for dusting or making a simple glaze.
- 2-3 tablespoons Milk or Cream: To mix with powdered sugar for a thin glaze.
- ½ teaspoon Vanilla Extract: (Optional) for glaze flavor.
Instructions
Follow these steps carefully for perfectly fluffy and delicious strawberry filled donuts:
1. Prepare the Dough – Activate the Yeast:
- Gently warm the milk in a small saucepan or microwave until it reaches 105-115°F (40-46°C). It should feel like a warm baby bottle – too hot will kill the yeast, too cool won’t activate it properly.
- Pour the warm milk into the bowl of a stand mixer fitted with the dough hook attachment (or a large mixing bowl if doing by hand).
- Sprinkle the active dry yeast and 1 teaspoon of the granulated sugar over the warm milk. Stir gently.
- Let the mixture sit for 5-10 minutes until it becomes foamy and bubbly. This indicates the yeast is active. If it doesn’t foam, discard and start again with fresh yeast.
2. Mix the Dough:
- Once the yeast is foamy, add the remaining granulated sugar, room temperature eggs, melted (and slightly cooled) butter, vanilla extract, and salt to the bowl. Mix briefly on low speed just to combine.
- Add about half of the all-purpose flour (around 2 cups) to the wet ingredients. Mix on low speed until incorporated.
- Gradually add the remaining flour, about half a cup at a time, mixing on low speed until a shaggy dough begins to form. Be careful not to add too much flour initially.
3. Knead the Dough:
- Stand Mixer Method: Increase the speed to medium-low and knead the dough for 7-10 minutes. The dough should become smooth, elastic, and slightly tacky, pulling away cleanly from the sides of the bowl. If it’s excessively sticky after 5 minutes, add flour 1 tablespoon at a time. If it seems too dry, add milk 1 teaspoon at a time.
- Hand Kneading Method: Turn the shaggy dough out onto a lightly floured surface. Knead by hand for 10-15 minutes, folding the dough over onto itself and pushing down and away with the heel of your hand, rotating the dough frequently. Add minimal flour to the surface only as needed to prevent sticking. The dough is ready when it’s smooth, elastic, and springs back slowly when poked.
4. First Rise (Bulk Fermentation):
- Lightly grease a large, clean bowl with a little oil or cooking spray.
- Form the kneaded dough into a smooth ball and place it in the greased bowl. Turn the dough over once to coat the entire surface lightly with oil – this prevents it from drying out.
- Cover the bowl tightly with plastic wrap or a clean kitchen towel.
- Place the bowl in a warm, draft-free spot. Let the dough rise for 1 to 1.5 hours, or until it has doubled in size. The exact time depends on the ambient temperature.
5. Make the Strawberry Filling (While Dough Rises):
- Combine the chopped strawberries, ½ cup granulated sugar, and fresh lemon juice in a medium saucepan.
- Place the saucepan over medium heat and bring the mixture to a simmer, stirring occasionally. Mash the strawberries slightly with your spoon or a potato masher as they cook, depending on how chunky you want the filling.
- Let the mixture simmer gently for 10-15 minutes, stirring frequently, until the strawberries have broken down and the sauce has slightly thickened.
- In a small bowl, whisk together the cornstarch and cold water until smooth (this is your slurry).
- Pour the cornstarch slurry into the simmering strawberry mixture while whisking constantly. Continue to cook and whisk for another 1-2 minutes until the filling noticeably thickens to a jam-like consistency.
- Remove the filling from the heat and transfer it to a heatproof bowl. Cover the surface directly with plastic wrap (to prevent a skin from forming) and let it cool completely. For faster cooling, you can place it in the refrigerator once it’s no longer steaming hot. Crucially, the filling must be completely cool before using.
6. Shape the Donuts:
- Once the dough has doubled, gently punch it down to release the air.
- Turn the dough out onto a lightly floured surface. Gently roll it out with a rolling pin to about ½-inch thickness. Try to handle the dough gently to keep it airy.
- Using a 3-inch round donut cutter (or a biscuit cutter/drinking glass), cut out as many rounds as possible. If you don’t have a donut cutter, just cut circles – you won’t need the center hole for filled donuts.
- Gather the dough scraps, gently re-roll (avoid overworking), and cut out more rounds until most of the dough is used. Overworking the scraps can make the donuts tougher.
- Place the cut donut rounds onto baking sheets lined with parchment paper, leaving some space between them. Dust the parchment lightly with flour to prevent sticking.
7. Second Rise (Proofing):
- Cover the donuts loosely with plastic wrap or a clean kitchen towel.
- Let them rise again in a warm place for another 30-45 minutes, or until they look puffy and have increased in size by about half. They should feel light and airy. If you gently poke the side of a donut, the indentation should spring back slowly.
8. Prepare for Frying:
- While the donuts are proofing, pour the vegetable oil into a large, heavy-bottomed pot or Dutch oven. The oil should be at least 2-3 inches deep, but leave several inches of headspace at the top of the pot for safety.
- Attach a deep-fry thermometer to the side of the pot. Heat the oil over medium heat until it reaches 350-360°F (175-180°C). Maintaining the correct temperature is crucial for perfectly cooked, non-greasy donuts. Adjust the heat as needed throughout the frying process.
- Set up a cooling station: Place a wire rack over a baking sheet lined with paper towels near your frying station. This allows excess oil to drip off.
- Prepare your filling station: Transfer the completely cooled strawberry filling into a piping bag fitted with a small-to-medium round tip or a bismarck tip (a long, thin tip designed for filling pastries). If you don’t have a piping bag, you can use a sturdy zip-top bag with a small corner snipped off.
9. Fry the Donuts:
- Carefully place 2-3 proofed donuts into the hot oil using a slotted spoon or spider strainer. Do not overcrowd the pot, as this will lower the oil temperature too much.
- Fry for about 1-2 minutes per side, or until they are a beautiful golden brown. They cook quickly!
- Use the slotted spoon or strainer to carefully flip the donuts and cook the other side.
- Once golden brown on both sides, lift the donuts out of the oil, allowing excess oil to drip back into the pot for a moment.
- Transfer the fried donuts immediately to the prepared wire rack to cool slightly.
- Continue frying the remaining donuts in batches, making sure the oil temperature returns to 350-360°F (175-180°C) between batches.
10. Fill the Donuts:
- Let the donuts cool for at least 10-15 minutes before filling. They should be warm, not hot. If they are too hot, the filling might melt or leak out.
- Use a small paring knife or a skewer to gently poke a hole into the side of each donut, wiggling it slightly to create a small cavity inside for the filling. Be careful not to poke all the way through the other side.
- Insert the tip of your piping bag (or zip-top bag) into the hole. Gently squeeze the bag to pipe the strawberry filling into the center of the donut. You’ll feel the donut get slightly heavier and puff up slightly. Stop before it feels like it might burst. Aim for about 1-2 tablespoons of filling per donut, depending on size.
- Wipe away any excess filling from the entry point.
11. Finish and Serve:
- Dusting: Once filled, you can simply dust the donuts generously with powdered sugar using a fine-mesh sieve.
- Glazing (Optional): Whisk together the sifted powdered sugar, 2 tablespoons of milk (or cream), and optional vanilla extract until smooth. Add more milk, ½ teaspoon at a time, if needed to reach desired drizzling consistency. Dip the tops of the filled donuts into the glaze or drizzle it over them. Let the glaze set for a few minutes before serving.
- These donuts are best enjoyed fresh, ideally within a few hours of making them.
Nutrition Facts
- Servings: This recipe yields approximately 12-15 donuts, depending on the size you cut them.
- Calories Per Serving (Approximate): Around 350-450 calories per filled donut (estimated, varies with size, oil absorption, and glaze).
- Fat: Primarily from the frying oil and butter in the dough. Frying contributes significantly to the fat content.
- Carbohydrates: High in carbohydrates from the flour, sugar in the dough, filling, and glaze.
- Sugar: Contains sugars from the dough, the strawberry filling, and any glaze or powdered sugar topping.
- Protein: Moderate amount primarily from the flour and eggs.
- Sodium: Contains sodium mainly from the salt added to the dough.
(Note: These are estimates. Actual nutritional values can vary based on specific ingredients, donut size, oil absorption during frying, and amount of filling/glaze used.)
Preparation Time
- Active Time: Approximately 45-60 minutes (mixing, kneading, shaping, frying, filling).
- Rising/Resting Time: Approximately 1.5 – 2.5 hours total (for both rises).
- Filling Cool Time: Approximately 30-60 minutes (can be done while dough rises).
- Total Time: Approximately 2.5 – 4 hours from start to finish (includes rising and cooling).
How to Serve
These Strawberry Filled Donuts are delightful on their own, but here are some ways to elevate the experience:
- Serve Warm: The absolute best way! The slight warmth makes the dough extra tender and the filling gooey.
- With Coffee or Tea: The classic pairing. The bitterness of coffee or the warmth of tea cuts through the sweetness perfectly.
- With Milk: A tall glass of cold milk is a simple, perfect companion, especially for kids.
- Dusting Options:
- Classic powdered sugar.
- A mix of granulated sugar and a pinch of cinnamon.
- Glaze Variations:
- Simple vanilla glaze (as described in ingredients).
- Lemon glaze (use lemon juice instead of milk in the glaze recipe).
- Chocolate glaze (melted chocolate drizzled over).
- On a Dessert Platter: Include them as part of a larger dessert spread for parties or gatherings.
- Breakfast Treat: Make weekend mornings extra special.
- Afternoon Snack: A delightful pick-me-up.
Additional Tips
- Flour Measurement Matters: For the fluffiest donuts, measure your flour correctly. Spoon the flour into your measuring cup and level it off with a straight edge. Scooping directly from the bag compacts the flour, leading to too much flour and denser donuts.
- Yeast Health Check: Always check the expiration date on your yeast. The foaming step (proofing the yeast) is crucial – if it doesn’t get bubbly, your yeast might be inactive, and your donuts won’t rise properly.
- Oil Temperature is Key: Invest in a deep-fry thermometer! If the oil is too hot, the donuts will brown too quickly on the outside and remain raw inside. If it’s too cool, they will absorb too much oil and become greasy. Keep it consistently between 350-360°F (175-180°C).
- Use Neutral Flavored Oil: Choose an oil with a high smoke point and neutral flavor, like vegetable, canola, or peanut oil. Avoid olive oil, as its flavor is too strong and its smoke point is lower.
- Don’t Overcrowd the Pot: Frying too many donuts at once drastically lowers the oil temperature, leading to greasy results. Fry in small batches (2-3 donuts at a time) and allow the oil to return to the target temperature between batches.
- Ensure Filling is Completely Cool: Adding warm filling to warm donuts can make them soggy or cause the filling to leak out more easily. Patience pays off here – let the filling chill thoroughly.
- Gentle Handling: Handle the proofed donuts very gently when transferring them to the hot oil. If you deflate them too much, they won’t be as light and airy after frying. Using floured parchment squares for proofing each donut can help ease transfer.
- Best Eaten Fresh: While they can be stored, yeast donuts are truly at their peak within a few hours of being made. Their texture changes significantly over time. If storing, keep them in an airtight container at room temperature for up to 1-2 days (unfilled might store slightly better).
FAQ
1. Can I bake these donuts instead of frying them?
- While you can technically bake this dough, the result will be very different. Fried yeast donuts have a characteristic light, airy texture with a slightly crisp exterior. Baked versions will be more like a soft, sweet bread roll – still delicious, but not the classic donut texture. If baking, brush with melted butter after baking and roll in sugar, or glaze. Bake at around 375°F (190°C) for 10-15 minutes, or until golden brown.
2. What’s the difference between Active Dry Yeast and Instant Yeast? Can I use Instant?
- Active Dry Yeast needs to be dissolved and “proofed” in warm liquid first (as described in the recipe). Instant Yeast (also called Rapid Rise or Bread Machine Yeast) can often be mixed directly with the dry ingredients, though proofing it doesn’t hurt. If using Instant Yeast, you can typically skip the 5-10 minute proofing step and just add it with the flour, ensuring your milk is still warm. Use the same amount (2 ¼ teaspoons).
3. Can I make the dough ahead of time?
- Yes! After the first rise (bulk fermentation), punch the dough down, place it back in the greased bowl, cover tightly with plastic wrap, and refrigerate for up to 24 hours. When ready to use, let the cold dough sit at room temperature for about 30-60 minutes to take the chill off before proceeding with shaping, the second rise, and frying. The second rise might take a bit longer starting from cold dough.
4. Can I freeze the donuts?
- It’s best to freeze the donuts before filling or glazing. Let the fried donuts cool completely, then place them in a single layer on a baking sheet to freeze solid. Once frozen, transfer them to a freezer-safe bag or container for up to 1-2 months. Thaw at room temperature. You can refresh them slightly by warming them briefly in an oven (around 300°F/150°C for a few minutes) before filling and finishing. The texture won’t be exactly the same as fresh, but it’s a good option. Freezing filled donuts can make them soggy upon thawing.
5. My donuts came out greasy. What went wrong?
- The most likely culprit is incorrect oil temperature. If the oil was too cool (below 350°F/175°C), the donuts spend too long in the oil and absorb more fat before the exterior sets. Ensure your thermometer is accurate and you allow the oil to reheat between batches. Overcrowding the pot also causes the temperature to drop significantly.
6. Can I use store-bought strawberry jam instead of making the filling?
- Absolutely! This is a great shortcut. Choose a good quality, thick strawberry jam or preserves. You might want to warm it slightly to make it easier to pipe, but ensure it’s not hot when filling the donuts. Taste it first – you may find some jams sweeter than the homemade version.
7. Why are my donuts tough or dense instead of light and fluffy?
- Several factors can cause this:
- Too much flour: Over-measuring flour is common. Use the spoon-and-level method.
- Over-kneading: While kneading develops gluten, excessive kneading (especially with too much added flour) can make the dough tough.
- Under-proofing: Not letting the dough rise sufficiently (both the first and second rise) means the yeast hasn’t produced enough gas to create an airy structure. Ensure the dough doubles in size (first rise) and looks puffy (second rise).
- Inactive Yeast: If your yeast didn’t foam properly, the donuts won’t rise well.
8. How do I reuse or dispose of the frying oil?
- Reuse: Let the oil cool completely. Strain it through a fine-mesh sieve lined with cheesecloth or a coffee filter to remove food particles. Store the strained oil in an airtight container in a cool, dark place. You can typically reuse frying oil 2-3 times, especially for donuts (as they don’t impart strong flavors). If the oil smells off, looks very dark, or smokes easily, discard it.
- Disposal: Never pour used cooking oil down the drain or toilet – it causes major plumbing issues. Let the oil cool completely. Pour it into a sealable container (like an old milk jug or the original oil bottle) and dispose of it in your household trash, or check if your local municipality has a cooking oil recycling program.

Strawberring Filled Donut Recipe
Ingredients
Here’s what you’ll need to create these delightful treats:
For the Donut Dough:
- 1 cup (240ml) Whole Milk: Warmed slightly (around 105-115°F or 40-46°C) to activate the yeast effectively.
- 2 ¼ teaspoons (7g) Active Dry Yeast: The leavening agent that makes the donuts light and airy. (One standard packet)
- ¼ cup (50g) Granulated Sugar: Provides sweetness and food for the yeast.
- 2 Large Eggs: At room temperature, they incorporate better and add richness and structure.
- ⅓ cup (75g) Unsalted Butter: Melted and slightly cooled; adds flavor, tenderness, and richness.
- 1 teaspoon Vanilla Extract: Enhances the overall flavor profile of the dough.
- ½ teaspoon Salt: Balances the sweetness and strengthens the gluten structure.
- 4 cups (480-500g) All-Purpose Flour: Plus more for dusting; the primary structure builder. Start with 4 cups and add slightly more only if needed. Spoon and level the flour for accuracy.
- Vegetable Oil (or other neutral high-heat oil like canola or peanut): Approximately 6-8 cups, for frying. Enough for at least 2-3 inches depth in your pot.
For the Strawberry Filling:
- 1 pound (about 4 cups or 450g) Fresh Strawberries: Hulled and roughly chopped. Frozen can be used, but fresh offers the best flavor.
- ½ cup (100g) Granulated Sugar: Adjust to your sweetness preference and the sweetness of the berries.
- 2 tablespoons Lemon Juice: Freshly squeezed brightens the flavor and helps the filling set.
- 2 tablespoons Cornstarch: Mixed with 2 tablespoons of cold water to create a slurry for thickening.
Optional Glaze/Topping:
- 1 cup (120g) Powdered Sugar: Sifted, for dusting or making a simple glaze.
- 2–3 tablespoons Milk or Cream: To mix with powdered sugar for a thin glaze.
- ½ teaspoon Vanilla Extract: (Optional) for glaze flavor.
Instructions
Follow these steps carefully for perfectly fluffy and delicious strawberry filled donuts:
1. Prepare the Dough – Activate the Yeast:
- Gently warm the milk in a small saucepan or microwave until it reaches 105-115°F (40-46°C). It should feel like a warm baby bottle – too hot will kill the yeast, too cool won’t activate it properly.
- Pour the warm milk into the bowl of a stand mixer fitted with the dough hook attachment (or a large mixing bowl if doing by hand).
- Sprinkle the active dry yeast and 1 teaspoon of the granulated sugar over the warm milk. Stir gently.
- Let the mixture sit for 5-10 minutes until it becomes foamy and bubbly. This indicates the yeast is active. If it doesn’t foam, discard and start again with fresh yeast.
2. Mix the Dough:
- Once the yeast is foamy, add the remaining granulated sugar, room temperature eggs, melted (and slightly cooled) butter, vanilla extract, and salt to the bowl. Mix briefly on low speed just to combine.
- Add about half of the all-purpose flour (around 2 cups) to the wet ingredients. Mix on low speed until incorporated.
- Gradually add the remaining flour, about half a cup at a time, mixing on low speed until a shaggy dough begins to form. Be careful not to add too much flour initially.
3. Knead the Dough:
- Stand Mixer Method: Increase the speed to medium-low and knead the dough for 7-10 minutes. The dough should become smooth, elastic, and slightly tacky, pulling away cleanly from the sides of the bowl. If it’s excessively sticky after 5 minutes, add flour 1 tablespoon at a time. If it seems too dry, add milk 1 teaspoon at a time.
- Hand Kneading Method: Turn the shaggy dough out onto a lightly floured surface. Knead by hand for 10-15 minutes, folding the dough over onto itself and pushing down and away with the heel of your hand, rotating the dough frequently. Add minimal flour to the surface only as needed to prevent sticking. The dough is ready when it’s smooth, elastic, and springs back slowly when poked.
4. First Rise (Bulk Fermentation):
- Lightly grease a large, clean bowl with a little oil or cooking spray.
- Form the kneaded dough into a smooth ball and place it in the greased bowl. Turn the dough over once to coat the entire surface lightly with oil – this prevents it from drying out.
- Cover the bowl tightly with plastic wrap or a clean kitchen towel.
- Place the bowl in a warm, draft-free spot. Let the dough rise for 1 to 1.5 hours, or until it has doubled in size. The exact time depends on the ambient temperature.
5. Make the Strawberry Filling (While Dough Rises):
- Combine the chopped strawberries, ½ cup granulated sugar, and fresh lemon juice in a medium saucepan.
- Place the saucepan over medium heat and bring the mixture to a simmer, stirring occasionally. Mash the strawberries slightly with your spoon or a potato masher as they cook, depending on how chunky you want the filling.
- Let the mixture simmer gently for 10-15 minutes, stirring frequently, until the strawberries have broken down and the sauce has slightly thickened.
- In a small bowl, whisk together the cornstarch and cold water until smooth (this is your slurry).
- Pour the cornstarch slurry into the simmering strawberry mixture while whisking constantly. Continue to cook and whisk for another 1-2 minutes until the filling noticeably thickens to a jam-like consistency.
- Remove the filling from the heat and transfer it to a heatproof bowl. Cover the surface directly with plastic wrap (to prevent a skin from forming) and let it cool completely. For faster cooling, you can place it in the refrigerator once it’s no longer steaming hot. Crucially, the filling must be completely cool before using.
6. Shape the Donuts:
- Once the dough has doubled, gently punch it down to release the air.
- Turn the dough out onto a lightly floured surface. Gently roll it out with a rolling pin to about ½-inch thickness. Try to handle the dough gently to keep it airy.
- Using a 3-inch round donut cutter (or a biscuit cutter/drinking glass), cut out as many rounds as possible. If you don’t have a donut cutter, just cut circles – you won’t need the center hole for filled donuts.
- Gather the dough scraps, gently re-roll (avoid overworking), and cut out more rounds until most of the dough is used. Overworking the scraps can make the donuts tougher.
- Place the cut donut rounds onto baking sheets lined with parchment paper, leaving some space between them. Dust the parchment lightly with flour to prevent sticking.
7. Second Rise (Proofing):
- Cover the donuts loosely with plastic wrap or a clean kitchen towel.
- Let them rise again in a warm place for another 30-45 minutes, or until they look puffy and have increased in size by about half. They should feel light and airy. If you gently poke the side of a donut, the indentation should spring back slowly.
8. Prepare for Frying:
- While the donuts are proofing, pour the vegetable oil into a large, heavy-bottomed pot or Dutch oven. The oil should be at least 2-3 inches deep, but leave several inches of headspace at the top of the pot for safety.
- Attach a deep-fry thermometer to the side of the pot. Heat the oil over medium heat until it reaches 350-360°F (175-180°C). Maintaining the correct temperature is crucial for perfectly cooked, non-greasy donuts. Adjust the heat as needed throughout the frying process.
- Set up a cooling station: Place a wire rack over a baking sheet lined with paper towels near your frying station. This allows excess oil to drip off.
- Prepare your filling station: Transfer the completely cooled strawberry filling into a piping bag fitted with a small-to-medium round tip or a bismarck tip (a long, thin tip designed for filling pastries). If you don’t have a piping bag, you can use a sturdy zip-top bag with a small corner snipped off.
9. Fry the Donuts:
- Carefully place 2-3 proofed donuts into the hot oil using a slotted spoon or spider strainer. Do not overcrowd the pot, as this will lower the oil temperature too much.
- Fry for about 1-2 minutes per side, or until they are a beautiful golden brown. They cook quickly!
- Use the slotted spoon or strainer to carefully flip the donuts and cook the other side.
- Once golden brown on both sides, lift the donuts out of the oil, allowing excess oil to drip back into the pot for a moment.
- Transfer the fried donuts immediately to the prepared wire rack to cool slightly.
- Continue frying the remaining donuts in batches, making sure the oil temperature returns to 350-360°F (175-180°C) between batches.
10. Fill the Donuts:
- Let the donuts cool for at least 10-15 minutes before filling. They should be warm, not hot. If they are too hot, the filling might melt or leak out.
- Use a small paring knife or a skewer to gently poke a hole into the side of each donut, wiggling it slightly to create a small cavity inside for the filling. Be careful not to poke all the way through the other side.
- Insert the tip of your piping bag (or zip-top bag) into the hole. Gently squeeze the bag to pipe the strawberry filling into the center of the donut. You’ll feel the donut get slightly heavier and puff up slightly. Stop before it feels like it might burst. Aim for about 1-2 tablespoons of filling per donut, depending on size.
- Wipe away any excess filling from the entry point.
11. Finish and Serve:
- Dusting: Once filled, you can simply dust the donuts generously with powdered sugar using a fine-mesh sieve.
- Glazing (Optional): Whisk together the sifted powdered sugar, 2 tablespoons of milk (or cream), and optional vanilla extract until smooth. Add more milk, ½ teaspoon at a time, if needed to reach desired drizzling consistency. Dip the tops of the filled donuts into the glaze or drizzle it over them. Let the glaze set for a few minutes before serving.
- These donuts are best enjoyed fresh, ideally within a few hours of making them.
Nutrition
- Serving Size: one normal portion
- Calories: 450


