


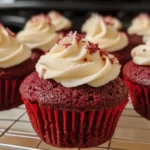
Baking has always been my way of showing love, and these Soft and Moist Red Velvet Cupcakes are a recipe I keep coming back to, time and time again. Honestly, they’re foolproof! The first time I made them for a family gathering, they were devoured within minutes. Even my notoriously picky nephew, who usually avoids anything beyond plain vanilla, couldn’t stop raving about how “deliciously chocolatey and not-too-sweet” they were. The secret, I believe, lies in the perfect balance of buttermilk, cocoa, and a touch of vinegar that creates that signature tangy red velvet flavor and unbelievably tender crumb. These cupcakes are not just visually stunning with their vibrant red hue, but they also melt in your mouth with every bite. Whether you’re baking for a birthday, a holiday, or just a sweet treat to brighten up a weekday, these red velvet cupcakes are guaranteed to be a crowd-pleaser. Prepare to be showered with compliments and requests for the recipe – they are truly irresistible!
Ingredients
- All-Purpose Flour: The foundation of our cupcakes, providing structure and ensuring a tender crumb.
- Granulated Sugar: Sweetens the cupcakes and contributes to their moistness and texture.
- Unsweetened Cocoa Powder: Adds a subtle chocolate flavor that is characteristic of red velvet, without being overpowering.
- Baking Soda: A leavening agent that reacts with the acidic ingredients to create lift and a light texture.
- Baking Powder: Another leavening agent that works alongside baking soda to ensure a perfect rise.
- Salt: Enhances the flavors of all the other ingredients and balances the sweetness.
- Buttermilk: The secret ingredient for moisture and tanginess, also tenderizes the gluten in the flour for a soft crumb.
- Vegetable Oil: Provides moisture and keeps the cupcakes incredibly tender and soft.
- Large Eggs: Bind the ingredients together and add richness and structure to the cupcakes.
- Red Food Coloring (Liquid or Gel): Gives the cupcakes their signature vibrant red color. Gel food coloring is recommended for a more intense color with less liquid.
- Vanilla Extract: Enhances the overall flavor profile, adding warmth and depth.
- White Vinegar: Reacts with the baking soda to create a tangy flavor and helps to brighten the red color.
For the Cream Cheese Frosting:
- Cream Cheese (Full Fat): The star of the frosting, providing a tangy and rich flavor and creamy texture. Ensure it’s softened to room temperature for smooth frosting.
- Unsalted Butter (Softened): Adds richness and helps create a light and fluffy frosting. Also, ensure it’s softened to room temperature.
- Powdered Sugar: Sweetens and thickens the frosting to the perfect consistency.
- Vanilla Extract: Complements the cream cheese flavor and adds a touch of sweetness.
Instructions
Let’s Make the Red Velvet Cupcakes:
- Preheat and Prepare: Preheat your oven to 350°F (175°C). Line a 12-cup muffin tin with cupcake liners. This step is crucial to ensure even baking and prevent sticking. Having the oven preheated to the correct temperature from the start is key to the cupcakes rising properly.
- Combine Dry Ingredients: In a large mixing bowl, whisk together the all-purpose flour, granulated sugar, unsweetened cocoa powder, baking soda, baking powder, and salt. Whisking ensures that all dry ingredients are evenly distributed, especially the leavening agents, which is vital for consistent rising. This also removes any lumps from the cocoa powder, preventing pockets of bitterness in your cupcakes.
- Combine Wet Ingredients: In a separate medium bowl, whisk together the buttermilk, vegetable oil, eggs, red food coloring, and vanilla extract. Buttermilk should be at room temperature for better emulsification. Mixing the wet ingredients separately helps to ensure that the food coloring is evenly dispersed throughout the liquid base before being added to the dry ingredients, resulting in a uniform red color in the finished cupcakes.
- Combine Wet and Dry Ingredients: Gradually add the wet ingredients to the dry ingredients, mixing on low speed with an electric mixer (or by hand) until just combined. Be careful not to overmix at this stage. Overmixing can develop the gluten in the flour, leading to tough cupcakes. Mix until you just see the flour disappear.
- Add Vinegar: In a small bowl, whisk together the white vinegar and baking soda. It will fizz! This is the chemical reaction we want. Immediately add this mixture to the batter and gently fold it in until just combined. The vinegar reacts with the baking soda, creating carbon dioxide, which lightens the batter and contributes to the cupcakes’ rise and signature tangy flavor.
- Fill Cupcake Liners: Divide the batter evenly among the prepared cupcake liners, filling each about two-thirds full. Using an ice cream scoop can help ensure even filling and consistent baking times. Don’t overfill, as this can cause the cupcakes to overflow and become misshapen.
- Bake: Bake for 18-20 minutes, or until a toothpick inserted into the center comes out clean. Baking time can vary slightly depending on your oven. Start checking for doneness around 18 minutes. Overbaking will dry out the cupcakes, so it’s better to err on the side of slightly underbaked if unsure.
- Cool Completely: Let the cupcakes cool in the muffin tin for a few minutes before transferring them to a wire rack to cool completely. Cooling in the muffin tin prevents them from being too fragile to handle immediately. Cooling completely before frosting is essential, as warm cupcakes will melt the frosting.
Make the Cream Cheese Frosting:
- Beat Cream Cheese and Butter: In a large bowl, using an electric mixer, beat the softened cream cheese and softened butter together until smooth and creamy. Ensure both are at room temperature to avoid lumps in your frosting. Beat until the mixture is light and fluffy, incorporating air for a smoother texture.
- Add Powdered Sugar and Vanilla: Gradually add the powdered sugar, one cup at a time, beating on low speed until incorporated. Then, increase the speed to medium and beat until the frosting is light and fluffy. Adding powdered sugar gradually prevents it from puffing up in a cloud. Beat until the frosting is smooth, creamy, and holds its shape.
- Add Vanilla Extract: Stir in the vanilla extract. Mix until just combined. Adding vanilla last prevents it from being overmixed and potentially thinning the frosting slightly.
- Frost the Cupcakes: Once the cupcakes are completely cooled, frost them generously with the cream cheese frosting using a spatula or piping bag. Get creative with your frosting techniques! You can swirl it on, pipe it with a decorative tip, or simply spread it evenly.
- Decorate (Optional): Decorate with sprinkles, red velvet crumbs, or fresh berries, if desired. Decorations add a finishing touch and can enhance the visual appeal of your cupcakes.
Nutrition Facts (per cupcake, without frosting)
- Servings: 12 cupcakes
- Calories: Approximately 250 kcal
- Fat: 12g
Please note: Nutritional information is an estimate and may vary based on specific ingredients and portion sizes. Frosting will significantly increase the calorie and sugar content.
Preparation Time
- Prep Time: 25 minutes (This includes gathering ingredients, mixing the batter, and preparing the muffin tin.)
- Bake Time: 18-20 minutes (Oven time to bake the cupcakes to golden perfection.)
- Cooling Time: 30 minutes (Allowing the cupcakes to cool completely before frosting is essential for best results and frosting consistency.)
- Frosting Time: 15 minutes (Making the cream cheese frosting and frosting the cooled cupcakes.)
- Total Time: Approximately 1 hour 30 minutes (From start to finish, including preparation, baking, cooling, and frosting.)
This recipe is relatively quick and easy to make, perfect for both beginner and experienced bakers. The majority of the time is spent baking and cooling, allowing you to prepare other elements or relax while the cupcakes are in the oven.
How to Serve
These Soft and Moist Red Velvet Cupcakes are incredibly versatile and can be served in various ways to suit any occasion. Here are some ideas to elevate your serving presentation and experience:
- Classic Presentation:
- Individual Plates: Serve each cupcake on a small dessert plate for an elegant touch.
- Cupcake Stand: Arrange the cupcakes on a tiered cupcake stand for a visually appealing centerpiece, perfect for parties and gatherings.
- Simple Arrangement: Line them up neatly on a platter for a casual yet inviting presentation.
- Frosting Variations:
- Classic Cream Cheese Frosting: The traditional and most beloved pairing. The tanginess of the cream cheese perfectly complements the red velvet flavor.
- Vanilla Buttercream: A sweeter and lighter option. Provides a smooth and buttery finish.
- Chocolate Buttercream: Enhance the chocolate notes of the red velvet with a rich chocolate buttercream.
- Whipped Cream: For a lighter and less sweet option, top with freshly whipped cream.
- Topping Ideas:
- Red Velvet Crumbs: Create red velvet crumbs by baking a thin layer of leftover batter and crumbling it after baking. Adds texture and reinforces the red velvet theme.
- Sprinkles: Use red, white, or festive sprinkles to add color and fun, especially for birthdays or holidays.
- Chopped Nuts: Pecans or walnuts add a crunchy texture and nutty flavor that complements red velvet.
- Fresh Berries: Raspberries, strawberries, or blueberries provide a fresh, fruity contrast and beautiful color.
- Chocolate Shavings: Dark or white chocolate shavings add elegance and a touch of extra chocolate flavor.
- Edible Glitter: For a glamorous touch, especially for special occasions, sprinkle edible glitter on top of the frosting.
- Occasion-Based Serving:
- Birthday Parties: Decorate with colorful sprinkles and candles. Arrange them on a birthday-themed cupcake stand.
- Valentine’s Day: Use heart-shaped sprinkles, red velvet crumbs, and serve with a glass of sparkling wine or champagne.
- Holidays (Christmas, 4th of July): Use holiday-themed sprinkles and decorations. Arrange them in festive patterns.
- Casual Gatherings: Simply serve them on a platter or in a basket for easy grab-and-go enjoyment.
- Pairing Suggestions:
- Coffee or Tea: The classic pairing for cupcakes. The warmth and slight bitterness of coffee or tea balance the sweetness of the cupcakes.
- Milk: Perfect for children and adults alike. Cold milk complements the moistness of the cupcakes.
- Sparkling Wine or Champagne: For a more sophisticated pairing, especially for celebrations.
- Dessert Wine: A light dessert wine can enhance the flavors of the red velvet and cream cheese frosting.
No matter how you choose to serve them, these Soft and Moist Red Velvet Cupcakes are sure to be a delightful treat that will impress your guests and satisfy any sweet craving.
Additional Tips for Perfect Red Velvet Cupcakes
To ensure your red velvet cupcakes are consistently soft, moist, and delicious every time you bake them, here are eight essential tips and tricks to keep in mind:
- Use Quality Ingredients: Start with fresh, high-quality ingredients. Using good quality cocoa powder and vanilla extract will significantly enhance the flavor. Fresh baking powder and baking soda are crucial for proper leavening. Don’t skimp on the cream cheese and butter for the frosting – full-fat versions provide the best flavor and texture.
- Room Temperature Ingredients are Key: Ensure your buttermilk, eggs, cream cheese, and butter are all at room temperature before you begin. Room temperature ingredients emulsify more easily, creating a smoother batter and frosting, resulting in a more uniform and tender cupcake. This also helps prevent curdling when combining wet and dry ingredients.
- Don’t Overmix the Batter: Overmixing develops the gluten in the flour, leading to tough and chewy cupcakes. Mix the wet and dry ingredients until just combined, and no streaks of flour remain. Gentle mixing is crucial for achieving that signature soft and tender crumb. The vinegar and baking soda mixture should be folded in last, just until incorporated.
- Measure Flour Accurately: Too much flour can result in dry cupcakes. Use the “spoon and level” method to measure your flour. Lightly spoon flour into your measuring cup and level it off with a straight edge. Avoid scooping directly from the bag, as this can pack the flour and lead to using too much. For even more accuracy, use a kitchen scale to weigh your flour.
- Use Gel Food Coloring: Gel food coloring is more concentrated than liquid food coloring, so you’ll need less to achieve a vibrant red color. It also won’t thin out your batter as much as liquid coloring. Start with a small amount and add more gradually until you achieve your desired shade of red. Brands like Americolor or Wilton are known for their vibrant gel food colorings.
- Bake at the Correct Temperature: Preheat your oven to the correct temperature and ensure it is properly calibrated. Oven thermometers are inexpensive and can help you ensure your oven is baking at the temperature you set. Baking at the wrong temperature can affect the texture and rise of your cupcakes. 350°F (175°C) is generally ideal for cupcakes.
- Don’t Overbake: Overbaking is the most common culprit for dry cupcakes. Start checking for doneness around 18 minutes. Cupcakes are done when a toothpick inserted into the center comes out clean or with a few moist crumbs attached. Remove them from the oven as soon as they are done.
- Cool Cupcakes Completely Before Frosting: This is crucial! Frosting warm cupcakes will cause the frosting to melt and slide off. Allow the cupcakes to cool completely on a wire rack before frosting. Patience is key here – even slightly warm cupcakes can cause frosting issues.
By following these tips, you’ll be well on your way to baking perfect Soft and Moist Red Velvet Cupcakes every single time. Enjoy the process and the delicious results!
FAQ – Frequently Asked Questions about Red Velvet Cupcakes
1. Can I make red velvet cupcakes without buttermilk?
Yes, you can substitute buttermilk. A good substitute is to use regular milk with a tablespoon of lemon juice or white vinegar added. Let it sit for 5-10 minutes to slightly curdle before using. This will mimic the acidity and tanginess of buttermilk, which is important for the red velvet flavor and tender texture. Alternatively, you can use plain yogurt or sour cream thinned with a little milk.
2. Can I use oil instead of butter in the cupcakes?
Yes, this recipe specifically uses vegetable oil in the cupcake batter and butter in the frosting. Oil contributes to the moistness of the cupcakes, making them incredibly soft. Butter is typically used in frostings for flavor and structure. Using oil in the cupcakes is recommended for the best soft and moist texture.
3. Why are my red velvet cupcakes not red enough?
There are several reasons why your cupcakes might not be as red as you desire:
* Food Coloring Type: Liquid food coloring is less concentrated than gel food coloring. Gel food coloring is recommended for a more vibrant red.
* Amount of Food Coloring: You might not be using enough food coloring. Start with the recommended amount in the recipe and gradually add more until you achieve your desired shade.
* Cocoa Powder Color: Darker cocoa powders can mute the red color. Using a lighter, natural cocoa powder can help the red color stand out more.
* Baking Time: Overbaking can sometimes dull the red color slightly.
4. Can I make red velvet cupcakes ahead of time?
Yes, you can bake the cupcakes ahead of time. Allow them to cool completely, then store them in an airtight container at room temperature for up to 2 days or in the refrigerator for up to 5 days. Frost them just before serving for the best freshness. You can also make the frosting ahead of time and store it in an airtight container in the refrigerator for up to 3 days. Let it come to room temperature and re-whip before frosting.
5. Can I freeze red velvet cupcakes?
Yes, you can freeze unfrosted red velvet cupcakes. Let them cool completely, then wrap each cupcake individually in plastic wrap and place them in a freezer-safe bag or container. Freeze for up to 2-3 months. Thaw them at room temperature for a few hours before frosting and serving. Freezing frosted cupcakes is not recommended as the frosting texture can change.
6. What is the best frosting for red velvet cupcakes?
Classic cream cheese frosting is the most traditional and arguably the best pairing for red velvet cupcakes. The tangy cream cheese frosting complements the subtle chocolate flavor and moistness of the cupcakes perfectly. Vanilla buttercream is another popular choice, offering a sweeter and less tangy alternative.
7. Why are my cupcakes sinking in the middle?
Cupcakes sinking in the middle can be caused by several factors:
* Oven Temperature: Oven temperature too low can cause sinking. Ensure your oven is preheated to the correct temperature and is accurate.
* Overmixing: Overmixing the batter can weaken the gluten structure and lead to sinking. Mix just until combined.
* Too Much Leavening Agent: Using too much baking soda or baking powder can cause a rapid rise followed by sinking. Always measure leavening agents accurately.
* Opening Oven Door Too Early: Opening the oven door too early during baking can cause a temperature drop, leading to sinking. Avoid opening the oven door until the cupcakes are mostly set.
8. Can I make red velvet cupcakes gluten-free?
Yes, you can make gluten-free red velvet cupcakes by substituting the all-purpose flour with a gluten-free all-purpose flour blend. Ensure the blend is designed for baking and contains xanthan gum or guar gum, which helps to provide structure in gluten-free baking. Follow the recipe as written, using the gluten-free flour blend in place of regular flour. Baking times may be slightly different, so check for doneness slightly earlier.
Soft and Moist Red Velvet Cupcakes
Ingredients
- All-Purpose Flour: The foundation of our cupcakes, providing structure and ensuring a tender crumb.
- Granulated Sugar: Sweetens the cupcakes and contributes to their moistness and texture.
- Unsweetened Cocoa Powder: Adds a subtle chocolate flavor that is characteristic of red velvet, without being overpowering.
- Baking Soda: A leavening agent that reacts with the acidic ingredients to create lift and a light texture.
- Baking Powder: Another leavening agent that works alongside baking soda to ensure a perfect rise.
- Salt: Enhances the flavors of all the other ingredients and balances the sweetness.
- Buttermilk: The secret ingredient for moisture and tanginess, also tenderizes the gluten in the flour for a soft crumb.
- Vegetable Oil: Provides moisture and keeps the cupcakes incredibly tender and soft.
- Large Eggs: Bind the ingredients together and add richness and structure to the cupcakes.
- Red Food Coloring (Liquid or Gel): Gives the cupcakes their signature vibrant red color. Gel food coloring is recommended for a more intense color with less liquid.
- Vanilla Extract: Enhances the overall flavor profile, adding warmth and depth.
- White Vinegar: Reacts with the baking soda to create a tangy flavor and helps to brighten the red color.
For the Cream Cheese Frosting:
- Cream Cheese (Full Fat): The star of the frosting, providing a tangy and rich flavor and creamy texture. Ensure it’s softened to room temperature for smooth frosting.
- Unsalted Butter (Softened): Adds richness and helps create a light and fluffy frosting. Also, ensure it’s softened to room temperature.
- Powdered Sugar: Sweetens and thickens the frosting to the perfect consistency.
- Vanilla Extract: Complements the cream cheese flavor and adds a touch of sweetness.
Instructions
Let’s Make the Red Velvet Cupcakes:
- Preheat and Prepare: Preheat your oven to 350°F (175°C). Line a 12-cup muffin tin with cupcake liners. This step is crucial to ensure even baking and prevent sticking. Having the oven preheated to the correct temperature from the start is key to the cupcakes rising properly.
- Combine Dry Ingredients: In a large mixing bowl, whisk together the all-purpose flour, granulated sugar, unsweetened cocoa powder, baking soda, baking powder, and salt. Whisking ensures that all dry ingredients are evenly distributed, especially the leavening agents, which is vital for consistent rising. This also removes any lumps from the cocoa powder, preventing pockets of bitterness in your cupcakes.
- Combine Wet Ingredients: In a separate medium bowl, whisk together the buttermilk, vegetable oil, eggs, red food coloring, and vanilla extract. Buttermilk should be at room temperature for better emulsification. Mixing the wet ingredients separately helps to ensure that the food coloring is evenly dispersed throughout the liquid base before being added to the dry ingredients, resulting in a uniform red color in the finished cupcakes.
- Combine Wet and Dry Ingredients: Gradually add the wet ingredients to the dry ingredients, mixing on low speed with an electric mixer (or by hand) until just combined. Be careful not to overmix at this stage. Overmixing can develop the gluten in the flour, leading to tough cupcakes. Mix until you just see the flour disappear.
- Add Vinegar: In a small bowl, whisk together the white vinegar and baking soda. It will fizz! This is the chemical reaction we want. Immediately add this mixture to the batter and gently fold it in until just combined. The vinegar reacts with the baking soda, creating carbon dioxide, which lightens the batter and contributes to the cupcakes’ rise and signature tangy flavor.
- Fill Cupcake Liners: Divide the batter evenly among the prepared cupcake liners, filling each about two-thirds full. Using an ice cream scoop can help ensure even filling and consistent baking times. Don’t overfill, as this can cause the cupcakes to overflow and become misshapen.
- Bake: Bake for 18-20 minutes, or until a toothpick inserted into the center comes out clean. Baking time can vary slightly depending on your oven. Start checking for doneness around 18 minutes. Overbaking will dry out the cupcakes, so it’s better to err on the side of slightly underbaked if unsure.
- Cool Completely: Let the cupcakes cool in the muffin tin for a few minutes before transferring them to a wire rack to cool completely. Cooling in the muffin tin prevents them from being too fragile to handle immediately. Cooling completely before frosting is essential, as warm cupcakes will melt the frosting.
Make the Cream Cheese Frosting:
- Beat Cream Cheese and Butter: In a large bowl, using an electric mixer, beat the softened cream cheese and softened butter together until smooth and creamy. Ensure both are at room temperature to avoid lumps in your frosting. Beat until the mixture is light and fluffy, incorporating air for a smoother texture.
- Add Powdered Sugar and Vanilla: Gradually add the powdered sugar, one cup at a time, beating on low speed until incorporated. Then, increase the speed to medium and beat until the frosting is light and fluffy. Adding powdered sugar gradually prevents it from puffing up in a cloud. Beat until the frosting is smooth, creamy, and holds its shape.
- Add Vanilla Extract: Stir in the vanilla extract. Mix until just combined. Adding vanilla last prevents it from being overmixed and potentially thinning the frosting slightly.
- Frost the Cupcakes: Once the cupcakes are completely cooled, frost them generously with the cream cheese frosting using a spatula or piping bag. Get creative with your frosting techniques! You can swirl it on, pipe it with a decorative tip, or simply spread it evenly.
- Decorate (Optional): Decorate with sprinkles, red velvet crumbs, or fresh berries, if desired. Decorations add a finishing touch and can enhance the visual appeal of your cupcakes.
Nutrition
- Serving Size: one normal portion
- Calories: 250
- Fat: 12g


