
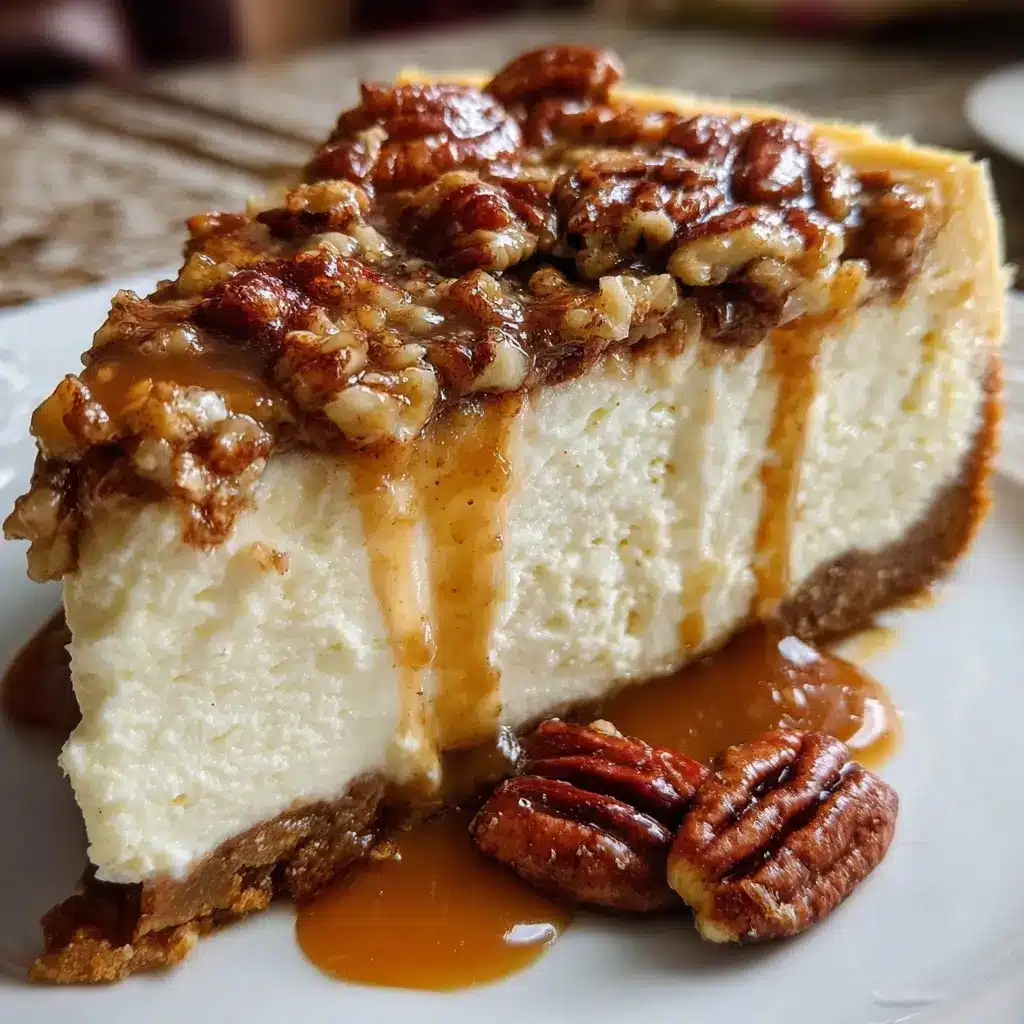

Of all the desserts that grace our family’s holiday table, none disappears quite as quickly as this Simple Maple Pecan Cheesecake. The first time I made it, I was nervous. Cheesecake can be notoriously finicky, a dessert that often feels reserved for professional pastry chefs. But I was determined to capture the cozy, heartwarming flavors of autumn in a single, show-stopping slice. The aroma that filled the kitchen as it baked—a warm, toasty blend of pecans, sweet maple, and rich cream cheese—was the first sign that I was onto something special. When I finally presented it after dinner, a hush fell over the room. That first bite was everything I had hoped for and more. The filling was unbelievably velvety and smooth, with a subtle tang that perfectly balanced the deep, caramel-like sweetness of the maple syrup. But the real star was the contrast: the creamy filling giving way to a buttery, crunchy pecan crust and the delightful texture of the candied pecan topping. My brother, a man of few words, simply closed his eyes and said, “That’s the best dessert you’ve ever made.” Since then, it has become a requested tradition, a symbol of celebration and comfort in our home. It’s the recipe I share with friends who think they can’t make cheesecake, because this one is forgiving, straightforward, and delivers a truly gourmet result without the fuss of a water bath.
Ingredients
Here is everything you will need to create this decadent and surprisingly simple Maple Pecan Cheesecake. Using high-quality, room-temperature ingredients is the first and most crucial step toward a flawless, creamy dessert.
For the Toasted Pecan Crust:
- 2 cups (220g) raw pecan halves: These form the nutty, flavorful base of our crust. Toasting them first is a non-negotiable step that deepens their flavor and brings out their natural oils, creating a richer, more complex foundation for the cheesecake.
- ¼ cup (50g) packed light brown sugar: The molasses content in brown sugar adds a wonderful caramel note that complements the pecans and maple perfectly.
- ½ teaspoon ground cinnamon: A subtle hint of spice that warms up the crust and bridges the flavors between the nutty base and the creamy filling.
- A pinch of salt: Just a small amount is needed to enhance all the other flavors and balance the sweetness of the sugar.
- 6 tablespoons (85g) unsalted butter, melted: This is the binder that holds our crust together. Using unsalted butter allows you to control the final saltiness of the recipe.
For the Maple Cheesecake Filling:
- 32 ounces (904g) full-fat block cream cheese, at room temperature: This is the heart and soul of the cheesecake. It is absolutely essential to use full-fat, block-style cream cheese for the right texture and flavor. Spreadable cream cheese in a tub contains more water and stabilizers, which will result in a soupy, unset cheesecake. Bringing it to true room temperature is the secret to a lump-free, silky-smooth filling.
- 1 ½ cups (300g) granulated sugar: Provides the primary sweetness and structure to the filling, allowing the maple and tangy cream cheese flavors to shine.
- ½ cup (120ml) pure maple syrup, preferably dark robust: This is our star flavor. Use 100% pure maple syrup, not pancake syrup. A dark or “very dark” grade will provide the most intense and authentic maple flavor.
- 4 large eggs, at room temperature: Eggs are crucial for the structure and richness of the cheesecake. When at room temperature, they incorporate more easily and evenly into the batter, reducing the risk of over-mixing and preventing cracks.
- 1 cup (240ml) full-fat sour cream, at room temperature: Sour cream adds a delightful, subtle tang that cuts through the richness of the cream cheese. It also contributes to the incredibly smooth, velvety texture of the final product. Like the other dairy ingredients, it must be at room temperature.
- 2 teaspoons pure vanilla extract: Vanilla enhances all the other flavors in the cheesecake, adding a layer of aromatic depth.
- 2 tablespoons all-purpose flour: A small amount of flour helps to bind the cheesecake, providing a bit of insurance against cracking and ensuring a slightly firmer, yet still creamy, set.
For the Candied Maple Pecan Topping:
- 1 cup (110g) pecan halves: More pecans to echo the flavor of the crust and provide a beautiful, textural garnish.
- 2 tablespoons pure maple syrup: This will coat the pecans, creating a sweet, sticky glaze as they toast.
- 1 tablespoon unsalted butter, melted: Adds richness and helps the pecans to brown and crisp up beautifully without burning.
- A pinch of flaky sea salt: A final sprinkle of flaky salt cuts the sweetness and adds a sophisticated crunch to the topping.
Instructions
Follow these detailed steps carefully to build your perfect Maple Pecan Cheesecake. The process is broken down into four main stages: creating the crust, mixing the filling, baking, and the all-important cooling phase. Patience during the cooling and chilling process is key to a perfect result.
Step 1: Prepare the Oven and Crust
- Preheat and Prepare: Position a rack in the middle of your oven and preheat to 350°F (175°C). Lightly grease the bottom and sides of a 9-inch springform pan with butter or non-stick spray. For extra insurance against leaks and easy removal, you can line the bottom with a circle of parchment paper.
- Toast the Pecans: Spread the 2 cups of pecans for the crust on a baking sheet. Toast in the preheated oven for 6-8 minutes, or until they are fragrant and slightly darkened. Keep a close eye on them as nuts can burn quickly. Let them cool completely.
- Make the Crust Crumbs: Once cooled, place the toasted pecans in the bowl of a food processor. Add the light brown sugar, cinnamon, and salt. Pulse until the pecans are finely ground into a texture resembling coarse sand.
- Form the Crust: Pour the melted butter over the pecan crumb mixture in the food processor and pulse a few more times until the mixture is evenly moistened and resembles wet sand.
- Press into Pan: Transfer the mixture to your prepared springform pan. Using the flat bottom of a measuring cup or your fingers, press the crumbs firmly and evenly onto the bottom and about 1 inch up the sides of the pan.
- Pre-Bake the Crust: Bake the crust for 10 minutes. This step helps to set the crust, keeping it crisp and preventing it from becoming soggy under the filling. Once baked, remove it from the oven and place it on a wire rack to cool slightly while you prepare the filling. Reduce the oven temperature to 325°F (165°C).
Step 2: Craft the Creamy Filling
- Beat the Cream Cheese: In the large bowl of a stand mixer fitted with the paddle attachment, or in a large bowl with a handheld electric mixer, beat the room temperature cream cheese on medium speed for about 2-3 minutes. Scrape down the sides and bottom of the bowl frequently. The goal is to get it completely smooth and free of any lumps before adding other ingredients.
- Add Sugars and Flavor: With the mixer on low speed, gradually add the granulated sugar and all-purpose flour. Mix until just combined. Pour in the pure maple syrup and vanilla extract, mixing on low until incorporated. Remember to scrape the bowl again to ensure everything is evenly mixed.
- Incorporate Eggs: Add the room temperature eggs one at a time, mixing on low speed until the yolk of each egg has just disappeared before adding the next. This is a critical step: Do not over-mix after adding the eggs. Over-mixing incorporates too much air, which causes the cheesecake to puff up in the oven and then fall and crack as it cools.
- Fold in Sour Cream: Add the room temperature sour cream and mix on the lowest possible speed for about 15-20 seconds, just until no white streaks remain. For a final, gentle mix, remove the bowl from the mixer and use a rubber spatula to fold the batter a few times, ensuring you scrape the bottom of the bowl to incorporate anything the mixer may have missed. The final batter should be thick, smooth, and velvety.
Step 3: Baking to Perfection
- Fill the Crust: Pour the cheesecake batter over the pre-baked crust in the springform pan. Use a spatula to spread it into an even layer.
- Bake: Place the cheesecake on the middle rack of your 325°F (165°C) oven. Bake for 60 to 75 minutes. To check for doneness, gently nudge the pan. The edges of the cheesecake should be set and slightly puffed, but the center 2-3 inches should still have a slight “jiggle” to it, similar to Jell-O. It will continue to cook and set from the residual heat as it cools. Over-baking is the number one cause of a dry, cracked cheesecake.
- Prepare the Topping (While Baking): About 15 minutes before the cheesecake is done, prepare the candied pecans. In a small bowl, toss the 1 cup of pecan halves with the 2 tablespoons of maple syrup and 1 tablespoon of melted butter. Spread them in a single layer on a small parchment-lined baking sheet.
- Toast the Topping: Place the pecans in the oven with the cheesecake for the final 10-12 minutes of baking time, or until they are glistening, toasted, and fragrant. Remove them from the oven and let them cool on the baking sheet.
Step 4: The Crucial Cooling and Chilling Process
- Slow Oven Cool: Once the cheesecake is done, turn the oven off completely. Prop the oven door open with a wooden spoon and let the cheesecake cool slowly in the cooling oven for 1 hour. This gradual temperature change is your best defense against cracks.
- Counter Cool: After 1 hour in the oven, carefully remove the cheesecake and place it on a wire rack to cool to room temperature, which will take another 1-2 hours. Before placing it in the fridge, you can run a thin, sharp knife around the edge of the cheesecake to loosen it from the pan, which can also help prevent cracking as it contracts.
- Chill Thoroughly: Once at room temperature, cover the cheesecake loosely with plastic wrap (don’t let the wrap touch the surface) and refrigerate for at least 8 hours, but preferably overnight. This long, cold chill is non-negotiable. It allows the cheesecake to fully set, and the flavors to meld and deepen. A rushed cheesecake will be soft and its flavor will not be fully developed.
- Garnish and Serve: Just before serving, arrange the cooled candied maple pecans on top of the cheesecake. You can place them around the outer edge or cover the entire surface. Sprinkle with a tiny pinch of flaky sea salt for that final pop of flavor.
Nutrition Facts
- Servings: 12-16 slices
- Calories per serving (approx. for 12 servings): 650-700 kcal
While this is an indulgent dessert, understanding its components can be helpful.
- Fat: High in fat, primarily from the full-fat cream cheese, butter, and pecans. This is what gives the cheesecake its signature rich flavor and creamy, melt-in-your-mouth texture.
- Carbohydrates & Sugar: The main sources are the granulated sugar in the filling and the maple syrup. These provide the sweetness that balances the tang of the cream cheese and the nutty crust.
- Protein: Contains a moderate amount of protein from the eggs, cream cheese, and pecans, which contributes to the structure and satisfying nature of the dessert.
- Sodium: A small amount of salt is used in the crust and topping to enhance the overall flavor profile and balance the sweetness.
- Dietary Fiber: The pecans in the crust and topping provide a good source of dietary fiber, adding a beneficial nutritional component to this decadent treat.
Preparation Time
This recipe is a labor of love, but most of the time is hands-off.
- Active Preparation Time: Approximately 30-40 minutes (preparing the crust, mixing the filling, and making the topping).
- Baking Time: 60-75 minutes.
- Cooling & Chilling Time: A minimum of 10 hours is required (1 hour in the oven, 1-2 hours on the counter, and at least 8 hours in the refrigerator). Proper planning is essential; this is the perfect make-ahead dessert for a special occasion.
How to Serve
Presentation can elevate this delicious cheesecake into a truly memorable experience. Here are a few ways to serve it, from simple and rustic to elegant and refined.
- The Classic Slice:
- For perfectly clean slices, use a long, thin knife. Dip the knife in hot water and wipe it completely dry before each and every cut. This melts the cream cheese just enough to allow the knife to glide through cleanly.
- Serve a simple, unadorned slice on a dessert plate to let the flavors of the maple and pecan shine on their own. The candied pecan topping provides all the garnish you truly need.
- Elevated Elegance:
- A Dollop of Cream: Add a generous dollop of freshly whipped, lightly sweetened cream or a tangy crème fraîche next to the slice.
- Extra Maple Drizzle: For true maple lovers, offer a small pitcher of warm, pure maple syrup on the side for guests to drizzle over their slice.
- Caramel Sauce: A drizzle of homemade or high-quality salted caramel sauce over the top can create an even more decadent experience, perfectly complementing the nutty and maple notes.
- Cinnamon Dust: A very light dusting of ground cinnamon over the plate before placing the slice adds a beautiful aroma and visual appeal.
- Occasion-Specific Presentation:
- Thanksgiving/Autumn Feast: Serve alongside a scoop of high-quality vanilla bean ice cream or cinnamon ice cream.
- Christmas or Holiday Party: Garnish the serving platter with fresh cranberries and a few sprigs of rosemary for a festive, colorful touch.
- Dinner Party: Serve smaller, more elegant slices paired with a dessert wine, such as an Icewine or a late-harvest Riesling, whose sweetness and acidity will beautifully complement the cheesecake.
Additional Tips
Master the art of cheesecake making with these eight essential tips. Following them will help you achieve a flawless, professional-quality dessert every time.
1. The Room Temperature Rule is Non-Negotiable: I cannot stress this enough. Your cream cheese, eggs, and sour cream must be at true room temperature. Cold ingredients do not blend smoothly, resulting in a lumpy batter and forcing you to over-mix, which is the primary cause of cracks. Take them out of the fridge at least 2-3 hours before you begin.
2. Don’t Over-mix the Eggs: Once you start adding the eggs, mix on the lowest speed possible and only until each egg is just incorporated. Over-mixing whips air into the batter. This air expands in the heat of the oven, causing the cheesecake to rise up like a soufflé, and then it inevitably collapses and cracks as it cools.
3. Scrape, Scrape, and Scrape Again: Throughout the mixing process, frequently stop the mixer and use a rubber spatula to scrape down the sides, bottom, and beater/paddle. Pockets of unmixed cream cheese or sugar can hide at the bottom of the bowl, leading to an uneven texture in your final cheesecake.
4. Embrace the Slow Cool: The sudden temperature change from a hot oven to a cool kitchen is a major shock to the delicate cheesecake custard, causing it to contract too quickly and crack. Letting the cheesecake cool in the turned-off oven with the door propped open for an hour is the most effective way to prevent this.
5. Don’t Open the Oven Door: While the cheesecake is baking, resist the temptation to open the oven door to peek. Every time you open it, the oven temperature fluctuates dramatically, which can interfere with the even baking process and contribute to cracks or a sunken center.
6. Know When It’s Done: Learning the “jiggle test” is key. The cheesecake is ready when the outer edges are set, but the center 2-3 inches still has a distinct wobble. It will not look fully solid in the middle. This residual jiggle is a sign that it will set up perfectly creamy, not dry and over-baked, as it cools.
7. Plan for the Overnight Chill: There are no shortcuts for the final chill. The minimum 8-hour refrigeration period is essential for the cheesecake to set to the proper consistency for slicing. It also allows the flavors to mature and meld together, resulting in a much more delicious and complex dessert on day two.
8. Springform Pan Prep is Key: While a springform pan is designed for easy removal, a little prep goes a long way. Greasing the pan ensures nothing sticks, and laying a parchment paper circle on the bottom guarantees a flawless release. For this recipe, which doesn’t use a water bath, you don’t need to wrap the outside in foil.
FAQ Section
Here are answers to some of the most common questions about making this Simple Maple Pecan Cheesecake.
1. Why did my cheesecake crack even though I followed the steps?
Cracking is the most common cheesecake woe and usually stems from one of three things: 1) Over-mixing the batter, especially after adding eggs, which incorporates too much air. 2) Over-baking the cheesecake until it’s completely firm in the center, which dries it out. 3) Cooling it too quickly by taking it directly from a hot oven into a cool room. Remember the low-speed mixing, the “jiggle test” for doneness, and the slow cool in the oven to minimize your chances of cracking. But even if it does crack, don’t worry! The delicious candied pecan topping will cover it beautifully, and it will taste just as amazing.
2. Can I use a different type of nut for the crust or topping?
Absolutely! While pecans are classic with maple, this recipe is very adaptable. Walnuts would be an excellent substitute, offering a slightly more earthy flavor. For a different twist, you could even try using toasted almonds or hazelnuts for the crust. Just ensure you use the same weight/volume and toast them first to bring out their flavor.
3. Can I make this cheesecake gluten-free?
Yes, this recipe is very easy to make gluten-free. The only gluten-containing ingredient is the small amount of all-purpose flour in the filling. You can simply substitute it with an equal amount of a gluten-free all-purpose flour blend or cornstarch. The pecan crust is naturally gluten-free.
4. Do I really need to use a springform pan?
A springform pan is highly recommended because its removable sides allow you to present the cheesecake beautifully without having to flip it or dig it out of a traditional pan. If you don’t have one, you could make it in a 9-inch deep-dish pie plate, but you will have to serve it by scooping slices directly from the dish, which won’t be as neat.
5. How far in advance can I make this cheesecake?
This is a perfect make-ahead dessert! You can bake it up to 2-3 days in advance. Keep it covered in the refrigerator. In fact, many people find the flavor and texture are even better on the second or third day. Wait to add the candied pecan topping until just before you plan to serve it to ensure the pecans stay crisp.
6. Can I freeze this Maple Pecan Cheesecake?
Yes, cheesecake freezes remarkably well! Let it cool and chill completely in the refrigerator as directed. Once fully chilled, you can freeze it whole or in individual slices. Wrap it tightly in a layer of plastic wrap, followed by a layer of heavy-duty aluminum foil. It can be frozen for up to 2 months. To thaw, transfer it to the refrigerator (still wrapped) and let it thaw overnight.
7. I don’t have sour cream. Is there a substitute?
For the best results, sour cream is recommended for its specific tang and fat content. However, in a pinch, you can substitute it with an equal amount of full-fat, plain Greek yogurt. This will provide a similar tangy flavor and creamy texture.
8. What’s the difference between pure maple syrup and pancake syrup?
This is a crucial distinction for this recipe. Pure maple syrup is made from only one ingredient: concentrated maple tree sap. It has a complex, rich, and authentic flavor. Pancake syrup, on the other hand, is typically corn syrup with artificial maple flavoring and colorants. Using pancake syrup will result in a cloyingly sweet cheesecake with a synthetic flavor and will not achieve the intended gourmet taste. Always opt for 100% pure maple syrup.
Simple Maple Pecan Cheesecake
Ingredients
Here is everything you will need to create this decadent and surprisingly simple Maple Pecan Cheesecake. Using high-quality, room-temperature ingredients is the first and most crucial step toward a flawless, creamy dessert.
For the Toasted Pecan Crust:
- 2 cups (220g) raw pecan halves: These form the nutty, flavorful base of our crust. Toasting them first is a non-negotiable step that deepens their flavor and brings out their natural oils, creating a richer, more complex foundation for the cheesecake.
- ¼ cup (50g) packed light brown sugar: The molasses content in brown sugar adds a wonderful caramel note that complements the pecans and maple perfectly.
- ½ teaspoon ground cinnamon: A subtle hint of spice that warms up the crust and bridges the flavors between the nutty base and the creamy filling.
- A pinch of salt: Just a small amount is needed to enhance all the other flavors and balance the sweetness of the sugar.
- 6 tablespoons (85g) unsalted butter, melted: This is the binder that holds our crust together. Using unsalted butter allows you to control the final saltiness of the recipe.
For the Maple Cheesecake Filling:
- 32 ounces (904g) full-fat block cream cheese, at room temperature: This is the heart and soul of the cheesecake. It is absolutely essential to use full-fat, block-style cream cheese for the right texture and flavor. Spreadable cream cheese in a tub contains more water and stabilizers, which will result in a soupy, unset cheesecake. Bringing it to true room temperature is the secret to a lump-free, silky-smooth filling.
- 1 ½ cups (300g) granulated sugar: Provides the primary sweetness and structure to the filling, allowing the maple and tangy cream cheese flavors to shine.
- ½ cup (120ml) pure maple syrup, preferably dark robust: This is our star flavor. Use 100% pure maple syrup, not pancake syrup. A dark or “very dark” grade will provide the most intense and authentic maple flavor.
- 4 large eggs, at room temperature: Eggs are crucial for the structure and richness of the cheesecake. When at room temperature, they incorporate more easily and evenly into the batter, reducing the risk of over-mixing and preventing cracks.
- 1 cup (240ml) full-fat sour cream, at room temperature: Sour cream adds a delightful, subtle tang that cuts through the richness of the cream cheese. It also contributes to the incredibly smooth, velvety texture of the final product. Like the other dairy ingredients, it must be at room temperature.
- 2 teaspoons pure vanilla extract: Vanilla enhances all the other flavors in the cheesecake, adding a layer of aromatic depth.
- 2 tablespoons all-purpose flour: A small amount of flour helps to bind the cheesecake, providing a bit of insurance against cracking and ensuring a slightly firmer, yet still creamy, set.
For the Candied Maple Pecan Topping:
- 1 cup (110g) pecan halves: More pecans to echo the flavor of the crust and provide a beautiful, textural garnish.
- 2 tablespoons pure maple syrup: This will coat the pecans, creating a sweet, sticky glaze as they toast.
- 1 tablespoon unsalted butter, melted: Adds richness and helps the pecans to brown and crisp up beautifully without burning.
- A pinch of flaky sea salt: A final sprinkle of flaky salt cuts the sweetness and adds a sophisticated crunch to the topping.
Instructions
Follow these detailed steps carefully to build your perfect Maple Pecan Cheesecake. The process is broken down into four main stages: creating the crust, mixing the filling, baking, and the all-important cooling phase. Patience during the cooling and chilling process is key to a perfect result.
Step 1: Prepare the Oven and Crust
- Preheat and Prepare: Position a rack in the middle of your oven and preheat to 350°F (175°C). Lightly grease the bottom and sides of a 9-inch springform pan with butter or non-stick spray. For extra insurance against leaks and easy removal, you can line the bottom with a circle of parchment paper.
- Toast the Pecans: Spread the 2 cups of pecans for the crust on a baking sheet. Toast in the preheated oven for 6-8 minutes, or until they are fragrant and slightly darkened. Keep a close eye on them as nuts can burn quickly. Let them cool completely.
- Make the Crust Crumbs: Once cooled, place the toasted pecans in the bowl of a food processor. Add the light brown sugar, cinnamon, and salt. Pulse until the pecans are finely ground into a texture resembling coarse sand.
- Form the Crust: Pour the melted butter over the pecan crumb mixture in the food processor and pulse a few more times until the mixture is evenly moistened and resembles wet sand.
- Press into Pan: Transfer the mixture to your prepared springform pan. Using the flat bottom of a measuring cup or your fingers, press the crumbs firmly and evenly onto the bottom and about 1 inch up the sides of the pan.
- Pre-Bake the Crust: Bake the crust for 10 minutes. This step helps to set the crust, keeping it crisp and preventing it from becoming soggy under the filling. Once baked, remove it from the oven and place it on a wire rack to cool slightly while you prepare the filling. Reduce the oven temperature to 325°F (165°C).
Step 2: Craft the Creamy Filling
- Beat the Cream Cheese: In the large bowl of a stand mixer fitted with the paddle attachment, or in a large bowl with a handheld electric mixer, beat the room temperature cream cheese on medium speed for about 2-3 minutes. Scrape down the sides and bottom of the bowl frequently. The goal is to get it completely smooth and free of any lumps before adding other ingredients.
- Add Sugars and Flavor: With the mixer on low speed, gradually add the granulated sugar and all-purpose flour. Mix until just combined. Pour in the pure maple syrup and vanilla extract, mixing on low until incorporated. Remember to scrape the bowl again to ensure everything is evenly mixed.
- Incorporate Eggs: Add the room temperature eggs one at a time, mixing on low speed until the yolk of each egg has just disappeared before adding the next. This is a critical step: Do not over-mix after adding the eggs. Over-mixing incorporates too much air, which causes the cheesecake to puff up in the oven and then fall and crack as it cools.
- Fold in Sour Cream: Add the room temperature sour cream and mix on the lowest possible speed for about 15-20 seconds, just until no white streaks remain. For a final, gentle mix, remove the bowl from the mixer and use a rubber spatula to fold the batter a few times, ensuring you scrape the bottom of the bowl to incorporate anything the mixer may have missed. The final batter should be thick, smooth, and velvety.
Step 3: Baking to Perfection
- Fill the Crust: Pour the cheesecake batter over the pre-baked crust in the springform pan. Use a spatula to spread it into an even layer.
- Bake: Place the cheesecake on the middle rack of your 325°F (165°C) oven. Bake for 60 to 75 minutes. To check for doneness, gently nudge the pan. The edges of the cheesecake should be set and slightly puffed, but the center 2-3 inches should still have a slight “jiggle” to it, similar to Jell-O. It will continue to cook and set from the residual heat as it cools. Over-baking is the number one cause of a dry, cracked cheesecake.
- Prepare the Topping (While Baking): About 15 minutes before the cheesecake is done, prepare the candied pecans. In a small bowl, toss the 1 cup of pecan halves with the 2 tablespoons of maple syrup and 1 tablespoon of melted butter. Spread them in a single layer on a small parchment-lined baking sheet.
- Toast the Topping: Place the pecans in the oven with the cheesecake for the final 10-12 minutes of baking time, or until they are glistening, toasted, and fragrant. Remove them from the oven and let them cool on the baking sheet.
Step 4: The Crucial Cooling and Chilling Process
- Slow Oven Cool: Once the cheesecake is done, turn the oven off completely. Prop the oven door open with a wooden spoon and let the cheesecake cool slowly in the cooling oven for 1 hour. This gradual temperature change is your best defense against cracks.
- Counter Cool: After 1 hour in the oven, carefully remove the cheesecake and place it on a wire rack to cool to room temperature, which will take another 1-2 hours. Before placing it in the fridge, you can run a thin, sharp knife around the edge of the cheesecake to loosen it from the pan, which can also help prevent cracking as it contracts.
- Chill Thoroughly: Once at room temperature, cover the cheesecake loosely with plastic wrap (don’t let the wrap touch the surface) and refrigerate for at least 8 hours, but preferably overnight. This long, cold chill is non-negotiable. It allows the cheesecake to fully set, and the flavors to meld and deepen. A rushed cheesecake will be soft and its flavor will not be fully developed.
- Garnish and Serve: Just before serving, arrange the cooled candied maple pecans on top of the cheesecake. You can place them around the outer edge or cover the entire surface. Sprinkle with a tiny pinch of flaky sea salt for that final pop of flavor.
Nutrition
- Serving Size: one normal portion
- Calories: 700


