Ingredients
Scale
- 4 Large, Very Ripe Bananas: (Essential for natural sweetness and creamy texture. Look for bananas with plenty of brown spots – these are peak sweetness!) Ensure they are peeled before freezing.
- 1 Teaspoon Vanilla Extract: (Optional, but highly recommended) Enhances the flavour profile, giving it a more traditional ice cream taste. Pure vanilla extract yields the best results.
- 12–16 Cookies or Wafers: (Your choice! Graham crackers broken in half, vanilla wafers, chocolate chip cookies, oatmeal cookies, or even gluten-free cookies work wonderfully). Choose cookies that are relatively sturdy to hold the ice cream without crumbling immediately. The number needed depends on the size of your cookies.
Instructions
Making these Simple Banana Ice Cream Sandwiches is a delightful process, broken down into a few key stages. Patience during the freezing steps is crucial for the best results!
Phase 1: Preparing the Banana Base (The “Nice Cream”)
- Peel and Slice: Peel the very ripe bananas. Slice them into uniform coins, about ½ inch (1-1.5 cm) thick. Uniformity helps them freeze evenly and blend more easily.
- Initial Freeze: Line a large baking sheet or tray that will fit comfortably in your freezer with parchment paper or wax paper. This step is vital to prevent the banana slices from sticking to the tray or each other. Arrange the banana slices in a single layer on the prepared baking sheet, ensuring they aren’t touching too much.
- Freeze Until Solid: Place the baking sheet with the banana slices into the freezer. Freeze for at least 2-4 hours, or preferably overnight, until the banana slices are completely frozen solid. They should be hard to the touch. This thorough freezing is the secret to achieving a creamy, ice-cream-like texture rather than a smoothie consistency. Don’t rush this step!
Phase 2: Making the Banana Nice Cream
- Prepare the Blender/Processor: Once the banana slices are frozen solid, remove them from the freezer. Let them sit at room temperature for just 2-5 minutes. This slight thaw makes them slightly easier for your blender or food processor blades to break down without putting excessive strain on the motor.
- Blend: Transfer the slightly thawed, frozen banana slices into the bowl of a high-speed blender or a sturdy food processor. If using, add the teaspoon of vanilla extract now.
- Pulse and Blend: Secure the lid tightly. Begin by pulsing the machine a few times to break up the larger chunks of frozen banana. Then, switch to a continuous blend. The mixture will likely look crumbly or like Dippin’ Dots at first – this is normal! Keep blending.
- Scrape Down Sides: You will likely need to stop the machine periodically and use a spatula to scrape down the sides of the bowl, pushing the mixture back towards the blades. This ensures everything gets blended evenly.
- Achieve Creaminess: Continue blending until the mixture transforms. It will go from crumbly, to slightly gooey, and finally, into a smooth, creamy, soft-serve ice cream consistency. Be patient; this can take anywhere from 2 to 5 minutes depending on the power of your machine. Avoid over-blending, as the friction can start to melt the nice cream too much. Stop as soon as it’s smooth and creamy.
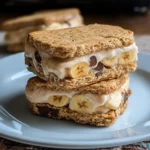
Phase 3: Assembling the Sandwiches
- Prepare Your Workspace: Work quickly during this phase, as the banana nice cream will start to melt relatively fast. Have your chosen cookies ready. Lay out half of the cookies, bottom-side up, on a clean baking sheet lined with fresh parchment or wax paper.
- Scoop the Nice Cream: Using an ice cream scoop or a large spoon, place a generous scoop of the freshly blended banana nice cream onto each waiting cookie half. Aim for a scoop size that fits well within the cookie’s diameter.
- Top and Press: Gently place the remaining cookie halves on top of the nice cream scoops, top-side up. Press down very gently – just enough to spread the nice cream slightly towards the edges and adhere the top cookie. Don’t press too hard, or the nice cream will squish out excessively, and you might break the cookies.
- Smooth Edges (Optional): If desired, you can use a small offset spatula or the back of a spoon to smooth the edges of the nice cream filling for a neater appearance.
Phase 4: Final Freeze
- Freeze Until Firm: Carefully place the baking sheet with the assembled banana ice cream sandwiches back into the freezer.
- Freeze Solid: Allow the sandwiches to freeze for at least 1-2 hours, or until the banana nice cream filling is firm to the touch and the sandwiches are solid enough to handle without falling apart or melting instantly. This final freezing step is crucial for a proper ice cream sandwich experience.
- Serve or Store: Once fully firm, the Simple Banana Ice Cream Sandwiches are ready to be enjoyed immediately! If not serving right away, wrap them individually in plastic wrap or place them in an airtight freezer-safe container for longer storage (see FAQ for storage details).
Nutrition
- Serving Size: one normal portion
- Calories: 250