
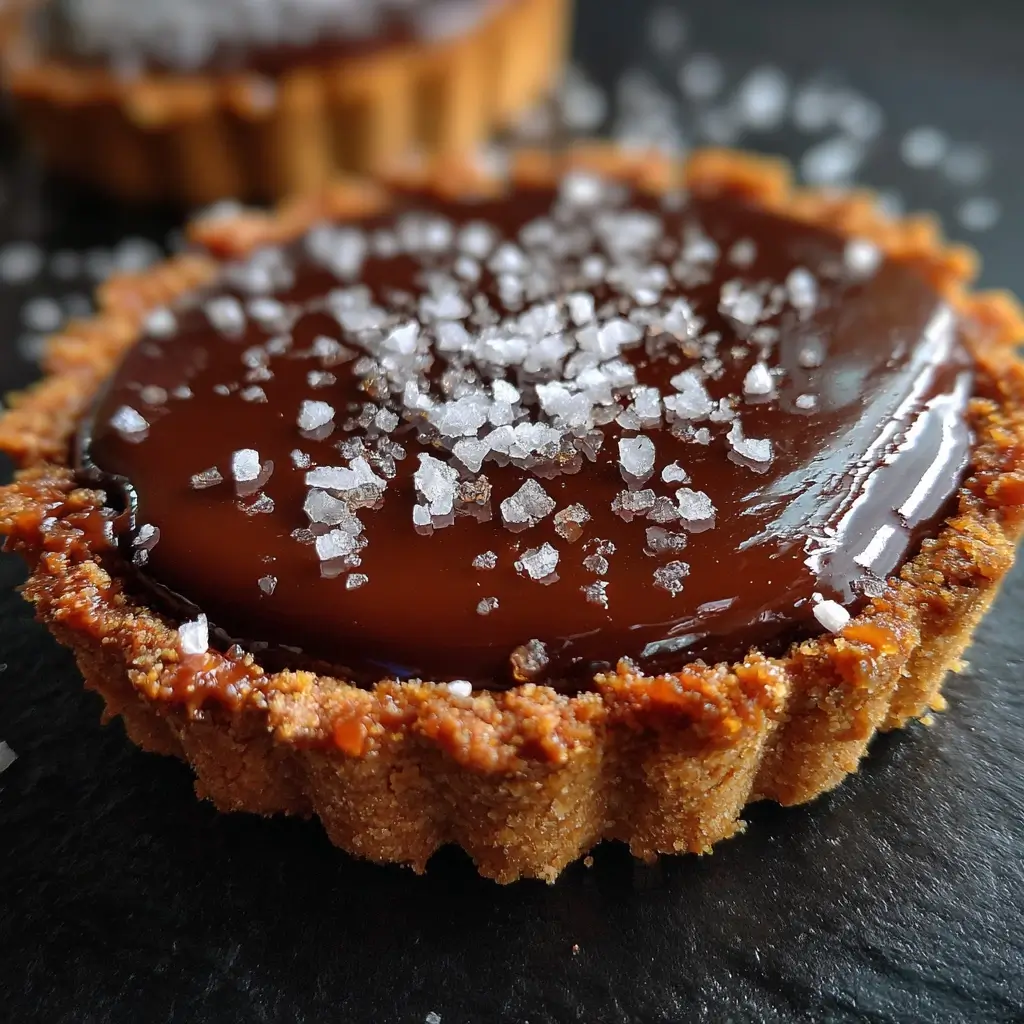

Of all the desserts that have graced my family’s table, none command the silence of pure, unadulterated bliss quite like this Rich Salted Caramel Chocolate Tart. I first made it for a milestone anniversary dinner, a gamble considering I was serving it to a family of discerning sweet tooths, including my notoriously hard-to-please father-in-law. The moment of truth arrived after the main course. I brought out the tart, its surface a glossy, dark mirror, a delicate sprinkle of flaky sea salt catching the light. As I sliced into it, the crisp chocolate crust gave way with a satisfying snap, revealing the luscious layers of gooey caramel and silky ganache. The first bites were taken in quiet contemplation, which soon erupted into a chorus of “wows” and “this is incredible.” My father-in-law, who usually offers polite but reserved compliments, looked up from his plate, fork poised, and declared it the best dessert he’d had in a decade. Since that day, this tart has become our official celebration dessert. It’s the grand finale for birthdays, the centerpiece for holiday gatherings, and the requested treat for any and every special occasion. It’s more than just a recipe; it’s a showstopper, a conversation starter, and a guaranteed creator of delicious memories. This is the dessert you make when you want to impress, when you want to indulge, and when you want to give a gift of pure, edible luxury.
Ingredients
Here is the curated list of ingredients required to create this masterpiece. Using high-quality components, especially for the chocolate and butter, will elevate the final result from simply good to absolutely unforgettable.
For the Chocolate Shortbread Crust:
- 1 ½ cups (180g) All-Purpose Flour: The structural foundation of our crisp and buttery crust.
- ⅓ cup (40g) Unsweetened Cocoa Powder: Provides a deep, rich chocolate flavor that perfectly complements the fillings.
- ⅔ cup (135g) Granulated Sugar: Adds the necessary sweetness and contributes to the crust’s tender, crumbly texture.
- ½ teaspoon Fine Sea Salt: Balances the sweetness and enhances the chocolate notes.
- ¾ cup (170g) Cold Unsalted Butter, cubed: The key to a flaky, shortbread-style crust. Keeping it cold is crucial for the perfect texture.
- 1 Large Egg Yolk: Acts as a binder, enriching the dough and adding to its structural integrity.
- 1-2 tablespoons Ice Water: Used sparingly to bring the dough together if it’s too dry.
For the Rich Salted Caramel Filling:
- 1 cup (200g) Granulated Sugar: The base of our caramel, which will be carefully caramelized to a beautiful amber color.
- ¼ cup (60ml) Water: Helps the sugar dissolve evenly at the beginning, preventing crystallization.
- ½ cup (120ml) Heavy Cream, at room temperature: Adds richness and creates the signature creamy, flowing texture of the caramel.
- 6 tablespoons (85g) Unsalted Butter, at room temperature, cubed: Enriches the caramel, giving it a velvety mouthfeel and incredible flavor.
- 1 ½ teaspoons Flaky Sea Salt (like Maldon): The star of this layer. The large flakes provide a delightful crunch and a burst of salinity to cut through the richness.
For the Luxurious Chocolate Ganache:
- 8 oz (225g) High-Quality Dark or Semisweet Chocolate (60-70% cacao), finely chopped: The soul of the ganache. Using a premium chocolate bar (not chips) ensures a smooth, glossy, and intensely flavorful finish.
- ¾ cup (180ml) Heavy Cream: The liquid component that melts the chocolate and transforms it into a silky, pourable ganache.
- 2 tablespoons (28g) Unsalted Butter, at room temperature: Adds a final touch of richness and a beautiful, professional-looking sheen to the ganache.
- 1 teaspoon Vanilla Extract: A subtle background note that enhances and rounds out the deep chocolate flavor.
- Extra Flaky Sea Salt, for garnish: The final flourish that signals the decadent flavor profile within.
Instructions
Follow these detailed steps carefully to assemble your tart. The process is broken down into four key stages: creating the crust, crafting the caramel, making the ganache, and final assembly. Patience is key, especially during the chilling stages.
Part 1: Making the Chocolate Shortbread Crust
- Combine Dry Ingredients: In a large bowl or the bowl of a food processor, whisk together the all-purpose flour, unsweetened cocoa powder, granulated sugar, and fine sea salt until well combined.
- Cut in the Butter: Add the cubes of cold butter to the dry ingredients. Using a pastry blender, your fingertips, or by pulsing in the food processor, cut the butter into the flour mixture. Continue until the mixture resembles coarse, sandy breadcrumbs with a few pea-sized pieces of butter remaining. These small butter pockets are what create the tender, flaky texture.
- Add the Binder: In a small bowl, lightly whisk the egg yolk. Add it to the flour-butter mixture. Mix (or pulse) until the dough just starts to come together in large clumps. If the dough seems too dry and crumbly, add one tablespoon of ice water at a time until it holds together when pressed. Be careful not to add too much water or overwork the dough, as this can make the crust tough.
- Form and Chill the Dough: Turn the dough out onto a clean surface and gently knead it once or twice to bring it together into a cohesive disc. Wrap the disc tightly in plastic wrap and refrigerate for at least 1 hour, or up to 2 days. Chilling the dough is essential; it allows the gluten to relax and the butter to firm up, which prevents the crust from shrinking during baking.
- Press into the Tart Pan: Preheat your oven to 375°F (190°C). Unwrap the chilled dough and press it evenly into the bottom and up the sides of a 9-inch tart pan with a removable bottom. Use the flat bottom of a measuring cup to help press the dough firmly and create an even thickness. Trim any excess dough from the rim.
- Blind Bake the Crust: Prick the bottom of the crust all over with a fork. This, known as “docking,” allows steam to escape and prevents the base from puffing up. Line the tart shell with parchment paper and fill it with pie weights, dried beans, or uncooked rice. This process, called “blind baking,” ensures the crust is fully cooked and crisp before the wet filling is added.
- Complete the Bake: Bake for 15 minutes. Carefully remove the parchment paper and weights. Return the crust to the oven and bake for another 10-12 minutes, or until the crust looks dry, firm, and matte. Let the baked crust cool completely in the pan on a wire rack.
Part 2: Crafting the Silky Salted Caramel
- Start the Caramel: In a medium, heavy-bottomed saucepan, combine the 1 cup of granulated sugar and ¼ cup of water. Stir gently just until the sugar is saturated. Place the saucepan over medium heat.
- Cook to Amber: Bring the mixture to a boil without stirring. You can gently swirl the pan occasionally to ensure even cooking. Let it bubble away until it turns a deep amber color, like a copper penny. This can take 5-10 minutes. Watch it very carefully, as caramel can go from perfect to burnt in a matter of seconds.
- Stop the Cooking: As soon as the caramel reaches the desired color, immediately remove it from the heat. Carefully and slowly pour in the room-temperature heavy cream. The mixture will bubble up violently, so stand back and be cautious. Whisk continuously until the bubbling subsides and the mixture is smooth.
- Enrich the Caramel: Whisk in the cubed, room-temperature butter until it is fully melted and incorporated. Finally, stir in the 1 ½ teaspoons of flaky sea salt.
- Fill the Crust: Pour the warm salted caramel into the completely cooled chocolate crust. Tilt the pan to spread it into an even layer. Place the tart in the refrigerator to chill for at least 1 hour, or until the caramel is set and firm to the touch.
Part 3: Creating the Luxurious Chocolate Ganache
- Prepare the Chocolate: Place the finely chopped dark or semisweet chocolate into a medium heatproof bowl. The finer you chop the chocolate, the more quickly and evenly it will melt.
- Heat the Cream: In a small saucepan, heat the ¾ cup of heavy cream over medium heat until it just begins to simmer around the edges. Do not let it come to a full, rolling boil.
- Combine and Rest: Pour the hot cream directly over the chopped chocolate. Let it sit, undisturbed, for 5 minutes. This allows the heat from the cream to gently melt the chocolate without scorching it.
- Whisk to Perfection: After 5 minutes, begin whisking from the center of the bowl in small, tight circles, gradually moving outwards. Continue to whisk until the mixture is completely smooth, emulsified, and glossy.
- Add Final Touches: Whisk in the room-temperature butter and the vanilla extract until fully incorporated. The butter adds an extra layer of richness and that beautiful, mirror-like shine.
Part 4: Assembling and Chilling the Tart
- Top the Tart: Retrieve the chilled tart from the refrigerator. The caramel layer should be firm. Gently pour the warm (but not hot) chocolate ganache over the set caramel layer.
- Smooth the Surface: Use an offset spatula or the back of a spoon to gently spread the ganache into a smooth, even layer that covers the entire surface of the tart.
- The Final Chill: Carefully place the tart back into the refrigerator. Let it chill for at least 4 hours, but preferably overnight. This extended chilling time allows the ganache to fully set to a firm, fudge-like consistency, making it easy to slice.
- Garnish and Serve: Just before serving, sprinkle the top of the tart with a generous pinch of flaky sea salt. To serve, let the tart sit at room temperature for 15-20 minutes to slightly soften, then use a sharp, hot knife to make clean slices.
Nutrition Facts
- Servings: 12-16 slices
- Calories per Serving (approximate): 450-500 kcal
- Total Fat: A significant source of richness, primarily from the butter, heavy cream, and chocolate. This contributes to the tart’s decadent mouthfeel and satisfying nature.
- Saturated Fat: As an indulgent dessert, this tart is high in saturated fat from dairy ingredients. It’s best enjoyed as a special treat in moderation.
- Carbohydrates: The primary source of energy, coming from the flour in the crust and the sugar in all three layers.
- Sugar: This is a sweet, dessert-focused recipe. The sugar provides the classic sweet flavor in the crust, caramel, and ganache.
- Sodium: The deliberate addition of flaky sea salt creates the signature “salted caramel” profile, balancing the intense sweetness and enhancing the deep chocolate flavors.
Preparation Time
This tart is a project of love, requiring patience and attention to chilling times for the best results.
- Active Time: Approximately 45-60 minutes (making dough, cooking caramel, preparing ganache).
- Chilling & Baking Time: Approximately 6-7 hours (1 hour for dough chill, 25 minutes for baking, 1 hour for caramel set, at least 4 hours for final ganache set).
- Total Time: Approximately 7-8 hours. It is highly recommended to make this tart a day ahead of serving.
How to Serve
Presenting this tart is almost as rewarding as eating it. Its sophisticated appearance requires minimal effort to look stunning on the plate.
- The Perfect Slice:
- For the cleanest cuts, use a long, thin, sharp knife.
- Dip the knife in hot water and wipe it dry between each and every slice. This melts the chocolate and caramel just enough to glide through without smearing, ensuring each piece has perfectly defined layers.
- Temperature Matters:
- Serve the tart slightly chilled, but not ice-cold. Let it sit at room temperature for about 15-20 minutes before slicing. This allows the ganache to soften slightly to a fudgy consistency and the caramel to become perfectly gooey.
- Elegant Garnishes:
- Flaky Sea Salt: A final, generous sprinkle just before serving is non-negotiable. It adds visual appeal and the final flavor pop.
- Chocolate Shavings: Use a vegetable peeler on the side of a bar of good-quality chocolate to create delicate curls.
- Cocoa Powder: A light dusting of unsweetened cocoa powder adds a dramatic, velvety finish.
- Fresh Berries: A few fresh raspberries or a sliced strawberry on the side can provide a wonderful tartness and a splash of color to cut through the richness.
- Delicious Pairings:
- Cream: A dollop of unsweetened or very lightly sweetened whipped cream or a quenelle of crème fraîche is a classic accompaniment, providing a light, airy contrast.
- Ice Cream: A small scoop of high-quality vanilla bean or coffee ice cream creates a delightful temperature and texture contrast.
- Coffee & Tea: Serve alongside a strong espresso, a bold black coffee, or a robust black tea like Earl Grey to complement the deep chocolate and caramel notes.
- Wine: For a sophisticated pairing, consider a dessert wine like a Tawny Port or a sweet Riesling.
Additional Tips
Master this recipe and avoid common pitfalls with these eight essential tips for tart-making success.
- Don’t Overwork the Crust Dough: The number one rule for a tender, melt-in-your-mouth shortbread crust is to handle the dough as little as possible. Overworking develops gluten, which results in a tough, chewy crust instead of a crisp, crumbly one. Mix only until the ingredients are just combined.
- Caramel Confidence with a Thermometer: While you can make caramel by eye, using a candy thermometer removes all the guesswork and ensures consistent results every time. Cook the sugar and water mixture until it reaches 340-350°F (170-175°C) for the perfect deep amber color and flavor without the risk of burning.
- The Secret to Glossy Ganache: For a ganache with a beautiful, mirror-like shine, ensure your butter is at room temperature before you whisk it in. Adding cold butter can cause the ganache to seize or become dull. Also, resist the urge to whisk vigorously; gentle, steady stirring is all that’s needed to emulsify the mixture.
- Quality Ingredients are Non-Negotiable: This tart has very few ingredients, so the quality of each one shines through. Use a European-style butter with a higher fat content for a richer crust and caramel. Most importantly, use a high-quality chocolate bar (60-70% cacao) that you would enjoy eating on its own. Chocolate chips contain stabilizers that prevent them from melting smoothly, which can result in a grainy ganache.
- Embrace the Make-Ahead Method: This is the perfect dessert to make ahead of a dinner party, reducing stress on the day of the event. You can bake the crust up to two days in advance and store it in an airtight container at room temperature. The entire tart can be assembled and refrigerated the day before serving, which actually improves the flavor as the layers meld together.
- Temperature is Everything: Pay close attention to the temperature cues in the recipe. The butter for the crust must be cold. The cream and butter for the caramel should be at room temperature to prevent the hot sugar from seizing. The ganache should be warm, not hot, when poured over the set caramel. Following these temperature guidelines is crucial for achieving the correct textures.
- Slicing Like a Professional: The hot knife trick mentioned in the serving section is the single best tip for beautiful slices. If your tart is very firm, let the hot, clean knife rest on the ganache for a second before pressing down firmly to cut. This small action makes a huge visual difference.
- Customize Your Creation: Don’t be afraid to add your own twist. Infuse the ganache cream with a tablespoon of espresso powder for a mocha flavor. Add a teaspoon of bourbon or dark rum to the caramel for extra warmth. You could even sprinkle a layer of toasted, chopped pecans or hazelnuts on top of the caramel before adding the ganache for added crunch and nutty flavor.
FAQ Section
Here are answers to some of the most common questions about making this Rich Salted Caramel Chocolate Tart.
1. My caramel crystallized and became grainy. What went wrong?
Crystallization is the biggest fear when making caramel. It usually happens for two reasons: stray sugar crystals on the side of the pan, or agitation. To prevent it, ensure your saucepan is perfectly clean. When the sugar and water first combine, you can stir, but once it comes to a boil, stop stirring completely. If you see crystals forming on the sides of the pan, use a pastry brush dipped in water to gently wash them down. Swirling the pan is okay, but vigorous stirring is the enemy.
2. Can I use milk chocolate or white chocolate for the ganache?
You can, but it will significantly change the flavor profile and require different ratios. This recipe is balanced for the bitterness of dark chocolate to cut through the sweet caramel. If you use milk chocolate, the tart will be much sweeter. If you use white chocolate, the flavor will be more vanilla and cream-based. For both, you would need to adjust the chocolate-to-cream ratio (use more chocolate and less cream) as they have a higher milk/sugar content and are softer.
3. How do I store the finished tart and how long will it last?
The tart must be stored in the refrigerator due to the dairy in the caramel and ganache. Store it in an airtight container or cover it loosely with plastic wrap (try not to let the wrap touch the surface). It will keep well for up to 4-5 days. The crust will soften slightly over time, but the flavors will remain delicious.
4. Can I make this recipe gluten-free?
Absolutely. The chocolate shortbread crust can be easily adapted for a gluten-free diet. Simply substitute the all-purpose flour with a high-quality, 1-to-1 gluten-free baking flour blend that contains xanthan gum. The rest of the recipe ingredients and instructions remain the same.
5. What is the difference between fine sea salt and flaky sea salt, and can I interchange them?
They serve different purposes. Fine sea salt is used within the crust and dissolves completely to season the dough evenly. Flaky sea salt (like Maldon) is a finishing salt. Its large, pyramid-shaped crystals do not dissolve easily, providing a textural crunch and a concentrated burst of saltiness when you bite into them. Do not use flaky salt inside the caramel; use it only for garnish. If you only have table salt, use slightly less than the recipe calls for.
6. Help! My ganache split and looks oily! Can I fix it?
A split or “broken” ganache happens when the emulsion of fat and liquid separates. This can be caused by the cream being too hot or by over-mixing. To fix it, gently warm 1-2 tablespoons of milk or more heavy cream. Add the split ganache to the warm milk, one spoonful at a time, whisking gently and constantly until it comes back together into a smooth, homogenous mixture.
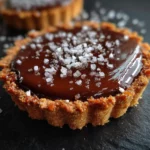
7. Can I make this in individual tartlet pans?
Yes, this recipe works beautifully for individual tartlets and they make for a stunning presentation. A 9-inch tart recipe will typically yield 6-8 four-inch tartlets. The process is the same, but the baking time for the smaller crusts will be shorter, around 10-12 minutes total. Keep a close eye on them to prevent burning.
8. Is a food processor necessary for the crust?
Not at all! A food processor makes the job faster, but the crust can be made beautifully by hand. Use a pastry blender (a handheld tool with wires or blades) to cut the butter into the flour. Alternatively, you can use two knives in a crisscross motion or simply your fingertips to quickly rub the cold butter into the dry ingredients until you achieve that sandy, crumbly texture.
Rich Salted Caramel Chocolate Tart
Ingredients
Here is the curated list of ingredients required to create this masterpiece. Using high-quality components, especially for the chocolate and butter, will elevate the final result from simply good to absolutely unforgettable.
For the Chocolate Shortbread Crust:
- 1 ½ cups (180g) All-Purpose Flour: The structural foundation of our crisp and buttery crust.
- ⅓ cup (40g) Unsweetened Cocoa Powder: Provides a deep, rich chocolate flavor that perfectly complements the fillings.
- ⅔ cup (135g) Granulated Sugar: Adds the necessary sweetness and contributes to the crust’s tender, crumbly texture.
- ½ teaspoon Fine Sea Salt: Balances the sweetness and enhances the chocolate notes.
- ¾ cup (170g) Cold Unsalted Butter, cubed: The key to a flaky, shortbread-style crust. Keeping it cold is crucial for the perfect texture.
- 1 Large Egg Yolk: Acts as a binder, enriching the dough and adding to its structural integrity.
- 1–2 tablespoons Ice Water: Used sparingly to bring the dough together if it’s too dry.
For the Rich Salted Caramel Filling:
- 1 cup (200g) Granulated Sugar: The base of our caramel, which will be carefully caramelized to a beautiful amber color.
- ¼ cup (60ml) Water: Helps the sugar dissolve evenly at the beginning, preventing crystallization.
- ½ cup (120ml) Heavy Cream, at room temperature: Adds richness and creates the signature creamy, flowing texture of the caramel.
- 6 tablespoons (85g) Unsalted Butter, at room temperature, cubed: Enriches the caramel, giving it a velvety mouthfeel and incredible flavor.
- 1 ½ teaspoons Flaky Sea Salt (like Maldon): The star of this layer. The large flakes provide a delightful crunch and a burst of salinity to cut through the richness.
For the Luxurious Chocolate Ganache:
- 8 oz (225g) High-Quality Dark or Semisweet Chocolate (60-70% cacao), finely chopped: The soul of the ganache. Using a premium chocolate bar (not chips) ensures a smooth, glossy, and intensely flavorful finish.
- ¾ cup (180ml) Heavy Cream: The liquid component that melts the chocolate and transforms it into a silky, pourable ganache.
- 2 tablespoons (28g) Unsalted Butter, at room temperature: Adds a final touch of richness and a beautiful, professional-looking sheen to the ganache.
- 1 teaspoon Vanilla Extract: A subtle background note that enhances and rounds out the deep chocolate flavor.
- Extra Flaky Sea Salt, for garnish: The final flourish that signals the decadent flavor profile within.
Instructions
Follow these detailed steps carefully to assemble your tart. The process is broken down into four key stages: creating the crust, crafting the caramel, making the ganache, and final assembly. Patience is key, especially during the chilling stages.
Part 1: Making the Chocolate Shortbread Crust
- Combine Dry Ingredients: In a large bowl or the bowl of a food processor, whisk together the all-purpose flour, unsweetened cocoa powder, granulated sugar, and fine sea salt until well combined.
- Cut in the Butter: Add the cubes of cold butter to the dry ingredients. Using a pastry blender, your fingertips, or by pulsing in the food processor, cut the butter into the flour mixture. Continue until the mixture resembles coarse, sandy breadcrumbs with a few pea-sized pieces of butter remaining. These small butter pockets are what create the tender, flaky texture.
- Add the Binder: In a small bowl, lightly whisk the egg yolk. Add it to the flour-butter mixture. Mix (or pulse) until the dough just starts to come together in large clumps. If the dough seems too dry and crumbly, add one tablespoon of ice water at a time until it holds together when pressed. Be careful not to add too much water or overwork the dough, as this can make the crust tough.
- Form and Chill the Dough: Turn the dough out onto a clean surface and gently knead it once or twice to bring it together into a cohesive disc. Wrap the disc tightly in plastic wrap and refrigerate for at least 1 hour, or up to 2 days. Chilling the dough is essential; it allows the gluten to relax and the butter to firm up, which prevents the crust from shrinking during baking.
- Press into the Tart Pan: Preheat your oven to 375°F (190°C). Unwrap the chilled dough and press it evenly into the bottom and up the sides of a 9-inch tart pan with a removable bottom. Use the flat bottom of a measuring cup to help press the dough firmly and create an even thickness. Trim any excess dough from the rim.
- Blind Bake the Crust: Prick the bottom of the crust all over with a fork. This, known as “docking,” allows steam to escape and prevents the base from puffing up. Line the tart shell with parchment paper and fill it with pie weights, dried beans, or uncooked rice. This process, called “blind baking,” ensures the crust is fully cooked and crisp before the wet filling is added.
- Complete the Bake: Bake for 15 minutes. Carefully remove the parchment paper and weights. Return the crust to the oven and bake for another 10-12 minutes, or until the crust looks dry, firm, and matte. Let the baked crust cool completely in the pan on a wire rack.
Part 2: Crafting the Silky Salted Caramel
- Start the Caramel: In a medium, heavy-bottomed saucepan, combine the 1 cup of granulated sugar and ¼ cup of water. Stir gently just until the sugar is saturated. Place the saucepan over medium heat.
- Cook to Amber: Bring the mixture to a boil without stirring. You can gently swirl the pan occasionally to ensure even cooking. Let it bubble away until it turns a deep amber color, like a copper penny. This can take 5-10 minutes. Watch it very carefully, as caramel can go from perfect to burnt in a matter of seconds.
- Stop the Cooking: As soon as the caramel reaches the desired color, immediately remove it from the heat. Carefully and slowly pour in the room-temperature heavy cream. The mixture will bubble up violently, so stand back and be cautious. Whisk continuously until the bubbling subsides and the mixture is smooth.
- Enrich the Caramel: Whisk in the cubed, room-temperature butter until it is fully melted and incorporated. Finally, stir in the 1 ½ teaspoons of flaky sea salt.
- Fill the Crust: Pour the warm salted caramel into the completely cooled chocolate crust. Tilt the pan to spread it into an even layer. Place the tart in the refrigerator to chill for at least 1 hour, or until the caramel is set and firm to the touch.
Part 3: Creating the Luxurious Chocolate Ganache
- Prepare the Chocolate: Place the finely chopped dark or semisweet chocolate into a medium heatproof bowl. The finer you chop the chocolate, the more quickly and evenly it will melt.
- Heat the Cream: In a small saucepan, heat the ¾ cup of heavy cream over medium heat until it just begins to simmer around the edges. Do not let it come to a full, rolling boil.
- Combine and Rest: Pour the hot cream directly over the chopped chocolate. Let it sit, undisturbed, for 5 minutes. This allows the heat from the cream to gently melt the chocolate without scorching it.
- Whisk to Perfection: After 5 minutes, begin whisking from the center of the bowl in small, tight circles, gradually moving outwards. Continue to whisk until the mixture is completely smooth, emulsified, and glossy.
- Add Final Touches: Whisk in the room-temperature butter and the vanilla extract until fully incorporated. The butter adds an extra layer of richness and that beautiful, mirror-like shine.
Part 4: Assembling and Chilling the Tart
- Top the Tart: Retrieve the chilled tart from the refrigerator. The caramel layer should be firm. Gently pour the warm (but not hot) chocolate ganache over the set caramel layer.
- Smooth the Surface: Use an offset spatula or the back of a spoon to gently spread the ganache into a smooth, even layer that covers the entire surface of the tart.
- The Final Chill: Carefully place the tart back into the refrigerator. Let it chill for at least 4 hours, but preferably overnight. This extended chilling time allows the ganache to fully set to a firm, fudge-like consistency, making it easy to slice.
- Garnish and Serve: Just before serving, sprinkle the top of the tart with a generous pinch of flaky sea salt. To serve, let the tart sit at room temperature for 15-20 minutes to slightly soften, then use a sharp, hot knife to make clean slices.
Nutrition
- Serving Size: one normal portion
- Calories: 500


