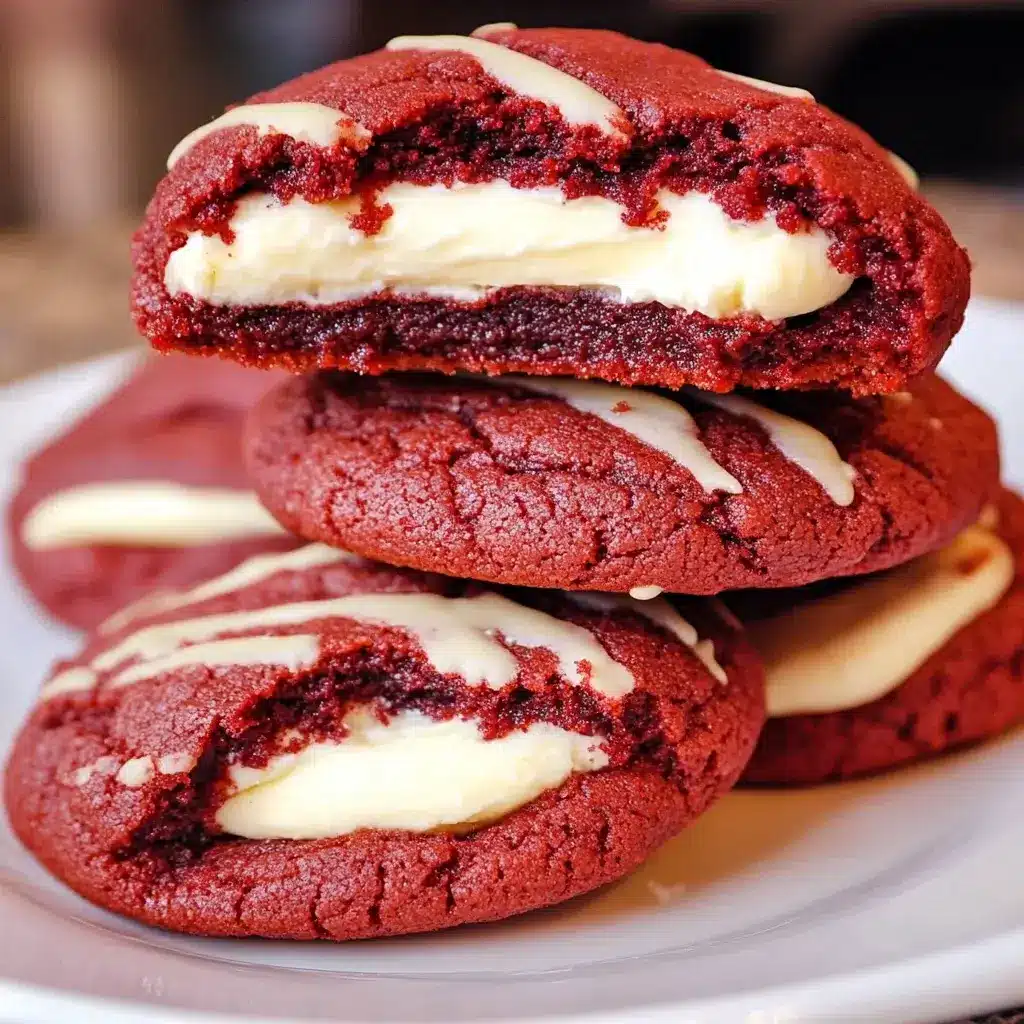

It’s funny how some recipes just have a way of becoming instant family favorites. These Red Velvet Cream Cheese Stuffed Cookies? They are that recipe in our house. From the moment the vibrant red dough comes together to the satisfyingly gooey cream cheese center, there’s something undeniably special about them. My kids, who are usually picky eaters, devour these cookies faster than I can bake them. And honestly, I don’t blame them! The slight tang of the red velvet, combined with the sweet and creamy filling, is just pure cookie bliss. They are perfect for holidays, potlucks, or just a special weekend treat. Trust me, once you try these, they’ll become a staple in your baking repertoire too.
Ingredients for Red Velvet Cream Cheese Stuffed Cookies
Here’s everything you’ll need to create these irresistible Red Velvet Cream Cheese Stuffed Cookies, broken down for easy understanding:
- All-Purpose Flour: The foundation of our cookies, providing structure and chewiness.
- Cocoa Powder: Just a touch! Unsweetened cocoa powder gives that signature red velvet hint of chocolate flavor and deepens the color.
- Baking Soda: Our leavening agent, helping the cookies rise and become light and airy.
- Salt: Enhances the flavors of all the other ingredients and balances the sweetness.
- Unsalted Butter: Provides richness, flavor, and that melt-in-your-mouth texture. Softened butter is key for creaming.
- Granulated Sugar: Sweetens the cookies and contributes to their tender texture.
- Brown Sugar: Adds moisture, chewiness, and a hint of molasses flavor that complements the red velvet.
- Eggs: Binds the ingredients together and adds richness and structure.
- Vanilla Extract: Enhances the overall flavor profile, adding warmth and depth.
- Buttermilk: The secret ingredient to red velvet! Buttermilk adds a slight tang and tenderness to the cookies, activating the baking soda for a perfect rise.
- Red Food Coloring: Essential for that iconic red velvet color. Use gel food coloring for the most vibrant and concentrated color.
- Cream Cheese: The star of our filling! Use full-fat cream cheese for the best flavor and creamy texture. Softened cream cheese is crucial for a smooth filling.
- Powdered Sugar: Sweetens and thickens the cream cheese filling to the perfect consistency.
Step-by-Step Instructions for Red Velvet Cream Cheese Stuffed Cookies
Follow these detailed instructions to bake perfect Red Velvet Cream Cheese Stuffed Cookies every time:
Part 1: Making the Red Velvet Cookie Dough
- Preheat Oven and Prepare Baking Sheets: Preheat your oven to 350°F (175°C). Line baking sheets with parchment paper or silicone baking mats. This prevents sticking and ensures easy cleanup.
- Whisk Dry Ingredients: In a medium bowl, whisk together the all-purpose flour, cocoa powder, baking soda, and salt. Whisking ensures everything is evenly distributed and prevents clumps of cocoa powder or baking soda in your dough. Set aside these dry ingredients.
- Cream Butter and Sugars: In a large bowl or the bowl of a stand mixer fitted with the paddle attachment, cream together the softened unsalted butter, granulated sugar, and brown sugar until light and fluffy. This process incorporates air into the butter and sugar, which is essential for light and tender cookies. Cream for 2-3 minutes until the mixture is noticeably paler and fluffier.
- Incorporate Eggs and Vanilla: Beat in the eggs one at a time, mixing well after each addition. Then, stir in the vanilla extract. Make sure each egg is fully incorporated before adding the next to maintain a smooth batter.
- Combine Wet Ingredients: In a separate small bowl, whisk together the buttermilk and red food coloring until well combined and the color is uniform. This ensures the red color is evenly distributed throughout the dough.
- Alternate Wet and Dry Ingredients: Gradually add the dry ingredients to the wet ingredients in three additions, alternating with the buttermilk mixture, beginning and ending with the dry ingredients. Mix on low speed until just combined after each addition. Be careful not to overmix; overmixing can develop the gluten in the flour, resulting in tough cookies. Mix until just no streaks of flour remain. The dough will be slightly sticky, which is normal.
- Chill the Dough: Cover the bowl with plastic wrap and refrigerate the dough for at least 30 minutes, or up to 2 hours. Chilling the dough is crucial! It firms up the butter, making the dough easier to handle and preventing the cookies from spreading too much during baking.
Part 2: Making the Cream Cheese Filling
- Cream Cream Cheese: In a medium bowl, beat the softened cream cheese with an electric mixer until smooth and creamy. Ensure your cream cheese is properly softened to avoid lumps in your filling.
- Add Powdered Sugar: Gradually add the powdered sugar to the cream cheese, mixing on low speed until fully incorporated and smooth. Start with a low speed to prevent a cloud of powdered sugar! Mix until the filling is thick, smooth, and holds its shape.
Part 3: Assembling and Baking the Cookies
- Portion Cookie Dough and Filling: Use a cookie scoop (about 1.5 tablespoons) to portion out the red velvet cookie dough. Roll each portion into a smooth ball. Then, using a smaller scoop or a teaspoon, scoop out about 1 teaspoon of cream cheese filling.
- Stuff the Cookies: Flatten a ball of cookie dough slightly in the palm of your hand. Place a scoop of cream cheese filling in the center. Gently bring the edges of the cookie dough up and around the filling, pinching to seal it completely. Roll the stuffed cookie into a smooth ball again. Repeat with the remaining dough and filling.
- Arrange on Baking Sheets: Place the stuffed cookie dough balls onto the prepared baking sheets, leaving about 2 inches of space between each cookie to allow for spreading.
- Bake: Bake for 10-12 minutes, or until the edges of the cookies are set and the centers are still slightly soft. Be careful not to overbake, as they will continue to set as they cool. The cookies should be slightly puffed and the edges will be just beginning to turn golden brown.
- Cool: Let the cookies cool on the baking sheets for a few minutes before transferring them to a wire rack to cool completely. This allows them to firm up slightly and prevents them from breaking when moved.
- Optional Decoration: Once cooled, you can dust the cookies with extra powdered sugar for a beautiful finishing touch, or drizzle with a simple glaze.
Nutrition Facts for Red Velvet Cream Cheese Stuffed Cookies
(Please note: Nutritional information is an estimate and can vary based on specific ingredient brands and portion sizes.)
Servings: Approximately 24 cookies
Serving Size: 1 cookie
- Calories per serving: Approximately 220-250 kcal
- Fat: 12-15g
- Saturated Fat: 7-9g
Preparation Time for Red Velvet Cream Cheese Stuffed Cookies
Get ready to enjoy these delightful treats with a reasonable time commitment!
- Prep Time: Approximately 45-55 minutes (includes making dough, filling, chilling, and stuffing cookies)
- Cook Time: 10-12 minutes per batch
- Total Time: Approximately 1 hour – 1 hour and 15 minutes (plus chilling time)
While there are a few steps involved, the process is straightforward and well worth the effort for these incredibly delicious cookies. The chilling time is hands-off, allowing you to do other things while the dough firms up.
How to Serve Red Velvet Cream Cheese Stuffed Cookies
These versatile cookies are perfect for a variety of occasions! Here are some delightful ways to serve them:
- Classic Dessert: Enjoy them as a simple and satisfying dessert after dinner or lunch. They pair perfectly with a glass of cold milk, a scoop of vanilla ice cream, or a warm cup of coffee or tea.
- Party Pleasers: Bring a batch to your next potluck, birthday party, or holiday gathering. They are always a crowd-pleaser and visually stunning on a dessert table.
- Holiday Treats: These cookies are especially festive for holidays like Valentine’s Day, Christmas, or the 4th of July due to their vibrant red color. Package them up in decorative boxes or bags for a thoughtful homemade gift.
- Afternoon Snack: Indulge in one or two cookies as a delightful afternoon pick-me-up. They are a perfect treat to enjoy with a break from work or studies.
- Cookie Exchange Superstar: If you participate in cookie exchanges, these stuffed cookies are sure to be a standout and highly sought-after contribution. Their unique flavor and presentation will make them memorable.
- Dessert Board Addition: Incorporate them into a dessert board or charcuterie board alongside other sweet treats like brownies, candies, fruits, and cheeses for a diverse and impressive spread.
- Warm and Gooey (Optional): While delicious at room temperature, you can also gently warm them in the microwave for a few seconds to make the cream cheese filling extra gooey and melty. Be careful not to overheat them.
- Garnished Elegance: For a more elegant presentation, dust them with powdered sugar, drizzle with a simple vanilla glaze, or even add a sprinkle of red velvet cake crumbs on top.
Additional Tips for Perfect Red Velvet Cream Cheese Stuffed Cookies
Baking perfection is within reach! Follow these helpful tips to ensure your Red Velvet Cream Cheese Stuffed Cookies are a resounding success:
- Measure Flour Correctly: Always measure flour correctly using the “spoon and level” method. Spoon flour into your measuring cup until it’s overflowing, then level it off with a straight edge (like the back of a knife). Avoid scooping directly from the bag, as this can compact the flour and result in too much flour in your recipe, leading to dry cookies.
- Use Softened Butter and Cream Cheese: Ensure your butter and cream cheese are properly softened to room temperature before creaming them. This is crucial for creating a smooth batter and filling. If the butter is too cold, it won’t cream properly, and if the cream cheese is too cold, the filling will be lumpy.
- Don’t Overmix the Dough: Overmixing the cookie dough can develop the gluten in the flour, resulting in tough cookies. Mix the wet and dry ingredients until just combined, and stop mixing as soon as no streaks of flour remain. A few streaks are okay; they will incorporate as you scoop the cookies.
- Chill the Dough (Don’t Skip It!): Chilling the dough is essential for preventing the cookies from spreading too thin during baking. It also makes the dough easier to handle and scoop. Don’t skip the chilling step, even if you’re short on time.
- Use Gel Food Coloring for Vibrant Color: Gel food coloring is more concentrated than liquid food coloring, so it will give you a much more vibrant red color without adding excess liquid to your dough. A little gel food coloring goes a long way.
- Don’t Overbake: Overbaked cookies will be dry and crumbly. Bake the cookies until the edges are just set and the centers are still slightly soft. They will continue to bake and firm up as they cool on the baking sheet. Err on the side of slightly underbaked for soft and chewy cookies.
- Space Cookies Properly on Baking Sheets: Give the cookies enough space on the baking sheets to spread out without touching each other. About 2 inches of space between each cookie is usually sufficient. Overcrowding can lead to uneven baking and cookies sticking together.
- Experiment with Variations: Get creative! Try adding chocolate chips, white chocolate chips, or chopped nuts to the cookie dough for added texture and flavor. You can also experiment with different extracts in the dough or filling, such as almond extract or peppermint extract. For a festive touch, roll the cookie dough balls in red or white sprinkles before baking.
Frequently Asked Questions About Red Velvet Cream Cheese Stuffed Cookies
Got questions? We’ve got answers! Here are some frequently asked questions to help you bake these cookies with confidence:
Q1: Can I make the dough ahead of time?
A: Absolutely! The red velvet cookie dough can be made ahead of time and stored in the refrigerator for up to 2-3 days. Make sure to wrap it tightly in plastic wrap to prevent it from drying out. When you’re ready to bake, let the dough sit at room temperature for about 15-20 minutes to soften slightly before scooping.
Q2: Can I freeze the cookie dough or baked cookies?
A: Yes, both the cookie dough and baked cookies can be frozen. To freeze cookie dough, scoop the dough into balls, place them on a baking sheet lined with parchment paper, and freeze until solid. Then, transfer the frozen dough balls to a freezer-safe bag or container. Bake directly from frozen, adding a few extra minutes to the baking time. Baked cookies can be frozen in an airtight container for up to 2-3 months. Thaw at room temperature before serving.
Q3: Can I use liquid food coloring instead of gel food coloring?
A: While you can use liquid food coloring, gel food coloring is highly recommended for red velvet cookies. Liquid food coloring is less concentrated, so you’ll need to use a lot more to achieve a vibrant red color, which can sometimes affect the consistency of the dough. Gel food coloring provides a more intense color with just a small amount and won’t thin out your dough.
Q4: What can I use if I don’t have buttermilk?
A: If you don’t have buttermilk, you can easily make a substitute. For 1 cup of buttermilk, combine 1 tablespoon of lemon juice or white vinegar with 1 cup of milk. Stir and let it sit for 5-10 minutes to thicken and slightly curdle before using. This will mimic the tang and acidity of buttermilk in the recipe.
Q5: My cream cheese filling is too soft. How can I fix it?
A: If your cream cheese filling is too soft, you can thicken it by adding more powdered sugar, a tablespoon at a time, until it reaches the desired consistency. Make sure you are using softened but not melted cream cheese. Chilling the filling in the refrigerator for about 15-20 minutes can also help firm it up before stuffing the cookies.
Q6: Why are my cookies spreading too much?
A: Cookies spreading too much can be caused by a few factors: dough not chilled enough, oven temperature too low, or too much butter in the dough. Make sure you chill the dough for the recommended time, preheat your oven to the correct temperature, and ensure you measured your ingredients accurately, especially the butter.
Q7: Can I make these cookies without cream cheese filling?
A: Yes, you can definitely make these cookies without the cream cheese filling. Simply bake the red velvet cookie dough balls as drop cookies without stuffing them. They will still be delicious red velvet cookies, just without the creamy center. You may need to adjust the baking time slightly, potentially reducing it by a minute or two.
Q8: How do I store leftover Red Velvet Cream Cheese Stuffed Cookies?
A: Store leftover Red Velvet Cream Cheese Stuffed Cookies in an airtight container at room temperature for up to 3-4 days. For longer storage, store them in the refrigerator for up to a week. Bring them to room temperature before serving for the best texture.

Red Velvet Cream Cheese Stuffed Cookies
Ingredients
Here’s everything you’ll need to create these irresistible Red Velvet Cream Cheese Stuffed Cookies, broken down for easy understanding:
- All-Purpose Flour: The foundation of our cookies, providing structure and chewiness.
- Cocoa Powder: Just a touch! Unsweetened cocoa powder gives that signature red velvet hint of chocolate flavor and deepens the color.
- Baking Soda: Our leavening agent, helping the cookies rise and become light and airy.
- Salt: Enhances the flavors of all the other ingredients and balances the sweetness.
- Unsalted Butter: Provides richness, flavor, and that melt-in-your-mouth texture. Softened butter is key for creaming.
- Granulated Sugar: Sweetens the cookies and contributes to their tender texture.
- Brown Sugar: Adds moisture, chewiness, and a hint of molasses flavor that complements the red velvet.
- Eggs: Binds the ingredients together and adds richness and structure.
- Vanilla Extract: Enhances the overall flavor profile, adding warmth and depth.
- Buttermilk: The secret ingredient to red velvet! Buttermilk adds a slight tang and tenderness to the cookies, activating the baking soda for a perfect rise.
- Red Food Coloring: Essential for that iconic red velvet color. Use gel food coloring for the most vibrant and concentrated color.
- Cream Cheese: The star of our filling! Use full-fat cream cheese for the best flavor and creamy texture. Softened cream cheese is crucial for a smooth filling.
- Powdered Sugar: Sweetens and thickens the cream cheese filling to the perfect consistency.
Instructions
Follow these detailed instructions to bake perfect Red Velvet Cream Cheese Stuffed Cookies every time:
Part 1: Making the Red Velvet Cookie Dough
- Preheat Oven and Prepare Baking Sheets: Preheat your oven to 350°F (175°C). Line baking sheets with parchment paper or silicone baking mats. This prevents sticking and ensures easy cleanup.
- Whisk Dry Ingredients: In a medium bowl, whisk together the all-purpose flour, cocoa powder, baking soda, and salt. Whisking ensures everything is evenly distributed and prevents clumps of cocoa powder or baking soda in your dough. Set aside these dry ingredients.
- Cream Butter and Sugars: In a large bowl or the bowl of a stand mixer fitted with the paddle attachment, cream together the softened unsalted butter, granulated sugar, and brown sugar until light and fluffy. This process incorporates air into the butter and sugar, which is essential for light and tender cookies. Cream for 2-3 minutes until the mixture is noticeably paler and fluffier.
- Incorporate Eggs and Vanilla: Beat in the eggs one at a time, mixing well after each addition. Then, stir in the vanilla extract. Make sure each egg is fully incorporated before adding the next to maintain a smooth batter.
- Combine Wet Ingredients: In a separate small bowl, whisk together the buttermilk and red food coloring until well combined and the color is uniform. This ensures the red color is evenly distributed throughout the dough.
- Alternate Wet and Dry Ingredients: Gradually add the dry ingredients to the wet ingredients in three additions, alternating with the buttermilk mixture, beginning and ending with the dry ingredients. Mix on low speed until just combined after each addition. Be careful not to overmix; overmixing can develop the gluten in the flour, resulting in tough cookies. Mix until just no streaks of flour remain. The dough will be slightly sticky, which is normal.
- Chill the Dough: Cover the bowl with plastic wrap and refrigerate the dough for at least 30 minutes, or up to 2 hours. Chilling the dough is crucial! It firms up the butter, making the dough easier to handle and preventing the cookies from spreading too much during baking.
Part 2: Making the Cream Cheese Filling
- Cream Cream Cheese: In a medium bowl, beat the softened cream cheese with an electric mixer until smooth and creamy. Ensure your cream cheese is properly softened to avoid lumps in your filling.
- Add Powdered Sugar: Gradually add the powdered sugar to the cream cheese, mixing on low speed until fully incorporated and smooth. Start with a low speed to prevent a cloud of powdered sugar! Mix until the filling is thick, smooth, and holds its shape.
Part 3: Assembling and Baking the Cookies
- Portion Cookie Dough and Filling: Use a cookie scoop (about 1.5 tablespoons) to portion out the red velvet cookie dough. Roll each portion into a smooth ball. Then, using a smaller scoop or a teaspoon, scoop out about 1 teaspoon of cream cheese filling.
- Stuff the Cookies: Flatten a ball of cookie dough slightly in the palm of your hand. Place a scoop of cream cheese filling in the center. Gently bring the edges of the cookie dough up and around the filling, pinching to seal it completely. Roll the stuffed cookie into a smooth ball again. Repeat with the remaining dough and filling.
- Arrange on Baking Sheets: Place the stuffed cookie dough balls onto the prepared baking sheets, leaving about 2 inches of space between each cookie to allow for spreading.
- Bake: Bake for 10-12 minutes, or until the edges of the cookies are set and the centers are still slightly soft. Be careful not to overbake, as they will continue to set as they cool. The cookies should be slightly puffed and the edges will be just beginning to turn golden brown.
- Cool: Let the cookies cool on the baking sheets for a few minutes before transferring them to a wire rack to cool completely. This allows them to firm up slightly and prevents them from breaking when moved.
- Optional Decoration: Once cooled, you can dust the cookies with extra powdered sugar for a beautiful finishing touch, or drizzle with a simple glaze.
Nutrition
- Serving Size: one normal portion
- Calories: 250
- Fat: 15g
- Saturated Fat: 9g