

The first time I made these Creamy Red Velvet Cake Truffles, it was for a last-minute Valentine’s Day dessert. Honestly, I wasn’t expecting much beyond a decent sweet treat. But from the moment I took the first bite, I was hooked. The combination of the moist, subtly cocoa-flavored red velvet cake, the rich cream cheese frosting, and the crisp, decadent chocolate coating is simply divine. My family devoured them! They were gone within minutes, with everyone raving about the texture and flavor. My usually picky kids requested them again the very next day! Since then, these truffles have become a staple in our house, perfect for holidays, parties, or just a special weekend treat. They’re surprisingly easy to make, and always a crowd-pleaser. If you’re looking for a dessert that’s both impressive and incredibly delicious, look no further – these Creamy Red Velvet Cake Truffles are an absolute winner.
Ingredients for Creamy Red Velvet Cake Truffles
Here’s what you’ll need to create these irresistible Creamy Red Velvet Cake Truffles. We’ve kept it simple and focused on fresh, quality ingredients to ensure the best flavor and texture.
- Red Velvet Cake (pre-baked): Approximately 10-12 ounces. You can use store-bought cake for convenience or bake your own favorite red velvet cake recipe from scratch. Make sure it’s cooled completely before starting.
- Cream Cheese Frosting: 8 ounces (about 1 cup). Use full-fat cream cheese frosting for the best creamy texture and flavor. You can also use store-bought or homemade frosting.
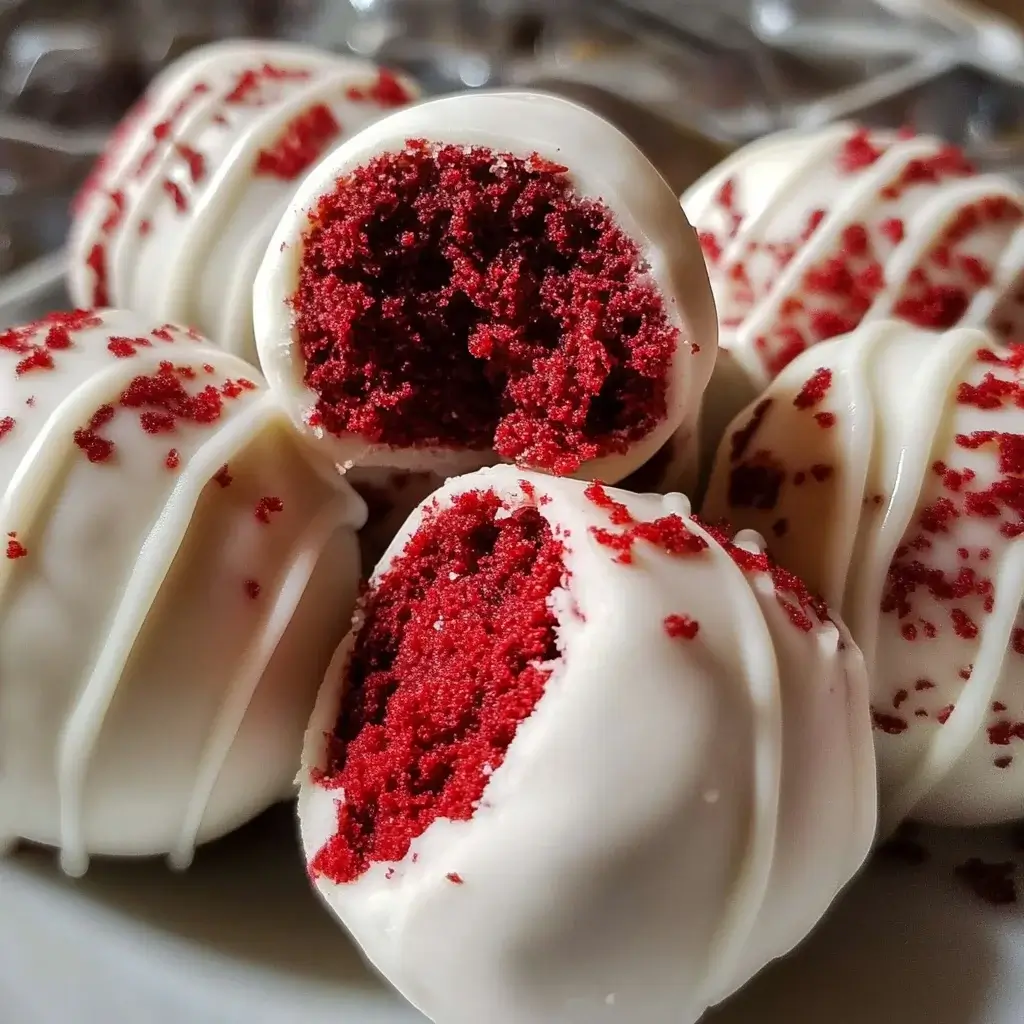
- Semi-Sweet Chocolate Chips: 12 ounces. High-quality semi-sweet chocolate chips will provide a rich, balanced sweetness and melt smoothly for coating the truffles. You can also use dark chocolate or milk chocolate depending on your preference.
- Vegetable Oil (or Coconut Oil): 1 tablespoon. This is added to the melting chocolate to help create a smoother, more fluid consistency for easier dipping and a glossy finish.
- Sprinkles (optional): For decoration. Red, white, or festive sprinkles add a beautiful finishing touch and visual appeal, especially for holidays or special occasions. You can also use chopped nuts, cocoa powder, or powdered sugar.
Instructions: Making Your Creamy Red Velvet Cake Truffles
Follow these step-by-step instructions to create perfect Creamy Red Velvet Cake Truffles every time. Don’t be intimidated; the process is easier than you might think, and the reward is well worth it!
Step 1: Crumble the Red Velvet Cake
Begin by taking your cooled red velvet cake and crumbling it thoroughly into a large mixing bowl. You want to break it down into fine crumbs with no large chunks remaining. The texture should resemble coarse breadcrumbs. Using your hands is often the easiest way to achieve this, ensuring you get a consistent crumble throughout the cake. If the cake is slightly dry, don’t worry, the frosting will add moisture. If it’s very moist, you might need to let it air dry for a bit before crumbling to prevent a sticky truffle mixture.
Step 2: Add Cream Cheese Frosting
Now, add the cream cheese frosting to the bowl of crumbled cake. Start with about ¾ of the frosting and gradually incorporate it into the cake crumbs using a spatula or your hands. Mix until the frosting is evenly distributed and the mixture comes together to form a moist, dough-like consistency. You want the mixture to be moist enough to hold its shape when rolled into balls, but not so sticky that it’s difficult to handle. If the mixture seems too dry, add the remaining frosting a little at a time until you reach the desired consistency. If it becomes too wet, you can add a bit more crumbled cake or chill the mixture for a short while to firm up.
Step 3: Roll into Truffle Balls
Once the cake and frosting are well combined, it’s time to roll the mixture into truffle balls. Using a tablespoon or a small cookie scoop, portion out the mixture and roll it between your palms to form smooth, round balls. Aim for consistent sizes so they bake evenly and look uniform. Place the rolled truffle balls onto a baking sheet lined with parchment paper or wax paper. This will prevent them from sticking to the sheet and make for easier removal later.
Step 4: Chill the Truffle Balls
After rolling all the truffles, place the baking sheet with the truffle balls into the refrigerator. Chill them for at least 30 minutes, or even better, for an hour. Chilling is a crucial step as it firms up the truffle mixture, making them much easier to dip in chocolate without falling apart. Cold truffles also help the chocolate coating set quickly and smoothly. You can even chill them for longer, up to a couple of hours, if needed, to fit your schedule.
Step 5: Melt the Chocolate
While the truffles are chilling, prepare the chocolate coating. Place the semi-sweet chocolate chips and vegetable oil (or coconut oil) into a microwave-safe bowl. Microwave in 30-second intervals, stirring well after each interval, until the chocolate is completely melted and smooth. Be careful not to overheat the chocolate, as it can seize or burn. If you prefer, you can also melt the chocolate using a double boiler on the stovetop. This method involves placing the chocolate in a heatproof bowl set over a saucepan of simmering water, ensuring the bottom of the bowl does not touch the water. Stir gently until melted and smooth. The addition of vegetable oil helps to thin the chocolate slightly, making it easier to dip the truffles and giving them a glossy finish.
Step 6: Dip the Truffle Balls
Once the chocolate is melted and the truffles are chilled, it’s time to dip. Remove the truffle balls from the refrigerator, one at a time. Using a fork or dipping tool, carefully dip each truffle ball into the melted chocolate, ensuring it’s fully coated. Gently tap off any excess chocolate by lightly tapping the fork against the edge of the bowl. Place the chocolate-covered truffle back onto the parchment-lined baking sheet. Work quickly, especially if your room is warm, as the chocolate will set faster on cold truffles.
Step 7: Decorate (Optional)
If desired, immediately decorate the truffles with sprinkles while the chocolate is still wet. This allows the sprinkles to adhere properly. You can use red, white, or festive sprinkles, chopped nuts, cocoa powder, or even a drizzle of white chocolate for decoration. Get creative and personalize your truffles!
Step 8: Let the Chocolate Set
Allow the chocolate coating to set completely. This will take about 30-60 minutes at room temperature, or you can speed up the process by placing the baking sheet back into the refrigerator for about 15-20 minutes. Once the chocolate is firm, the Creamy Red Velvet Cake Truffles are ready to be enjoyed!
Step 9: Storage
Store your Creamy Red Velvet Cake Truffles in an airtight container in the refrigerator. They will stay fresh for up to a week. For longer storage, you can freeze them in an airtight container for up to 2-3 months. Thaw in the refrigerator before serving.
Nutrition Facts for Creamy Red Velvet Cake Truffles
(Note: Nutritional values are estimates and can vary based on specific ingredients and portion sizes. These are based on an estimated serving size of one truffle and using standard ingredients.)
Serving Size: 1 Truffle
Servings Per Recipe: Approximately 24 truffles (depending on size)
- Calories: Approximately 150-180 kcal
- Total Fat: 8-10g
- Saturated Fat: 5-6g
Please note: These values are approximate and for informational purposes only. For precise nutritional information, refer to the nutritional labels of the specific ingredients used and consider using a nutrition calculator.
Preparation Time for Creamy Red Velvet Cake Truffles
From start to finish, making Creamy Red Velvet Cake Truffles is a relatively straightforward process, perfect for both beginner and experienced bakers.
- Prep Time: 30 minutes (crumbling cake, mixing frosting, rolling truffles)
- Chill Time: 1 hour (minimum, for truffle balls to firm up)
- Cook Time/Melt Time: 5-10 minutes (melting chocolate)
- Decoration & Setting Time: 30-60 minutes (dipping, decorating, chocolate setting)
- Total Time: Approximately 2 hours – 2 hours 30 minutes (including chill and setting time)
While the total time might seem a bit lengthy, most of it is hands-off chilling and setting time. Active preparation time is quite minimal, making these truffles a manageable dessert to make, even on a busy day. You can break up the process by making the truffle balls ahead of time and chilling them overnight, then dipping and decorating the next day.
How to Serve Creamy Red Velvet Cake Truffles
Creamy Red Velvet Cake Truffles are incredibly versatile and can be served in numerous delightful ways. Here are some ideas to elevate your truffle presentation and enjoyment:
- Elegant Dessert Platter:
- Arrange the truffles on a tiered dessert platter alongside other bite-sized treats like mini cupcakes, macarons, and fresh berries.
- Use decorative paper liners or small truffle cups for an extra touch of elegance.
- Garnish the platter with edible flowers or fresh mint sprigs for visual appeal.
- Individual Truffle Favors:
- Package 2-3 truffles in small cellophane bags tied with ribbon for party favors or gifts.
- Use personalized tags or labels for a special touch, especially for events like weddings or birthdays.
- Arrange truffle favors in a decorative basket or box for gifting.
- Holiday Dessert Table Centerpiece:
- Create a stunning centerpiece by arranging the truffles in a festive pattern on a cake stand.
- Use holiday-themed sprinkles or decorations to match the occasion, such as red and green for Christmas, or pastel colors for Easter.
- Surround the truffles with candles or fairy lights for a warm and inviting ambiance.
- Casual Get-Togethers and Parties:
- Simply place a bowl or plate of truffles on a coffee table or dessert buffet for guests to help themselves.
- Serve them alongside coffee, tea, or a glass of milk for a simple yet satisfying treat.
- Offer a variety of drinks to complement the richness of the truffles, like sparkling cider or dessert wine.
- Romantic Dessert for Two:
- Present a small plate of truffles as a romantic dessert for Valentine’s Day or an anniversary.
- Pair them with a glass of champagne or a sweet dessert wine for a luxurious treat.
- Add a few fresh strawberries or raspberries to the plate for a touch of freshness and color.
- Kid-Friendly Dessert:
- Truffles are perfect for children’s parties! Arrange them on a colorful plate or in fun, themed cupcake liners.
- Let kids decorate their own truffles with various sprinkles and toppings for a fun activity.
- Serve with milk or juice for a kid-approved dessert option.
- After-Dinner Indulgence:
- Offer truffles as a delightful after-dinner treat instead of a heavy dessert.
- They are perfectly portioned and provide just the right amount of sweetness to end a meal.
- Serve with espresso or a digestif for a sophisticated finish.
Additional Tips for Perfect Creamy Red Velvet Cake Truffles
To ensure your Creamy Red Velvet Cake Truffles are absolutely perfect every time, here are some additional tips and tricks to keep in mind:
- Cake Moisture Matters: The moisture content of your red velvet cake is crucial. If your cake is very moist, you might need to use slightly less frosting or add a bit of crushed vanilla wafers or graham cracker crumbs to absorb excess moisture and prevent the truffle mixture from being too sticky. Conversely, if your cake is dry, add frosting gradually until you reach the right consistency.
- Quality Chocolate is Key: Use good quality chocolate for coating. The flavor of the chocolate coating significantly impacts the overall taste of the truffles. Semi-sweet, dark, or milk chocolate all work well, depending on your preference. Chocolate melting wafers or couverture chocolate will provide the smoothest, glossiest finish, but good quality chocolate chips are also perfectly acceptable for home baking.
- Don’t Overheat the Chocolate: When melting chocolate, be patient and melt it slowly and gently. Overheating can cause the chocolate to seize or burn, resulting in a grainy texture. Microwave in short intervals and stir frequently, or use a double boiler for more controlled melting.
- Chill Truffles Thoroughly: Chilling the truffle balls is not optional; it’s essential. Cold truffles are much easier to dip in chocolate and hold their shape better. Sufficient chilling prevents the truffles from becoming too soft and melting into the chocolate during dipping.
- Work Quickly While Dipping: Once you start dipping, work relatively quickly, especially if you are working in a warm environment. The chocolate will set faster on cold truffles, so speed is helpful for a smooth coating and easy decoration.
- Use Dipping Tools: While you can use forks for dipping, investing in a set of dipping tools can make the process much easier and cleaner, especially if you plan to make truffles often. Dipping forks and angled spatulas are particularly useful for smoothly coating truffles and removing excess chocolate.
- Get Creative with Decorations: Sprinkles are just the beginning! Experiment with different decorations to personalize your truffles. Try chopped nuts (pecans, walnuts, pistachios), cocoa powder, powdered sugar, melted white chocolate drizzle, sea salt flakes, or even edible glitter for a festive touch.
- Make Ahead and Freeze: Creamy Red Velvet Cake Truffles are excellent make-ahead desserts. You can prepare the truffle balls and freeze them before dipping. Or, you can make the complete truffles, including the chocolate coating, and freeze them for up to 2-3 months. Thaw in the refrigerator before serving to maintain their texture and flavor.
Frequently Asked Questions (FAQ) about Creamy Red Velvet Cake Truffles
Here are some common questions people ask when making Creamy Red Velvet Cake Truffles, along with their answers to help you troubleshoot and achieve truffle perfection:
Q1: Can I use a cake mix instead of a homemade red velvet cake?
A: Yes, absolutely! Using a red velvet cake mix is a convenient shortcut. Bake the cake mix according to package directions, let it cool completely, and then crumble it for the truffle recipe. This is a great time-saver without compromising too much on flavor.
Q2: Can I use different types of frosting?
A: While cream cheese frosting is classic for red velvet cake and truffles, you can experiment with other frostings. Vanilla buttercream, chocolate buttercream, or even a tangy lemon frosting could create interesting flavor variations. However, cream cheese frosting provides the best balance of tanginess and creaminess that complements red velvet cake.
Q3: My truffle mixture is too sticky. What can I do?
A: If your truffle mixture is too sticky to roll, try chilling it in the refrigerator for a longer period, about 1-2 hours. This will firm it up considerably. If it’s still too sticky after chilling, you can gently roll the balls in a little powdered sugar or cocoa powder before dipping them in chocolate to make them easier to handle.
Q4: Can I use white chocolate or dark chocolate instead of semi-sweet chocolate for coating?
A: Yes, definitely! You can use white chocolate, dark chocolate, or even milk chocolate for coating. White chocolate will create a sweeter truffle, while dark chocolate will add a slightly bitter and more intense chocolate flavor. Choose your favorite or experiment with different chocolates for variety.
Q5: How long do Creamy Red Velvet Cake Truffles last?
A: Stored properly in an airtight container in the refrigerator, Creamy Red Velvet Cake Truffles will last for up to a week. For longer storage, you can freeze them for up to 2-3 months. Thaw them in the refrigerator overnight before serving.
Q6: Can I make these truffles ahead of time?
A: Yes, these truffles are perfect for making ahead of time. You can make the truffle balls up to 2-3 days in advance and store them, covered, in the refrigerator until you are ready to dip them. You can also make the fully coated truffles a day or two ahead and store them in the refrigerator.
Q7: My chocolate coating is cracking. Why is this happening?
A: Chocolate cracking can happen if the chocolate coating sets too quickly, especially if the truffles are very cold or the room temperature is too low. To prevent cracking, try letting the melted chocolate cool slightly before dipping, and avoid chilling the truffles in the freezer to set the chocolate. Adding a bit more vegetable oil to the melted chocolate can also help make it more flexible and less prone to cracking.
Q8: Can I make these truffles without cream cheese frosting?
A: While cream cheese frosting is traditional and adds a signature tang to red velvet truffles, you can experiment with other binders. You could try using a different type of frosting like vanilla buttercream or even melted marshmallows mixed with a bit of butter. However, the flavor profile will be different from the classic Creamy Red Velvet Cake Truffle. For the best result, sticking with cream cheese frosting is highly recommended.

Creamy Red Velvet Cake Truffles
Ingredients
Here’s what you’ll need to create these irresistible Creamy Red Velvet Cake Truffles. We’ve kept it simple and focused on fresh, quality ingredients to ensure the best flavor and texture.
- Red Velvet Cake (pre-baked): Approximately 10-12 ounces. You can use store-bought cake for convenience or bake your own favorite red velvet cake recipe from scratch. Make sure it’s cooled completely before starting.
- Cream Cheese Frosting: 8 ounces (about 1 cup). Use full-fat cream cheese frosting for the best creamy texture and flavor. You can also use store-bought or homemade frosting.
- Semi-Sweet Chocolate Chips: 12 ounces. High-quality semi-sweet chocolate chips will provide a rich, balanced sweetness and melt smoothly for coating the truffles. You can also use dark chocolate or milk chocolate depending on your preference.
- Vegetable Oil (or Coconut Oil): 1 tablespoon. This is added to the melting chocolate to help create a smoother, more fluid consistency for easier dipping and a glossy finish.
- Sprinkles (optional): For decoration. Red, white, or festive sprinkles add a beautiful finishing touch and visual appeal, especially for holidays or special occasions. You can also use chopped nuts, cocoa powder, or powdered sugar.
Instructions
Follow these step-by-step instructions to create perfect Creamy Red Velvet Cake Truffles every time. Don’t be intimidated; the process is easier than you might think, and the reward is well worth it!
Step 1: Crumble the Red Velvet Cake
Begin by taking your cooled red velvet cake and crumbling it thoroughly into a large mixing bowl. You want to break it down into fine crumbs with no large chunks remaining. The texture should resemble coarse breadcrumbs. Using your hands is often the easiest way to achieve this, ensuring you get a consistent crumble throughout the cake. If the cake is slightly dry, don’t worry, the frosting will add moisture. If it’s very moist, you might need to let it air dry for a bit before crumbling to prevent a sticky truffle mixture.
Step 2: Add Cream Cheese Frosting
Now, add the cream cheese frosting to the bowl of crumbled cake. Start with about ¾ of the frosting and gradually incorporate it into the cake crumbs using a spatula or your hands. Mix until the frosting is evenly distributed and the mixture comes together to form a moist, dough-like consistency. You want the mixture to be moist enough to hold its shape when rolled into balls, but not so sticky that it’s difficult to handle. If the mixture seems too dry, add the remaining frosting a little at a time until you reach the desired consistency. If it becomes too wet, you can add a bit more crumbled cake or chill the mixture for a short while to firm up.
Step 3: Roll into Truffle Balls
Once the cake and frosting are well combined, it’s time to roll the mixture into truffle balls. Using a tablespoon or a small cookie scoop, portion out the mixture and roll it between your palms to form smooth, round balls. Aim for consistent sizes so they bake evenly and look uniform. Place the rolled truffle balls onto a baking sheet lined with parchment paper or wax paper. This will prevent them from sticking to the sheet and make for easier removal later.
Step 4: Chill the Truffle Balls
After rolling all the truffles, place the baking sheet with the truffle balls into the refrigerator. Chill them for at least 30 minutes, or even better, for an hour. Chilling is a crucial step as it firms up the truffle mixture, making them much easier to dip in chocolate without falling apart. Cold truffles also help the chocolate coating set quickly and smoothly. You can even chill them for longer, up to a couple of hours, if needed, to fit your schedule.
Step 5: Melt the Chocolate
While the truffles are chilling, prepare the chocolate coating. Place the semi-sweet chocolate chips and vegetable oil (or coconut oil) into a microwave-safe bowl. Microwave in 30-second intervals, stirring well after each interval, until the chocolate is completely melted and smooth. Be careful not to overheat the chocolate, as it can seize or burn. If you prefer, you can also melt the chocolate using a double boiler on the stovetop. This method involves placing the chocolate in a heatproof bowl set over a saucepan of simmering water, ensuring the bottom of the bowl does not touch the water. Stir gently until melted and smooth. The addition of vegetable oil helps to thin the chocolate slightly, making it easier to dip the truffles and giving them a glossy finish.
Step 6: Dip the Truffle Balls
Once the chocolate is melted and the truffles are chilled, it’s time to dip. Remove the truffle balls from the refrigerator, one at a time. Using a fork or dipping tool, carefully dip each truffle ball into the melted chocolate, ensuring it’s fully coated. Gently tap off any excess chocolate by lightly tapping the fork against the edge of the bowl. Place the chocolate-covered truffle back onto the parchment-lined baking sheet. Work quickly, especially if your room is warm, as the chocolate will set faster on cold truffles.
Step 7: Decorate (Optional)
If desired, immediately decorate the truffles with sprinkles while the chocolate is still wet. This allows the sprinkles to adhere properly. You can use red, white, or festive sprinkles, chopped nuts, cocoa powder, or even a drizzle of white chocolate for decoration. Get creative and personalize your truffles!
Step 8: Let the Chocolate Set
Allow the chocolate coating to set completely. This will take about 30-60 minutes at room temperature, or you can speed up the process by placing the baking sheet back into the refrigerator for about 15-20 minutes. Once the chocolate is firm, the Creamy Red Velvet Cake Truffles are ready to be enjoyed!
Step 9: Storage
Store your Creamy Red Velvet Cake Truffles in an airtight container in the refrigerator. They will stay fresh for up to a week. For longer storage, you can freeze them in an airtight container for up to 2-3 months. Thaw in the refrigerator before serving.
Nutrition
- Serving Size: one normal portion
- Calories: 180
- Fat: 10g
- Saturated Fat: 6g


