


Of all the party appetizers I’ve made over the years, from intricate canapés to cheese boards that cost a small fortune, none have consistently received the same level of universal praise as this simple Ranch Veggie Cups Recipe. I first made them for my son’s fifth birthday party, a last-minute addition born out of a desire to sneak some healthy options onto a table laden with sugar and beige-colored snacks. I expected the kids to ignore them in favor of cupcakes, and the adults to politely nibble on one or two. Instead, they were the first thing to disappear. The kids loved having their own personal “dip and stick” cups, and the adults were thrilled to have a fresh, guilt-free option that was both convenient and delicious. Since then, these vibrant little bouquets of freshness have become my signature contribution to potlucks, Super Bowl parties, baby showers, and even casual summer barbecues. They look stunningly impressive arranged on a platter, yet they are deceptively easy to assemble. This recipe isn’t just about providing a snack; it’s about offering a moment of crisp, cool, and creamy satisfaction that everyone, from the pickiest toddler to the most sophisticated foodie, can enjoy. It’s the perfect blend of effortless elegance and wholesome goodness.
Ingredients
This recipe focuses on fresh, high-quality components to create the most vibrant and flavorful veggie cups. We’ll cover both a homemade ranch dip that is truly exceptional and the best vegetables to use for maximum crunch and color.
For the Homemade Creamy Ranch Dip (Yields approx. 2 cups):
- 1 cup Sour Cream: This forms the thick, tangy base of our dip. Full-fat sour cream will yield the creamiest result, providing a rich mouthfeel that clings perfectly to the vegetables.
- ½ cup Mayonnaise: Use a good quality mayonnaise to add richness and a smooth, luxurious texture that balances the tang of the sour cream and buttermilk.
- ½ cup Buttermilk: This is the secret ingredient for authentic ranch flavor. It thins the dip to the perfect consistency and adds a distinctive, pleasant tanginess. If you don’t have buttermilk, you can make a substitute by adding 1/2 tablespoon of lemon juice or white vinegar to a measuring cup and filling it to the ½ cup line with whole milk; let it sit for 5-10 minutes.
- 1 tbsp Fresh Chives, finely chopped: Adds a mild, delicate onion flavor that is essential to the ranch profile.
- 1 tbsp Fresh Parsley, finely chopped: Provides a clean, peppery, and bright note that lightens the richness of the dip.
- 1 tsp Fresh Dill, finely chopped: Delivers a unique, slightly anise-like flavor that is characteristic of a great ranch dressing.
- ½ tsp Garlic Powder: Offers a consistent, savory garlic flavor without the harsh bite of raw garlic.
- ½ tsp Onion Powder: Provides a sweet and savory onion background note that deepens the overall flavor.
- ½ tsp Salt (or to taste): Enhances all the other flavors in the dip.
- ¼ tsp Black Pepper, freshly ground: Adds a touch of mild spice and complexity.
For the Vegetable Sticks (Use a colorful variety):
- 4 large Carrots: Choose firm, bright orange carrots. Their natural sweetness and satisfying crunch make them a universal favorite.
- 4 stalks Celery: Look for crisp, light green stalks. Celery offers a savory, slightly salty flavor and a wonderful fibrous snap.
- 2 large Bell Peppers (different colors, e.g., red and yellow): Red bell peppers are sweet and packed with Vitamin C, while yellow peppers offer a milder, fruity flavor. Their vibrant colors make the cups visually stunning.
- 1 large English Cucumber: These are ideal because they have thin skin and very few seeds. Their high water content provides a cool, refreshing contrast to the creamy dip.
- 1 cup Sugar Snap Peas: These provide a unique, sweet crunch. They can be placed whole into the cups for a beautiful green accent.
- 1 pint Cherry or Grape Tomatoes: These add a juicy, sweet-tart burst of flavor. They are best served on small skewers to keep them from sinking into the dip.
Instructions
Follow these step-by-step instructions for a foolproof assembly process, resulting in perfect, professional-looking veggie cups every time. The key is in the preparation of the components and the thoughtful arrangement.
Step 1: Prepare the Homemade Ranch Dip
- In a medium-sized mixing bowl, combine the sour cream and mayonnaise. Whisk them together until they are smooth and fully incorporated.
- Slowly pour in the buttermilk while continuing to whisk. This will thin the mixture to a perfect dip consistency – not too thick, not too runny.
- Add the finely chopped fresh chives, parsley, and dill to the bowl. Stir them in, ensuring they are evenly distributed.
- Sprinkle in the garlic powder, onion powder, salt, and freshly ground black pepper. Whisk everything together one last time until the dip is uniform in color and texture.
- For the best flavor, cover the bowl with plastic wrap and refrigerate the dip for at least 30 minutes (an hour is even better). This allows the flavors of the herbs and spices to meld together and fully develop.
Step 2: Prepare the Vegetables
- Wash all vegetables thoroughly under cold running water and pat them completely dry with a paper towel. This is a crucial step to prevent the dip from becoming watery.
- Peel the carrots. Trim the ends off the carrots, celery, and cucumber.
- Cut the carrots, celery, bell peppers, and cucumber into uniform sticks, approximately 3-4 inches long and about ½ inch thick. The goal is to have them stand tall in the cups without flopping over. For the bell peppers, remove the seeds and white pith before slicing them into strips.
- If using, string the sugar snap peas by pulling the tough string that runs along the seam.
- Thread 2-3 cherry or grape tomatoes onto small 4-inch wooden or bamboo skewers. This makes them easy to dip and prevents them from getting lost at the bottom of the cup.
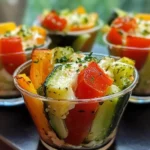
Step 3: Assemble the Ranch Veggie Cups
- Set out your chosen cups (9-ounce clear plastic cups are ideal for visibility and size).
- Give your chilled ranch dip a final stir. Spoon or pipe approximately 2 to 3 tablespoons of the dip into the bottom of each cup. Using a piping bag (or a zip-top bag with the corner snipped off) can make this process cleaner and faster.
- Begin arranging the vegetable sticks in the dip. Start by placing the taller, sturdier vegetables like carrots and celery sticks towards the back of the cup.
- Fill in the arrangement with the more colorful bell pepper strips and cucumber sticks, fanning them out to create a beautiful, bouquet-like effect.
- Carefully place a sugar snap pea or two and a skewer of cherry tomatoes into each cup.
- Continue assembling until all cups are filled. Serve immediately or store in the refrigerator until you’re ready to serve.
Nutrition Facts
- Servings: This recipe yields approximately 12 individual veggie cups.
- Calories per serving: Approximately 150-180 calories per cup (this can vary based on the exact amount of dip and types of vegetables used).
- Fiber: A good source of dietary fiber from the variety of fresh vegetables, which is crucial for digestive health and promoting a feeling of fullness.
- Vitamin A: Carrots are a powerhouse of Vitamin A (in the form of beta-carotene), which is essential for vision health, immune function, and cell growth.
- Vitamin C: Bell peppers, particularly the red and yellow varieties, are packed with Vitamin C, a powerful antioxidant that supports the immune system and skin health.
Preparation Time
The beauty of this recipe lies in its efficiency. The total preparation time is minimal, making it perfect for busy hosts.
- Active Preparation Time: 20-25 minutes. This includes mixing the ranch dip and chopping all the fresh vegetables.
- Chilling Time (for dip): 30-60 minutes. This is a passive time where the dip is in the refrigerator, allowing the flavors to meld beautifully. You can use this time to chop the vegetables or prepare other dishes.
How to Serve
Presentation elevates these simple cups from a mere snack to a centerpiece-worthy appetizer. Here are some creative ways to serve your Ranch Veggie Cups for any occasion:
- For a Crowd or Buffet:
- Arrange the completed cups on a large, flat platter or a multi-tiered serving tray. The tiered approach adds height and visual interest to your food display.
- Group them in a circular pattern on a round tray or in neat rows on a rectangular one.
- Place them inside a shallow basket or crate lined with a decorative napkin for a rustic, farm-fresh feel.
- Occasion-Specific Serving Ideas:
- Kid’s Birthday Party: Use colorful, fun-patterned paper cups instead of clear plastic ones. Arrange them on a platter next to other kid-friendly foods.
- Super Bowl or Game Day: Place the cups in a galvanized metal beverage tub filled with ice to keep them extra cold and crisp throughout the game.
- Baby or Bridal Shower: Tie a small ribbon around each cup in a color that matches the party’s theme for an elegant and personalized touch.
- Elegant Cocktail Party: Use small, clear glass tumblers or stemless wine glasses instead of plastic cups for a more sophisticated presentation. Garnish the dip with a sprinkle of smoked paprika or extra fresh dill.
- Garnishing and Final Touches:
- Before serving, give a final sprinkle of finely chopped fresh parsley or chives over the top of the vegetables for an extra pop of color and freshness.
- Consider placing a small bowl of extra ranch dip on the side for those who love to double-dip.
- If you have guests with dietary restrictions, create small, elegant labels to place in front of the platter, indicating “Classic Ranch Veggie Cups.”
Additional Tips
Master this recipe and make it your own with these eight expert tips designed to enhance flavor, save time, and ensure perfect results every single time.
- The Make-Ahead Master Plan: You can do most of the prep work a day in advance. The ranch dip can be made up to 2-3 days ahead; its flavor actually improves as it sits. The vegetables can be washed, chopped, and stored in an airtight container in the refrigerator. To keep them extra crisp, place a damp paper towel in the container with them. Assemble the cups just a few hours before serving for maximum freshness.
- Achieve Ultimate Vegetable Crispness: For the absolute crunchiest vegetables, give them an ice bath after chopping. Submerge the cut veggie sticks in a large bowl of ice water for 15-20 minutes. This shocks them, making them incredibly crisp and firm. Just be sure to dry them thoroughly before placing them in the dip.
- Dip Variations for Every Palate: While classic ranch is a winner, don’t be afraid to mix it up. Substitute the ranch with a thick hummus, a creamy Greek yogurt and dill dip, a spicy black bean dip, or a green goddess dressing. This is a great way to cater to different tastes or dietary needs like dairy-free or vegan.
- Prevent Soggy Bottoms: To create a barrier between the dip and more delicate vegetables like cucumbers, place the sturdiest veggie stick—the bottom end of a carrot or celery stick—directly into the middle of the dip first. Then, arrange the other vegetables around it. This small trick helps keep everything crisp.
- Kid-Friendly “Build-Your-Own” Bar: Turn this appetizer into a fun activity for kids. Set up a “veggie cup bar” with individual portions of dip in cups and bowls of all the different prepared vegetables. Let the kids build their own custom veggie cups. They are far more likely to eat the vegetables they picked themselves.
- Boost the Protein: To make the cups more substantial and turn them into a light lunch or a more filling snack, add a protein element. Tuck in a stick of string cheese, a tightly rolled-up slice of turkey or ham, or even a cooked and chilled shrimp skewer.
- Choose the Right Vessel: The standard 9-ounce clear plastic cup is perfect for most occasions, but you can get creative. For smaller, bite-sized appetizers, use 5-ounce cups. For a more elegant affair, short glass tumblers work beautifully. The key is to choose a cup that is wide enough to hold the vegetables and sturdy enough not to tip over.
- Safe and Secure Transport: If you’re bringing these to a party, assembly on-site is best. But if you must transport them assembled, use a cupcake carrier. The individual compartments are perfectly sized to hold the veggie cups upright and prevent them from tipping over and spilling in transit.
FAQ Section
Here are answers to some of the most frequently asked questions about making Ranch Veggie Cups.
1. How far in advance can I fully assemble the veggie cups?
For the best results and crispest vegetables, it’s recommended to assemble the cups no more than 3-4 hours before you plan to serve them. If you assemble them too far in advance, the vegetables may begin to lose their crispness from sitting in the dip. Store them covered in the refrigerator until party time.
2. How do I prevent the vegetables from becoming soggy from the dip?
The most important step is to ensure your vegetables are completely dry after washing them. Any excess water will thin the dip and make the veggies limp. Additionally, using a thick dip (like the homemade recipe provided) and placing sturdier veggies like carrots in first helps minimize direct contact for more delicate ones.
3. Can I use store-bought ranch dip to save time?
Absolutely! While the homemade version is highly recommended for its fresh flavor, using your favorite store-bought ranch dip is a fantastic time-saver. Look for a thicker, “dip-style” ranch rather than a thinner “dressing-style” one for the best consistency.
4. What are the absolute best vegetables to use for veggie cups?
The best vegetables are ones that are firm, crunchy, and can be cut into sticks. Carrots, celery, bell peppers (all colors), and English cucumbers are the classic, can’t-miss choices. Other great options include jicama sticks, sugar snap peas, and blanched asparagus or green beans.
5. Some of my vegetables, like celery, tend to brown after being cut. How can I prevent this?
To prevent oxidation and browning on vegetables like celery or jicama, you can toss them in a little bit of fresh lemon juice after cutting them. The citric acid helps to preserve their color and adds a subtle, fresh brightness to their flavor.
6. Is this Ranch Veggie Cups recipe gluten-free?
Yes, this recipe is naturally gluten-free. All the components—fresh vegetables, sour cream, mayonnaise, buttermilk, and spices—do not contain gluten. However, if you are serving someone with a severe allergy, it’s always wise to double-check the labels on your store-bought ingredients (like mayonnaise or spices) to ensure they are certified gluten-free and produced in a gluten-free facility.
7. How many veggie cups does this specific recipe yield?
This recipe is designed to make approximately 12 individual veggie cups, using about 2-3 tablespoons of dip per 9-ounce cup. You can easily scale the recipe up or down depending on the size of your gathering. Simply double the ingredients for 24 cups, or halve them for 6.
8. My homemade dip seems too thin or too thick. How can I fix it?
The consistency of the dip is easy to adjust. If your dip is too thick, simply whisk in a little more buttermilk, one teaspoon at a time, until you reach your desired consistency. If the dip is too thin, you can thicken it by stirring in a bit more sour cream or even a tablespoon of cream cheese. Remember that the dip will thicken slightly as it chills in the refrigerator.
Ranch Veggie Cups Recipe
Ingredients
This recipe focuses on fresh, high-quality components to create the most vibrant and flavorful veggie cups. We’ll cover both a homemade ranch dip that is truly exceptional and the best vegetables to use for maximum crunch and color.
For the Homemade Creamy Ranch Dip (Yields approx. 2 cups):
- 1 cup Sour Cream: This forms the thick, tangy base of our dip. Full-fat sour cream will yield the creamiest result, providing a rich mouthfeel that clings perfectly to the vegetables.
- ½ cup Mayonnaise: Use a good quality mayonnaise to add richness and a smooth, luxurious texture that balances the tang of the sour cream and buttermilk.
- ½ cup Buttermilk: This is the secret ingredient for authentic ranch flavor. It thins the dip to the perfect consistency and adds a distinctive, pleasant tanginess. If you don’t have buttermilk, you can make a substitute by adding 1/2 tablespoon of lemon juice or white vinegar to a measuring cup and filling it to the ½ cup line with whole milk; let it sit for 5–10 minutes.
- 1 tbsp Fresh Chives, finely chopped: Adds a mild, delicate onion flavor that is essential to the ranch profile.
- 1 tbsp Fresh Parsley, finely chopped: Provides a clean, peppery, and bright note that lightens the richness of the dip.
- 1 tsp Fresh Dill, finely chopped: Delivers a unique, slightly anise-like flavor that is characteristic of a great ranch dressing.
- ½ tsp Garlic Powder: Offers a consistent, savory garlic flavor without the harsh bite of raw garlic.
- ½ tsp Onion Powder: Provides a sweet and savory onion background note that deepens the overall flavor.
- ½ tsp Salt (or to taste): Enhances all the other flavors in the dip.
- ¼ tsp Black Pepper, freshly ground: Adds a touch of mild spice and complexity.
For the Vegetable Sticks (Use a colorful variety):
- 4 large Carrots: Choose firm, bright orange carrots. Their natural sweetness and satisfying crunch make them a universal favorite.
- 4 stalks Celery: Look for crisp, light green stalks. Celery offers a savory, slightly salty flavor and a wonderful fibrous snap.
- 2 large Bell Peppers (different colors, e.g., red and yellow): Red bell peppers are sweet and packed with Vitamin C, while yellow peppers offer a milder, fruity flavor. Their vibrant colors make the cups visually stunning.
- 1 large English Cucumber: These are ideal because they have thin skin and very few seeds. Their high water content provides a cool, refreshing contrast to the creamy dip.
- 1 cup Sugar Snap Peas: These provide a unique, sweet crunch. They can be placed whole into the cups for a beautiful green accent.
- 1 pint Cherry or Grape Tomatoes: These add a juicy, sweet-tart burst of flavor. They are best served on small skewers to keep them from sinking into the dip.
Instructions
Follow these step-by-step instructions for a foolproof assembly process, resulting in perfect, professional-looking veggie cups every time. The key is in the preparation of the components and the thoughtful arrangement.
Step 1: Prepare the Homemade Ranch Dip
- In a medium-sized mixing bowl, combine the sour cream and mayonnaise. Whisk them together until they are smooth and fully incorporated.
- Slowly pour in the buttermilk while continuing to whisk. This will thin the mixture to a perfect dip consistency – not too thick, not too runny.
- Add the finely chopped fresh chives, parsley, and dill to the bowl. Stir them in, ensuring they are evenly distributed.
- Sprinkle in the garlic powder, onion powder, salt, and freshly ground black pepper. Whisk everything together one last time until the dip is uniform in color and texture.
- For the best flavor, cover the bowl with plastic wrap and refrigerate the dip for at least 30 minutes (an hour is even better). This allows the flavors of the herbs and spices to meld together and fully develop.
Step 2: Prepare the Vegetables
- Wash all vegetables thoroughly under cold running water and pat them completely dry with a paper towel. This is a crucial step to prevent the dip from becoming watery.
- Peel the carrots. Trim the ends off the carrots, celery, and cucumber.
- Cut the carrots, celery, bell peppers, and cucumber into uniform sticks, approximately 3-4 inches long and about ½ inch thick. The goal is to have them stand tall in the cups without flopping over. For the bell peppers, remove the seeds and white pith before slicing them into strips.
- If using, string the sugar snap peas by pulling the tough string that runs along the seam.
- Thread 2-3 cherry or grape tomatoes onto small 4-inch wooden or bamboo skewers. This makes them easy to dip and prevents them from getting lost at the bottom of the cup.
Step 3: Assemble the Ranch Veggie Cups
- Set out your chosen cups (9-ounce clear plastic cups are ideal for visibility and size).
- Give your chilled ranch dip a final stir. Spoon or pipe approximately 2 to 3 tablespoons of the dip into the bottom of each cup. Using a piping bag (or a zip-top bag with the corner snipped off) can make this process cleaner and faster.
- Begin arranging the vegetable sticks in the dip. Start by placing the taller, sturdier vegetables like carrots and celery sticks towards the back of the cup.
- Fill in the arrangement with the more colorful bell pepper strips and cucumber sticks, fanning them out to create a beautiful, bouquet-like effect.
- Carefully place a sugar snap pea or two and a skewer of cherry tomatoes into each cup.
- Continue assembling until all cups are filled. Serve immediately or store in the refrigerator until you’re ready to serve.
Nutrition
- Serving Size: one normal portion
- Calories: 180


