


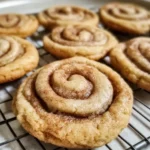
There are certain smells that instantly transport you back to a place of pure comfort, and for me, the scent of warm cinnamon and sugar is at the very top of that list. I remember lazy Sunday mornings, the air thick with the promise of my grandmother’s legendary cinnamon rolls—a process that took hours of patient kneading, rising, and waiting. While I cherish those memories, my modern, hectic life doesn’t always allow for such a time-intensive baking project. This led me on a quest: could I capture the soul-warming essence of a gooey cinnamon roll in a fraction of the time? The answer, I’m overjoyed to report, is a resounding yes, and it comes in the form of these Quick Cinnamon Roll Cookies. The first time I baked a batch, my kitchen filled with that iconic, nostalgic aroma, and I knew I was onto something special. When my family came home, their eyes lit up. My husband, a cinnamon roll purist, was skeptical at first, but one bite of the soft, chewy cookie with its distinct cinnamon swirl and tangy cream cheese glaze won him over completely. My kids devoured them, leaving a trail of powdered sugar and demanding to know when I could make them again. These cookies are now a staple in our home, our go-to for a quick dessert, a special after-school treat, or a welcome addition to any holiday cookie platter. They deliver all the flavor of a classic cinnamon roll—the buttery dough, the sweet and spicy filling, the creamy frosting—without the long wait. They are, in a word, revolutionary.
Ingredients
Here is the complete list of everything you’ll need, broken down by component, to create these unforgettable cookies. Using high-quality ingredients at the correct temperature is the first step toward baking perfection.
For the Cookie Dough:
- Unsalted Butter (1 cup, softened): Using softened, room temperature butter is crucial for creating a light, airy dough when creamed with the sugar.
- Granulated Sugar (1 cup): This provides the primary sweetness and contributes to the cookies’ tender structure and golden-brown edges.
- Large Egg (1, room temperature): The egg acts as a binder, holding the dough together and adding richness and moisture.
- Vanilla Extract (2 teaspoons): A high-quality vanilla extract enhances all the other flavors in the cookie, adding a layer of aromatic depth.
- All-Purpose Flour (3 cups, spooned and leveled): This is the foundation of our cookie, providing the structure. Be sure to measure it correctly to avoid a dense, dry cookie.
- Baking Powder (1 teaspoon): This leavening agent gives the cookies a slight lift, ensuring they are soft and puffy rather than flat.
- Salt (½ teaspoon): A small amount of salt is essential to balance the sweetness and bring out the complex flavors of the butter and cinnamon.
For the Cinnamon Swirl Filling:
- Unsalted Butter (¼ cup, melted): Melted butter acts as the “glue” for the cinnamon-sugar filling, ensuring it sticks to the dough and creates a rich, gooey swirl.
- Brown Sugar (½ cup, packed): Brown sugar brings a deep, molasses-like sweetness and moisture to the filling, which is characteristic of a classic cinnamon roll.
- Ground Cinnamon (2 tablespoons): This is the star of the show. Don’t be shy with the cinnamon; it provides the warm, spicy flavor that defines these cookies.
For the Cream Cheese Glaze:
- Cream Cheese (4 ounces, softened): Softened cream cheese is key to a smooth, lump-free glaze. It provides that signature tangy flavor that perfectly cuts through the sweetness of the cookie.
- Unsalted Butter (2 tablespoons, softened): A little butter in the glaze adds richness and helps it set to a perfect consistency.
- Powdered Sugar (1 cup, sifted): Sifted powdered sugar dissolves easily, creating a silky-smooth glaze without any gritty texture.
- Milk or Cream (1-2 tablespoons): This is used to thin the glaze to your desired drizzling consistency. Start with one tablespoon and add more as needed.
- Vanilla Extract (½ teaspoon): A hint of vanilla in the glaze ties all the flavors together beautifully.
Instructions
Follow these step-by-step instructions carefully for soft, chewy cookies with a perfect cinnamon swirl every single time. The process is straightforward and rewarding.
Step 1: Prepare the Cookie Dough
In a large mixing bowl, using a stand mixer with a paddle attachment or a hand mixer, cream together the 1 cup of softened butter and 1 cup of granulated sugar. Beat on medium-high speed for about 2-3 minutes, or until the mixture is light in color, fluffy, and has significantly increased in volume. Scrape down the sides of the bowl as needed. Add the room temperature egg and 2 teaspoons of vanilla extract, and beat again until everything is well combined, about 1 minute more.
Step 2: Combine Dry Ingredients
In a separate medium bowl, whisk together the 3 cups of all-purpose flour, 1 teaspoon of baking powder, and ½ teaspoon of salt. This step ensures that the leavening agent and salt are evenly distributed throughout the dough, which is essential for a uniform texture and rise.
Step 3: Finish the Dough
With the mixer on low speed, gradually add the dry ingredient mixture to the wet ingredients. Mix only until the flour is just incorporated. Be careful not to overmix at this stage; overmixing develops the gluten in the flour, which can lead to tough, dense cookies instead of soft and tender ones. The dough will be soft and slightly sticky.
Step 4: Roll and Fill the Dough
Turn the dough out onto a large piece of parchment paper. Dust the dough and a rolling pin lightly with flour to prevent sticking. Roll the dough into a large rectangle, approximately 12×16 inches and about ¼ inch thick. In a small bowl, stir together the ½ cup of packed brown sugar and 2 tablespoons of ground cinnamon for the filling. Brush the entire surface of the rolled-out dough with the ¼ cup of melted butter. Sprinkle the cinnamon-sugar mixture evenly over the buttered dough, leaving a small ½-inch border along one of the long edges. Gently press the filling into the dough with your hands.
Step 5: Roll and Chill the Log
Starting from the long edge without the border, tightly roll the dough into a log. The parchment paper can help you lift and guide the roll to keep it tight. The border you left clean will help seal the log shut. Once rolled, wrap the log tightly in the parchment paper or plastic wrap. Place the log in the refrigerator to chill for at least 2 hours, or up to overnight. This chilling step is absolutely critical. It solidifies the butter, which prevents the cookies from spreading too much in the oven and helps the swirl keep its shape.
Step 6: Slice and Bake
Preheat your oven to 350°F (175°C). Line two baking sheets with parchment paper. Remove the chilled log from the refrigerator and unwrap it. Using a sharp, thin knife or unflavored dental floss for the cleanest cut, slice the log into cookies that are about ½ inch thick. Arrange the slices on the prepared baking sheets, leaving about 2 inches of space between each cookie to allow for spreading.
Step 7: Bake to Perfection
Bake for 10-12 minutes, or until the edges are lightly golden brown and the centers are set but still look slightly soft. They will continue to firm up as they cool on the baking sheet. For a chewier cookie, err on the side of underbaking.
Step 8: Cool and Prepare the Glaze
Let the cookies cool on the baking sheets for 5 minutes before transferring them to a wire rack to cool completely. While the cookies are cooling, prepare the glaze. In a medium bowl, beat the 4 ounces of softened cream cheese and 2 tablespoons of softened butter with a hand mixer until smooth and creamy. Sift in the 1 cup of powdered sugar and beat on low speed until combined, then increase the speed and beat until smooth. Add the ½ teaspoon of vanilla extract and 1 tablespoon of milk or cream. Beat again until you reach a smooth, drizzling consistency. If the glaze is too thick, add more milk, one teaspoon at a time.
Step 9: Glaze the Cookies
Once the cookies are completely cool, use a spoon or a piping bag to drizzle the cream cheese glaze over them. Let the glaze set for about 20-30 minutes before serving or storing.
Nutrition Facts
Please note that these values are an estimate and can vary based on the specific ingredients and brands used.
- Servings: This recipe yields approximately 24-30 cookies.
- Calories per serving (1 cookie): Approximately 195 kcal. This is a rich, satisfying treat perfect for a special occasion or a cozy afternoon.
- Carbohydrates: Roughly 25g per cookie. The primary source of quick energy, coming from the sugars and flour.
- Fat: Approximately 10g per cookie. Sourced from the butter and cream cheese, this provides the rich flavor and tender texture.
- Protein: Approximately 2g per cookie. While not a high-protein food, it contributes to the overall structure and satisfaction.
- Sugar: Approximately 15g per cookie. This is what makes it a dessert! The combination of granulated, brown, and powdered sugar gives it that classic sweet taste.
Preparation Time
The beauty of this recipe is that it delivers cinnamon roll flavor without the all-day commitment. The active time is minimal, with most of the duration dedicated to hands-off chilling.
- Active Preparation Time: 25-30 minutes (mixing dough, rolling, filling, and slicing).
- Chilling Time: 2 hours (minimum). This is crucial for the recipe’s success.
- Baking Time: 10-12 minutes per batch.
- Total Time: Approximately 2 hours and 45 minutes.
How to Serve
These Quick Cinnamon Roll Cookies are incredibly versatile. They can be dressed up or down for any occasion. Here are some of our favorite ways to serve them:
- The Classic Way:
- Serve them slightly warm, either fresh from the oven (after glazing) or gently reheated for 10 seconds in the microwave.
- Pair with a tall, cold glass of milk for the ultimate nostalgic comfort food experience.
- For Your Morning Coffee:
- Enjoy a cookie or two alongside your morning cup of coffee or a foamy latte. The warm cinnamon spice is a perfect complement to the rich, bitter notes of the coffee.
- They make a fantastic, indulgent alternative to a traditional breakfast pastry.
- As a Dessert Centerpiece:
- Arrange the cookies on a tiered cake stand or a beautiful platter for a party or gathering.
- Dust with a little extra powdered sugar or a sprinkle of cinnamon just before serving for an elegant finishing touch.
- They are a guaranteed hit at holiday cookie exchanges and potlucks.
- Ice Cream Sandwiches:
- For an incredibly decadent treat, place a scoop of high-quality vanilla bean or coffee-flavored ice cream between two cookies.
- You can roll the edges in mini chocolate chips or chopped pecans for extra texture and flavor.
- Gift-Giving and Care Packages:
- Stack the cookies in a clear cellophane bag and tie it with a festive ribbon for a beautiful and delicious homemade gift.
- They travel well, making them perfect for including in care packages for college students or loved ones far away.
Additional Tips
To elevate your Cinnamon Roll Cookies from great to absolutely perfect, keep these eight professional tips in mind.
1. Room Temperature Ingredients are Non-Negotiable: For the dough and glaze, using truly softened (not melted!) butter and cream cheese, as well as room temperature eggs, is critical. These ingredients emulsify better, creating a smoother, more uniform texture and trapping air, which results in a lighter, fluffier cookie.
2. Don’t Overmix the Dough: Once you add the flour, mix only until you no longer see dry streaks. Overmixing develops gluten, which is great for chewy bread but results in tough, dense, and disappointingly hard cookies. Mix on low speed and stop as soon as it comes together.
3. The Chill is The Thrill: Do not, under any circumstances, skip the 2-hour chilling period. This step is what prevents your cookies from spreading into thin, flat discs in the oven. It solidifies the butter in the dough and the filling, ensuring your cookies hold their shape and the swirl remains distinct and beautiful. If your kitchen is warm, you can even chill the sliced cookies on the baking sheet for 15 minutes before baking.
4. The Secret to a Clean Cut: For perfectly round cookies with a crisp swirl, use a piece of unflavored dental floss instead of a knife. Slide the floss under the log, bring the ends up, cross them over the top, and pull. This “pinches” through the dough cleanly without squishing the log or smearing the filling.
5. Measure Your Flour Correctly: How you measure flour can dramatically change your cookie’s texture. Instead of scooping directly from the bag (which compacts the flour), use a spoon to fluff up the flour in its container. Then, spoon the flour into your measuring cup until it’s overflowing, and use the back of a knife to level it off. This prevents dry, crumbly cookies.
6. Watch the Cookies, Not the Clock: Ovens can vary in temperature. Start checking your cookies at the 10-minute mark. The perfect moment to pull them out is when the edges are just starting to turn a light golden brown, but the centers still look slightly soft and underdone. They will finish baking from the residual heat of the pan, yielding a perfectly soft and chewy center.
7. Customize Your Glaze Consistency: The glaze is all about personal preference. For a thicker, more frosting-like topping, use less milk and more powdered sugar. For a thin, translucent drizzle that cracks when you bite into it, use more milk. Always add liquid a tiny bit at a time until you reach your desired consistency.
8. Even Rolling for an Even Bake: When rolling out the dough, try to maintain a uniform thickness across the entire rectangle. If some parts are thinner than others, those cookies will bake faster and may burn while the thicker parts remain undercooked. Using rolling pin guides can be a helpful tool for this.
FAQ Section
Here are answers to some of the most frequently asked questions about making these Quick Cinnamon Roll Cookies.
1. Can I make the cookie dough ahead of time?
Absolutely! This is a great make-ahead recipe. You can prepare the dough, roll it into a log, and wrap it tightly in plastic wrap. The log can be stored in the refrigerator for up to 3 days. When you’re ready to bake, simply slice and bake as directed, you might need to add a minute or two to the baking time since the dough is extra cold.
2. Why did my cookies spread so much and lose their swirl?
The most common culprit is insufficient chilling time. If the butter in the dough and filling is too soft when it goes into the oven, it will melt instantly and cause the cookies to spread out, blurring the swirl. Ensure the log is firm to the touch after chilling. Another reason could be that your butter was too soft—almost melted—when you creamed it with the sugar.
3. Can I freeze these cookies?
Yes, they freeze beautifully! There are two ways to do it. You can freeze the unbaked, sliced cookies by placing them on a baking sheet in a single layer until solid, then transferring them to a freezer bag for up to 3 months. Bake directly from frozen, adding 2-3 minutes to the bake time. Alternatively, you can freeze the fully baked and cooled (unglazed) cookies. Store them in an airtight container with parchment paper between layers. Thaw at room temperature and then apply the fresh glaze before serving.
4. What if I don’t have a stand mixer?
No problem at all! You can make this entire recipe with a good electric hand mixer. If you don’t have a hand mixer, you can even make it by hand. It will require more elbow grease, especially for creaming the butter and sugar, but it’s completely doable. Use a large bowl and a sturdy whisk or wooden spoon. Just make sure to cream the butter and sugar until it’s truly light and fluffy.
5. Can I use brown sugar in the cookie dough instead of granulated sugar?
You can, but it will change the final cookie. Using all brown sugar will result in a much softer, chewier, and more moist cookie with a deeper, caramel-like flavor. The cookies may also spread a bit more. For a nice compromise, you could try using half granulated sugar and half brown sugar in the dough.
6. My cream cheese glaze is lumpy. What did I do wrong?
Lumps in the glaze are almost always caused by the cream cheese or butter being too cold. They must be fully softened to room temperature to blend smoothly with the powdered sugar. Another tip is to sift your powdered sugar before adding it, as it can sometimes have small, hard clumps. If you still have lumps, you can try pressing the glaze through a fine-mesh sieve with a spatula.
7. Can I make these cookies gluten-free?
Yes, you likely can. The best option is to use a high-quality “cup-for-cup” or “1-to-1” gluten-free all-purpose flour blend that already contains xanthan gum. Substitute it in the same amount as the all-purpose flour. Be aware that the texture might be slightly different—sometimes a bit more delicate or sandy—but the flavor will still be fantastic.
8. Why did my cookies turn out hard instead of soft and chewy?
There are three main reasons for hard cookies. First is overbaking; even one or two extra minutes in the oven can bake out the moisture, so pull them when the centers look a touch underdone. Second is overmixing the dough after adding flour, which develops too much gluten. The third, and very common, reason is measuring the flour incorrectly by scooping it, which adds too much flour to the dough, making it dry and dense. Remember to spoon and level.
Quick Cinnamon Roll Cookies
Ingredients
Here is the complete list of everything you’ll need, broken down by component, to create these unforgettable cookies. Using high-quality ingredients at the correct temperature is the first step toward baking perfection.
For the Cookie Dough:
- Unsalted Butter (1 cup, softened): Using softened, room temperature butter is crucial for creating a light, airy dough when creamed with the sugar.
- Granulated Sugar (1 cup): This provides the primary sweetness and contributes to the cookies’ tender structure and golden-brown edges.
- Large Egg (1, room temperature): The egg acts as a binder, holding the dough together and adding richness and moisture.
- Vanilla Extract (2 teaspoons): A high-quality vanilla extract enhances all the other flavors in the cookie, adding a layer of aromatic depth.
- All-Purpose Flour (3 cups, spooned and leveled): This is the foundation of our cookie, providing the structure. Be sure to measure it correctly to avoid a dense, dry cookie.
- Baking Powder (1 teaspoon): This leavening agent gives the cookies a slight lift, ensuring they are soft and puffy rather than flat.
- Salt (½ teaspoon): A small amount of salt is essential to balance the sweetness and bring out the complex flavors of the butter and cinnamon.
For the Cinnamon Swirl Filling:
- Unsalted Butter (¼ cup, melted): Melted butter acts as the “glue” for the cinnamon-sugar filling, ensuring it sticks to the dough and creates a rich, gooey swirl.
- Brown Sugar (½ cup, packed): Brown sugar brings a deep, molasses-like sweetness and moisture to the filling, which is characteristic of a classic cinnamon roll.
- Ground Cinnamon (2 tablespoons): This is the star of the show. Don’t be shy with the cinnamon; it provides the warm, spicy flavor that defines these cookies.
For the Cream Cheese Glaze:
- Cream Cheese (4 ounces, softened): Softened cream cheese is key to a smooth, lump-free glaze. It provides that signature tangy flavor that perfectly cuts through the sweetness of the cookie.
- Unsalted Butter (2 tablespoons, softened): A little butter in the glaze adds richness and helps it set to a perfect consistency.
- Powdered Sugar (1 cup, sifted): Sifted powdered sugar dissolves easily, creating a silky-smooth glaze without any gritty texture.
- Milk or Cream (1-2 tablespoons): This is used to thin the glaze to your desired drizzling consistency. Start with one tablespoon and add more as needed.
- Vanilla Extract (½ teaspoon): A hint of vanilla in the glaze ties all the flavors together beautifully.
Instructions
Follow these step-by-step instructions carefully for soft, chewy cookies with a perfect cinnamon swirl every single time. The process is straightforward and rewarding.
Step 1: Prepare the Cookie Dough
In a large mixing bowl, using a stand mixer with a paddle attachment or a hand mixer, cream together the 1 cup of softened butter and 1 cup of granulated sugar. Beat on medium-high speed for about 2-3 minutes, or until the mixture is light in color, fluffy, and has significantly increased in volume. Scrape down the sides of the bowl as needed. Add the room temperature egg and 2 teaspoons of vanilla extract, and beat again until everything is well combined, about 1 minute more.
Step 2: Combine Dry Ingredients
In a separate medium bowl, whisk together the 3 cups of all-purpose flour, 1 teaspoon of baking powder, and ½ teaspoon of salt. This step ensures that the leavening agent and salt are evenly distributed throughout the dough, which is essential for a uniform texture and rise.
Step 3: Finish the Dough
With the mixer on low speed, gradually add the dry ingredient mixture to the wet ingredients. Mix only until the flour is just incorporated. Be careful not to overmix at this stage; overmixing develops the gluten in the flour, which can lead to tough, dense cookies instead of soft and tender ones. The dough will be soft and slightly sticky.
Step 4: Roll and Fill the Dough
Turn the dough out onto a large piece of parchment paper. Dust the dough and a rolling pin lightly with flour to prevent sticking. Roll the dough into a large rectangle, approximately 12×16 inches and about ¼ inch thick. In a small bowl, stir together the ½ cup of packed brown sugar and 2 tablespoons of ground cinnamon for the filling. Brush the entire surface of the rolled-out dough with the ¼ cup of melted butter. Sprinkle the cinnamon-sugar mixture evenly over the buttered dough, leaving a small ½-inch border along one of the long edges. Gently press the filling into the dough with your hands.
Step 5: Roll and Chill the Log
Starting from the long edge without the border, tightly roll the dough into a log. The parchment paper can help you lift and guide the roll to keep it tight. The border you left clean will help seal the log shut. Once rolled, wrap the log tightly in the parchment paper or plastic wrap. Place the log in the refrigerator to chill for at least 2 hours, or up to overnight. This chilling step is absolutely critical. It solidifies the butter, which prevents the cookies from spreading too much in the oven and helps the swirl keep its shape.
Step 6: Slice and Bake
Preheat your oven to 350°F (175°C). Line two baking sheets with parchment paper. Remove the chilled log from the refrigerator and unwrap it. Using a sharp, thin knife or unflavored dental floss for the cleanest cut, slice the log into cookies that are about ½ inch thick. Arrange the slices on the prepared baking sheets, leaving about 2 inches of space between each cookie to allow for spreading.
Step 7: Bake to Perfection
Bake for 10-12 minutes, or until the edges are lightly golden brown and the centers are set but still look slightly soft. They will continue to firm up as they cool on the baking sheet. For a chewier cookie, err on the side of underbaking.
Step 8: Cool and Prepare the Glaze
Let the cookies cool on the baking sheets for 5 minutes before transferring them to a wire rack to cool completely. While the cookies are cooling, prepare the glaze. In a medium bowl, beat the 4 ounces of softened cream cheese and 2 tablespoons of softened butter with a hand mixer until smooth and creamy. Sift in the 1 cup of powdered sugar and beat on low speed until combined, then increase the speed and beat until smooth. Add the ½ teaspoon of vanilla extract and 1 tablespoon of milk or cream. Beat again until you reach a smooth, drizzling consistency. If the glaze is too thick, add more milk, one teaspoon at a time.
Step 9: Glaze the Cookies
Once the cookies are completely cool, use a spoon or a piping bag to drizzle the cream cheese glaze over them. Let the glaze set for about 20-30 minutes before serving or storing.
Nutrition
- Serving Size: one normal portion
- Calories: 195
- Sugar: 15g
- Fat: 10g
- Carbohydrates: 25g
- Protein: 2g


