


I still remember the first time I made this vibrant dip. We were having a last-minute family get-together, and I was scrambling for a healthy, crowd-pleasing appetizer that wouldn’t keep me stuck in the kitchen for hours. I’d seen pictures of stunning, magenta-colored hummus online and always thought it must be complicated. On a whim, I grabbed some pre-cooked beets from the pantry, a can of chickpeas, and the usual hummus suspects. In less than fifteen minutes, my food processor whirred to a stop, revealing the most breathtakingly beautiful, creamy dip I had ever made. I swirled it into a bowl, topped it with some fresh herbs and seeds, and set it out with a platter of veggies and pita. The reaction was immediate. My kids, who normally eye vegetables with deep suspicion, were drawn in by the electric pink color. My husband, a classic hummus purist, admitted it was one of the best versions he’d ever tasted, with a subtle, earthy sweetness that was utterly addictive. The bowl was scraped clean before the main course was even ready. This Quick Beetroot Hummus recipe has since become my secret weapon for everything from after-school snacks to elegant party starters. It’s proof that show-stopping, delicious, and healthy food doesn’t have to be difficult or time-consuming.
Ingredients
This recipe relies on a few simple, high-quality ingredients to create its signature flavor and stunning color. Using pre-cooked, vacuum-packed beets is the key to making this recipe incredibly fast, but we’ll explore other options in the tips section.
- 1 (15-ounce) can of Chickpeas (Garbanzo Beans): Drained, but reserve the liquid (aquafaba). This is the creamy, protein-packed base of our hummus. Canned chickpeas make this recipe exceptionally quick and easy.
- 8 ounces (approx. 250g) Cooked Beets: This is usually one large or two small pre-cooked beets, often found vacuum-packed in the produce section. They provide the signature color and a wonderful, earthy sweetness.
- 1/4 cup (60ml) Tahini: A smooth, high-quality sesame paste is crucial. It adds a nutty depth and is essential for that classic, creamy hummus texture.
- 1/4 cup (60ml) Fresh Lemon Juice: Always use fresh-squeezed for the brightest flavor. This cuts through the richness of the tahini and the earthiness of the beets, balancing the entire dip.
- 2 cloves Garlic: Fresh garlic adds a pungent, savory kick. You can adjust this to your personal taste, using more for a spicier hummus or less for a milder flavor.
- 2 tablespoons Extra Virgin Olive Oil: A good quality olive oil adds richness, helps create a smooth consistency, and provides healthy fats. More is used for drizzling on top before serving.
- 1 teaspoon Ground Cumin: This classic hummus spice adds a warm, smoky, and savory undertone that pairs beautifully with both the chickpeas and the beets.
- 1/2 teaspoon Sea Salt: Essential for bringing all the flavors together. You can adjust to taste after blending.
- 2-4 tablespoons Reserved Chickpea Liquid (Aquafaba): This starchy liquid is the secret to a light, fluffy hummus without watering it down. Use as needed to reach your desired consistency.
Instructions
Making this hummus is as simple as gathering your ingredients and letting a food processor do all the work. The entire process takes less than 15 minutes from start to finish.
- Prepare the Ingredients: Open your can of chickpeas and drain them over a small bowl to reserve the liquid (aquafaba). Peel your garlic cloves. If your cooked beets are large, roughly chop them into a few smaller pieces to help your food processor.
- Combine in Food Processor: Add the drained chickpeas, cooked beets, tahini, fresh lemon juice, garlic cloves, extra virgin olive oil, ground cumin, and sea salt to the bowl of a food processor or a high-powered blender.
- Initial Blend: Secure the lid and blend the ingredients on high for about 1 minute. The mixture will be thick and likely a bit chunky at this stage. Scrape down the sides of the bowl with a spatula to ensure everything is incorporated.
- Add Liquid and Blend Until Smooth: With the processor running on low, slowly stream in 2 tablespoons of the reserved aquafaba. Once it’s incorporated, turn the processor back to high and let it run for a full 3-4 minutes. This extended blending time is key to achieving an ultra-creamy, whipped texture. Be patient!
- Check Consistency and Adjust: Stop the processor and check the consistency. If it’s still thicker than you’d like, add another 1-2 tablespoons of aquafaba and blend again until you reach your desired smoothness.
- Taste and Final Seasoning: Give the hummus a taste. This is your chance to perfect it. Does it need more salt? A little more lemon juice for brightness? A bit more cumin for warmth? Add any adjustments and give it one final, quick blend to combine.
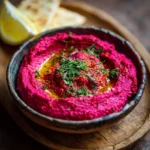
- Serve: Transfer the finished hummus to a serving bowl. Use the back of a spoon to create an attractive swirl on top. Drizzle generously with extra virgin olive oil and add any optional garnishes you like (see “How to Serve” for ideas).
Nutrition Facts
This recipe makes approximately 2.5 cups of hummus, serving about 10 people with a 1/4 cup serving size.
- Servings: 10
- Calories Per Serving: Approximately 120 kcal
- Rich in Dietary Fiber: Thanks to the chickpeas and beets, each serving provides a good dose of fiber, which is crucial for digestive health, stabilizing blood sugar levels, and promoting a feeling of fullness.
- Excellent Source of Plant-Based Protein: The combination of chickpeas and tahini delivers a solid amount of protein, making this a satisfying and nourishing snack that helps with muscle repair and energy.
- Packed with Healthy Fats: The olive oil and tahini contribute heart-healthy monounsaturated and polyunsaturated fats, which are essential for brain function and overall cellular health.
- High in Vitamins and Minerals: Beets are a powerhouse of essential nutrients, including folate, manganese, potassium, and vitamin C. These support everything from immune function to energy production.
- Naturally Vegan and Gluten-Free: This recipe contains no animal products or gluten, making it a fantastic and inclusive option for individuals with various dietary needs and preferences.
Preparation Time
This recipe is designed for speed and convenience, perfect for a busy day or a last-minute gathering.
- Total Time: 10-15 minutes
The incredibly short preparation time is achieved by using two key convenience items: canned chickpeas and pre-cooked beets. This eliminates the need for soaking beans or roasting vegetables, which would typically add hours to the process. It’s a true “dump and blend” recipe that delivers maximum flavor and visual impact with minimal effort.
How to Serve
The beauty of this beetroot hummus lies in its versatility. Its vibrant color makes any platter pop, and its sweet and savory flavor profile pairs well with a huge variety of foods. Here are some of our favorite ways to serve it:
- As a Classic Dip Platter:
- Warm Pita Bread: Soft, fluffy pita bread, either whole or cut into wedges, is the ultimate companion. Lightly warm it in the oven or toaster for the best experience.
- Crunchy Pita Chips: For a textural contrast, serve with store-bought or homemade baked pita chips.
- Vegetable Crudités: The bright pink hummus looks stunning alongside a rainbow of fresh vegetables. Think carrot sticks, cucumber slices, celery sticks, bell pepper strips (red, yellow, and orange), broccoli and cauliflower florets, and snap peas.
- Crackers and Crisps: A variety of crackers, from simple sea salt to hearty whole-grain or seeded versions, are perfect for scooping.
- As a Flavorful Spread:
- Sandwiches and Wraps: Ditch the mayo and use this hummus as a healthy, flavorful base. It’s fantastic in a veggie wrap with spinach, shredded carrots, and cucumber, or on a sandwich with sliced turkey and avocado.
- Avocado Toast Upgrade: Spread a generous layer of beetroot hummus on toasted sourdough bread before topping it with sliced avocado for a colorful, nutrient-dense breakfast or lunch.
- Bagels and Savory Toasts: A wonderful alternative to cream cheese on a toasted everything bagel or a simple piece of rye toast.
- As a Component in Meals:
- Vibrant Grain Bowls: Add a large dollop to a bowl of quinoa or farro, along with roasted vegetables, leafy greens, and a protein like grilled chicken or falafel.
- Salad Dressing Booster: Whisk a spoonful of the hummus with a little extra olive oil and lemon juice to create a creamy, vibrant dressing for a simple green salad.
- Topping for Grilled Proteins: Serve a spoonful alongside grilled halloumi, roasted chicken, or flaky white fish to add a burst of color and flavor.
- Healthy Deviled Eggs: Mix the hummus with cooked egg yolks for a stunning and delicious twist on the classic appetizer.
- Garnishing for a “Wow” Factor:
- Before serving, create a swirl with a spoon and drizzle with high-quality extra virgin olive oil.
- Sprinkle with toasted sesame seeds, hemp hearts, or dukkah (an Egyptian nut and spice blend).
- Add a crumble of salty feta cheese or goat cheese.
- Top with fresh, chopped herbs like parsley, dill, or cilantro.
- A sprinkle of flaky sea salt and a crack of black pepper adds a final professional touch.
Additional Tips
Take your beetroot hummus from great to absolutely spectacular with these eight expert tips.
- For an Even Creamier Texture, Peel the Chickpeas: This step is optional but makes a noticeable difference. If you have an extra 5 minutes, you can easily pop the skins off the chickpeas by gently pinching them. The skins can sometimes add a slightly grainy texture, and removing them results in a truly silky-smooth hummus.
- Roast Your Own Beets for Deeper Flavor: If you’re not in a rush, roasting your own beets will yield a deeper, more concentrated, and sweeter flavor than pre-cooked versions. Simply wrap whole, washed beets in foil and roast at 400°F (200°C) for 45-60 minutes, or until tender. Let them cool, and the skins will slip right off.
- Taste and Adjust Fearlessly: A recipe is a guide, but your palate is the judge. After the initial blend, always taste. Is it flat? It probably needs more salt or a squeeze of lemon. Not savory enough? Add another pinch of cumin or half a clove of garlic. Perfecting the balance is what makes it yours.
- Experiment with Spices: While cumin is classic, don’t be afraid to experiment. A pinch of smoked paprika can add a lovely smoky dimension. A dash of ground coriander can lend a bright, citrusy note. For a little heat, try a pinch of cayenne pepper or a small, de-seeded chili.
- Go Tahini-Free If Needed: If you have a sesame allergy or simply don’t have tahini on hand, you can still make delicious hummus. Substitute the tahini with a creamy, neutral nut butter like cashew butter, or for a nut-free version, use sunflower seed butter. In a pinch, you can also just omit it and add an extra tablespoon or two of olive oil. The texture will be slightly different but still delicious.
- Don’t Underestimate the Power of Aquafaba: The reserved liquid from the can of chickpeas is culinary gold. It helps to thin the hummus while its starch content creates a light, airy, and emulsified texture that you can’t get from plain water. Always start with a little and add more as needed to avoid making the hummus too thin.
- Make it Ahead for Better Flavor: Hummus is a great make-ahead dish. In fact, the flavors will continue to meld and deepen as it sits. Store it in an airtight container in the refrigerator for up to 5 days. You may find it thickens slightly upon chilling; simply stir in a teaspoon of water or lemon juice to loosen it before serving.
- Use an Ice Cube for Fluffiness: This is a pro-level trick for exceptionally fluffy hummus. After the initial blend, add one or two ice cubes to the food processor along with the aquafaba. As they blend, they help to whip air into the mixture and keep it cool, resulting in a lighter, fluffier final product.
FAQ Section
Here are answers to some of the most common questions about making this Quick Beetroot Hummus.
1. Can I use raw beets instead of cooked beets for this recipe?
No, it is not recommended to use raw beets. Raw beets are very hard and fibrous, and they will not blend into a smooth, creamy consistency in a standard food processor. They also have a much more intense, earthy flavor that can be overpowering. You must use cooked beets—either pre-cooked from a package, canned, or roasted/boiled at home—to achieve the desired texture and balanced flavor.
2. How long will this beetroot hummus last in the refrigerator?
When stored properly in an airtight container, your homemade beetroot hummus will stay fresh for about 4 to 5 days in the refrigerator. The flavors will actually meld and become even more delicious after the first day. If you notice any fizziness or a sour smell, it’s time to discard it.
3. Can I freeze beetroot hummus?
Yes, you can freeze hummus. Place it in a freezer-safe, airtight container, leaving a little space at the top for expansion. Pour a thin layer of olive oil over the surface to prevent it from drying out. It can be frozen for up to 3-4 months. To thaw, transfer it to the refrigerator overnight. The texture may be slightly different after thawing; give it a vigorous stir, and you can add a little more olive oil or a squeeze of lemon juice to revive its creaminess.
4. My hummus tastes a little bitter. What went wrong?
Bitterness in hummus almost always comes from the tahini. It can be caused by using a brand of tahini that is low-quality, or the tahini itself may have gone rancid (check the expiration date and smell it). Always use a fresh, smooth, and high-quality tahini for the best results. A squeeze of lemon juice can sometimes help balance minor bitterness, but if the tahini is the culprit, it’s hard to mask completely.
5. Is this beetroot hummus recipe actually healthy?
Absolutely. It’s packed with nutrients. The chickpeas provide fiber and plant-based protein. The beets are loaded with vitamins, minerals, and antioxidants. The tahini and olive oil contribute healthy, unsaturated fats. It is a well-rounded, whole-food dip that is far more nutritious than most store-bought creamy dips, which are often high in preservatives and unhealthy fats.
6. Why didn’t my hummus turn out a vibrant, bright pink color?
The color intensity depends on the ratio of beets to chickpeas and the type of beet used. If your hummus is more of a pale pink, you likely used a smaller amount of beet relative to the chickpeas. For that shocking, electric magenta color, ensure you use a full 8 ounces of beets. Some beet varieties are also more intensely pigmented than others.
7. I don’t have a food processor. Can I use a blender?
Yes, a high-powered blender (like a Vitamix or Blendtec) is an excellent alternative and can often produce an even smoother, creamier result than a food processor. If you are using a standard blender, you may need to stop more frequently to scrape down the sides, and you might need to add a bit more liquid (aquafaba or olive oil) to help the blades catch the ingredients and blend everything smoothly.
8. Is this recipe vegan and gluten-free?
Yes, this recipe is naturally 100% vegan and gluten-free. All the ingredients—chickpeas, beets, tahini, lemon, oil, and spices—are plant-based and do not contain any gluten. It’s a perfect appetizer or snack to serve to guests with these common dietary restrictions, ensuring everyone can enjoy it. Just be sure to serve it with gluten-free crackers or bread if needed.
Quick Beetroot Hummus Recipe
Ingredients
This recipe relies on a few simple, high-quality ingredients to create its signature flavor and stunning color. Using pre-cooked, vacuum-packed beets is the key to making this recipe incredibly fast, but we’ll explore other options in the tips section.
- 1 (15-ounce) can of Chickpeas (Garbanzo Beans): Drained, but reserve the liquid (aquafaba). This is the creamy, protein-packed base of our hummus. Canned chickpeas make this recipe exceptionally quick and easy.
- 8 ounces (approx. 250g) Cooked Beets: This is usually one large or two small pre-cooked beets, often found vacuum-packed in the produce section. They provide the signature color and a wonderful, earthy sweetness.
- 1/4 cup (60ml) Tahini: A smooth, high-quality sesame paste is crucial. It adds a nutty depth and is essential for that classic, creamy hummus texture.
- 1/4 cup (60ml) Fresh Lemon Juice: Always use fresh-squeezed for the brightest flavor. This cuts through the richness of the tahini and the earthiness of the beets, balancing the entire dip.
- 2 cloves Garlic: Fresh garlic adds a pungent, savory kick. You can adjust this to your personal taste, using more for a spicier hummus or less for a milder flavor.
- 2 tablespoons Extra Virgin Olive Oil: A good quality olive oil adds richness, helps create a smooth consistency, and provides healthy fats. More is used for drizzling on top before serving.
- 1 teaspoon Ground Cumin: This classic hummus spice adds a warm, smoky, and savory undertone that pairs beautifully with both the chickpeas and the beets.
- 1/2 teaspoon Sea Salt: Essential for bringing all the flavors together. You can adjust to taste after blending.
- 2–4 tablespoons Reserved Chickpea Liquid (Aquafaba): This starchy liquid is the secret to a light, fluffy hummus without watering it down. Use as needed to reach your desired consistency.
Instructions
Making this hummus is as simple as gathering your ingredients and letting a food processor do all the work. The entire process takes less than 15 minutes from start to finish.
- Prepare the Ingredients: Open your can of chickpeas and drain them over a small bowl to reserve the liquid (aquafaba). Peel your garlic cloves. If your cooked beets are large, roughly chop them into a few smaller pieces to help your food processor.
- Combine in Food Processor: Add the drained chickpeas, cooked beets, tahini, fresh lemon juice, garlic cloves, extra virgin olive oil, ground cumin, and sea salt to the bowl of a food processor or a high-powered blender.
- Initial Blend: Secure the lid and blend the ingredients on high for about 1 minute. The mixture will be thick and likely a bit chunky at this stage. Scrape down the sides of the bowl with a spatula to ensure everything is incorporated.
- Add Liquid and Blend Until Smooth: With the processor running on low, slowly stream in 2 tablespoons of the reserved aquafaba. Once it’s incorporated, turn the processor back to high and let it run for a full 3-4 minutes. This extended blending time is key to achieving an ultra-creamy, whipped texture. Be patient!
- Check Consistency and Adjust: Stop the processor and check the consistency. If it’s still thicker than you’d like, add another 1-2 tablespoons of aquafaba and blend again until you reach your desired smoothness.
- Taste and Final Seasoning: Give the hummus a taste. This is your chance to perfect it. Does it need more salt? A little more lemon juice for brightness? A bit more cumin for warmth? Add any adjustments and give it one final, quick blend to combine.
- Serve: Transfer the finished hummus to a serving bowl. Use the back of a spoon to create an attractive swirl on top. Drizzle generously with extra virgin olive oil and add any optional garnishes you like (see “How to Serve” for ideas).
Nutrition
- Serving Size: one normal portion
- Calories: 120


