

The first time I made these Pumpkin and Walnut Energy Bars, it was out of pure necessity. The familiar mid-afternoon energy crash had hit our household, and the chorus of “I’m hungry” was echoing from every room. I wanted to create something that wasn’t just a quick fix of sugar but a genuinely nourishing snack that would carry us through until dinner. With a can of pumpkin purée in the pantry from my last fall baking spree and a bag of walnuts waiting for their moment to shine, an idea began to form. I imagined a bar that was chewy, crunchy, and packed with the warm, comforting spices of autumn. As I mixed the hearty oats, the vibrant orange pumpkin, and the rich, earthy walnuts, the kitchen began to fill with the most incredible aroma—a blend of cinnamon, nutmeg, and ginger that felt like a cozy hug. After a short chilling time, the moment of truth arrived. I cut them into neat squares and offered one to my toughest critic: my youngest child. The initial skepticism was quickly replaced by a look of pure delight. They were an instant sensation. Now, these bars are a weekly staple in our home. They’ve become our go-to pre-hike fuel, our favorite after-school snack, and the perfect healthy treat to pack for road trips. They disappear from the container almost as quickly as I can make them, a testament to their delicious power to satisfy and energize. This recipe is more than just a set of instructions; it’s a solution to the daily search for a snack that is both incredibly tasty and wonderfully good for you.
Ingredients
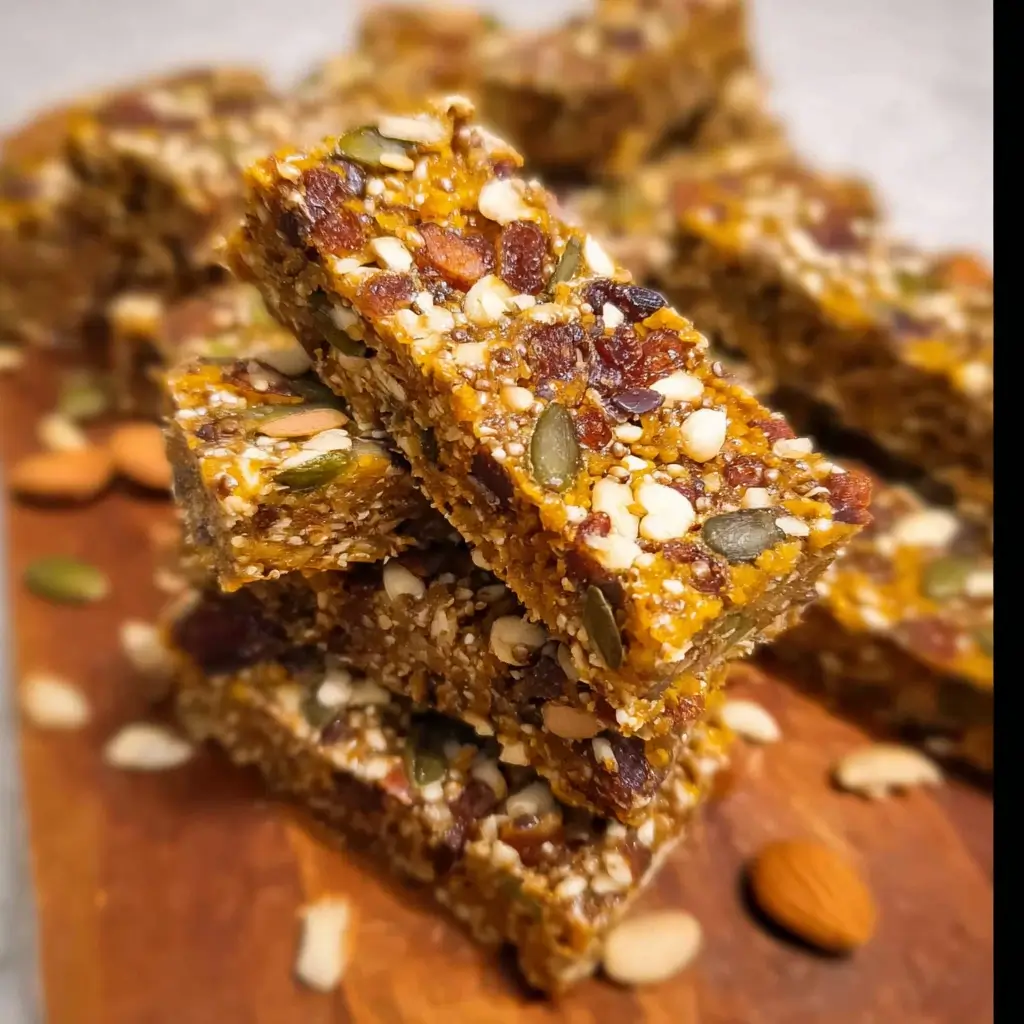
- 2 cups (180g) Rolled Oats (Old-Fashioned): The foundational ingredient, providing complex carbohydrates and soluble fiber for slow-releasing, sustained energy. Do not use instant or steel-cut oats, as they will alter the texture.
- 1 cup (120g) Raw Walnuts: Roughly chopped, these add a delightful crunch, a buttery flavor, and are a fantastic source of plant-based Omega-3 fatty acids and antioxidants.
- 1/2 cup (60g) Raw Pumpkin Seeds (Pepitas): For an extra layer of crunch and a boost of magnesium, zinc, and healthy fats.
- 1/2 cup (90g) Ground Flaxseed Meal: This acts as a powerful binder and is packed with fiber and Omega-3s, contributing to the bar’s chewy texture and nutritional profile.
- 2 tablespoons Chia Seeds: These tiny seeds are nutritional powerhouses that absorb liquid, helping to bind the bars together while providing fiber, protein, and healthy fats.
- 1 cup (245g) Pure Pumpkin Purée: Make sure to use 100% pure pumpkin purée, not pumpkin pie filling, which is pre-sweetened and spiced. This adds natural sweetness, moisture, and a significant dose of Vitamin A.
- 1/2 cup (120ml) Maple Syrup or Honey: A natural liquid sweetener that helps bind the ingredients. Maple syrup keeps the recipe vegan, while honey offers its own unique flavor and benefits.
- 1/2 cup (128g) Almond Butter or Walnut Butter: A creamy, protein-rich binder that adds healthy fats and flavor. Ensure it’s a natural, drippy variety for best results.
- 1 teaspoon Vanilla Extract: Enhances all the other flavors in the bar, adding a touch of warmth and depth.
- 2 teaspoons Pumpkin Pie Spice: A classic blend of cinnamon, nutmeg, ginger, and cloves that gives these bars their signature autumnal flavor. You can also make your own blend if preferred.
- 1/4 teaspoon Sea Salt: Crucial for balancing the sweetness and bringing out the complex flavors of the nuts and spices.
Instructions
- Prepare Your Pan: Lightly grease an 8×8 inch (20×20 cm) square baking pan or line it with parchment paper, leaving some overhang on two sides. This overhang will act as “handles,” making it much easier to lift the bars out of the pan for cutting later. Set the prepared pan aside.
- Combine Dry Ingredients: In a large mixing bowl, add all of your dry ingredients: the rolled oats, chopped walnuts, pumpkin seeds, ground flaxseed meal, chia seeds, pumpkin pie spice, and sea salt. Use a whisk or a large spoon to stir everything together thoroughly. This step is important to ensure that the spices, seeds, and nuts are evenly distributed throughout the mixture, guaranteeing that every single bite is perfectly balanced in flavor and texture.
- Combine Wet Ingredients: In a separate medium-sized, microwave-safe bowl, combine the wet ingredients: the pumpkin purée, maple syrup (or honey), and the almond or walnut butter. Whisk them together until they are smooth and well-incorporated. To make the mixture easier to stir, you can gently warm it in the microwave for 20-30 seconds. This will soften the nut butter and help everything combine into a cohesive, smooth sauce. Once mixed, stir in the vanilla extract.
- Mix Wet and Dry: Pour the wet pumpkin mixture over the dry oat mixture in the large bowl. Using a sturdy spatula or a wooden spoon, begin to fold and mix the ingredients together. Be patient and thorough. At first, it might seem like there isn’t enough liquid, but keep mixing until every oat and nut is coated and the mixture becomes uniformly moist and sticky. Scrape the bottom and sides of the bowl to ensure everything is incorporated.
- Press into the Pan: Transfer the sticky mixture into your prepared 8×8 inch pan. Spread it out evenly with your spatula. Now for the most critical step: pressing. To create dense, firm bars that won’t crumble, you must press the mixture down very firmly and evenly. You can use the back of your spatula, but a better method is to place a piece of parchment paper on top of the mixture and use the flat bottom of a measuring cup or a glass to press down with significant force across the entire surface, paying special attention to the corners and edges. The more compact you make it, the better the bars will hold together.
- Chill for Firmness: Once the mixture is tightly packed into the pan, cover it with plastic wrap or foil. Place the pan in the refrigerator to chill for at least 2 hours, though 3-4 hours or even overnight is ideal. This chilling time is not optional; it allows the chia seeds and flax meal to absorb moisture and solidify, the fats in the nut butter to harden, and all the flavors to meld together beautifully.
- Cut and Serve: After the chilling period, the block will be firm to the touch. Use the parchment paper handles to lift the entire block out of the pan and onto a cutting board. Using a large, sharp knife, slice the block into your desired size. You can make 12 larger rectangular bars or 16 smaller squares. For the cleanest cuts, you can run the knife under hot water and wipe it dry between slices. The bars are now ready to be enjoyed!
Nutrition Facts
- Servings: 16 small squares
- Calories per serving: Approximately 195 kcal
- Fiber (4g per serving): These bars are a fantastic source of dietary fiber, thanks to the oats, flaxseed, chia seeds, and nuts. Fiber is essential for maintaining a healthy digestive system, promoting regularity, and helping you feel full and satisfied for longer, which can prevent overeating and support stable blood sugar levels.
- Healthy Fats (11g per serving): The walnuts, pumpkin seeds, chia seeds, flaxseed, and nut butter provide a powerful dose of heart-healthy unsaturated fats, including Omega-3 fatty acids. These fats are crucial for brain health, reducing inflammation, and supporting overall cardiovascular wellness.
- Protein (6g per serving): With contributions from nuts, seeds, and oats, each bar provides a solid amount of plant-based protein. Protein is vital for repairing and building tissues, supporting muscle function, and contributing to the feeling of satiety, making these bars an excellent post-workout or recovery snack.
- Vitamin A (45% of RDI per serving): The star ingredient, pumpkin purée, is exceptionally rich in beta-carotene, which the body converts into Vitamin A. This essential vitamin is critical for maintaining healthy vision, supporting a robust immune system, and promoting cell growth.
- Magnesium (20% of RDI per serving): Pumpkin seeds, almonds, and walnuts are excellent sources of magnesium, a mineral involved in over 300 biochemical reactions in the body. It plays a key role in energy production, muscle and nerve function, blood pressure regulation, and bone health.
Preparation Time
The beauty of this recipe lies in its simplicity and speed. You only need about 15 minutes of active preparation time to measure, mix, and press the ingredients into the pan. The majority of the time is hands-off, requiring a minimum of 2 hours of chilling time in the refrigerator for the bars to set properly and become firm enough to cut.
How to Serve
These versatile Pumpkin and Walnut Energy Bars can be enjoyed in numerous ways to fit any part of your day. Here are some of our favorite ways to serve them:
- As a Pre-Workout Boost: The combination of complex carbs from oats and simple carbs from maple syrup provides both quick and sustained energy. Eat a bar 30-60 minutes before a workout for the perfect fuel.
- For Post-Workout Recovery: The protein and healthy fats help repair muscle tissue and replenish energy stores after exercise. Pair a bar with a glass of milk or a small smoothie for a complete recovery snack.
- A Quick On-the-Go Breakfast: When you’re rushing out the door, grab one or two bars for a nutritious and filling breakfast that will keep you satisfied until lunch. It’s far healthier than most store-bought breakfast bars.
- The Perfect Afternoon Pick-Me-Up: Combat the 3 p.m. slump by pairing a bar with a cup of tea or coffee. It’s a wholesome way to re-energize your body and mind without a sugar crash.
- A Healthy Lunchbox Addition: These bars are a fantastic addition to both kids’ and adults’ lunchboxes. They are nut-aware (if using seed butter) and provide valuable nutrients to power through the school or workday.
- Crumbled as a Topping: Break up a bar and sprinkle the crumbles over a bowl of Greek yogurt, a smoothie bowl, or even a scoop of vanilla ice cream for a healthier dessert with added texture and flavor.
- Part of a Healthy Snack Platter: Cut the bars into small, bite-sized cubes and serve them on a platter with fresh fruit, cheese, and other healthy snacks when you have guests.
Additional Tips
- Toast Your Nuts and Seeds: For a deeper, richer, and more complex flavor profile, spread the walnuts and pumpkin seeds on a baking sheet and toast them in an oven at 350°F (175°C) for 5-7 minutes, or until fragrant. Let them cool completely before chopping and adding them to the mixture. This small step makes a huge difference.
- Customize Your Mix-Ins: Feel free to get creative! You can swap the walnuts for pecans or almonds. You can add 1/4 cup of dried fruit like cranberries or chopped dates for extra sweetness and chewiness, or a 1/4 cup of dark chocolate chips for a more decadent treat.
- Achieve the Perfect Press: The most common issue with no-bake bars is that they crumble. To avoid this, the pressing stage is non-negotiable. After spreading the mix in the pan, lay a piece of parchment paper on top and use the bottom of another, smaller pan to press down with your full body weight. This ensures maximum compression.
- Make it Gluten-Free: To ensure these bars are 100% gluten-free, simply use certified gluten-free rolled oats. Oats are naturally gluten-free but are often processed in facilities that also handle wheat, so cross-contamination can be an issue for those with celiac disease or high sensitivity.
- Boost the Protein Content: If you want to increase the protein for post-workout recovery, you can add 1-2 scoops of your favorite vanilla or unflavored protein powder to the dry ingredients. You may need to add an extra tablespoon or two of pumpkin purée or nut butter to ensure the mixture is still moist enough to stick together.
- Don’t Rush the Chill: We can’t stress this enough. The chilling time is essential for the chemical reactions that make these bars solid. The fats solidify, and the soluble fiber in the chia and flax seeds creates a gel that binds everything. Cutting them too early will result in a crumbly mess.
- For a Sweeter or Less Sweet Bar: The sweetness can easily be adjusted. If you have a sweet tooth, you can increase the maple syrup to 2/3 cup. If you prefer things less sweet, reduce it to 1/3 cup. Note that changing the liquid amount may slightly affect how well the bars hold together.
- Batch Prep and Freeze: This recipe doubles beautifully. Simply use a 9×13 inch pan and double all the ingredients. Once the bars are cut, wrap them individually in plastic wrap and then place them in a freezer-safe bag or container. They will last for up to 3 months in the freezer.
FAQ Section
Q1: How should I store these Pumpkin and Walnut Energy Bars?
A: These bars must be stored in the refrigerator to maintain their firm texture. Place them in an airtight container, separating layers with parchment paper to prevent sticking. They will stay fresh and delicious in the fridge for up to 10 days. For longer-term storage, they freeze exceptionally well.
Q2: Can I make these bars nut-free for school lunches?
A: Absolutely! To make these bars nut-free, simply substitute the walnuts with an equal amount of raw sunflower seeds or extra pumpkin seeds. For the nut butter, use sunflower seed butter (SunButter) or tahini. The flavor will be slightly different but just as delicious and allergy-friendly.
Q3: My energy bars are too crumbly. What went wrong?
A: Crumbly bars are usually caused by one of three things. First, you may not have pressed the mixture down firmly enough in the pan. Compacting the mixture is key. Second, you might not have used enough “binder” – the nut butter and liquid sweetener. Ensure your measurements are accurate and your nut butter is the drippy, natural kind. Finally, you may not have chilled them for long enough. Give them at least 2-3 hours in the fridge to fully set.
Q4: Are these homemade energy bars actually healthy?
A: Yes, they are significantly healthier than most store-bought energy bars, which are often loaded with refined sugars, artificial ingredients, and preservatives. These homemade bars are made with whole-food ingredients like oats, nuts, seeds, and pumpkin. They provide a balanced mix of complex carbohydrates, healthy fats, plant-based protein, and fiber, making them a genuinely nourishing and energizing snack.
Q5: Can I use fresh, homemade pumpkin purée instead of canned?
A: Yes, you can use homemade pumpkin purée. To do so, roast a sugar pumpkin until tender, then scrape out the flesh and blend it until smooth. The key is to make sure your homemade purée has a similar consistency to the canned version. If it’s too watery, you can strain it through a cheesecloth or simmer it gently on the stove to cook off some excess moisture before using it in the recipe.
Q6: I don’t have pumpkin pie spice. What can I use instead?
A: No problem! You can easily make your own pumpkin pie spice blend. For this recipe, a good approximation would be to mix 1 teaspoon of cinnamon, 1/2 teaspoon of ground ginger, 1/4 teaspoon of ground nutmeg, and 1/8 teaspoon of ground cloves or allspice. This will give you that classic warm, spicy flavor.
Q7: Is it more cost-effective to make my own energy bars?
A: While there’s an initial investment in buying the ingredients like nuts, seeds, and maple syrup, it is almost always more cost-effective in the long run. A single high-quality energy bar from the store can cost anywhere from $2 to $4. This recipe makes 12-16 bars, bringing the cost per bar down significantly, especially if you buy key ingredients in bulk.
Q8: Can I freeze these pumpkin energy bars for later?
A: Yes, these bars are perfect for freezing! After cutting them into individual bars, wrap each one tightly in plastic wrap or beeswax wrap. Place the wrapped bars in a zip-top freezer bag or an airtight container. They can be stored in the freezer for up to 3 months. To eat, simply take one out and let it thaw on the counter for 15-20 minutes or in the fridge for an hour. They are also delicious eaten straight from the freezer for a firmer, chewier texture.

Pumpkin and Walnut Energy Bars
Ingredients
- 2 cups (180g) Rolled Oats (Old-Fashioned): The foundational ingredient, providing complex carbohydrates and soluble fiber for slow-releasing, sustained energy. Do not use instant or steel-cut oats, as they will alter the texture.
- 1 cup (120g) Raw Walnuts: Roughly chopped, these add a delightful crunch, a buttery flavor, and are a fantastic source of plant-based Omega-3 fatty acids and antioxidants.
- 1/2 cup (60g) Raw Pumpkin Seeds (Pepitas): For an extra layer of crunch and a boost of magnesium, zinc, and healthy fats.
- 1/2 cup (90g) Ground Flaxseed Meal: This acts as a powerful binder and is packed with fiber and Omega-3s, contributing to the bar’s chewy texture and nutritional profile.
- 2 tablespoons Chia Seeds: These tiny seeds are nutritional powerhouses that absorb liquid, helping to bind the bars together while providing fiber, protein, and healthy fats.
- 1 cup (245g) Pure Pumpkin Purée: Make sure to use 100% pure pumpkin purée, not pumpkin pie filling, which is pre-sweetened and spiced. This adds natural sweetness, moisture, and a significant dose of Vitamin A.
- 1/2 cup (120ml) Maple Syrup or Honey: A natural liquid sweetener that helps bind the ingredients. Maple syrup keeps the recipe vegan, while honey offers its own unique flavor and benefits.
- 1/2 cup (128g) Almond Butter or Walnut Butter: A creamy, protein-rich binder that adds healthy fats and flavor. Ensure it’s a natural, drippy variety for best results.
- 1 teaspoon Vanilla Extract: Enhances all the other flavors in the bar, adding a touch of warmth and depth.
- 2 teaspoons Pumpkin Pie Spice: A classic blend of cinnamon, nutmeg, ginger, and cloves that gives these bars their signature autumnal flavor. You can also make your own blend if preferred.
- 1/4 teaspoon Sea Salt: Crucial for balancing the sweetness and bringing out the complex flavors of the nuts and spices.
Instructions
- Prepare Your Pan: Lightly grease an 8×8 inch (20×20 cm) square baking pan or line it with parchment paper, leaving some overhang on two sides. This overhang will act as “handles,” making it much easier to lift the bars out of the pan for cutting later. Set the prepared pan aside.
- Combine Dry Ingredients: In a large mixing bowl, add all of your dry ingredients: the rolled oats, chopped walnuts, pumpkin seeds, ground flaxseed meal, chia seeds, pumpkin pie spice, and sea salt. Use a whisk or a large spoon to stir everything together thoroughly. This step is important to ensure that the spices, seeds, and nuts are evenly distributed throughout the mixture, guaranteeing that every single bite is perfectly balanced in flavor and texture.
- Combine Wet Ingredients: In a separate medium-sized, microwave-safe bowl, combine the wet ingredients: the pumpkin purée, maple syrup (or honey), and the almond or walnut butter. Whisk them together until they are smooth and well-incorporated. To make the mixture easier to stir, you can gently warm it in the microwave for 20-30 seconds. This will soften the nut butter and help everything combine into a cohesive, smooth sauce. Once mixed, stir in the vanilla extract.
- Mix Wet and Dry: Pour the wet pumpkin mixture over the dry oat mixture in the large bowl. Using a sturdy spatula or a wooden spoon, begin to fold and mix the ingredients together. Be patient and thorough. At first, it might seem like there isn’t enough liquid, but keep mixing until every oat and nut is coated and the mixture becomes uniformly moist and sticky. Scrape the bottom and sides of the bowl to ensure everything is incorporated.
- Press into the Pan: Transfer the sticky mixture into your prepared 8×8 inch pan. Spread it out evenly with your spatula. Now for the most critical step: pressing. To create dense, firm bars that won’t crumble, you must press the mixture down very firmly and evenly. You can use the back of your spatula, but a better method is to place a piece of parchment paper on top of the mixture and use the flat bottom of a measuring cup or a glass to press down with significant force across the entire surface, paying special attention to the corners and edges. The more compact you make it, the better the bars will hold together.
- Chill for Firmness: Once the mixture is tightly packed into the pan, cover it with plastic wrap or foil. Place the pan in the refrigerator to chill for at least 2 hours, though 3-4 hours or even overnight is ideal. This chilling time is not optional; it allows the chia seeds and flax meal to absorb moisture and solidify, the fats in the nut butter to harden, and all the flavors to meld together beautifully.
- Cut and Serve: After the chilling period, the block will be firm to the touch. Use the parchment paper handles to lift the entire block out of the pan and onto a cutting board. Using a large, sharp knife, slice the block into your desired size. You can make 12 larger rectangular bars or 16 smaller squares. For the cleanest cuts, you can run the knife under hot water and wipe it dry between slices. The bars are now ready to be enjoyed!
Nutrition
- Serving Size: one normal portion
- Calories: 195
- Fat: 11g
- Fiber: 4g
- Protein: 6g


