


There are some snacks that just stick with you, becoming woven into the fabric of family life. For us, the Peanut Butter Apple Sandwich isn’t just food; it’s a memory maker. I remember the first time I threw one together – it was a hectic afternoon, the kids were hungry, and frankly, so was I. We were low on conventional lunch supplies, but I spotted a jar of peanut butter and a bowl of crisp apples on the counter. On a whim, I sliced an apple, slathered some peanut butter between two slices, and handed it over. The reaction was immediate delight! That simple combination of creamy, nutty peanut butter and sweet, crunchy apple became an instant hit. Now, it’s our go-to for quick breakfasts, easy lunchbox additions, satisfying after-school snacks, and even light, healthy desserts. It’s proof that sometimes the simplest things are truly the most delicious and satisfying, offering a wonderful balance of textures and flavors that appeals to everyone from toddlers to adults. It’s versatile, quick, and packed with goodness – what’s not to love? This humble sandwich has saved many a ‘hangry’ moment in our household, and I’m excited to share this wonderfully simple yet incredibly satisfying recipe with you.
Ingredients
Here’s what you’ll need to assemble this delightful snack:
- 1 Medium Apple (such as Fuji, Honeycrisp, Gala, or Granny Smith): Provides the crisp, sweet or tart base “slices” for the sandwich. Choose a firm variety that holds its shape well.
- 2 Tablespoons Peanut Butter (Creamy or Crunchy): The creamy, nutty filling that provides protein and healthy fats. Use your preferred type; natural peanut butter works wonderfully too, just give it a good stir first.
- Optional: 2 Slices Whole Wheat Bread (or bread of choice): If you prefer a more traditional sandwich structure, bread adds extra fiber and substance. Gluten-free bread works well too.
- Optional: 1/4 Teaspoon Ground Cinnamon: Adds a warm, spicy note that complements both apple and peanut butter beautifully.
- Optional: 1 Teaspoon Honey or Maple Syrup: For a touch of extra sweetness, drizzled over the peanut butter.
- Optional: 1 Tablespoon Granola, Chia Seeds, or Chopped Nuts: Adds extra crunch, texture, and nutritional value.
Instructions
Creating this delicious sandwich is incredibly straightforward:
- Prepare the Apple: Wash the apple thoroughly under running water. Using an apple corer or a sharp knife, carefully remove the core. Place the apple on its side on a cutting board and slice it horizontally into rounds, about 1/4 to 1/2 inch thick. You’ll need at least two good slices for one “sandwich,” but you can use the whole apple to make multiple sandwiches or snacks. If you are concerned about browning and not serving immediately, you can lightly toss the apple slices in a bowl with a tiny squeeze of lemon juice.
- Prepare the Bread (If Using): If you’re incorporating bread, you can use the slices as they are, or lightly toast them in a toaster or toaster oven for added warmth and texture. Toasting provides a nice contrast to the cool apple and creamy peanut butter.
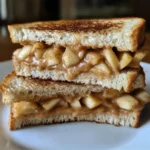
- Spread the Peanut Butter: If using bread, spread 1 tablespoon of peanut butter evenly onto one slice of bread. If making an apple-only version, select two apple slices to be the “bread.” Spread 1 tablespoon of peanut butter evenly over the cut surface of one apple slice, going almost to the edges.
- Layer the Filling: If using bread, place your apple slices (you might fit 2-3 depending on size) neatly onto the peanut butter-covered bread slice. If making the apple-only version, you can either spread the second tablespoon of peanut butter on the other apple slice or simply layer the second apple slice directly onto the peanut butter of the first slice.
- Add Optional Enhancements: If desired, this is the time to sprinkle ground cinnamon over the peanut butter or apple slices. You can also drizzle a small amount of honey or maple syrup for extra sweetness. For added texture and nutrients, sprinkle on some granola, chia seeds, or chopped nuts over the peanut butter layer before closing the sandwich.
- Assemble the Sandwich: If using bread, place the second slice of bread on top of the apple slices. If using only apple slices, place the second apple slice (either plain or with peanut butter) on top of the first layer to complete your apple sandwich.
- Serve: Serve the peanut butter apple sandwich immediately for the best texture and freshness. If you used bread, you can slice it in half diagonally for easier handling, especially for children.
Nutrition Facts
Nutritional information is approximate and can vary based on specific ingredients used (type of apple, peanut butter, bread, and optional additions). This estimate is for one sandwich using two apple slices (no bread) and 2 tablespoons of peanut butter:
- Servings: 1 Apple Sandwich
- Calories: Approximately 250-350 kcal per serving. This provides a good amount of energy suitable for a snack or light meal component.
- Protein: Around 8-10 grams. Peanut butter is a significant source, contributing to satiety and muscle maintenance.
- Fiber: Approximately 6-8 grams. Primarily from the apple skin and flesh, aiding digestion and promoting fullness. Using whole wheat bread will increase this further.
- Healthy Fats: Around 16-18 grams. Mostly unsaturated fats from the peanut butter, which are beneficial for heart health.
- Carbohydrates: Approximately 25-30 grams. Natural sugars from the apple provide quick energy, while complex carbs (especially if using whole wheat bread) offer sustained release.
Preparation Time
This recipe is exceptionally quick to prepare, making it ideal for busy schedules.
- Total Time: 5-10 minutes. The majority of the time is spent washing, coring, and slicing the apple. Spreading the peanut butter and assembling takes only a minute or two. If you choose to toast bread, add an extra 2-3 minutes. It’s genuinely one of the fastest, freshest snacks you can make.
How to Serve
The Peanut Butter Apple Sandwich is wonderfully versatile. Here are several ways to enjoy and serve it:
- Quick Breakfast Boost: Serve alongside a small bowl of yogurt or a hard-boiled egg for a balanced and speedy start to the day.
- Packed Lunch Hero: Include it in lunchboxes for kids or adults. To minimize browning on apple edges if making ahead, brush lightly with lemon juice. Pack it alongside some veggie sticks and hummus.
- After-School Power Snack: It’s the perfect tide-me-over snack to bridge the gap between school and dinner, providing energy and nutrients.
- Light & Healthy Dessert: Drizzle with a little extra honey or maple syrup, maybe add a few dark chocolate chips, and serve as a guilt-free sweet treat.
- Fun Appetizer Slices: Use smaller apples or cut larger rounds into wedges. Arrange them on a platter, perhaps with different nut butters or toppings, for a fun party appetizer.
- Pre or Post Workout Fuel: The combination of carbs for energy and protein for muscle repair makes it a great option before or after exercise.
- Interactive Snack Time: Lay out apple slices, peanut butter, and various toppings (seeds, granola, raisins, shredded coconut) and let kids build their own apple sandwiches.
- With a Drink: Pair it simply with a glass of cold milk, almond milk, oat milk, or a cup of herbal tea for a comforting snack moment.
Additional Tips
Enhance your Peanut Butter Apple Sandwich experience with these handy tips:
- Choose Your Apple Wisely: The type of apple makes a difference! Fuji, Gala, and Honeycrisp offer sweetness and a satisfying crunch. Granny Smith provides a tart contrast to the rich peanut butter. Experiment to find your favorite. Avoid softer apples like Red Delicious, as they might not hold up as well.
- Explore Nut Butter Alternatives: If you have peanut allergies or just want variety, almond butter, cashew butter, sunflower seed butter (nut-free!), or even tahini can be delicious substitutes. Each brings a unique flavor profile.
- Toast for Texture: If using bread, toasting it adds a delightful warmth and crunch that contrasts beautifully with the cool, crisp apple and creamy peanut butter. Even lightly warming the apple slices in a pan for a minute can offer a different experience.
- Boost with Add-Ins: Don’t stop at cinnamon! Sprinkle on chia seeds, hemp seeds, or flax seeds for an omega-3 boost. Add raisins, dried cranberries, or shredded coconut for extra sweetness and texture. Mini chocolate chips turn it into a decadent treat.
- Spice it Up: Beyond cinnamon, a pinch of nutmeg, cardamom, or even a tiny dash of cayenne pepper (for the adventurous!) can add complexity to the flavor profile. Apple pie spice blend is also a fantastic option.
- Presentation Matters: For kids (or fun-loving adults!), use small cookie cutters to cut shapes out of the apple slices before assembling. Drizzling the peanut butter or honey in a pattern also makes it more visually appealing.
- Make it Gluten-Free Easily: The simplest way is to omit the bread entirely and use two apple slices as the “bun.” If you prefer a bread structure, simply use your favorite gluten-free bread slices.
- Temperature Play: Try using chilled apples straight from the refrigerator for an extra refreshing crunch, especially nice on a warm day. Contrast this with lightly warmed (toasted) bread for a pleasant temperature dynamic.
Frequently Asked Questions (FAQ)
Here are answers to some common questions about making Peanut Butter Apple Sandwiches:
- Q: What are the best types of apples for this recipe?
A: Firm, crisp apples work best as they hold their shape and provide a satisfying crunch. Popular choices include Honeycrisp, Fuji, Gala, Pink Lady, and Granny Smith (for a tart flavor). Softer apples like McIntosh or Red Delicious tend to become mushy. - Q: Can I use other nut or seed butters instead of peanut butter?
A: Absolutely! Almond butter, cashew butter, sunflower seed butter (a great nut-free option), tahini, or any other spreadable nut/seed butter works well. This is an easy way to cater to allergies or simply change the flavor profile. - Q: Is the Peanut Butter Apple Sandwich considered a healthy snack?
A: Yes, it generally is! It offers a good balance of carbohydrates for energy (from the apple), healthy fats and protein for satiety (from the peanut butter), and fiber (from both, especially apple skin). Using natural peanut butter (without added sugars or oils) and whole fruit makes it a wholesome choice compared to many processed snacks. Portion size is key, especially with peanut butter which is calorie-dense. - Q: How can I prevent the apple slices from browning if I make it ahead of time?
A: Apple slices brown due to oxidation when exposed to air. To prevent or slow this, you can lightly brush the cut surfaces of the apple slices with a little lemon juice, lime juice, or even pineapple juice. The acidity helps inhibit the browning process. Store in an airtight container in the refrigerator. - Q: Can I prepare these sandwiches in advance?
A: Yes, you can prepare them a few hours in advance, especially if you treat the apple slices to prevent browning (see previous question). Assemble the sandwich and store it in an airtight container in the refrigerator. They are best enjoyed fresh for optimal crunch, but they hold up reasonably well for packing in lunches. If using bread, it might get slightly soft over time. - Q: Is this recipe suitable for kids?
A: Definitely! It’s a fantastic kid-friendly snack. It’s easy for them to hold, tastes great, and provides valuable nutrients. You can cut the apple slices or the full sandwich into smaller, manageable pieces or fun shapes for younger children. It’s also a great recipe for kids to help make themselves. - Q: How can I make this recipe vegan?
A: It’s very easy to make this vegan. Most natural peanut butters are vegan (just check the label for honey or dairy). Ensure the bread you choose (if using) is vegan. If adding a sweetener, use maple syrup instead of honey. Apples, peanut butter (check label), and optional additions like seeds and cinnamon are typically vegan. - Q: What if I don’t have bread or want a lower-carb option?
A: Simply omit the bread! The core concept of the recipe uses two apple slices as the “bread” for the peanut butter filling. This creates a naturally gluten-free, lower-carb, and fruit-focused version that is equally delicious and satisfying. This is often the preferred way to enjoy this combination.
Peanut Butter Apple Sandwich
Ingredients
Here’s what you’ll need to assemble this delightful snack:
- 1 Medium Apple (such as Fuji, Honeycrisp, Gala, or Granny Smith): Provides the crisp, sweet or tart base “slices” for the sandwich. Choose a firm variety that holds its shape well.
- 2 Tablespoons Peanut Butter (Creamy or Crunchy): The creamy, nutty filling that provides protein and healthy fats. Use your preferred type; natural peanut butter works wonderfully too, just give it a good stir first.
- Optional: 2 Slices Whole Wheat Bread (or bread of choice): If you prefer a more traditional sandwich structure, bread adds extra fiber and substance. Gluten-free bread works well too.
- Optional: 1/4 Teaspoon Ground Cinnamon: Adds a warm, spicy note that complements both apple and peanut butter beautifully.
- Optional: 1 Teaspoon Honey or Maple Syrup: For a touch of extra sweetness, drizzled over the peanut butter.
- Optional: 1 Tablespoon Granola, Chia Seeds, or Chopped Nuts: Adds extra crunch, texture, and nutritional value.
Instructions
Creating this delicious sandwich is incredibly straightforward:
- Prepare the Apple: Wash the apple thoroughly under running water. Using an apple corer or a sharp knife, carefully remove the core. Place the apple on its side on a cutting board and slice it horizontally into rounds, about 1/4 to 1/2 inch thick. You’ll need at least two good slices for one “sandwich,” but you can use the whole apple to make multiple sandwiches or snacks. If you are concerned about browning and not serving immediately, you can lightly toss the apple slices in a bowl with a tiny squeeze of lemon juice.
- Prepare the Bread (If Using): If you’re incorporating bread, you can use the slices as they are, or lightly toast them in a toaster or toaster oven for added warmth and texture. Toasting provides a nice contrast to the cool apple and creamy peanut butter.
- Spread the Peanut Butter: If using bread, spread 1 tablespoon of peanut butter evenly onto one slice of bread. If making an apple-only version, select two apple slices to be the “bread.” Spread 1 tablespoon of peanut butter evenly over the cut surface of one apple slice, going almost to the edges.
- Layer the Filling: If using bread, place your apple slices (you might fit 2-3 depending on size) neatly onto the peanut butter-covered bread slice. If making the apple-only version, you can either spread the second tablespoon of peanut butter on the other apple slice or simply layer the second apple slice directly onto the peanut butter of the first slice.
- Add Optional Enhancements: If desired, this is the time to sprinkle ground cinnamon over the peanut butter or apple slices. You can also drizzle a small amount of honey or maple syrup for extra sweetness. For added texture and nutrients, sprinkle on some granola, chia seeds, or chopped nuts over the peanut butter layer before closing the sandwich.
- Assemble the Sandwich: If using bread, place the second slice of bread on top of the apple slices. If using only apple slices, place the second apple slice (either plain or with peanut butter) on top of the first layer to complete your apple sandwich.
- Serve: Serve the peanut butter apple sandwich immediately for the best texture and freshness. If you used bread, you can slice it in half diagonally for easier handling, especially for children.
Nutrition
- Serving Size: one normal portion
- Calories: 350
- Fat: 18 grams
- Carbohydrates: 30 grams
- Fiber: 8 grams
- Protein: 10 grams


