

Of all the culinary revelations I’ve had in my kitchen, few have been as profoundly simple and surprisingly game-changing as this No-Cook Chickpea Salad Wrap. I remember the day vividly. It was a chaotic Tuesday, with back-to-back meetings, a looming deadline, and the familiar pang of lunchtime hunger setting in. The thought of chopping, sautéing, or turning on a single appliance felt like an insurmountable task. My fridge held the usual suspects, but inspiration was at an all-time low. Then my eyes landed on a humble can of chickpeas. I had always seen recipes for “chickpea tuna,” but I was skeptical. Could mashed chickpeas really replicate the satisfying, savory experience of a classic deli salad? With nothing to lose, I decided to try. I grabbed some vegan mayo, a stalk of celery for crunch, a red onion for a bit of bite, and a squeeze of lemon for brightness. In less than fifteen minutes, I had a bowl of what looked remarkably like a high-end tuna salad. I scooped a generous portion into a whole-wheat tortilla, added a handful of fresh spinach, and took a bite. It was nothing short of a miracle. The texture was perfect—creamy from the mayo, with a satisfying bite from the partially mashed chickpeas and a refreshing crunch from the celery. The flavors were perfectly balanced: savory, tangy, and deeply satisfying. When my partner came home for lunch, I presented them with a wrap without preamble. They devoured it, their eyes widening with each bite. “This is amazing! Is it some new artisanal chicken salad?” The look on their face when I revealed the secret ingredient—canned chickpeas—was priceless. Since that day, these No-Cook Chickpea Salad Wraps have become a non-negotiable staple in our household. They are our go-to for quick work-from-home lunches, a lifesaver for packed school lunches, and the perfect light-yet-filling meal to take on picnics and road trips. It’s the recipe that proves you don’t need heat, hassle, or a long list of fancy ingredients to create something truly delicious, healthy, and beloved by the entire family. It’s a testament to the power of simple, whole-food ingredients, and it’s a recipe I am genuinely excited to share with you.
Ingredients
- 2 (15-ounce) cans chickpeas (garbanzo beans): These are the star of the show, providing a hearty, protein-packed base. Using canned chickpeas makes this recipe incredibly fast. Be sure to rinse and drain them well to remove excess sodium and the “canned” taste.
- ⅔ cup vegan mayonnaise: This is the creamy binder that brings everything together. Use your favorite brand; a high-quality, avocado oil or cashew-based mayo can add extra richness and healthy fats.
- 1 large celery stalk, finely diced: This is essential for the classic salad texture, providing a fresh, watery crunch that contrasts beautifully with the creamy chickpeas.
- ½ small red onion, finely diced: This adds a pungent, slightly sweet bite and a vibrant color. Soaking the diced onion in cold water for 10 minutes can mellow its sharp flavor if you prefer.
- 2 tablespoons fresh dill, chopped: This herb is non-negotiable for that signature deli-salad flavor. Its fresh, slightly tangy, and grassy notes elevate the entire dish.
- 1 tablespoon Dijon mustard: This adds a tangy complexity and a subtle, zesty kick that cuts through the creaminess of the mayonnaise.
- 1 tablespoon fresh lemon juice: A crucial element for brightness. Freshly squeezed lemon juice awakens all the other flavors and prevents the salad from feeling too heavy.
- ½ teaspoon sea salt (or to taste): Enhances all the individual flavors and brings the salad into balance.
- ¼ teaspoon black pepper (or to taste): Provides a gentle warmth and spiciness.
- 4-6 large tortillas or wraps: The vessel for your delicious salad. Whole wheat, spinach, sun-dried tomato, or gluten-free wraps all work wonderfully.
- Optional fillings: lettuce, spinach, sliced tomatoes, avocado slices, alfalfa sprouts: These add extra nutrients, texture, and freshness to your finished wrap.
Instructions
- Prepare the Chickpeas: Open the cans of chickpeas and pour them into a fine-mesh sieve or colander. Rinse them thoroughly under cold running water for at least 30 seconds. This step is crucial for washing away the starchy liquid (aquafaba) and excess sodium, resulting in a cleaner, fresher taste. Shake the colander vigorously to drain as much water as possible. Pat them dry with a clean kitchen towel or paper towels for the best texture.
- Mash the Chickpeas: Transfer the drained and dried chickpeas to a large mixing bowl. Using a potato masher or the back of a large fork, mash the chickpeas until they are broken down. Aim for a varied texture—you want about half of the chickpeas to be completely mashed into a paste-like consistency, while the other half remains partially or wholly intact. This variation is the key to mimicking the flaky texture of tuna or chicken salad and prevents the final product from becoming a uniform mush.
- Add the Vegetables and Herbs: Add the finely diced celery, red onion, and chopped fresh dill to the bowl with the mashed chickpeas. The fine dice is important for ensuring you get a little bit of every flavor and texture in each bite.
- Prepare the Dressing: In a separate, smaller bowl, whisk together the vegan mayonnaise, Dijon mustard, and fresh lemon juice. Combining the wet ingredients separately ensures the dressing is smooth and homogenous, which allows it to coat the chickpeas and vegetables evenly.
- Combine and Mix: Pour the prepared dressing over the chickpea and vegetable mixture. Using a spatula or large spoon, gently fold everything together until all the ingredients are well-coated and evenly distributed. Be careful not to overmix, as this can break down the remaining whole chickpeas and make the salad gummy.
- Season and Rest: Season the chickpea salad with sea salt and black pepper. Stir once more, then taste. Adjust the seasoning as needed—you might want a little more salt for flavor, another squeeze of lemon for brightness, or more pepper for a kick. For the best possible flavor, cover the bowl and let the salad rest in the refrigerator for at least 15-30 minutes. This allows the flavors to meld and deepen.
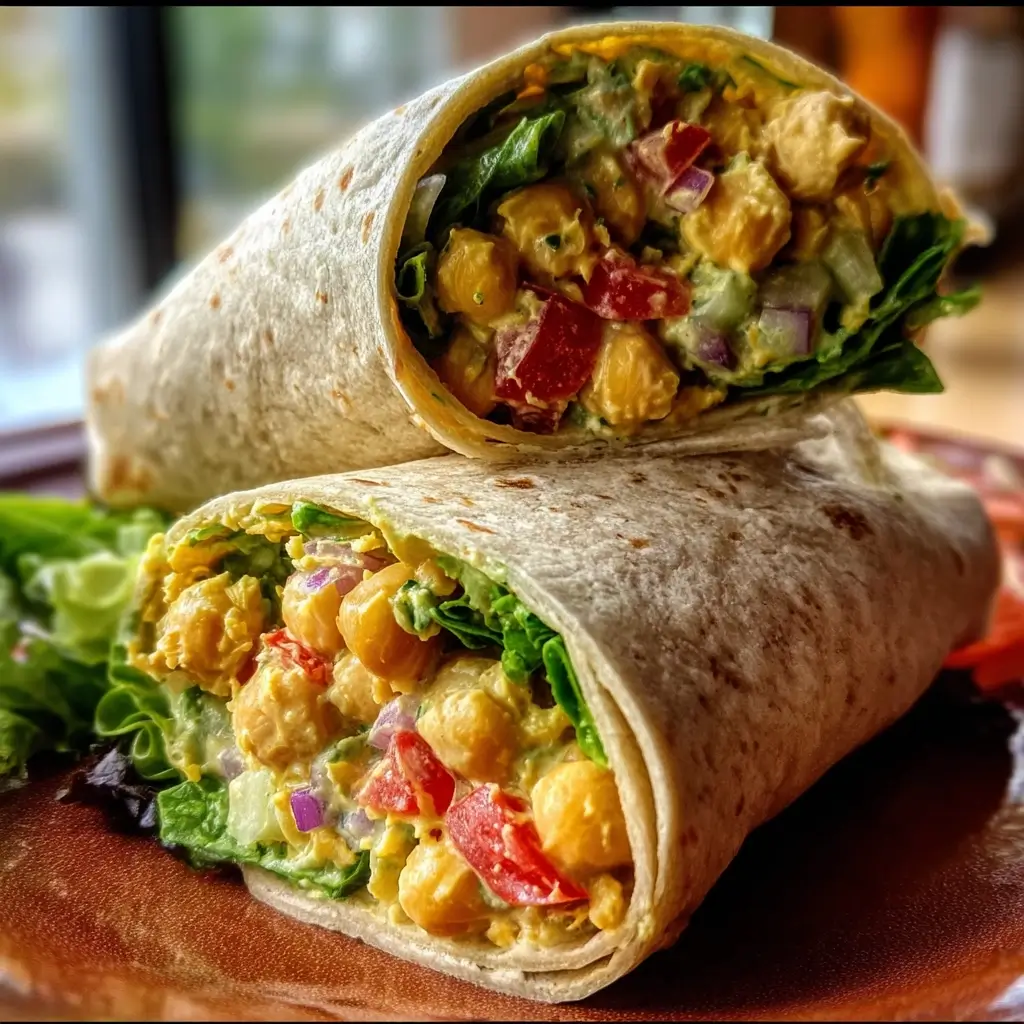
- Assemble the Wraps: Lay a tortilla flat on a clean surface. If using, place a layer of leafy greens like spinach or lettuce in the center. Spoon a generous amount of the chickpea salad (about ¼ to ⅓ of the mixture, depending on the size of your tortilla) onto the greens. Top with any additional fillings like sliced tomato or avocado. Fold in the sides of the tortilla, then tightly roll it up from the bottom to create a secure wrap. Slice in half on a diagonal and serve immediately.
Nutrition Facts
This recipe makes approximately 4 large wraps. The nutritional information is an estimate per serving (1 wrap), without optional fillings.
- Servings: 4
- Calories per serving: Approximately 450-550 kcal (This can vary significantly based on the type of wrap and vegan mayonnaise used).
- Protein (Approx. 15g): Primarily from the chickpeas, this plant-based protein is essential for building and repairing tissues, and it contributes to the salad’s satisfying, filling nature, keeping you full for hours.
- Fiber (Approx. 12g): Chickpeas are an excellent source of dietary fiber, which is crucial for digestive health, regulating blood sugar levels, and promoting a feeling of satiety.
- Healthy Fats (Approx. 20g): The majority of the fat content comes from the vegan mayonnaise. Choosing a mayo made with avocado oil or olive oil will provide heart-healthy monounsaturated fats.
- Complex Carbohydrates (Approx. 55g): The chickpeas and whole-wheat wrap provide complex carbs, which are digested slowly, offering a steady release of energy rather than the quick spike and crash associated with simple sugars.
- Iron (Approx. 25% of DV): Chickpeas are a good source of iron, a vital mineral for transporting oxygen in the blood and preventing fatigue, making this a great energy-boosting lunch option.
Preparation Time
This recipe is the definition of quick and easy. With no cooking required, the entire process is streamlined and efficient.
- Total Preparation Time: 15 minutes
- Breakdown: Approximately 5 minutes for rinsing and draining the chickpeas and dicing the vegetables, 5 minutes for mashing and mixing all the ingredients together, and 5 minutes for assembling the wraps. If you choose to let the salad rest to meld the flavors, add an additional 15-30 minutes of inactive time.
How to Serve
While the classic wrap is fantastic, this versatile chickpea salad can be served in a multitude of delicious ways. Here are some ideas to keep your lunches exciting:
- The Classic Wrap:
- Serve in large whole-wheat, spinach, or sun-dried tomato tortillas.
- Add a layer of crisp romaine lettuce or tender baby spinach for freshness.
- Include slices of ripe tomato, creamy avocado, or crunchy cucumber for extra layers of flavor and texture.
- As a Hearty Sandwich:
- Spoon the salad between two slices of your favorite bread. Toasted sourdough, hearty whole-grain, or a soft brioche bun are all excellent choices.
- Add a slice of vegan cheese (like provolone or cheddar) for an extra savory element.
- As a Fresh Green Salad:
- For a lower-carb option, serve a generous scoop of the chickpea salad on a large bed of mixed greens, arugula, or kale.
- Drizzle with a light lemon-tahini dressing or a simple balsamic vinaigrette.
- Top with toasted sunflower seeds or pumpkin seeds for extra crunch.
- As a Dip or Appetizer:
- Serve the chickpea salad in a bowl surrounded by an assortment of dippers.
- Sturdy crackers, toasted pita bread, pretzel thins, and fresh veggie sticks (like carrots, bell peppers, and cucumbers) are perfect companions.
- In Lettuce Cups:
- For a light, gluten-free, and keto-friendly alternative, scoop the salad into crisp lettuce cups.
- Butter lettuce, romaine hearts, or iceberg lettuce work best as they provide a sturdy, cup-like shape.
- Stuffed in Vegetables:
- Hollow out an avocado or a bell pepper and stuff it with the chickpea salad for a nutrient-dense and visually appealing meal.
- This method is perfect for a light lunch or a healthy, protein-packed snack.
Additional Tips
Unlock the full potential of your No-Cook Chickpea Salad with these eight expert tips.
- Master the Mash: The texture is everything. For the perfect consistency, avoid using a food processor, which can quickly turn the chickpeas into hummus. A simple potato masher or a fork gives you complete control. Mash about half to two-thirds of the chickpeas thoroughly to create a creamy base, leaving the rest partially or fully intact for that crucial, satisfying bite.
- Don’t Skip the Rest: While you can eat it immediately, letting the salad rest in the fridge for at least 30 minutes (or even a few hours) makes a world of difference. This “marrying” time allows the flavors of the onion, dill, lemon, and mustard to meld together and infuse the chickpeas, resulting in a much deeper and more cohesive taste.
- Meal Prep Like a Pro: This recipe is a meal prep dream. You can make a large batch of the chickpea salad and store it in an airtight container in the refrigerator for up to 4-5 days. To prevent soggy wraps, store the salad separately and assemble your wrap, sandwich, or salad just before serving.
- Boost the Crunch Factor: If you love texture, consider adding more crunchy elements. A quarter cup of toasted sunflower seeds, chopped walnuts, or pecans can add a delightful nutty crunch and a boost of healthy fats and nutrients. Add them just before serving to maintain their crispness.
- Get the Creaminess Just Right: The amount of vegan mayonnaise can be adjusted to your personal preference. Start with the recommended amount, and if you prefer a creamier salad, add more, one tablespoon at a time. For a lighter version, you can substitute half of the vegan mayo with unsweetened vegan yogurt or mashed avocado.
- Embrace the Brine: For an extra layer of tangy, savory flavor reminiscent of classic deli salads, add a tablespoon of finely chopped dill pickles or a splash of pickle juice to the mixture. The acidic brine cuts through the richness and adds a wonderful zesty note.
- Spice It Up Your Way: This recipe is a fantastic base for customization. If you enjoy a bit of heat, add a pinch of cayenne pepper, a dash of your favorite hot sauce (like Sriracha or Tabasco), or some finely diced jalapeño to the mix.
- Don’t Underestimate Fresh Herbs: While fresh dill is classic, don’t be afraid to experiment with other fresh herbs. Fresh parsley can add a clean, peppery flavor, while fresh chives can provide a mild oniony taste. Always use fresh herbs over dried for this recipe, as their vibrant flavor is key to the salad’s fresh taste.
FAQ Section
Here are answers to some of the most common questions about making No-Cook Chickpea Salad Wraps.
1. Can I make this recipe gluten-free?
Absolutely! The chickpea salad itself is naturally gluten-free. To make the entire meal gluten-free, simply serve it in gluten-free wraps, on gluten-free bread, in lettuce cups, or as a topping for a green salad. Always check the labels on your Dijon mustard and vegan mayonnaise to ensure they are certified gluten-free if you have a severe intolerance or celiac disease.
2. How long does this chickpea salad last in the refrigerator?
When stored properly in an airtight container, the chickpea salad will stay fresh in the refrigerator for up to 5 days. The flavors actually tend to get even better by the second day. If you’ve added avocado directly into the mix, it’s best to eat it within 1-2 days as the avocado will start to brown.
3. Can I freeze chickpea salad?
It is not recommended to freeze this chickpea salad. Mayonnaise-based salads do not freeze well; the emulsion can break upon thawing, resulting in a separated, watery, and unappetizing texture. The fresh vegetables like celery and onion will also lose their crunch and become soft and mushy. This recipe is best enjoyed fresh or refrigerated.
4. What can I use as a substitute for vegan mayonnaise?
If you’re not a fan of vegan mayo or don’t have any on hand, there are several great substitutes. For a creamy, rich alternative, use an equal amount of well-mashed avocado seasoned with a little extra salt and lemon juice. For a lighter, tangier version, you can use plain, unsweetened vegan yogurt (like coconut or cashew yogurt). A thick, creamy tahini dressing (tahini, water, lemon juice, garlic) also works beautifully.
5. Is this recipe actually healthy?
Yes, this recipe is packed with nutritional benefits. Chickpeas provide an excellent source of plant-based protein and dietary fiber, which promote satiety and digestive health. The vegetables add vitamins and minerals, and when made with a high-quality vegan mayo (like one made from avocado oil) and served in a whole-wheat wrap, it’s a well-rounded meal that provides sustained energy.
6. My chickpea salad seems too dry or too wet. How can I fix it?
This is an easy fix! If your salad seems too dry, simply add more vegan mayonnaise or a splash of lemon juice or pickle brine, one tablespoon at a time, until you reach your desired consistency. If it seems too wet (which can happen if your chickpeas weren’t drained well), you can add a tablespoon of nutritional yeast (which also adds a cheesy flavor), some breadcrumbs, or a handful of mashed chickpeas to help absorb the excess moisture.
7. Can I use dried chickpeas instead of canned?
You certainly can, but it will add a cooking step to the process. You’ll need to soak the dried chickpeas overnight and then boil them until they are tender (usually 1-2 hours). One cup of dried chickpeas will yield approximately 3 cups of cooked chickpeas, which is roughly the equivalent of two 15-ounce cans. While it requires more time, using home-cooked chickpeas can result in a superior flavor and texture.
8. What other vegetables or add-ins work well in this salad?
This recipe is incredibly versatile! Feel free to get creative and add other ingredients based on your preferences. Some fantastic additions include:
- Shredded carrots for sweetness and color.
- Diced bell peppers (red, yellow, or orange) for a sweet crunch.
- Chopped pickles or capers for a briny, salty bite.
- Sweet corn for pops of sweetness.
- A teaspoon of curry powder for a warm, spiced variation.
- Nutritional yeast for a cheesy, savory flavor boost.

No-Cook Chickpea Salad Wraps
Ingredients
- 2 (15-ounce) cans chickpeas (garbanzo beans): These are the star of the show, providing a hearty, protein-packed base. Using canned chickpeas makes this recipe incredibly fast. Be sure to rinse and drain them well to remove excess sodium and the “canned” taste.
- ⅔ cup vegan mayonnaise: This is the creamy binder that brings everything together. Use your favorite brand; a high-quality, avocado oil or cashew-based mayo can add extra richness and healthy fats.
- 1 large celery stalk, finely diced: This is essential for the classic salad texture, providing a fresh, watery crunch that contrasts beautifully with the creamy chickpeas.
- ½ small red onion, finely diced: This adds a pungent, slightly sweet bite and a vibrant color. Soaking the diced onion in cold water for 10 minutes can mellow its sharp flavor if you prefer.
- 2 tablespoons fresh dill, chopped: This herb is non-negotiable for that signature deli-salad flavor. Its fresh, slightly tangy, and grassy notes elevate the entire dish.
- 1 tablespoon Dijon mustard: This adds a tangy complexity and a subtle, zesty kick that cuts through the creaminess of the mayonnaise.
- 1 tablespoon fresh lemon juice: A crucial element for brightness. Freshly squeezed lemon juice awakens all the other flavors and prevents the salad from feeling too heavy.
- ½ teaspoon sea salt (or to taste): Enhances all the individual flavors and brings the salad into balance.
- ¼ teaspoon black pepper (or to taste): Provides a gentle warmth and spiciness.
- 4–6 large tortillas or wraps: The vessel for your delicious salad. Whole wheat, spinach, sun-dried tomato, or gluten-free wraps all work wonderfully.
- Optional fillings: lettuce, spinach, sliced tomatoes, avocado slices, alfalfa sprouts: These add extra nutrients, texture, and freshness to your finished wrap.
Instructions
- Prepare the Chickpeas: Open the cans of chickpeas and pour them into a fine-mesh sieve or colander. Rinse them thoroughly under cold running water for at least 30 seconds. This step is crucial for washing away the starchy liquid (aquafaba) and excess sodium, resulting in a cleaner, fresher taste. Shake the colander vigorously to drain as much water as possible. Pat them dry with a clean kitchen towel or paper towels for the best texture.
- Mash the Chickpeas: Transfer the drained and dried chickpeas to a large mixing bowl. Using a potato masher or the back of a large fork, mash the chickpeas until they are broken down. Aim for a varied texture—you want about half of the chickpeas to be completely mashed into a paste-like consistency, while the other half remains partially or wholly intact. This variation is the key to mimicking the flaky texture of tuna or chicken salad and prevents the final product from becoming a uniform mush.
- Add the Vegetables and Herbs: Add the finely diced celery, red onion, and chopped fresh dill to the bowl with the mashed chickpeas. The fine dice is important for ensuring you get a little bit of every flavor and texture in each bite.
- Prepare the Dressing: In a separate, smaller bowl, whisk together the vegan mayonnaise, Dijon mustard, and fresh lemon juice. Combining the wet ingredients separately ensures the dressing is smooth and homogenous, which allows it to coat the chickpeas and vegetables evenly.
- Combine and Mix: Pour the prepared dressing over the chickpea and vegetable mixture. Using a spatula or large spoon, gently fold everything together until all the ingredients are well-coated and evenly distributed. Be careful not to overmix, as this can break down the remaining whole chickpeas and make the salad gummy.
- Season and Rest: Season the chickpea salad with sea salt and black pepper. Stir once more, then taste. Adjust the seasoning as needed—you might want a little more salt for flavor, another squeeze of lemon for brightness, or more pepper for a kick. For the best possible flavor, cover the bowl and let the salad rest in the refrigerator for at least 15-30 minutes. This allows the flavors to meld and deepen.
- Assemble the Wraps: Lay a tortilla flat on a clean surface. If using, place a layer of leafy greens like spinach or lettuce in the center. Spoon a generous amount of the chickpea salad (about ¼ to ⅓ of the mixture, depending on the size of your tortilla) onto the greens. Top with any additional fillings like sliced tomato or avocado. Fold in the sides of the tortilla, then tightly roll it up from the bottom to create a secure wrap. Slice in half on a diagonal and serve immediately.
Nutrition
- Serving Size: one normal portion
- Calories: 550
- Fat: 20g
- Carbohydrates: 55g
- Fiber: 12g
- Protein: 15g


