


As the first hint of a chill nips at the air and the leaves begin their spectacular transformation, my kitchen instincts immediately pivot to one quintessential flavor: pumpkin. For years, I searched for the perfect fall dessert that could satisfy a crowd without tying me to the oven for hours. The moment I perfected these No-Bake Pumpkin Cheesecake Bites, I knew I had found a true champion. The first time I brought a platter of these to our annual family get-together, they vanished in under ten minutes. My nephew, usually a staunch chocolate-only advocate, declared them “the best part of autumn, but in a square.” The magic lies in the contrast—the spicy, crisp foundation of the gingersnap crust giving way to a rich, impossibly creamy pumpkin filling that is both light and decadent. It’s the dessert that tastes like you spent all day baking, but it’s our little secret that it came together with just a mixer and some time in the refrigerator. This recipe has since become my go-to for everything from casual fall weekends to the centerpiece of our Thanksgiving dessert table, proving that sometimes the simplest treats create the most lasting memories.
Ingredients
Here is the complete list of ingredients you’ll need, separated by component, to create these delightful autumnal bites. Using high-quality, full-fat ingredients is crucial for achieving the perfect texture and flavor.
For the Gingersnap Crust:
- 2 cups gingersnap cookie crumbs: This equates to about 40-45 cookies or a 10-ounce package. These provide a wonderfully spicy, crunchy base that perfectly complements the pumpkin.
- ¼ cup granulated sugar: Adds a touch of sweetness to balance the spice of the cookies and the tang of the cheesecake filling.
- ½ cup unsalted butter, melted: Acts as the binder that holds the crust together, creating a firm yet sliceable foundation.
For the Pumpkin Cheesecake Filling:
- 16 ounces full-fat block cream cheese, softened to room temperature: This is the heart of the cheesecake. Using softened, full-fat cream cheese is non-negotiable for a smooth, creamy, and lump-free texture.
- 1 cup canned pumpkin puree: Be sure to use 100% pure pumpkin puree, not pumpkin pie filling, which contains added sugars and spices.
- 1 cup powdered sugar, sifted: Also known as confectioners’ sugar, this dissolves instantly into the filling for sweetness without any graininess. Sifting prevents clumps.
- 2 teaspoons pumpkin pie spice: This convenient blend of cinnamon, nutmeg, ginger, and allspice provides all the classic warm spice notes of fall.
- 1 teaspoon pure vanilla extract: Enhances the other flavors in the filling, adding a layer of aromatic depth.
- 1 cup cold heavy whipping cream: When whipped to stiff peaks, this is the secret ingredient that makes the filling light, airy, and mousse-like rather than dense.
Instructions
Follow these detailed steps carefully to ensure your no-bake cheesecake bites are a flawless success. The process is straightforward, with the most important element being patience during the chilling phase.
- Prepare the Pan: Begin by taking an 8×8 inch square baking pan. To ensure easy removal of the cheesecake later, line the pan with parchment paper, leaving at least a 2-inch overhang on two opposite sides. These overhangs will act as “handles” to lift the entire cheesecake block out of the pan for clean slicing. Lightly grease the pan before adding the parchment to help it stick in place.
- Create the Gingersnap Crumbs: If you are starting with whole gingersnap cookies, you’ll need to turn them into fine crumbs. The easiest method is to place them in the bowl of a food processor and pulse until they resemble coarse sand. If you don’t have a food processor, place the cookies in a large, sealed zip-top bag, press out the air, and crush them with a rolling pin or the flat side of a meat mallet.
- Make the Crust: In a medium bowl, combine the gingersnap cookie crumbs and the granulated sugar. Stir them together until evenly mixed. Pour the melted unsalted butter over the crumb mixture. Using a fork or a spatula, mix until all the crumbs are evenly moistened. The final texture should be similar to wet sand.
- Press the Crust into the Pan: Transfer the buttery crumb mixture into your prepared 8×8 inch pan. Using the bottom of a flat measuring cup or the back of a spoon, press the crumbs down into a firm, even, and compact layer across the entire bottom of the pan. Pay special attention to the corners and edges to ensure a solid foundation.
- Chill the Crust: Place the pan with the crust into the refrigerator for at least 30 minutes. This step is crucial as it allows the butter to solidify, creating a firm base that won’t crumble when you add the filling.
- Whip the Heavy Cream: While the crust is chilling, prepare the filling. In a large, clean mixing bowl (preferably chilled), pour in the cold heavy whipping cream. Using an electric hand mixer or a stand mixer with the whisk attachment, beat the cream on medium-high speed. Continue beating until stiff peaks form. You’ll know they are ready when the cream holds its shape and a peak stands straight up when you lift the beaters out. Be careful not to over-beat, or it will turn into butter. Set the whipped cream aside.
- Mix the Cheesecake Base: In a separate large bowl, place the softened block cream cheese. Beat it with the electric mixer on medium speed until it is completely smooth, creamy, and free of any lumps. This step is vital for a silky-smooth final product. Scrape down the sides of the bowl as needed.
- Combine the Filling Ingredients: Add the sifted powdered sugar to the smooth cream cheese and beat on low speed until just combined. Then, add the pumpkin puree, pumpkin pie spice, and vanilla extract. Continue to mix on low speed until everything is fully incorporated and the mixture is a uniform orange color. Scrape the bowl again to ensure there are no unmixed pockets of cream cheese at the bottom.
- Fold in the Whipped Cream: Now, gently add about one-third of the whipped cream into the pumpkin and cream cheese mixture. Using a rubber spatula, fold it in to lighten the base. Then, add the remaining whipped cream and continue to fold gently until no white streaks remain. The folding motion (scooping from the bottom and folding it over the top) is important to maintain the airiness of the whipped cream, which gives the cheesecake its light texture.
- Assemble the Cheesecake: Retrieve your chilled crust from the refrigerator. Spoon the pumpkin cheesecake filling onto the crust. Using your spatula, spread the filling into an even, smooth layer, making sure it reaches all the corners of the pan.
- Chill for Setting: This is the most important step. Cover the pan tightly with plastic wrap or aluminum foil. Place the cheesecake in the refrigerator to chill for a minimum of 6 hours. For the best, firmest results and the cleanest slices, it is highly recommended to chill it overnight. This extended time allows the filling to fully set and the flavors to meld together beautifully.
- Slice and Serve: Once the cheesecake is thoroughly chilled and firm to the touch, it’s time to slice. Use the parchment paper overhangs to carefully lift the entire cheesecake block out of the pan and onto a cutting board. For the cleanest cuts, use a large, sharp knife. Dip the knife in hot water and wipe it clean between each cut. Slice the block into small, bite-sized squares. A 6×6 grid will yield 36 perfect bites, or a 5×5 grid will give you 25 slightly larger ones. Arrange on a platter and enjoy!
Nutrition Facts
The nutritional information is an estimate based on the recipe yielding 25 bites. Actual values may vary based on specific ingredients used.
- Servings: 25 bites
- Calories per serving: Approximately 165 kcal. A small, decadent treat that is rich in flavor.
- Fat: Approximately 12g. Primarily from the full-fat cream cheese, butter, and heavy cream, which are essential for the creamy texture.
- Carbohydrates: Approximately 13g. Sourced from the gingersnap cookies and sugars, providing the dessert’s sweetness and structure.
- Protein: Approximately 2g. A small amount contributed by the cream cheese.
- Sugar: Approximately 9g. A balanced amount to create a dessert that is sweet but not cloying, allowing the pumpkin and spice flavors to shine.
Preparation Time
This recipe is designed for convenience, requiring minimal active work and relying on the refrigerator to do the heavy lifting.
- Active Preparation Time: 25-30 minutes. This includes preparing the pan, making the crust, and mixing the filling.
- Chilling Time: Minimum of 6 hours, but overnight (8-12 hours) is strongly recommended for optimal firmness and flavor development.
How to Serve
These No-Bake Pumpkin Cheesecake Bites are wonderfully versatile. They can be served simply as they are or dressed up for a more elegant presentation. Here are some serving suggestions:
- The Classic Topping:
- Place a small dollop of freshly sweetened whipped cream on top of each bite.
- Finish with a light dusting of pumpkin pie spice or ground cinnamon.
- For a Touch of Elegance:
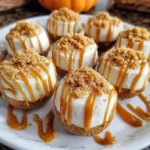
- Drizzle the bites with a high-quality salted caramel sauce just before serving.
- Sprinkle with finely chopped toasted pecans or walnuts for added crunch and nutty flavor.
- Garnish with a small piece of candied ginger for an extra pop of spicy-sweetness.
- On a Dessert Platter:
- Arrange the bites on a large platter or tiered stand.
- Mix them with other small desserts like mini brownies, chocolate-covered pretzels, or fresh berries for a beautiful and diverse dessert board.
- This presentation is perfect for holiday parties, potlucks, and Thanksgiving gatherings.
- Perfect Pairings:
- Serve alongside a hot cup of coffee, a chai latte, or a spiced apple cider for the ultimate cozy fall experience.
- A glass of dessert wine, like a late-harvest Riesling, can also complement the flavors beautifully.
Additional Tips
To ensure your cheesecake bites are absolutely perfect every time, keep these eight professional tips in mind.
- Room Temperature Ingredients are Non-Negotiable: For the filling, having your block cream cheese at room temperature is the single most important step to prevent a lumpy cheesecake. Take it out of the fridge at least 1-2 hours before you begin. Room temperature ingredients blend together more smoothly and create a silkier, more uniform final product.
- Use Pure Pumpkin Puree, Not Pie Filling: Double-check your can! Pumpkin pie filling comes pre-sweetened and pre-spiced. Using it will make your cheesecake overly sweet and throw off the carefully balanced spice profile of this recipe. You want 100% pure pumpkin puree for full control over flavor.
- The Secret to a Perfect Crust: To get a truly compact and even crust, use the flat bottom of a drinking glass or a metal measuring cup to press the crumb mixture firmly into the pan. This provides more even pressure than a spoon and ensures your base is solid and won’t fall apart when you slice it.
- Master the Art of the Clean Slice: The trick to getting those perfectly sharp, clean edges on your cheesecake bites is a hot, clean knife. Fill a tall glass with hot water. Dip your sharpest knife into the water, wipe it completely dry with a paper towel, and make one cut. Repeat this process—dip, wipe, cut—for every single slice. It’s tedious but worth it for a professional look.
- Embrace the Make-Ahead Advantage: This is the ideal make-ahead dessert, which is a lifesaver for holiday planning. You can prepare the entire recipe up to 2 days in advance. Just keep it covered tightly in the refrigerator. In fact, the flavor and texture are often even better on the second day as the flavors have more time to meld.
- Freezing for Future Cravings: These bites freeze exceptionally well. To freeze, place the cut bites on a baking sheet lined with parchment paper, ensuring they aren’t touching. “Flash freeze” them for about an hour until solid. Once solid, transfer them to an airtight, freezer-safe container or bag, placing parchment paper between layers. They can be frozen for up to 2 months. Thaw in the refrigerator for a few hours before serving.
- Become a Spice Master: Don’t be afraid to customize the spice blend. If you love ginger, add an extra ¼ teaspoon of ground ginger. If you prefer a cinnamon-heavy flavor, adjust accordingly. You can even add a pinch of cardamom or cloves for a more complex aroma. Taste the filling before you fold in the whipped cream to make any adjustments.
- Whipping Cream Wisdom: The key to stable, voluminous whipped cream is cold. Use very cold heavy cream, straight from the fridge. For best results, chill your mixing bowl and the mixer’s beaters in the freezer for 10-15 minutes before you start. This helps the cream whip up faster and hold its stiff peaks more effectively.
Frequently Asked Questions (FAQ)
Here are answers to some of the most common questions about making No-Bake Pumpkin Cheesecake Bites.
1. Can I use a different type of cookie for the crust?
Absolutely! While gingersnaps provide a classic spicy flavor, you can easily substitute them. Graham crackers are a classic cheesecake crust choice. For a sweeter, buttery base, try vanilla wafers or shortbread cookies. You could even use chocolate wafer cookies for a pumpkin-chocolate combination. The process remains the same: crush 2 cups of your chosen cookie and mix with the melted butter and sugar.
2. My cheesecake filling seems soft and didn’t set properly. What went wrong?
This is the most common issue with no-bake cheesecakes and usually comes down to one of three things. First, it may not have been chilled long enough. 6 hours is the minimum, but overnight is truly best. Second, your heavy cream may not have been whipped to stiff peaks. If the cream is only at soft peaks, it won’t provide enough structure to set the filling. Third, you may have used a low-fat or “spreadable” tub-style cream cheese. Full-fat block cream cheese has a lower water content and the necessary stabilizers to set up firmly.
3. Why is my cheesecake filling lumpy?
Lumps are almost always caused by cream cheese that was too cold when it was mixed. When cold cream cheese is beaten, it’s difficult to break down the small, dense bits, which then remain in the final filling. To fix this, ensure your cream cheese is truly at room temperature and beat it by itself until it is completely smooth before adding any other ingredients.
4. Can I make this recipe in a different pan, like a muffin tin?
Yes, this recipe is very adaptable. For individual mini-cheesecakes, you can press the crust into the bottom of a standard muffin tin lined with paper or foil liners. Divide the filling evenly among the cups. This method requires less chilling time, usually around 3-4 hours. You can also make this recipe in a 9-inch round springform pan for a more traditional cheesecake presentation.
5. How long will these pumpkin cheesecake bites last in the refrigerator?
When stored in an airtight container, these cheesecake bites will stay fresh and delicious in the refrigerator for up to 5 days. The crust may soften slightly over time, but the flavor will remain excellent.
6. Can I use homemade pumpkin puree instead of canned?
You can, but with a major caveat. Homemade pumpkin puree is often much more watery and fibrous than its canned counterpart. To use it successfully in this recipe, you must first strain it thoroughly to remove excess moisture. You can do this by placing the puree in a fine-mesh sieve lined with cheesecloth and letting it drain over a bowl in the refrigerator for several hours until it has a thick consistency similar to canned puree.
7. I don’t have pumpkin pie spice. What can I use instead?
No problem! You can easily make your own pumpkin pie spice blend. For the 2 teaspoons needed in this recipe, combine the following: 1 teaspoon ground cinnamon, ½ teaspoon ground ginger, ¼ teaspoon ground nutmeg, and ¼ teaspoon ground allspice or cloves.
8. Can I make this recipe with less sugar?
You can reduce the sugar, but it may affect the final texture. The powdered sugar in the filling not only adds sweetness but also contributes to the structure and smoothness. You could try reducing the powdered sugar to ¾ cup, but I wouldn’t recommend going lower than that. For the crust, you can reduce or omit the granulated sugar with very little impact on the final result, as the cookies are already sweet. Using sugar substitutes may work, but can sometimes alter the texture or leave an aftertaste.
No-Bake Pumpkin Cheesecake Bites
Ingredients
Here is the complete list of ingredients you’ll need, separated by component, to create these delightful autumnal bites. Using high-quality, full-fat ingredients is crucial for achieving the perfect texture and flavor.
For the Gingersnap Crust:
- 2 cups gingersnap cookie crumbs: This equates to about 40–45 cookies or a 10-ounce package. These provide a wonderfully spicy, crunchy base that perfectly complements the pumpkin.
- ¼ cup granulated sugar: Adds a touch of sweetness to balance the spice of the cookies and the tang of the cheesecake filling.
- ½ cup unsalted butter, melted: Acts as the binder that holds the crust together, creating a firm yet sliceable foundation.
For the Pumpkin Cheesecake Filling:
- 16 ounces full-fat block cream cheese, softened to room temperature: This is the heart of the cheesecake. Using softened, full-fat cream cheese is non-negotiable for a smooth, creamy, and lump-free texture.
- 1 cup canned pumpkin puree: Be sure to use 100% pure pumpkin puree, not pumpkin pie filling, which contains added sugars and spices.
- 1 cup powdered sugar, sifted: Also known as confectioners’ sugar, this dissolves instantly into the filling for sweetness without any graininess. Sifting prevents clumps.
- 2 teaspoons pumpkin pie spice: This convenient blend of cinnamon, nutmeg, ginger, and allspice provides all the classic warm spice notes of fall.
- 1 teaspoon pure vanilla extract: Enhances the other flavors in the filling, adding a layer of aromatic depth.
- 1 cup cold heavy whipping cream: When whipped to stiff peaks, this is the secret ingredient that makes the filling light, airy, and mousse-like rather than dense.
Instructions
Follow these detailed steps carefully to ensure your no-bake cheesecake bites are a flawless success. The process is straightforward, with the most important element being patience during the chilling phase.
- Prepare the Pan: Begin by taking an 8×8 inch square baking pan. To ensure easy removal of the cheesecake later, line the pan with parchment paper, leaving at least a 2-inch overhang on two opposite sides. These overhangs will act as “handles” to lift the entire cheesecake block out of the pan for clean slicing. Lightly grease the pan before adding the parchment to help it stick in place.
- Create the Gingersnap Crumbs: If you are starting with whole gingersnap cookies, you’ll need to turn them into fine crumbs. The easiest method is to place them in the bowl of a food processor and pulse until they resemble coarse sand. If you don’t have a food processor, place the cookies in a large, sealed zip-top bag, press out the air, and crush them with a rolling pin or the flat side of a meat mallet.
- Make the Crust: In a medium bowl, combine the gingersnap cookie crumbs and the granulated sugar. Stir them together until evenly mixed. Pour the melted unsalted butter over the crumb mixture. Using a fork or a spatula, mix until all the crumbs are evenly moistened. The final texture should be similar to wet sand.
- Press the Crust into the Pan: Transfer the buttery crumb mixture into your prepared 8×8 inch pan. Using the bottom of a flat measuring cup or the back of a spoon, press the crumbs down into a firm, even, and compact layer across the entire bottom of the pan. Pay special attention to the corners and edges to ensure a solid foundation.
- Chill the Crust: Place the pan with the crust into the refrigerator for at least 30 minutes. This step is crucial as it allows the butter to solidify, creating a firm base that won’t crumble when you add the filling.
- Whip the Heavy Cream: While the crust is chilling, prepare the filling. In a large, clean mixing bowl (preferably chilled), pour in the cold heavy whipping cream. Using an electric hand mixer or a stand mixer with the whisk attachment, beat the cream on medium-high speed. Continue beating until stiff peaks form. You’ll know they are ready when the cream holds its shape and a peak stands straight up when you lift the beaters out. Be careful not to over-beat, or it will turn into butter. Set the whipped cream aside.
- Mix the Cheesecake Base: In a separate large bowl, place the softened block cream cheese. Beat it with the electric mixer on medium speed until it is completely smooth, creamy, and free of any lumps. This step is vital for a silky-smooth final product. Scrape down the sides of the bowl as needed.
- Combine the Filling Ingredients: Add the sifted powdered sugar to the smooth cream cheese and beat on low speed until just combined. Then, add the pumpkin puree, pumpkin pie spice, and vanilla extract. Continue to mix on low speed until everything is fully incorporated and the mixture is a uniform orange color. Scrape the bowl again to ensure there are no unmixed pockets of cream cheese at the bottom.
- Fold in the Whipped Cream: Now, gently add about one-third of the whipped cream into the pumpkin and cream cheese mixture. Using a rubber spatula, fold it in to lighten the base. Then, add the remaining whipped cream and continue to fold gently until no white streaks remain. The folding motion (scooping from the bottom and folding it over the top) is important to maintain the airiness of the whipped cream, which gives the cheesecake its light texture.
- Assemble the Cheesecake: Retrieve your chilled crust from the refrigerator. Spoon the pumpkin cheesecake filling onto the crust. Using your spatula, spread the filling into an even, smooth layer, making sure it reaches all the corners of the pan.
- Chill for Setting: This is the most important step. Cover the pan tightly with plastic wrap or aluminum foil. Place the cheesecake in the refrigerator to chill for a minimum of 6 hours. For the best, firmest results and the cleanest slices, it is highly recommended to chill it overnight. This extended time allows the filling to fully set and the flavors to meld together beautifully.
- Slice and Serve: Once the cheesecake is thoroughly chilled and firm to the touch, it’s time to slice. Use the parchment paper overhangs to carefully lift the entire cheesecake block out of the pan and onto a cutting board. For the cleanest cuts, use a large, sharp knife. Dip the knife in hot water and wipe it clean between each cut. Slice the block into small, bite-sized squares. A 6×6 grid will yield 36 perfect bites, or a 5×5 grid will give you 25 slightly larger ones. Arrange on a platter and enjoy!
Nutrition
- Serving Size: one normal portion
- Calories: 165
- Sugar: 9g
- Fat: 12g
- Carbohydrates: 13g
- Protein: 2g


