


As a busy parent and self-proclaimed dessert enthusiast, I’m always on the lookout for recipes that are both delicious and easy to make. Let me tell you, these No-Bake Coconut Snowballs are an absolute game-changer! From the moment I first whipped up a batch, my family was hooked. The kids love helping to roll them (it’s like edible playdough!), and the adults can’t resist the sweet, coconutty goodness. They’re the perfect treat for holidays, parties, or even just a simple weeknight dessert craving. Honestly, if you’re looking for a foolproof recipe that delivers big on flavor and minimal effort, look no further. These coconut snowballs are destined to become a staple in your recipe repertoire, just like they have in mine. Prepare to be amazed by how something so simple can be so incredibly satisfying – they truly are little bites of snowy, coconut heaven!
Ingredients for No-Bake Coconut Snowballs
This recipe keeps it delightfully simple with just a handful of ingredients, each playing a crucial role in creating the perfect no-bake coconut snowball. You likely already have many of these pantry staples on hand!
- Sweetened Condensed Milk: The magic binder! Sweetened condensed milk is the key ingredient that holds these snowballs together without any baking. It also adds a rich, creamy sweetness that perfectly complements the coconut. Look for a standard 14-ounce can of sweetened condensed milk.
- Desiccated Coconut, Unsweetened: This is the star of the show, providing the signature coconut flavor and the delightful snowy texture. Unsweetened desiccated coconut ensures the snowballs aren’t overly sweet, allowing the sweetness from the condensed milk to shine through. You’ll need it for both the inside of the snowballs and for rolling them to achieve that classic “snowball” look.
- Vanilla Extract: A touch of vanilla extract enhances the overall sweetness and adds a warm, comforting flavor note that beautifully complements the coconut. Pure vanilla extract is recommended for the best flavor.
- Almond Extract (Optional): While optional, a tiny splash of almond extract elevates these coconut snowballs to another level. Almond extract and coconut are a classic flavor pairing, adding a subtle nutty complexity that’s simply irresistible. A little goes a long way – just a quarter to half a teaspoon is usually sufficient. If you’re not a fan of almond extract or have allergies, you can easily omit it without significantly altering the recipe’s success.
- Pinch of Salt: A seemingly insignificant ingredient, but a pinch of salt is essential in balancing the sweetness and enhancing all the other flavors. It prevents the snowballs from tasting one-dimensional and overly sugary.
Instructions: How to Make No-Bake Coconut Snowballs
Creating these delightful No-Bake Coconut Snowballs is incredibly straightforward. Follow these simple step-by-step instructions, and you’ll have a batch of these sweet treats ready in no time! The beauty of this recipe is its simplicity – perfect for beginner bakers and a fun activity to do with kids.
Step 1: Prepare Your Workspace and Ingredients
Before you begin, gather all your ingredients and measuring tools. It’s always helpful to have everything pre-measured and ready to go. Line a baking sheet with parchment paper or wax paper. This will prevent the snowballs from sticking and make cleanup a breeze. Having your workspace organized will make the process smoother and more enjoyable. Ensure your desiccated coconut is ready in two separate bowls – one for mixing into the snowball mixture and another for rolling the finished snowballs. This prevents cross-contamination and keeps your rolling coconut fresh and fluffy.
Step 2: Combine the Wet Ingredients
In a medium-sized mixing bowl, pour in the entire can of sweetened condensed milk. This sticky, sweet base is the foundation of our snowballs. Add the vanilla extract and almond extract (if using) to the sweetened condensed milk. These extracts will infuse the mixture with delightful aromas and flavors. Give these wet ingredients a good stir with a spatula or spoon to ensure they are well combined. This step is crucial for evenly distributing the flavor throughout the snowballs.
Step 3: Gradually Incorporate the Coconut
Now, the fun part – adding the coconut! Gradually add the unsweetened desiccated coconut to the wet ingredients, mixing as you go. Start with about half of the coconut and mix it in thoroughly until it is well incorporated into the sweetened condensed milk mixture. Continue adding the remaining coconut in batches, mixing after each addition. The mixture will start to thicken as you add more coconut. Mix until all the coconut is evenly distributed and the mixture comes together to form a slightly sticky dough. You should be able to pinch a bit of the mixture and have it hold its shape. If the mixture seems too wet, you can add a little more desiccated coconut, one tablespoon at a time, until it reaches the right consistency. Conversely, if it seems too dry, you can add a tiny splash (literally drops) of sweetened condensed milk.
Step 4: Chill the Mixture (Important!)
This is a crucial step for easy snowball rolling! Cover the bowl with plastic wrap or a lid and refrigerate the coconut mixture for at least 30 minutes, or even better, for an hour. Chilling the mixture firms it up considerably, making it much easier to handle and roll into neat, round snowballs. Trying to roll the mixture while it’s still warm and sticky can be quite messy and result in misshapen snowballs. Patience is key here – the chilling time is well worth it for a less sticky and more manageable dough. You can even chill it for longer, up to a few hours, if needed.
Step 5: Roll into Snowballs
Once the mixture is thoroughly chilled, remove it from the refrigerator. Now it’s time to roll those snowballs! Take a small amount of the chilled coconut mixture, about a tablespoonful, and roll it between your palms to form a smooth, round ball. Don’t worry if they aren’t perfectly round – a slightly rustic shape adds to their charm. Aim for consistent sizes so they look uniform on a platter. If you find the mixture is still a little sticky, you can lightly dampen your hands with water or even a tiny bit of coconut oil – this will help prevent the mixture from sticking to your hands.
Step 6: Coat in Coconut
After rolling each snowball, immediately roll it in the reserved bowl of desiccated coconut. Gently press the coconut flakes onto the surface of the snowball to ensure it is fully coated. The coconut coating is what gives these treats their signature “snowball” appearance and adds extra texture and flavor. Make sure to coat them generously for the best visual appeal and coconutty goodness.
Step 7: Set and Store
Place the coconut-coated snowballs onto the prepared baking sheet lined with parchment paper or wax paper. This prevents them from sticking and makes them easy to remove later. Once all the snowballs are rolled and coated, allow them to set at room temperature for about 15-20 minutes to allow the coconut coating to adhere properly. After setting, you can store them in an airtight container at room temperature for a few days or in the refrigerator for up to a week. Refrigerating them will make them firmer and chewier, while storing them at room temperature will keep them slightly softer. They are delicious either way!
Nutrition Facts for No-Bake Coconut Snowballs
These No-Bake Coconut Snowballs are a delightful treat, but like all desserts, they are best enjoyed in moderation. Here’s an estimated nutritional breakdown per serving. Please note that these are approximate values and can vary slightly based on ingredient brands and specific measurements.
- Serving Size: 1 Coconut Snowball
- Servings Per Recipe: Approximately 24 snowballs (depending on size)
- Calories Per Serving: Approximately 120-150 calories
- Fat: 8-10 grams
Please note: This nutritional information is an estimate. For precise values, use a nutrition calculator with the specific brands and quantities of ingredients you use.
Preparation Time for No-Bake Coconut Snowballs
The beauty of these No-Bake Coconut Snowballs is their quick and easy preparation!
- Prep Time: 15-20 minutes (for mixing ingredients and rolling snowballs)
- Chill Time: 30 minutes – 1 hour (recommended for easier rolling)
- Total Time: Approximately 45 minutes – 1 hour 20 minutes (including chill time)
This recipe is perfect when you need a sweet treat in a hurry, especially since the active preparation time is minimal. Most of the time is spent chilling, which requires no effort on your part!
How to Serve No-Bake Coconut Snowballs
These versatile No-Bake Coconut Snowballs can be served in various ways, making them perfect for any occasion. Their simplicity and elegant appearance make them a crowd-pleaser.
- Classic Dessert Platter: Arrange the coconut snowballs on a pretty platter as part of a dessert spread. They look especially festive when arranged alongside other holiday treats like cookies, fudge, and candies.
- Holiday Gift Giving: Package a batch of coconut snowballs in a decorative tin or cellophane bags tied with ribbons. They make a thoughtful and homemade gift for friends, family, and neighbors during the holiday season.
- Party Favors: Individually wrap snowballs in small cellophane bags and tie with ribbons for adorable and edible party favors. They are perfect for winter-themed parties, birthdays, or baby showers.
- After-Dinner Treat: Serve a few coconut snowballs as a light and sweet after-dinner dessert. They pair wonderfully with a cup of coffee or tea.
- Kids’ Snack: These snowballs are a fun and relatively easy-to-eat snack for kids. They are perfect for lunchboxes or after-school treats (in moderation, of course!).
- Dessert Buffet Addition: Add them to a dessert buffet for any celebration. Their no-bake nature makes them a convenient and delicious addition that doesn’t require oven space.
- Pair with Hot Chocolate: Serve coconut snowballs alongside a warm mug of hot chocolate for a cozy winter treat. The creamy coconut and rich chocolate are a delightful combination.
- Elegant Dessert Plate: For a more sophisticated presentation, place a few snowballs on a dessert plate and drizzle with melted chocolate or caramel. You can also garnish with fresh berries or a sprig of mint for an elegant touch.
Additional Tips for Perfect No-Bake Coconut Snowballs
To ensure your No-Bake Coconut Snowballs are a resounding success every time, here are some helpful tips and tricks:
- Don’t Skip the Chilling Time: Chilling the coconut mixture is absolutely crucial. It firms up the dough, making it much easier to roll into neat snowballs. If you try to roll them without chilling, the mixture will be too sticky and messy to handle. Plan for at least 30 minutes of chilling time, or even longer if possible.
- Use Unsweetened Desiccated Coconut: Sweetened condensed milk is already very sweet, so using unsweetened desiccated coconut prevents the snowballs from becoming overwhelmingly sugary. Unsweetened coconut also has a better texture for rolling and coating.
- Adjust Coconut Consistency as Needed: If your coconut mixture seems too wet after mixing, add a tablespoon or two more of desiccated coconut until it reaches a workable consistency. Conversely, if it seems too dry, add a tiny splash of sweetened condensed milk (a teaspoon at a time) to moisten it slightly. The goal is a mixture that holds its shape when pressed together but is still easy to roll.
- Lightly Dampen Hands for Rolling: If you find the coconut mixture sticking to your hands while rolling, lightly dampen your palms with water or a tiny bit of coconut oil. This will prevent sticking and help you roll smoother snowballs. Avoid using too much water, as it can make the snowballs too wet.
- Vary the Extracts: While vanilla and almond extracts are classic choices, you can experiment with other extracts to create different flavor profiles. Try using peppermint extract for a festive holiday twist, lemon extract for a citrusy touch, or even rum extract for a more adult-oriented treat.
- Get Creative with Coatings: While desiccated coconut is the traditional coating, you can get creative and try other coatings. Consider rolling them in powdered sugar for a different snowy look, finely chopped nuts for added crunch, cocoa powder for a chocolatey version, or even sprinkles for a fun, colorful treat.
- Make Them Ahead of Time: No-Bake Coconut Snowballs are perfect for making ahead of time. They can be stored in an airtight container at room temperature for a few days or in the refrigerator for up to a week. This makes them ideal for holiday baking or party preparation when you want to get ahead of schedule.
- Customize the Size: You can adjust the size of your coconut snowballs to suit your needs. For smaller, bite-sized treats, use less mixture per snowball. For larger, more substantial desserts, use a bit more. Just remember that the nutritional information will vary depending on the size.
Frequently Asked Questions (FAQ) about No-Bake Coconut Snowballs
Here are some common questions people ask about making No-Bake Coconut Snowballs, along with detailed answers to help you succeed:
Q1: Can I use sweetened desiccated coconut instead of unsweetened?
A: While you can use sweetened desiccated coconut, it’s generally not recommended. Sweetened condensed milk is already very sweet, and using sweetened coconut will likely result in snowballs that are excessively sugary and potentially overwhelming. Unsweetened desiccated coconut provides the perfect balance, allowing the sweetness from the condensed milk to shine through without being cloying. If you only have sweetened coconut on hand, you might consider slightly reducing the amount of sweetened condensed milk used, but it’s always best to aim for unsweetened coconut for optimal flavor balance in this recipe.
Q2: My coconut snowball mixture is too sticky to roll. What can I do?
A: A sticky mixture is a common issue, but easily solvable! The most likely culprit is not chilling the mixture for long enough. If your mixture is too sticky, return it to the refrigerator and chill for another 30 minutes to an hour. This chilling time is crucial for firming up the coconut mixture and making it rollable. If, after chilling for a sufficient time, it’s still too sticky, you can try adding a tablespoon or two more of unsweetened desiccated coconut to absorb some of the moisture. Mix it in thoroughly and then try rolling again. Remember to lightly dampen your hands with water or coconut oil, as mentioned in the tips, to further prevent sticking.
Q3: Can I freeze No-Bake Coconut Snowballs?
A: Yes, you can freeze No-Bake Coconut Snowballs, making them even more convenient for make-ahead desserts. To freeze them, arrange the rolled and coated snowballs in a single layer on a baking sheet lined with parchment paper and freeze until solid. Once frozen solid, transfer them to an airtight freezer-safe container or bag. They can be frozen for up to 2-3 months. When ready to serve, thaw them in the refrigerator for a few hours or at room temperature for about 30 minutes. Freezing may slightly alter the texture, making them a bit firmer, but they will still be delicious.
Q4: I don’t have almond extract. Can I still make these snowballs?
A: Absolutely! Almond extract is optional in this recipe. While it adds a lovely subtle flavor that complements the coconut beautifully, the snowballs will still be delicious without it. If you don’t have almond extract or prefer not to use it, simply omit it from the recipe. The vanilla extract and the natural flavor of the coconut will still create a wonderfully flavorful treat. You could also consider substituting with another extract you enjoy, such as coconut extract (to enhance the coconut flavor) or even a citrus extract like orange or lemon for a different twist.
Q5: How long do No-Bake Coconut Snowballs last?
A: No-Bake Coconut Snowballs will last for several days at room temperature and even longer in the refrigerator. Stored in an airtight container at room temperature, they will stay fresh for about 3-4 days. If stored in an airtight container in the refrigerator, they can last up to a week. Refrigerating them will make them firmer and chewier, while storing them at room temperature will keep them slightly softer. For longer storage, freezing is the best option, as mentioned in Q3.
Q6: Can I make these vegan?
A: Making these coconut snowballs vegan requires a substitution for the sweetened condensed milk, which is the key binder in the recipe. Fortunately, there are vegan sweetened condensed milk alternatives available now, typically made from coconut milk or oat milk. Using a vegan sweetened condensed milk substitute will allow you to create a completely vegan version of these snowballs. Ensure all other ingredients you use are also vegan-friendly to maintain the recipe’s vegan status.
Q7: Can I add other ingredients to the coconut snowball mixture?
A: Yes, you can definitely customize these coconut snowballs by adding other ingredients to the mixture! Some popular additions include:
- Chocolate Chips: Mini chocolate chips or chopped dark chocolate add a delightful chocolatey element.
- Nuts: Finely chopped almonds, pecans, or macadamia nuts provide extra crunch and flavor.
- Dried Fruit: Chopped dried cranberries, cherries, or raisins add a chewy texture and fruity sweetness.
- Spices: A pinch of cinnamon, nutmeg, or cardamom can add warmth and complexity to the flavor profile, especially during the holidays.
- Citrus Zest: Lemon or orange zest can add a bright, refreshing citrus note.
When adding extra ingredients, be mindful of the consistency of the mixture. If you add too much, it might become too dry or difficult to roll. Start with small amounts and adjust as needed.
Q8: My coconut snowballs are cracking after rolling. What am I doing wrong?
A: Cracking can sometimes happen if the coconut mixture is too dry. This could be due to using too much desiccated coconut or not enough sweetened condensed milk. If your snowballs are cracking, try adding a very small amount (a teaspoon at a time) of sweetened condensed milk to the mixture and gently mixing it in. This should help to moisten the mixture slightly and prevent cracking. Also, ensure you are rolling them gently and not overworking the mixture, as excessive handling can also contribute to cracking. If the cracks are minimal, don’t worry too much; they will still taste delicious!
Print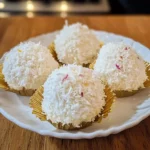
No-Bake Coconut Snowballs
Ingredients
This recipe keeps it delightfully simple with just a handful of ingredients, each playing a crucial role in creating the perfect no-bake coconut snowball. You likely already have many of these pantry staples on hand!
- Sweetened Condensed Milk: The magic binder! Sweetened condensed milk is the key ingredient that holds these snowballs together without any baking. It also adds a rich, creamy sweetness that perfectly complements the coconut. Look for a standard 14-ounce can of sweetened condensed milk.
- Desiccated Coconut, Unsweetened: This is the star of the show, providing the signature coconut flavor and the delightful snowy texture. Unsweetened desiccated coconut ensures the snowballs aren’t overly sweet, allowing the sweetness from the condensed milk to shine through. You’ll need it for both the inside of the snowballs and for rolling them to achieve that classic “snowball” look.
- Vanilla Extract: A touch of vanilla extract enhances the overall sweetness and adds a warm, comforting flavor note that beautifully complements the coconut. Pure vanilla extract is recommended for the best flavor.
- Almond Extract (Optional): While optional, a tiny splash of almond extract elevates these coconut snowballs to another level. Almond extract and coconut are a classic flavor pairing, adding a subtle nutty complexity that’s simply irresistible. A little goes a long way – just a quarter to half a teaspoon is usually sufficient. If you’re not a fan of almond extract or have allergies, you can easily omit it without significantly altering the recipe’s success.
- Pinch of Salt: A seemingly insignificant ingredient, but a pinch of salt is essential in balancing the sweetness and enhancing all the other flavors. It prevents the snowballs from tasting one-dimensional and overly sugary.
Instructions
Creating these delightful No-Bake Coconut Snowballs is incredibly straightforward. Follow these simple step-by-step instructions, and you’ll have a batch of these sweet treats ready in no time! The beauty of this recipe is its simplicity – perfect for beginner bakers and a fun activity to do with kids.
Step 1: Prepare Your Workspace and Ingredients
Before you begin, gather all your ingredients and measuring tools. It’s always helpful to have everything pre-measured and ready to go. Line a baking sheet with parchment paper or wax paper. This will prevent the snowballs from sticking and make cleanup a breeze. Having your workspace organized will make the process smoother and more enjoyable. Ensure your desiccated coconut is ready in two separate bowls – one for mixing into the snowball mixture and another for rolling the finished snowballs. This prevents cross-contamination and keeps your rolling coconut fresh and fluffy.
Step 2: Combine the Wet Ingredients
In a medium-sized mixing bowl, pour in the entire can of sweetened condensed milk. This sticky, sweet base is the foundation of our snowballs. Add the vanilla extract and almond extract (if using) to the sweetened condensed milk. These extracts will infuse the mixture with delightful aromas and flavors. Give these wet ingredients a good stir with a spatula or spoon to ensure they are well combined. This step is crucial for evenly distributing the flavor throughout the snowballs.
Step 3: Gradually Incorporate the Coconut
Now, the fun part – adding the coconut! Gradually add the unsweetened desiccated coconut to the wet ingredients, mixing as you go. Start with about half of the coconut and mix it in thoroughly until it is well incorporated into the sweetened condensed milk mixture. Continue adding the remaining coconut in batches, mixing after each addition. The mixture will start to thicken as you add more coconut. Mix until all the coconut is evenly distributed and the mixture comes together to form a slightly sticky dough. You should be able to pinch a bit of the mixture and have it hold its shape. If the mixture seems too wet, you can add a little more desiccated coconut, one tablespoon at a time, until it reaches the right consistency. Conversely, if it seems too dry, you can add a tiny splash (literally drops) of sweetened condensed milk.
Step 4: Chill the Mixture (Important!)
This is a crucial step for easy snowball rolling! Cover the bowl with plastic wrap or a lid and refrigerate the coconut mixture for at least 30 minutes, or even better, for an hour. Chilling the mixture firms it up considerably, making it much easier to handle and roll into neat, round snowballs. Trying to roll the mixture while it’s still warm and sticky can be quite messy and result in misshapen snowballs. Patience is key here – the chilling time is well worth it for a less sticky and more manageable dough. You can even chill it for longer, up to a few hours, if needed.
Step 5: Roll into Snowballs
Once the mixture is thoroughly chilled, remove it from the refrigerator. Now it’s time to roll those snowballs! Take a small amount of the chilled coconut mixture, about a tablespoonful, and roll it between your palms to form a smooth, round ball. Don’t worry if they aren’t perfectly round – a slightly rustic shape adds to their charm. Aim for consistent sizes so they look uniform on a platter. If you find the mixture is still a little sticky, you can lightly dampen your hands with water or even a tiny bit of coconut oil – this will help prevent the mixture from sticking to your hands.
Step 6: Coat in Coconut
After rolling each snowball, immediately roll it in the reserved bowl of desiccated coconut. Gently press the coconut flakes onto the surface of the snowball to ensure it is fully coated. The coconut coating is what gives these treats their signature “snowball” appearance and adds extra texture and flavor. Make sure to coat them generously for the best visual appeal and coconutty goodness.
Step 7: Set and Store
Place the coconut-coated snowballs onto the prepared baking sheet lined with parchment paper or wax paper. This prevents them from sticking and makes them easy to remove later. Once all the snowballs are rolled and coated, allow them to set at room temperature for about 15-20 minutes to allow the coconut coating to adhere properly. After setting, you can store them in an airtight container at room temperature for a few days or in the refrigerator for up to a week. Refrigerating them will make them firmer and chewier, while storing them at room temperature will keep them slightly softer. They are delicious either way!
Nutrition
- Serving Size: one normal portion
- Calories: 150
- Fat: 10 grams


