

I still remember the first time I tried making rice paper rolls. It was for a summer potluck, and I envisioned bringing a platter of vibrant, healthy, and impressive-looking appetizers. Let’s just say my initial attempts were… educational. Some wrappers tore dramatically, others fused together into an inseparable blob, and my fillings kept staging daring escapes. But the idea of those fresh, crisp rolls bursting with colourful vegetables and herbs kept me going. After a bit of practice (and maybe watching one too many online tutorials), I finally cracked the code. These Mini Rice Paper Salad Rolls are the culmination of that journey – scaled down for easier handling, perfect portion control, and maximum cuteness factor. They’ve become an absolute staple in our house. My kids, initially skeptical of anything green, devour them (especially when a good dipping sauce is involved!), and they are my go-to for adding a touch of elegance and freshness to any gathering, big or small. They look intricate, but once you get the hang of the rolling, they come together surprisingly quickly, offering a delightful crunch, chew, and burst of flavour in every bite. Forget greasy appetizers; these mini rolls are light, satisfying, and endlessly customizable, making them a true crowd-pleaser. The smaller size makes them less intimidating to roll for beginners and incredibly convenient for guests to handle. Trust me, mastering these little gems is easier than you think, and the reward is a delicious, healthy, and visually stunning dish.
Ingredients
Here’s what you’ll need to create these delightful Mini Rice Paper Salad Rolls:
- Rice Paper Wrappers (approx. 20-24 sheets, 16cm or 6-inch diameter): These are thin, brittle sheets made from rice flour, tapioca starch, water, and salt. Choose the smaller size for mini rolls; they become pliable when dipped in water.
- Cooked Shrimp (approx. 250g / ½ lb, small to medium, peeled and deveined): Pre-cooked shrimp offer convenience. Slice them in half lengthwise for easier rolling and better distribution in mini rolls. Alternatively, use shredded cooked chicken, thinly sliced cooked pork, or pan-fried tofu strips.
- Rice Vermicelli Noodles (approx. 100g / 3.5 oz dry): Thin, delicate noodles made from rice flour. Cook according to package directions, then rinse under cold water to stop the cooking and prevent sticking.
- Large Lettuce Leaves (approx. 8-10 leaves, like Butter Lettuce or Green Leaf): Forms the base layer inside the roll, preventing sharper ingredients from tearing the wrapper. Wash and tear into manageable pieces roughly half the size of the wrapper.
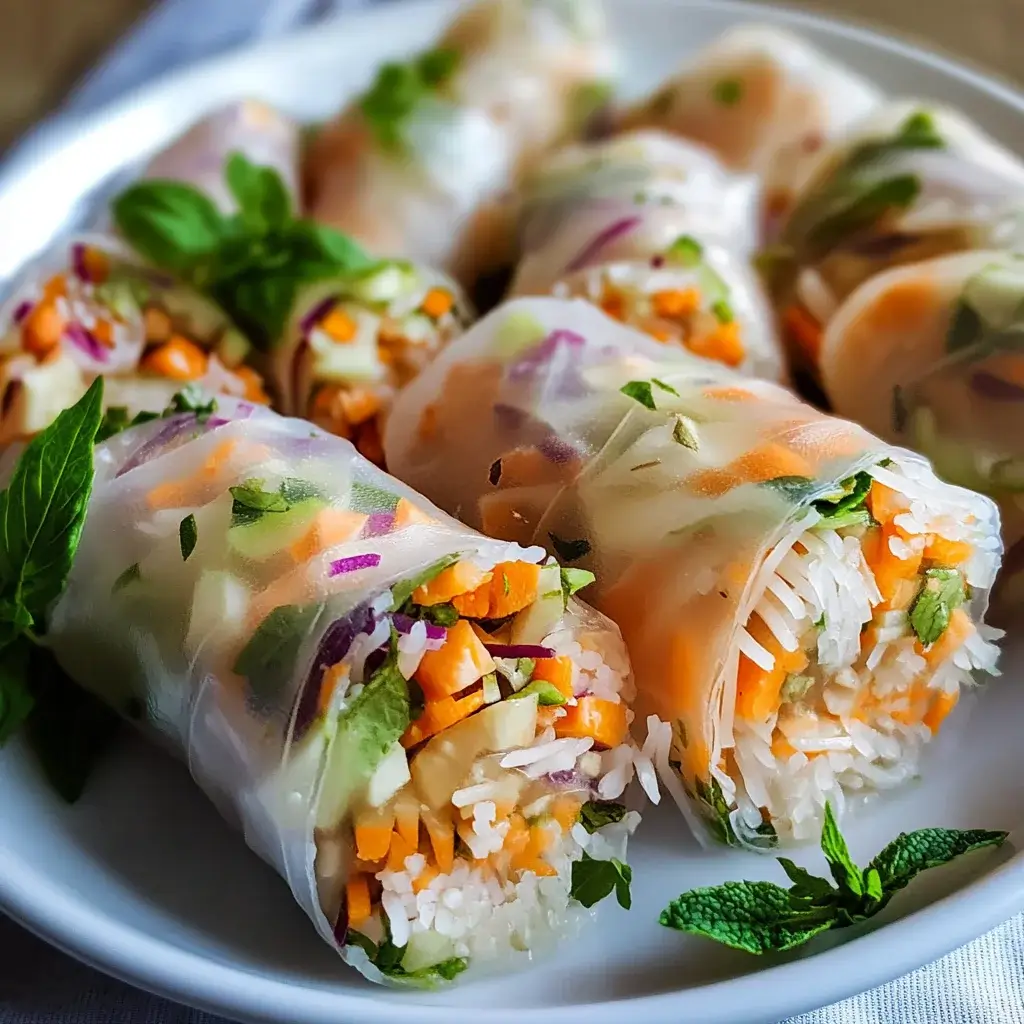
- Carrots (2 medium, julienned): Provide sweetness, crunch, and vibrant colour. Cut into very thin matchsticks.
- Cucumber (1 small, julienned): Adds refreshing coolness and crispness. Remove seeds if particularly watery, then cut into thin matchsticks.
- Fresh Mint Leaves (1 cup, loosely packed): Essential for the classic fresh spring roll flavour. Pick leaves from stems.
- Fresh Cilantro Leaves (1 cup, loosely packed): Adds a distinct, bright, herbaceous note. Use leaves and tender stems.
- Fresh Thai Basil Leaves (optional, ½ cup, loosely packed): Offers a subtle anise or licorice flavour, adding complexity.
- Bean Sprouts (optional, 1 cup): Add extra crunch and volume. Ensure they are fresh and crisp.
- Warm Water (for dipping wrappers): Needed to soften the rice paper wrappers. Use a shallow dish or pie plate large enough to fit the wrapper.
(Optional Peanut Dipping Sauce Ingredients)
- Creamy Peanut Butter (½ cup): The base of the sauce, providing richness and nutty flavour.
- Hoisin Sauce (¼ cup): Adds sweetness, saltiness, and depth.
- Water (¼ cup, or more to reach desired consistency): Thins the sauce.
- Lime Juice (1-2 tablespoons, fresh): Brightens the flavours and cuts through the richness.
- Soy Sauce or Tamari (1 tablespoon): Adds umami and saltiness. Use tamari for gluten-free.
- Maple Syrup or Honey (1 teaspoon, optional): For a touch more sweetness, adjust to taste.
- Garlic (1 clove, minced, optional): Adds a pungent kick.
- Sriracha or Chili Garlic Sauce (to taste, optional): For heat.
Instructions
Follow these steps carefully for perfectly assembled Mini Rice Paper Salad Rolls:
- Prepare the Filling Components (Mise en Place): This is crucial for smooth rolling.
- Cook the rice vermicelli according to package instructions. Drain immediately and rinse thoroughly under cold running water. Toss with a tiny bit of neutral oil (like canola or vegetable) to prevent sticking, if desired. Set aside.
- If using raw shrimp, cook them (boiling or pan-frying works well) until pink and opaque. Let cool completely, then peel, devein (if necessary), and slice in half lengthwise. If using pre-cooked shrimp, simply slice them.
- Wash and thoroughly dry all vegetables and herbs. Patting them dry with paper towels is important to prevent soggy rolls.
- Julienne the carrots and cucumber into thin, uniform matchsticks (about 2 inches long).
- Tear the lettuce leaves into smaller pieces, roughly 3-4 inches wide.
- Pick the mint, cilantro, and basil leaves from their stems.
- Arrange all prepared filling ingredients within easy reach on your workspace: cooked noodles, shrimp halves, lettuce, carrots, cucumber, herbs, and bean sprouts (if using).
- Set Up Your Rolling Station:
- Fill a wide, shallow dish (like a pie plate or large bowl) with about an inch of warm (not hot) water.
- Have a clean, flat work surface ready. A large cutting board (plastic or wood) or even a clean countertop works well. Some find a damp tea towel helps prevent sticking, but I prefer a smooth, clean board.
- Keep your prepared fillings nearby.
- Have a platter or container ready to place the finished rolls, ensuring they don’t touch initially to prevent sticking.
- Soften the Rice Paper Wrapper:
- Take one sheet of rice paper wrapper and fully submerge it in the warm water for about 15-30 seconds. The exact time depends on the brand and thickness of the wrapper and the water temperature. You want it to be pliable and soft, but not overly floppy or mushy. It will continue to soften slightly after you remove it from the water.
- Carefully lift the softened wrapper out of the water, letting excess water drip off. It might feel slightly stiff initially but will become more flexible.
- Lay the wrapper flat on your clean work surface. Smooth out any major wrinkles gently.
- Layer the Fillings:
- Work relatively quickly but carefully. Imagine the wrapper divided into thirds horizontally. Place the fillings on the third closest to you, leaving about a 1-inch border on the sides and the bottom edge.
- Bottom Layer: Place a piece of lettuce first. This creates a barrier to help prevent sharper ingredients like carrot sticks from tearing the delicate wrapper.
- Noodles & Veggies: Add a small amount of rice vermicelli noodles on top of the lettuce. Don’t overfill! Then, layer a few matchsticks of carrots and cucumber.
- Herbs & Sprouts: Sprinkle generously with mint, cilantro, and Thai basil leaves (if using), and add a few bean sprouts if desired.
- Protein: Place 2-3 shrimp halves (cut side down if you want the pink side visible through the wrapper) near the top edge of the filling pile.
- Roll the Wrapper: This requires a gentle but firm touch.
- First Fold: Carefully lift the bottom edge of the wrapper (the edge closest to you) up and over the filling pile. Tuck it snugly against the filling.
- Side Folds: Fold the left side of the wrapper inwards towards the center, over the filling. Then, fold the right side inwards towards the center. It should now look like an open envelope.
- Final Roll: Continue rolling the wrapper tightly upwards from the bottom towards the top edge, keeping the sides tucked in. Try to maintain even pressure to create a compact roll without tearing the wrapper. The softened rice paper should stick to itself to seal the roll.
- Place Finished Rolls:
- Set the completed mini roll seam-side down on your serving platter or container.
- Repeat the softening, filling, and rolling process with the remaining wrappers and fillings. Make sure the finished rolls are not touching each other initially on the platter, as they can stick together as they sit. If you need to layer them, place a piece of plastic wrap or parchment paper between layers.
- (Optional) Prepare the Peanut Dipping Sauce:
- In a small bowl, whisk together the peanut butter, hoisin sauce, water, lime juice, and soy sauce (or tamari).
- Continue whisking until smooth. Add more water, one teaspoon at a time, if the sauce is too thick, until it reaches your desired drizzling or dipping consistency.
- Stir in the optional minced garlic, maple syrup/honey, and sriracha/chili garlic sauce, adjusting to your taste preferences.
- Transfer the sauce to a small serving bowl.
Nutrition Facts
- Servings: This recipe makes approximately 20-24 mini rolls. A suggested serving size is 3-4 mini rolls.
- Calories per Serving (approx. 4 rolls, without sauce): 180-220 kcal. Calories vary based on exact filling amounts and protein choice.
- Protein: Provides around 10-15g per serving (primarily from shrimp or other protein). Protein is essential for muscle repair and satiety.
- Fiber: Contains approximately 3-5g per serving (from vegetables, herbs, and rice paper/noodles). Fiber aids digestion and helps you feel full.
- Low in Saturated Fat: Naturally low in unhealthy saturated fats, especially when using lean protein like shrimp or tofu.
- Rich in Vitamins & Minerals: Packed with vitamins (like Vitamin A from carrots, Vitamin C from herbs/cucumber, K from lettuce) and minerals depending on the specific vegetables used.
(Note: Nutritional information is an estimate and can vary significantly based on specific ingredients, portion sizes, and optional additions like dipping sauce. Peanut sauce adds significant calories, fat, and sodium.)
Preparation Time
- Active Preparation Time: Approximately 45-60 minutes. This includes washing and chopping vegetables/herbs, cooking noodles, preparing protein (if not pre-cooked), and rolling the wraps. Your speed may vary depending on your knife skills and familiarity with rolling.
- Total Time: Approximately 50-70 minutes (includes brief cooking time for noodles/shrimp and setup). Setting up an efficient “mise en place” (having all ingredients prepped and ready) significantly speeds up the rolling process.
How to Serve
These Mini Rice Paper Salad Rolls are versatile and can be served in various delightful ways:
- Appetizer Platter: Arrange the mini rolls attractively on a large platter.
- Ensure they aren’t touching initially to prevent sticking.
- Garnish the platter with extra mint sprigs, lime wedges, or edible flowers for visual appeal.
- Serve with one or multiple dipping sauces in small bowls placed centrally or alongside the platter. Popular choices include:
- Peanut Dipping Sauce (recipe often included or easily found)
- Nuoc Cham (Vietnamese Dipping Sauce – fish sauce based, sweet, sour, savory)
- Sweet Chili Sauce
- Hoisin-based dips
- Individual Servings: Place 3-4 mini rolls on small individual plates for a sophisticated starter. Drizzle lightly with sauce or provide a small personal dipping container.
- Light Lunch or Dinner: Serve a larger portion (5-7 rolls per person) alongside a complementary dish like a light Asian-inspired soup (e.g., Miso Soup, Tom Yum) or a small noodle salad.
- Packed Lunches & Picnics: These rolls travel reasonably well for a few hours if packed correctly.
- Wrap each roll individually in plastic wrap or place them in a container with dividers or parchment paper between them to prevent sticking.
- Pack the dipping sauce separately in a leak-proof container.
- Keep them cool in an insulated lunch bag with an ice pack.
- Party Finger Food: Their mini size makes them perfect for mingling. Provide napkins and ensure easy access to dipping sauces. Consider slicing larger rolls in half crosswise (after rolling) for even smaller, bite-sized portions, securing with a toothpick if needed.
Additional Tips
Maximize your Mini Rice Paper Salad Roll success with these helpful tips:
- Don’t Oversoak the Wrappers: This is the most common mistake. Submerge wrappers for just 15-30 seconds until they are pliable but not limp. They will continue to soften as you fill and roll. Over-soaked wrappers tear easily and become gummy.
- Don’t Overfill the Rolls: Especially with mini rolls, less is more. Overfilling makes rolling difficult and increases the risk of tearing. Aim for a balanced amount of each ingredient, creating a compact but not bulging roll.
- Work Surface Matters: A smooth, clean cutting board (plastic or wood) is ideal. If wrappers stick, try lightly dampening the surface with water or using a clean, damp, lint-free tea towel spread flat. Experiment to see what works best for you.
- Ingredient Prep is Key: Have everything chopped, cooked, cooled, and arranged before you start rolling (mise en place). This makes the assembly process efficient and prevents wrappers from drying out or becoming too soft while you prep mid-roll. Ensure veggies are dry!
- Layer Strategically: Start with a softer lettuce leaf against the wrapper to create a protective barrier against sharper ingredients like julienned carrots or cucumber ends. Place colourful ingredients like shrimp or red peppers strategically if you want them visible through the translucent wrapper.
- Roll Tightly but Gently: Apply consistent, gentle pressure as you roll. You want the roll to be compact so it holds together, but rolling too aggressively can cause tears. Tuck in the sides securely before the final roll upwards.
- Prevent Sticking: Freshly made rice paper rolls are notorious for sticking together. When placing finished rolls on a platter, leave space between them initially. If storing or transporting, wrap each roll individually in plastic wrap or separate layers with parchment paper.
- Customize Your Fillings: Don’t be afraid to experiment! Swap shrimp for shredded teriyaki chicken, smoked salmon, baked tofu, or keep it vegetarian/vegan with avocado, mango strips, bell peppers, or extra herbs. The possibilities are endless.
Frequently Asked Questions (FAQ)
Q1: Are these Mini Rice Paper Salad Rolls gluten-free?
A1: Yes, typically they are naturally gluten-free! Rice paper wrappers, rice vermicelli noodles, fresh vegetables, herbs, and shrimp/tofu are all gluten-free. However, always double-check the packaging of your rice paper and noodles, as some brands might have additives. Also, ensure your dipping sauce ingredients (like hoisin or soy sauce) are certified gluten-free (use tamari instead of regular soy sauce).
Q2: How can I make these rolls vegan?
A2: Easily! Simply omit the shrimp and replace it with a plant-based protein like pan-fried or baked tofu strips (marinated for extra flavour!), edamame, or even thin slices of avocado. Ensure your dipping sauce is also vegan (check hoisin sauce ingredients, use maple syrup instead of honey if applicable).
Q3: How do I store leftover rice paper rolls?
A3: Storing is tricky as they tend to dry out or become tough. For best results, wrap each roll individually and tightly in plastic wrap immediately after making them. Store them in an airtight container in the refrigerator for up to 24 hours. They are definitely best enjoyed fresh on the day they are made. The texture will change upon refrigeration.
Q4: Can I freeze rice paper rolls?
A4: No, freezing is not recommended. The fresh vegetables and herbs will become limp and watery upon thawing, and the rice paper wrapper texture will deteriorate significantly, becoming tough and unpleasant.
Q5: My rice paper wrappers keep tearing! What am I doing wrong?
A5: Tearing usually happens for a few reasons: oversoaking the wrapper (making it too delicate), overfilling the roll, using ingredients with sharp edges directly against the wrapper (use lettuce as a buffer), or rolling too aggressively. Try soaking for less time, using slightly less filling, and being gentle but firm during the rolling process. The quality of the wrapper brand can also make a difference.
Q6: What kind of rice paper wrappers should I buy?
A6: Look for wrappers made primarily from rice flour and tapioca starch. For mini rolls, choose the smaller diameter (around 16cm or 6 inches). Some brands are thinner or more brittle than others; you might need to try a couple to find your preference. They are usually found in the Asian section of most supermarkets or at Asian grocery stores.
Q7: Can I make these ahead of time for a party?
A7: You can make them a few hours ahead on the same day. Prepare them as close to serving time as possible for optimal freshness. Wrap each roll individually in plastic wrap immediately after rolling and store them in the fridge. Let them sit at room temperature for about 15-20 minutes before serving to take the chill off, as the wrappers can be a bit firm straight from the fridge. The dipping sauce can be made a day or two in advance and stored in the fridge.
Q8: Why are my rolls sticking together so badly?
A8: The softened rice paper is naturally sticky. As soon as the rolls are finished, they will want to fuse to anything they touch, including each other. To prevent this, leave space between rolls on the serving platter. If you need to stack them or store them, individual wrapping (plastic wrap) or separating layers with parchment paper is essential. Working quickly and not letting softened wrappers sit for too long before filling also helps minimize overall stickiness.

Mini Rice Paper Salad Rolls
Ingredients
Here’s what you’ll need to create these delightful Mini Rice Paper Salad Rolls:
- Rice Paper Wrappers (approx. 20-24 sheets, 16cm or 6-inch diameter): These are thin, brittle sheets made from rice flour, tapioca starch, water, and salt. Choose the smaller size for mini rolls; they become pliable when dipped in water.
- Cooked Shrimp (approx. 250g / ½ lb, small to medium, peeled and deveined): Pre-cooked shrimp offer convenience. Slice them in half lengthwise for easier rolling and better distribution in mini rolls. Alternatively, use shredded cooked chicken, thinly sliced cooked pork, or pan-fried tofu strips.
- Rice Vermicelli Noodles (approx. 100g / 3.5 oz dry): Thin, delicate noodles made from rice flour. Cook according to package directions, then rinse under cold water to stop the cooking and prevent sticking.
- Large Lettuce Leaves (approx. 8-10 leaves, like Butter Lettuce or Green Leaf): Forms the base layer inside the roll, preventing sharper ingredients from tearing the wrapper. Wash and tear into manageable pieces roughly half the size of the wrapper.
- Carrots (2 medium, julienned): Provide sweetness, crunch, and vibrant colour. Cut into very thin matchsticks.
- Cucumber (1 small, julienned): Adds refreshing coolness and crispness. Remove seeds if particularly watery, then cut into thin matchsticks.
- Fresh Mint Leaves (1 cup, loosely packed): Essential for the classic fresh spring roll flavour. Pick leaves from stems.
- Fresh Cilantro Leaves (1 cup, loosely packed): Adds a distinct, bright, herbaceous note. Use leaves and tender stems.
- Fresh Thai Basil Leaves (optional, ½ cup, loosely packed): Offers a subtle anise or licorice flavour, adding complexity.
- Bean Sprouts (optional, 1 cup): Add extra crunch and volume. Ensure they are fresh and crisp.
- Warm Water (for dipping wrappers): Needed to soften the rice paper wrappers. Use a shallow dish or pie plate large enough to fit the wrapper.
(Optional Peanut Dipping Sauce Ingredients)
- Creamy Peanut Butter (½ cup): The base of the sauce, providing richness and nutty flavour.
- Hoisin Sauce (¼ cup): Adds sweetness, saltiness, and depth.
- Water (¼ cup, or more to reach desired consistency): Thins the sauce.
- Lime Juice (1-2 tablespoons, fresh): Brightens the flavours and cuts through the richness.
- Soy Sauce or Tamari (1 tablespoon): Adds umami and saltiness. Use tamari for gluten-free.
- Maple Syrup or Honey (1 teaspoon, optional): For a touch more sweetness, adjust to taste.
- Garlic (1 clove, minced, optional): Adds a pungent kick.
- Sriracha or Chili Garlic Sauce (to taste, optional): For heat.
Instructions
Follow these steps carefully for perfectly assembled Mini Rice Paper Salad Rolls:
- Prepare the Filling Components (Mise en Place): This is crucial for smooth rolling.
- Cook the rice vermicelli according to package instructions. Drain immediately and rinse thoroughly under cold running water. Toss with a tiny bit of neutral oil (like canola or vegetable) to prevent sticking, if desired. Set aside.
- If using raw shrimp, cook them (boiling or pan-frying works well) until pink and opaque. Let cool completely, then peel, devein (if necessary), and slice in half lengthwise. If using pre-cooked shrimp, simply slice them.
- Wash and thoroughly dry all vegetables and herbs. Patting them dry with paper towels is important to prevent soggy rolls.
- Julienne the carrots and cucumber into thin, uniform matchsticks (about 2 inches long).
- Tear the lettuce leaves into smaller pieces, roughly 3-4 inches wide.
- Pick the mint, cilantro, and basil leaves from their stems.
- Arrange all prepared filling ingredients within easy reach on your workspace: cooked noodles, shrimp halves, lettuce, carrots, cucumber, herbs, and bean sprouts (if using).
- Set Up Your Rolling Station:
- Fill a wide, shallow dish (like a pie plate or large bowl) with about an inch of warm (not hot) water.
- Have a clean, flat work surface ready. A large cutting board (plastic or wood) or even a clean countertop works well. Some find a damp tea towel helps prevent sticking, but I prefer a smooth, clean board.
- Keep your prepared fillings nearby.
- Have a platter or container ready to place the finished rolls, ensuring they don’t touch initially to prevent sticking.
- Soften the Rice Paper Wrapper:
- Take one sheet of rice paper wrapper and fully submerge it in the warm water for about 15-30 seconds. The exact time depends on the brand and thickness of the wrapper and the water temperature. You want it to be pliable and soft, but not overly floppy or mushy. It will continue to soften slightly after you remove it from the water.
- Carefully lift the softened wrapper out of the water, letting excess water drip off. It might feel slightly stiff initially but will become more flexible.
- Lay the wrapper flat on your clean work surface. Smooth out any major wrinkles gently.
- Layer the Fillings:
- Work relatively quickly but carefully. Imagine the wrapper divided into thirds horizontally. Place the fillings on the third closest to you, leaving about a 1-inch border on the sides and the bottom edge.
- Bottom Layer: Place a piece of lettuce first. This creates a barrier to help prevent sharper ingredients like carrot sticks from tearing the delicate wrapper.
- Noodles & Veggies: Add a small amount of rice vermicelli noodles on top of the lettuce. Don’t overfill! Then, layer a few matchsticks of carrots and cucumber.
- Herbs & Sprouts: Sprinkle generously with mint, cilantro, and Thai basil leaves (if using), and add a few bean sprouts if desired.
- Protein: Place 2-3 shrimp halves (cut side down if you want the pink side visible through the wrapper) near the top edge of the filling pile.
- Roll the Wrapper: This requires a gentle but firm touch.
- First Fold: Carefully lift the bottom edge of the wrapper (the edge closest to you) up and over the filling pile. Tuck it snugly against the filling.
- Side Folds: Fold the left side of the wrapper inwards towards the center, over the filling. Then, fold the right side inwards towards the center. It should now look like an open envelope.
- Final Roll: Continue rolling the wrapper tightly upwards from the bottom towards the top edge, keeping the sides tucked in. Try to maintain even pressure to create a compact roll without tearing the wrapper. The softened rice paper should stick to itself to seal the roll.
- Place Finished Rolls:
- Set the completed mini roll seam-side down on your serving platter or container.
- Repeat the softening, filling, and rolling process with the remaining wrappers and fillings. Make sure the finished rolls are not touching each other initially on the platter, as they can stick together as they sit. If you need to layer them, place a piece of plastic wrap or parchment paper between layers.
- (Optional) Prepare the Peanut Dipping Sauce:
- In a small bowl, whisk together the peanut butter, hoisin sauce, water, lime juice, and soy sauce (or tamari).
- Continue whisking until smooth. Add more water, one teaspoon at a time, if the sauce is too thick, until it reaches your desired drizzling or dipping consistency.
- Stir in the optional minced garlic, maple syrup/honey, and sriracha/chili garlic sauce, adjusting to your taste preferences.
- Transfer the sauce to a small serving bowl.
Nutrition
- Serving Size: one normal portion
- Calories: 220
- Fiber: 5g
- Protein: 15g


