

Of all the culinary challenges I’ve faced as a parent, the quest for the perfect, healthy, and genuinely exciting snack has been the most persistent. We’ve all been there: you spend time crafting a beautiful, nutritious meal, only to have it met with a turned-up nose or a definitive “I don’t like it.” My moment of breakthrough came on a Tuesday afternoon, armed with a container of leftover rice and a crisper drawer full of vegetables on the verge of losing their crunch. I was determined to create something that wasn’t just another hidden-veggie muffin. I wanted something savory, satisfying, and easy for little hands to hold. That’s how these Mini Rice and Veggie Cakes were born. The first time I pan-fried a batch, the aroma of toasting rice and savory seasonings filled the kitchen, and my notoriously picky six-year-old wandered in, intrigued. He watched as I flipped the little golden-brown discs. “What are those?” he asked, a rare flicker of culinary curiosity in his eyes. When I offered him one, he didn’t just poke it—he took a bite. Then another. And another. Soon, my husband was stealing them from the cooling rack, and I knew I had a winner. These cakes are a true kitchen workhorse: they’re a fantastic way to use up leftovers, a perfect vehicle for packing in vegetables, and an absolute lifesaver for lunchboxes, after-school snacks, or even a light dinner. They are crispy on the outside, soft and flavorful on the inside, and endlessly customizable. This recipe isn’t just about food; it’s about turning everyday ingredients into moments of delicious, stress-free victory.
Ingredients
- 2 cups Cooked Short-Grain Rice, cooled: The star of the show. Short-grain rice (like sushi or Arborio rice) is essential as its high starch content makes it sticky, which is the natural glue that holds these cakes together. It’s best to use rice that has been cooked and completely cooled, preferably refrigerated overnight, as this further enhances its binding properties.
- 1 cup Finely Grated Zucchini (about 1 medium): Zucchini adds wonderful moisture and a host of nutrients. It’s crucial to squeeze out as much excess water as possible after grating to prevent the cakes from becoming soggy and falling apart.
- ½ cup Finely Grated Carrot (about 1 large): Carrots provide a subtle sweetness that balances the savory flavors, along with a beautiful pop of orange color and a boost of Vitamin A.
- ¼ cup Frozen Peas, thawed: These little green gems add a lovely texture and another layer of vegetable goodness. You can thaw them quickly by running them under warm water for a minute.
- ½ cup Shredded Cheddar Cheese (or Parmesan): Cheese adds a fantastic savory, umami flavor and helps bind the cakes as it melts. Sharp cheddar gives a classic taste, while Parmesan adds a saltier, nuttier profile.
- 1 large Egg, lightly beaten: The primary binder that brings everything together. The egg’s protein structure cooks and sets, ensuring your mini cakes hold their shape perfectly.
- 3 tablespoons All-Purpose Flour (or a gluten-free alternative): A little flour absorbs any remaining moisture from the vegetables and helps create a more stable mixture. You can easily substitute with oat flour or a 1-to-1 gluten-free baking blend.
- 1 teaspoon Garlic Powder: Provides a deep, savory aromatic flavor without the harshness of raw garlic.
- 1 teaspoon Onion Powder: Complements the garlic powder, adding a foundational savory sweetness to the flavor profile.
- 1 tablespoon Low-Sodium Soy Sauce (or Tamari for gluten-free): This is the secret weapon for a deep, rich umami flavor that makes these cakes utterly irresistible.
- Salt and Black Pepper to taste: To enhance all the other flavors. Be mindful of the saltiness from the cheese and soy sauce before adding too much.
- 2-3 tablespoons High-Smoke Point Oil for frying (like avocado, canola, or grapeseed oil): You’ll need this for pan-frying the cakes to a perfect golden-brown crisp. A high-smoke point oil won’t burn at the medium-high heat required for cooking.
Instructions
- Prepare Your Vegetables: The first and most critical step for success is managing the moisture in your vegetables. Start by finely grating the zucchini. Place the grated zucchini in the center of a clean kitchen towel, cheesecloth, or several layers of sturdy paper towels. Gather the ends and twist tightly, squeezing out as much liquid as you possibly can over a sink or bowl. You’ll be surprised at how much water comes out! Discard the liquid. This step is non-negotiable, as excess water will make your mixture too wet and your cakes will fall apart in the pan. Finely grate the carrot as well. If you are using frozen peas, ensure they are fully thawed.
- Combine the Core Ingredients: In a large mixing bowl, add your 2 cups of cooled, cooked short-grain rice. Break up any large clumps with a fork or your hands. Add the squeezed zucchini, grated carrot, and thawed peas to the bowl. Sprinkle in the shredded cheddar or Parmesan cheese.
- Create the Binding Mixture: In a separate, smaller bowl, whisk the large egg until it’s uniformly yellow. To the egg, add the 3 tablespoons of all-purpose flour, 1 teaspoon of garlic powder, 1 teaspoon of onion powder, and 1 tablespoon of soy sauce. Whisk everything together until you have a smooth, well-combined slurry. This ensures the seasonings and binders are evenly distributed throughout the cakes.
- Mix Everything Together: Pour the egg and flour mixture over the rice and vegetable mixture in the large bowl. Add a pinch of salt and freshly ground black pepper. Now, using a sturdy spatula or your hands, mix everything together until it’s thoroughly combined. Don’t be shy about getting in there with your hands; it’s often the best way to ensure everything is incorporated. The final mixture should be sticky and hold its shape when you squeeze a small amount in your palm. If it feels overly wet, add another tablespoon of flour. If it feels too dry and crumbly, you can add a teaspoon of water or another splash of soy sauce.
- Form the Mini Cakes: Line a baking sheet or large plate with parchment paper to prevent sticking. Scoop out about 2 tablespoons of the mixture for each cake. A small cookie scoop works perfectly for creating uniform patties. Roll the mixture into a ball in your hands, and then gently flatten it into a small disc, about ½-inch thick and 2 inches in diameter. If the mixture is sticking to your hands, keep a small bowl of water nearby and lightly dampen your palms before forming each cake. Place the formed cakes on the prepared parchment paper. You should get between 16 to 20 mini cakes from this recipe.
- Cook the Cakes to Golden Perfection: You have a few options for cooking.
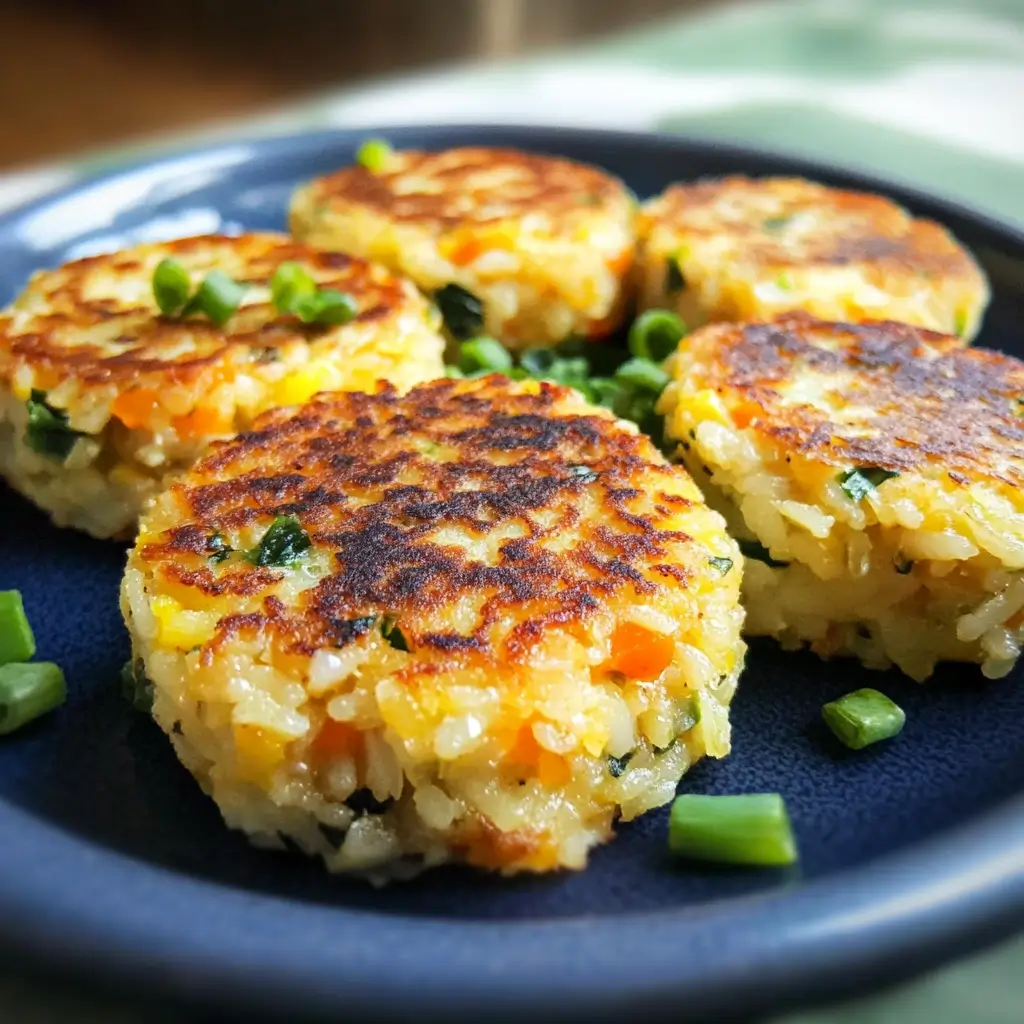
- Pan-Frying (Recommended for best texture): Heat 2-3 tablespoons of high-smoke point oil in a large non-stick skillet or cast-iron pan over medium to medium-high heat. The oil is ready when it shimmers slightly. Carefully place the cakes in the pan, ensuring not to overcrowd it (cook in batches if necessary). Fry for 3-4 minutes per side, or until they are a deep golden brown and beautifully crispy.
- Baking: Preheat your oven to 400°F (200°C). Place the cakes on a parchment-lined baking sheet. Lightly brush or spray the tops with oil. Bake for 10-12 minutes, then carefully flip them, brush the other side with oil, and bake for another 10-12 minutes, or until golden and firm.
- Air Frying: Preheat your air fryer to 375°F (190°C). Place the cakes in a single layer in the air fryer basket (you’ll need to work in batches). Spray the tops with cooking spray. Air fry for 6-8 minutes, then flip and air fry for another 5-7 minutes, or until crispy and golden.
- Cool and Serve: Once cooked, transfer the mini rice and veggie cakes to a wire cooling rack. This allows air to circulate underneath, preventing the bottoms from getting soggy and ensuring they stay crispy. Let them cool for a few minutes before serving, as they will be very hot inside.
Nutrition Facts
- Servings: This recipe yields approximately 18 mini cakes. A recommended serving size is 3 cakes.
- Calories per Serving (3 cakes): Approximately 180-220 kcal, depending on the specific cheese and oil used.
- Complex Carbohydrates: The rice provides a fantastic source of complex carbohydrates, which are digested slowly, offering sustained energy release. This makes them a perfect snack to power through an afternoon slump without the crash associated with sugary treats.
- Dietary Fiber: With a generous amount of zucchini, carrots, and peas, these cakes are a good source of fiber. Fiber is crucial for maintaining a healthy digestive system, promoting feelings of fullness, and helping to regulate blood sugar levels.
- Protein: The combination of egg and cheese contributes a solid amount of protein to each serving. Protein is essential for building and repairing tissues, supporting muscle growth, and keeping you satisfied for longer.
- Vitamin A: Thanks to the vibrant carrots, these little cakes are packed with beta-carotene, which the body converts into Vitamin A. This essential vitamin supports healthy vision, immune function, and cell growth.
- Low in Saturated Fat: When pan-fried with a heart-healthy oil like avocado or grapeseed oil, and especially when baked or air-fried, these cakes are relatively low in saturated fat, making them a wholesome choice for the entire family.
Preparation Time
The total time for this recipe can vary slightly depending on your efficiency in the kitchen and whether you are using pre-cooked rice. Using leftover rice is the ultimate time-saver.
- Prep Time: 15-20 minutes. This includes grating and squeezing the vegetables, mixing the ingredients, and forming the patties.
- Cook Time: 15-20 minutes. This accounts for cooking the cakes in two batches if pan-frying.
- Total Time: Approximately 30-40 minutes from start to finish, making it a perfectly manageable recipe for a weeknight snack or meal component.
How to Serve
These versatile Mini Rice and Veggie Cakes can be served in a multitude of ways, making them suitable for any meal of the day. Here are some of our favorite serving suggestions:
- As a Perfect Appetizer or Snack:
- Serve them warm, fresh from the pan, on a platter for guests or as an after-school snack.
- Pair them with a variety of dipping sauces to elevate the experience.
- For a Light Lunch or Dinner:
- Serve a portion of 3-4 cakes alongside a fresh, crisp green salad with a light vinaigrette.
- Accompany them with a bowl of tomato soup for a comforting and complete meal.
- Plate them with a side of steamed green beans or roasted asparagus.
- In a Lunchbox:
- These cakes are fantastic at room temperature, so they are ideal for school or work lunchboxes.
- Pack them with a small container of dip and some fresh fruit for a balanced, easy-to-eat meal.
- For Toddlers and Baby-Led Weaning (BLW):
- For younger toddlers and babies, cut the cakes into long, thin strips that are easy for little hands to grasp.
- Ensure you omit the salt if preparing for babies under one year of age. The soy sauce and cheese provide plenty of flavor.
- Creative Dipping Sauce Pairings:
- Cool & Creamy Yogurt Dip: Mix Greek yogurt with fresh dill, a squeeze of lemon juice, and a pinch of garlic powder.
- Sweet & Tangy Chili Sauce: A store-bought sweet chili sauce is a quick and delicious option.
- Simple Marinara: Warm up a small bowl of your favorite marinara sauce for dipping.
- Avocado Crema: Blend a ripe avocado with lime juice, a spoonful of sour cream or yogurt, and a little cilantro.
- Soy-Ginger Dip: Mix a little soy sauce, grated fresh ginger, a dash of sesame oil, and a splash of rice vinegar.
Additional Tips
- The Rice Really Matters: While you can technically use any rice, short-grain rice is highly recommended for its starchy, sticky texture. Long-grain rice like basmati or jasmine is drier and more separate, which will likely result in crumbly cakes that don’t hold together. If you only have long-grain rice, you may need to add an extra binder, like another tablespoon of flour or even a little mashed potato, to help it stick.
- Squeeze That Zucchini… Seriously!: I cannot overstate the importance of this step. Zucchini is over 90% water. If you skip squeezing it, that water will release during cooking, turning your beautiful, crispy cakes into a steamy, soggy mess that falls apart. Take the extra two minutes—it’s the secret to a perfect texture.
- Get Creative with Your Veggie & Herb Combos: This recipe is a fantastic base for experimentation. Finely chopped broccoli florets, corn kernels, chopped spinach (squeezed dry like the zucchini), or finely diced bell peppers are all excellent additions. You can also add fresh herbs like chopped cilantro, parsley, or chives for a burst of freshness.
- Boost the Protein and Fiber: To make these cakes even more substantial, consider adding other ingredients. A cup of rinsed canned chickpeas, lightly mashed, or some crumbled firm tofu can seamlessly blend in. For a non-vegetarian option, a half-cup of finely shredded cooked chicken or flaked salmon works wonderfully.
- Master the Make-Ahead & Freeze Method: These cakes are a dream for meal prep. You can freeze them either cooked or uncooked.
- To Freeze Uncooked: Form the patties and place them on a parchment-lined baking sheet. Freeze for 1-2 hours until solid, then transfer to a freezer-safe bag or container. You can cook them directly from frozen, just add a few extra minutes to the cooking time.
- To Freeze Cooked: Let the cooked cakes cool completely. Flash-freeze them on a baking sheet before transferring to a freezer bag. Reheat them in the oven at 375°F (190°C) or in an air fryer for 8-10 minutes until hot and re-crisped.
- Don’t Crowd the Pan: When pan-frying, giving each cake enough space is crucial. If you overcrowd the pan, the temperature of the oil will drop, and the cakes will steam instead of fry. This prevents them from developing that irresistible crispy, golden-brown crust. Always cook in batches if your pan isn’t large enough.
- Uniformity for Even Cooking: Use a measuring spoon or a small ice cream/cookie scoop to portion out your mixture. This ensures all your cakes are roughly the same size and thickness, which means they will all cook evenly in the same amount of time.
- Explore Different Flavor Profiles: Don’t be afraid to switch up the seasonings.
- Italian-Inspired: Swap the soy sauce for a tablespoon of tomato paste and use Parmesan cheese. Season with dried oregano and basil. Serve with marinara.
- Mexican-Inspired: Use a Mexican cheese blend, add a teaspoon of cumin and a pinch of chili powder, and stir in some black beans and corn. Serve with salsa and avocado crema.
- Indian-Inspired: Add a teaspoon of mild curry powder or a mix of turmeric, cumin, and coriander. Stir in some finely chopped cilantro. Serve with a dollop of mango chutney or raita.
FAQ Section
1. Can I make these Mini Rice and Veggie Cakes gluten-free?
Absolutely! This recipe is very easy to adapt for a gluten-free diet. Simply make two substitutions: use a certified gluten-free all-purpose flour blend or oat flour in place of the all-purpose flour, and use tamari or gluten-free soy sauce instead of regular soy sauce. All other ingredients are naturally gluten-free.
2. How can I make a vegan version of this recipe?
Yes, you can easily make these cakes vegan. To replace the egg, create a “flax egg” by mixing 1 tablespoon of ground flaxseed with 3 tablespoons of water. Let it sit for 5-10 minutes until it becomes gelatinous, then use it in place of the chicken egg. For the cheese, use your favorite brand of vegan shredded cheese or substitute it with 2-3 tablespoons of nutritional yeast for a cheesy, umami flavor.
3. My rice cakes are falling apart in the pan. What did I do wrong?
This is the most common issue, and it usually comes down to one of three things. First, your mixture might be too wet. Did you thoroughly squeeze all the water from the zucchini? Second, your binder might be insufficient. Ensure you used a large egg or a proper vegan substitute. If the mixture still feels loose, add another tablespoon of flour. Third, the type of rice matters. If you used long-grain rice, it might not be sticky enough. Next time, opt for short-grain rice.
4. Can I bake these instead of frying them to make them healthier?
Yes, baking is a great, healthier alternative to pan-frying. Preheat your oven to 400°F (200°C). Arrange the formed cakes on a baking sheet lined with parchment paper. To help them get crispy, lightly brush or spray the tops with olive oil or avocado oil. Bake for 10-12 minutes, then carefully flip them over. Brush the other side with a little oil and bake for another 10-12 minutes, or until they are golden brown and feel firm to the touch. They won’t be quite as crispy as the pan-fried version, but they will be equally delicious.
5. How should I store leftover rice cakes and how long will they last?
Leftovers are fantastic! Allow the cakes to cool completely to room temperature. Then, store them in an airtight container in the refrigerator. They will stay fresh for up to 4 days. You can eat them cold straight from the fridge (perfect for lunchboxes), or you can reheat them for the best texture. The best way to reheat is in an oven, toaster oven, or air fryer for a few minutes until they are warm and crispy again. Microwaving will make them soft.
6. Are these rice and veggie cakes suitable for babies and toddlers?
They are perfect for babies and toddlers! They are soft on the inside, easy to hold, and a wonderful way to introduce vegetables and different textures. For babies under one year old, it’s recommended to omit the salt and use a very low-sodium soy sauce or skip it altogether. The cheese provides enough salty flavor. You can cut the cakes into strips for baby-led weaning or into small, bite-sized pieces for toddlers.
7. I don’t have leftover rice. Can I make it fresh for this recipe?
You certainly can. Cook 1 cup of dry short-grain rice according to package directions, which will yield about 3 cups of cooked rice (you’ll have a little extra). The key is to let the freshly cooked rice cool down completely before using it. For best results, spread it out on a baking sheet and place it in the refrigerator for at least 30 minutes (or in the freezer for 10-15 minutes) to cool it quickly and help it become stickier.
8. What are some other creative ways to use these cakes besides just as a snack?
Think of them as a versatile base! You can crumble a couple of leftover cakes over a salad to act as savory “croutons.” You can also use them as a base for a mini-meal: top a warm cake with a dollop of marinara and a sprinkle of mozzarella and broil for a minute to make a “rice cake pizza.” You could even serve one topped with a fried or poached egg for a delicious and protein-packed breakfast.

Mini Rice and Veggie Cakes
Ingredients
- 2 cups Cooked Short-Grain Rice, cooled: The star of the show. Short-grain rice (like sushi or Arborio rice) is essential as its high starch content makes it sticky, which is the natural glue that holds these cakes together. It’s best to use rice that has been cooked and completely cooled, preferably refrigerated overnight, as this further enhances its binding properties.
- 1 cup Finely Grated Zucchini (about 1 medium): Zucchini adds wonderful moisture and a host of nutrients. It’s crucial to squeeze out as much excess water as possible after grating to prevent the cakes from becoming soggy and falling apart.
- ½ cup Finely Grated Carrot (about 1 large): Carrots provide a subtle sweetness that balances the savory flavors, along with a beautiful pop of orange color and a boost of Vitamin A.
- ¼ cup Frozen Peas, thawed: These little green gems add a lovely texture and another layer of vegetable goodness. You can thaw them quickly by running them under warm water for a minute.
- ½ cup Shredded Cheddar Cheese (or Parmesan): Cheese adds a fantastic savory, umami flavor and helps bind the cakes as it melts. Sharp cheddar gives a classic taste, while Parmesan adds a saltier, nuttier profile.
- 1 large Egg, lightly beaten: The primary binder that brings everything together. The egg’s protein structure cooks and sets, ensuring your mini cakes hold their shape perfectly.
- 3 tablespoons All-Purpose Flour (or a gluten-free alternative): A little flour absorbs any remaining moisture from the vegetables and helps create a more stable mixture. You can easily substitute with oat flour or a 1-to-1 gluten-free baking blend.
- 1 teaspoon Garlic Powder: Provides a deep, savory aromatic flavor without the harshness of raw garlic.
- 1 teaspoon Onion Powder: Complements the garlic powder, adding a foundational savory sweetness to the flavor profile.
- 1 tablespoon Low-Sodium Soy Sauce (or Tamari for gluten-free): This is the secret weapon for a deep, rich umami flavor that makes these cakes utterly irresistible.
- Salt and Black Pepper to taste: To enhance all the other flavors. Be mindful of the saltiness from the cheese and soy sauce before adding too much.
- 2–3 tablespoons High-Smoke Point Oil for frying (like avocado, canola, or grapeseed oil): You’ll need this for pan-frying the cakes to a perfect golden-brown crisp. A high-smoke point oil won’t burn at the medium-high heat required for cooking.
Instructions
- Prepare Your Vegetables: The first and most critical step for success is managing the moisture in your vegetables. Start by finely grating the zucchini. Place the grated zucchini in the center of a clean kitchen towel, cheesecloth, or several layers of sturdy paper towels. Gather the ends and twist tightly, squeezing out as much liquid as you possibly can over a sink or bowl. You’ll be surprised at how much water comes out! Discard the liquid. This step is non-negotiable, as excess water will make your mixture too wet and your cakes will fall apart in the pan. Finely grate the carrot as well. If you are using frozen peas, ensure they are fully thawed.
- Combine the Core Ingredients: In a large mixing bowl, add your 2 cups of cooled, cooked short-grain rice. Break up any large clumps with a fork or your hands. Add the squeezed zucchini, grated carrot, and thawed peas to the bowl. Sprinkle in the shredded cheddar or Parmesan cheese.
- Create the Binding Mixture: In a separate, smaller bowl, whisk the large egg until it’s uniformly yellow. To the egg, add the 3 tablespoons of all-purpose flour, 1 teaspoon of garlic powder, 1 teaspoon of onion powder, and 1 tablespoon of soy sauce. Whisk everything together until you have a smooth, well-combined slurry. This ensures the seasonings and binders are evenly distributed throughout the cakes.
- Mix Everything Together: Pour the egg and flour mixture over the rice and vegetable mixture in the large bowl. Add a pinch of salt and freshly ground black pepper. Now, using a sturdy spatula or your hands, mix everything together until it’s thoroughly combined. Don’t be shy about getting in there with your hands; it’s often the best way to ensure everything is incorporated. The final mixture should be sticky and hold its shape when you squeeze a small amount in your palm. If it feels overly wet, add another tablespoon of flour. If it feels too dry and crumbly, you can add a teaspoon of water or another splash of soy sauce.
- Form the Mini Cakes: Line a baking sheet or large plate with parchment paper to prevent sticking. Scoop out about 2 tablespoons of the mixture for each cake. A small cookie scoop works perfectly for creating uniform patties. Roll the mixture into a ball in your hands, and then gently flatten it into a small disc, about ½-inch thick and 2 inches in diameter. If the mixture is sticking to your hands, keep a small bowl of water nearby and lightly dampen your palms before forming each cake. Place the formed cakes on the prepared parchment paper. You should get between 16 to 20 mini cakes from this recipe.
- Cook the Cakes to Golden Perfection: You have a few options for cooking.
- Pan-Frying (Recommended for best texture): Heat 2-3 tablespoons of high-smoke point oil in a large non-stick skillet or cast-iron pan over medium to medium-high heat. The oil is ready when it shimmers slightly. Carefully place the cakes in the pan, ensuring not to overcrowd it (cook in batches if necessary). Fry for 3-4 minutes per side, or until they are a deep golden brown and beautifully crispy.
- Baking: Preheat your oven to 400°F (200°C). Place the cakes on a parchment-lined baking sheet. Lightly brush or spray the tops with oil. Bake for 10-12 minutes, then carefully flip them, brush the other side with oil, and bake for another 10-12 minutes, or until golden and firm.
- Air Frying: Preheat your air fryer to 375°F (190°C). Place the cakes in a single layer in the air fryer basket (you’ll need to work in batches). Spray the tops with cooking spray. Air fry for 6-8 minutes, then flip and air fry for another 5-7 minutes, or until crispy and golden.
- Cool and Serve: Once cooked, transfer the mini rice and veggie cakes to a wire cooling rack. This allows air to circulate underneath, preventing the bottoms from getting soggy and ensuring they stay crispy. Let them cool for a few minutes before serving, as they will be very hot inside.
Nutrition
- Serving Size: one normal portion
- Calories: 220


