


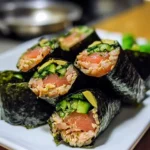
The first time I whipped up these Mini Nori Tuna Wraps, it was a revelation. My family, particularly the kids, can be a tough crowd when it comes to trying new “healthy” things, especially if they look a bit unconventional. I was searching for a quick lunch option that wasn’t another boring sandwich and stumbled upon the idea of using nori sheets as a wrap. The result? An absolute smash hit! The kids loved the “sushi-like” appearance, and my husband appreciated the protein punch without the heaviness of bread. They’re now a staple in our household, perfect for a speedy lunch, a light dinner, or even an after-school snack. The crispness of the nori, the savory tuna filling, and the fresh crunch of veggies create a symphony of textures and flavors that’s both satisfying and incredibly easy to assemble. I’ve tweaked the recipe over time, and this version is, in my opinion, perfection – customizable, nutritious, and downright delicious.
Ingredients
- Canned Tuna: 2 cans (5 oz / 142g each), packed in water or olive oil, thoroughly drained – This is the protein-packed star of our wraps. Draining well is key to avoid soggy nori.
- Nori Sheets: 4-5 large sheets – These are dried seaweed sheets, the same kind used for sushi, providing a unique umami flavor and essential minerals.
- Mayonnaise: 1/4 cup (or to taste) – For creaminess and binding. Use your favorite brand, or substitute with Greek yogurt for a lighter version.
- Dijon Mustard: 1 teaspoon – Adds a subtle tang and depth of flavor to the tuna salad.
- Lemon Juice: 1 teaspoon, freshly squeezed – Brightens up the tuna mixture and cuts through the richness.
- Celery: 1 stalk, finely diced – Provides a wonderful crunch and freshness.
- Red Onion: 2 tablespoons, finely minced – Offers a sharp, aromatic bite. (Optional, or substitute with scallions for a milder flavor).
- Fresh Parsley or Cilantro: 1 tablespoon, chopped – For a burst of herbaceous freshness.
- Salt and Black Pepper: To taste – Essential for seasoning the tuna filling perfectly.
- Optional Fillings & Enhancements:
- Avocado: 1/2, thinly sliced – Adds creaminess and healthy fats.
- Cucumber: 1/4, julienned or thinly sliced – For extra crunch and hydration.
- Carrots: 1/4 cup, julienned or shredded – Adds sweetness and a vibrant color.
- Bell Pepper: 1/4, thinly sliced (any color) – For a sweet, crisp element.
- Sesame Seeds: 1 teaspoon, toasted – For garnish, adding a nutty flavor and visual appeal.
- Sriracha or Hot Sauce: A dash, to taste – If you like a bit of heat in your tuna.
- Soy Sauce or Tamari: For dipping (optional) – Enhances the umami flavor.
Instructions
- Prepare the Tuna Filling:
- Open the cans of tuna and drain them thoroughly. Press out as much liquid as possible. This is crucial to prevent the nori from becoming soggy too quickly.
- In a medium-sized mixing bowl, flake the drained tuna with a fork.
- Add the mayonnaise, Dijon mustard, and fresh lemon juice to the tuna. Mix well until combined.
- Stir in the finely diced celery, minced red onion (if using), and chopped fresh parsley or cilantro.
- Season the tuna mixture with salt and black pepper to your liking. Taste and adjust seasonings if necessary. You can also add a dash of sriracha at this stage if you prefer a spicy kick.
- Prepare the Nori Sheets:
- Lay one nori sheet on a clean, dry cutting board or work surface, shiny side down. The rougher side should be facing up, as this helps the filling adhere better.
- If you want truly “mini” wraps that are easier to handle as finger food, you can cut the nori sheets in half crosswise using clean kitchen scissors or a sharp knife. This will yield more, smaller wraps. For larger, more substantial wraps, keep the sheets whole.
- Assemble the Wraps:
- Take a portion of the tuna salad (about 1/4 to 1/5 of the mixture if using whole sheets, or less if using half sheets) and spread it thinly and evenly over the nori sheet. Leave about a 1-inch border clear along one of the longer edges (this will be the edge you seal). If you’re using half sheets, leave the border on one of the shorter edges.
- Be careful not to overfill the wraps, as this will make them difficult to roll and more likely to burst.
- If using additional fillings like avocado slices, julienned cucumber, carrots, or bell pepper, arrange them in a neat line horizontally across the tuna mixture, closer to the edge you will start rolling from.
- Roll the Wraps:
- Starting from the edge with the filling closest to you, carefully and tightly roll the nori sheet away from you, like you would a sushi roll or a burrito.
- When you reach the clear border, lightly dampen it with a fingertip dipped in water. This will help seal the nori wrap.
- Press gently to seal the edge.
- Slice and Serve (Optional):
- If you’ve made larger wraps, you can slice them into bite-sized pieces, similar to sushi maki rolls. Use a very sharp, slightly dampened knife to make clean cuts. Wipe the knife clean between cuts if necessary. Aim for 1-inch thick pieces.
- If you made smaller wraps using half nori sheets, they can often be served whole as hand rolls.
- Arrange the mini nori tuna wraps on a platter. Garnish with toasted sesame seeds if desired, and serve immediately with soy sauce or tamari for dipping, if preferred.
Nutrition Facts
- Servings: Approximately 4-5 large wraps (or 8-10 mini wraps if nori is halved)
- Calories per serving (estimated for 1 large wrap/2 mini wraps): Around 180-250 calories (This can vary significantly based on tuna packed in oil vs. water, amount of mayo, and added fillings like avocado).
- Protein: High – Tuna is an excellent source of lean protein, crucial for muscle building, repair, and satiety.
- Healthy Fats: Moderate – Primarily from mayonnaise (can be reduced by using light mayo or Greek yogurt) and optional avocado. Omega-3 fatty acids from tuna are beneficial for heart and brain health.
- Carbohydrates: Low – Nori sheets and fresh vegetables contribute minimal carbohydrates, making these wraps a great low-carb option.
- Fiber: Good source – From vegetables like celery, carrots, and cucumber, aiding digestion and promoting fullness.
- Vitamins and Minerals: Nori itself is a source of iodine, vitamin A, C, and some B vitamins. Tuna provides selenium and vitamin D.
Preparation Time
- Active Preparation Time: Approximately 15-20 minutes. This includes draining the tuna, chopping the vegetables, mixing the filling, and assembling the wraps.
- Total Time: Approximately 15-20 minutes. These wraps are designed to be quick and require no cooking time (unless you choose to toast sesame seeds). They are best served fresh.
How to Serve
These Mini Nori Tuna Wraps are incredibly versatile. Here are some delightful ways to serve them:
- As a Quick & Healthy Lunch:
- Pack them in a bento box with some fruit, a hard-boiled egg, or a small side salad for a complete and balanced meal.
- Enjoy alongside a cup of miso soup for an authentic Japanese-inspired lunch.
- As an Appetizer or Party Snack:
- Slice the wraps into elegant, bite-sized pieces (like maki rolls) and arrange them beautifully on a platter.
- Provide small dipping bowls of soy sauce, tamari (for a gluten-free option), spicy mayo (mayonnaise mixed with sriracha), or ponzu sauce.
- Garnish with toasted sesame seeds, microgreens, or thinly sliced scallions for an upscale presentation.
- For a Light Dinner:
- Serve a larger portion of the wraps accompanied by a side of edamame (steamed or roasted) and a seaweed salad.
- Pair with a simple Asian-style cucumber salad (cucumbers, rice vinegar, sesame oil, a pinch of sugar).
- Kid-Friendly Meal or Snack:
- The “mini” aspect and sushi-like appearance make them appealing to children.
- Let kids help assemble their own wraps (with supervision), choosing their favorite veggie fillings.
- Cut them into fun shapes if you’re feeling creative.
- Post-Workout Snack:
- They offer a good balance of protein and healthy fats, making them a great option for refueling after exercise.
- Picnic or On-the-Go Option:
- While best fresh, they can be packed carefully for a picnic. Wrap them individually in plastic wrap or store them in an airtight container. Consume within a few hours, especially if containing mayonnaise and kept at room temperature. Consider using an ice pack.
Additional Tips
- Don’t Overstuff: It’s tempting to load up your wraps, but overfilling makes them difficult to roll tightly and can cause the nori to tear. A thin, even layer of tuna salad and a modest amount of veggies is key.
- Use a Sharp Knife for Slicing: If you plan to slice the wraps into maki-style pieces, a very sharp knife is essential. Slightly dampen the blade with water before each cut to prevent sticking and ensure clean edges.
- Work Quickly with Nori: Nori sheets absorb moisture quickly. Once you lay down your filling, try to roll the wrap relatively soon to prevent the nori from becoming too soft or tearing.
- Toast Your Sesame Seeds: If using sesame seeds for garnish, toasting them for a few minutes in a dry skillet over medium heat until fragrant and lightly golden significantly enhances their nutty flavor.
- Customize Your Filling: Don’t be afraid to experiment! Add a pinch of furikake seasoning to the tuna, or try different crunchy vegetables like thinly sliced radishes or kohlrabi. A bit of grated ginger can also add a nice zing.
- Control Moisture: Beyond draining the tuna well, pat dry any particularly wet vegetables (like cucumber if it releases a lot of water) before adding them to the wrap. Excess moisture is the enemy of crisp nori.
- For a Spicier Kick: Incorporate finely minced jalapeño into the tuna salad, or mix a good amount of sriracha or gochujang (Korean chili paste) into the mayonnaise for a fiery twist.
- Make it Creamier (or Lighter): For an ultra-creamy texture, mash some avocado directly into the tuna salad. For a lighter, higher-protein version, substitute some or all of the mayonnaise with plain Greek yogurt.
FAQ Section
- Q: Can I make these Mini Nori Tuna Wraps ahead of time?
A: These wraps are best enjoyed fresh, as the nori can become soggy over time, especially once it comes into contact with the moist tuna filling. You can prepare the tuna salad filling a day in advance and store it in an airtight container in the refrigerator. Assemble the wraps just before serving for the best texture. If you must make them a few hours ahead, wrap them tightly in plastic wrap and store them in the fridge, but be prepared for a softer nori texture. - Q: Are these wraps gluten-free?
A: Yes, they can easily be gluten-free. Nori, tuna, mayonnaise, and most fresh vegetables are naturally gluten-free. The main thing to check is your soy sauce if you’re using it for dipping; opt for tamari, which is typically brewed without wheat, or a specifically labeled gluten-free soy sauce. - Q: Are Mini Nori Tuna Wraps keto-friendly or low-carb?
A: Absolutely! Nori sheets are very low in carbohydrates. Tuna is virtually carb-free. By using full-fat mayonnaise and low-carb vegetables (like cucumber, celery, avocado, bell peppers), and avoiding high-sugar additions, these wraps are an excellent keto and low-carb option. Just be mindful of the carb count in any store-bought sauces. - Q: My nori sheets are tearing when I try to roll them. What am I doing wrong?
A: This can happen for a few reasons:- Nori quality: Older or lower-quality nori can be more brittle.
- Too much moisture: If your filling is too wet or you apply too much water to seal, it can weaken the nori.
- Overfilling: Too much filling puts stress on the nori.
- Rolling too loosely then trying to tighten: Try to roll firmly and tightly from the start.
- Handling: Be gentle. If your nori is very dry, sometimes the warmth from your hands can make it slightly more pliable.
- Q: Can I use fresh tuna instead of canned?
A: Yes, you can! Seared and flaked fresh tuna (like Ahi) would make a delicious, more gourmet version. Cook the tuna to your liking, let it cool, then flake it and proceed with the recipe. Smoked tuna would also be a tasty alternative. - Q: What are some other protein options if I don’t like tuna or want variety?
A: These wraps are highly adaptable! You could use:- Canned salmon or smoked salmon.
- Shredded cooked chicken (rotisserie chicken works well).
- Egg salad.
- Mashed chickpeas or white beans for a vegetarian option (seasoned similarly to the tuna).
- Firm tofu, crumbled and seasoned, or baked tofu strips.
- Q: How do I store leftover Mini Nori Tuna Wraps?
A: If you have leftovers, wrap them individually and tightly in plastic wrap or store them in an airtight container in the refrigerator. They are best consumed within 24 hours. The nori will likely soften, but they will still be tasty. Avoid freezing them, as the texture of the tuna salad and nori will be compromised upon thawing. - Q: What if I don’t have mayonnaise or want a healthier alternative?
A: Plain Greek yogurt is an excellent substitute for mayonnaise. It provides a similar creamy texture and a tangy flavor, plus it adds extra protein and probiotics. You could also use mashed avocado as a binder for a creamy, healthy fat-rich option, or a combination of Greek yogurt and mashed avocado. Adjust seasonings accordingly, as you might need a bit more lemon juice or mustard to mimic mayo’s tang.
Mini Nori Tuna Wraps
Ingredients
- Canned Tuna: 2 cans (5 oz / 142g each), packed in water or olive oil, thoroughly drained – This is the protein-packed star of our wraps. Draining well is key to avoid soggy nori.
- Nori Sheets: 4-5 large sheets – These are dried seaweed sheets, the same kind used for sushi, providing a unique umami flavor and essential minerals.
- Mayonnaise: 1/4 cup (or to taste) – For creaminess and binding. Use your favorite brand, or substitute with Greek yogurt for a lighter version.
- Dijon Mustard: 1 teaspoon – Adds a subtle tang and depth of flavor to the tuna salad.
- Lemon Juice: 1 teaspoon, freshly squeezed – Brightens up the tuna mixture and cuts through the richness.
- Celery: 1 stalk, finely diced – Provides a wonderful crunch and freshness.
- Red Onion: 2 tablespoons, finely minced – Offers a sharp, aromatic bite. (Optional, or substitute with scallions for a milder flavor).
- Fresh Parsley or Cilantro: 1 tablespoon, chopped – For a burst of herbaceous freshness.
- Salt and Black Pepper: To taste – Essential for seasoning the tuna filling perfectly.
- Optional Fillings & Enhancements:
- Avocado: 1/2, thinly sliced – Adds creaminess and healthy fats.
- Cucumber: 1/4, julienned or thinly sliced – For extra crunch and hydration.
- Carrots: 1/4 cup, julienned or shredded – Adds sweetness and a vibrant color.
- Bell Pepper: 1/4, thinly sliced (any color) – For a sweet, crisp element.
- Sesame Seeds: 1 teaspoon, toasted – For garnish, adding a nutty flavor and visual appeal.
- Sriracha or Hot Sauce: A dash, to taste – If you like a bit of heat in your tuna.
- Soy Sauce or Tamari: For dipping (optional) – Enhances the umami flavor.
Instructions
- Prepare the Tuna Filling:
- Open the cans of tuna and drain them thoroughly. Press out as much liquid as possible. This is crucial to prevent the nori from becoming soggy too quickly.
- In a medium-sized mixing bowl, flake the drained tuna with a fork.
- Add the mayonnaise, Dijon mustard, and fresh lemon juice to the tuna. Mix well until combined.
- Stir in the finely diced celery, minced red onion (if using), and chopped fresh parsley or cilantro.
- Season the tuna mixture with salt and black pepper to your liking. Taste and adjust seasonings if necessary. You can also add a dash of sriracha at this stage if you prefer a spicy kick.
- Prepare the Nori Sheets:
- Lay one nori sheet on a clean, dry cutting board or work surface, shiny side down. The rougher side should be facing up, as this helps the filling adhere better.
- If you want truly “mini” wraps that are easier to handle as finger food, you can cut the nori sheets in half crosswise using clean kitchen scissors or a sharp knife. This will yield more, smaller wraps. For larger, more substantial wraps, keep the sheets whole.
- Assemble the Wraps:
- Take a portion of the tuna salad (about 1/4 to 1/5 of the mixture if using whole sheets, or less if using half sheets) and spread it thinly and evenly over the nori sheet. Leave about a 1-inch border clear along one of the longer edges (this will be the edge you seal). If you’re using half sheets, leave the border on one of the shorter edges.
- Be careful not to overfill the wraps, as this will make them difficult to roll and more likely to burst.
- If using additional fillings like avocado slices, julienned cucumber, carrots, or bell pepper, arrange them in a neat line horizontally across the tuna mixture, closer to the edge you will start rolling from.
- Roll the Wraps:
- Starting from the edge with the filling closest to you, carefully and tightly roll the nori sheet away from you, like you would a sushi roll or a burrito.
- When you reach the clear border, lightly dampen it with a fingertip dipped in water. This will help seal the nori wrap.
- Press gently to seal the edge.
- Slice and Serve (Optional):
- If you’ve made larger wraps, you can slice them into bite-sized pieces, similar to sushi maki rolls. Use a very sharp, slightly dampened knife to make clean cuts. Wipe the knife clean between cuts if necessary. Aim for 1-inch thick pieces.
- If you made smaller wraps using half nori sheets, they can often be served whole as hand rolls.
- Arrange the mini nori tuna wraps on a platter. Garnish with toasted sesame seeds if desired, and serve immediately with soy sauce or tamari for dipping, if preferred.
Nutrition
- Serving Size: one normal portion
- Calories: 250


