
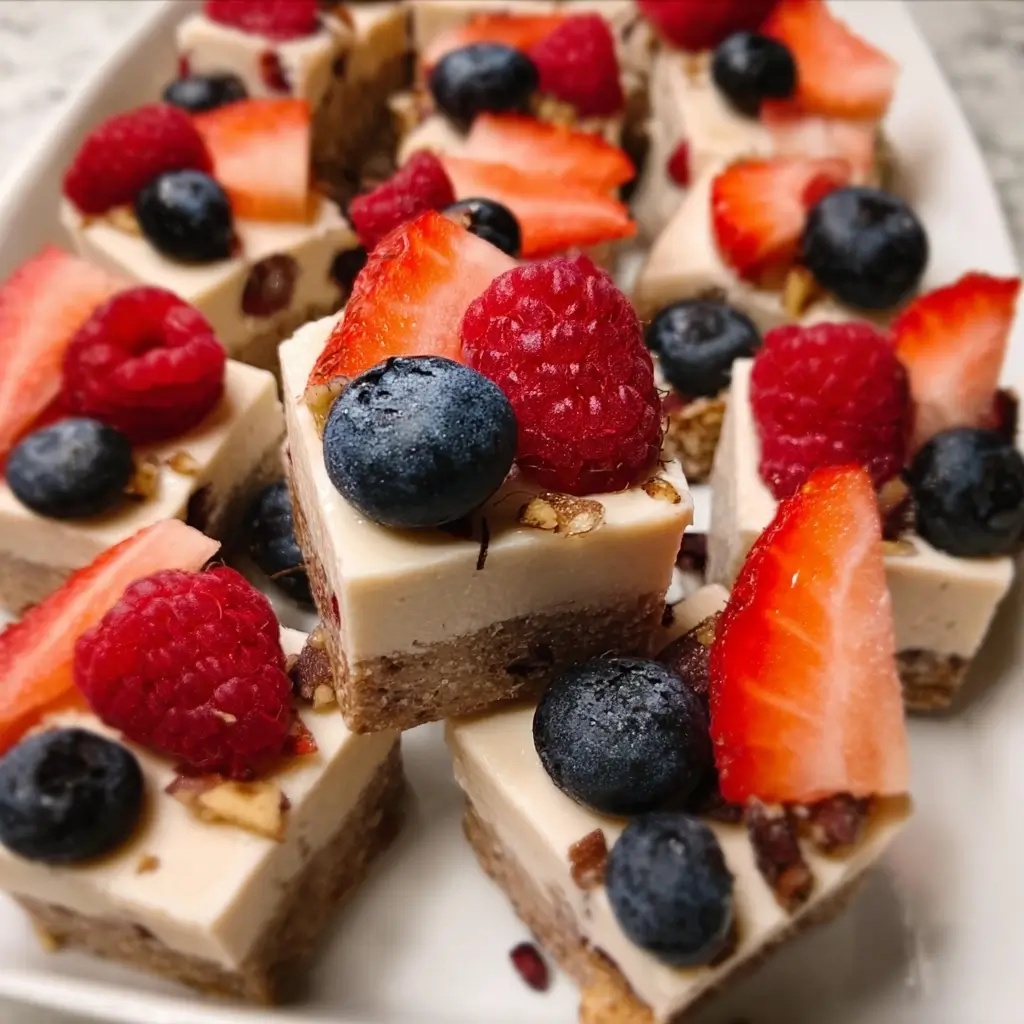

Of all the recipes that have become staples in my kitchen, this one for Mini No-Bake Berry Bars holds a special place. I first whipped them up on a sweltering July afternoon when the thought of turning on my oven was simply unbearable. We had friends coming over for a last-minute barbecue, and I needed a dessert that was quick, impressive, and wouldn’t heat up the house. I remembered seeing a similar concept online and decided to create my own version using ingredients I already had. The result was nothing short of magical. The crust was perfectly chewy and nutty, and the vibrant berry filling was a creamy, dreamy explosion of flavor—sweet, tart, and unbelievably refreshing. My kids, who are usually skeptical of “healthy” treats, devoured them. Our friends were asking for the recipe before they’d even finished their first bar. Since that day, these little gems have become my go-to for everything from potlucks and holiday gatherings to a simple after-school snack. They are effortlessly elegant, deceptively simple, and a guaranteed crowd-pleaser that proves you don’t need heat to create something truly spectacular.
Ingredients
Here is everything you will need to create these vibrant and delicious no-bake treats. Each ingredient is chosen for a specific purpose, contributing to the perfect texture and flavor profile.
For the Chewy Oat Crust:
- 1 ½ cups Rolled Oats: (Use certified gluten-free if necessary) These provide the main structure and a wonderful chewy texture to the base.
- 1 cup Raw Walnuts or Almonds: These add a rich, nutty flavor, healthy fats, and a satisfying crunch that complements the creamy filling.
- ½ cup Medjool Dates, pitted: These are the star binder and natural sweetener for the crust, giving it a delicious caramel-like flavor and sticky, pressable consistency.
- ¼ cup Melted Coconut Oil: This helps bind the crust ingredients together and ensures it firms up perfectly in the freezer.
- ¼ teaspoon Sea Salt: A small pinch of salt is crucial for balancing the sweetness of the dates and enhancing all the nutty flavors.
For the Creamy Berry Filling:
- 1 ½ cups Raw Cashews, soaked: This is the secret to an incredibly creamy, dairy-free filling. Soaking them makes them soft and easy to blend into a smooth, cheesecake-like consistency.
- 3 cups Frozen Mixed Berries: (Such as raspberries, blueberries, and strawberries) Using frozen berries helps the filling set faster and provides an intense, concentrated fruit flavor and a stunning jewel-toned color.
- ½ cup Pure Maple Syrup or Agave Nectar: This provides sweetness to balance the tartness of the berries. You can adjust the amount based on your preference and the sweetness of your fruit.
- ¼ cup Fresh Lemon Juice: This brightens up the berry flavors, adds a necessary tang, and helps to naturally preserve the vibrant color of the filling.
- 1 teaspoon Vanilla Extract: Vanilla adds a layer of aromatic warmth that beautifully complements the fruit and nut flavors.
- ⅓ cup Melted Coconut Oil: Essential for the filling, this ingredient solidifies when chilled, helping the bars set firmly so they can be sliced cleanly.
Instructions
Follow these simple, step-by-step instructions to assemble your Mini No-Bake Berry Bars. The process is divided into preparing the crust, blending the filling, and final assembly.
Step 1: Prepare the Pan
- Line an 8×8 inch (20×20 cm) square baking pan with parchment paper, leaving some overhang on two opposite sides. This will act as “handles,” making it easy to lift the bars out of the pan for slicing later. Set aside.
Step 2: Prepare the Cashews for the Filling
- This is a crucial first step for a creamy filling. Place the raw cashews in a bowl and cover them completely with boiling water. Let them soak for at least 1 hour (or up to 4 hours). If you have more time, you can soak them in cold water for 4-6 hours or overnight in the refrigerator. Once soaked, drain the water completely and rinse the cashews.
Step 3: Make the Crust
- While the cashews are soaking, prepare the crust. In the bowl of a food processor, combine the rolled oats, walnuts (or almonds), pitted Medjool dates, and sea salt.
- Pulse the mixture 10-15 times until the nuts are broken down and the mixture resembles coarse, crumbly sand.
- Add the ¼ cup of melted coconut oil to the food processor. Process again until the mixture starts to clump together. When you pinch a small amount between your fingers, it should hold its shape. Be careful not to over-process into a paste.
Step 4: Press the Crust into the Pan
- Transfer the crust mixture to your prepared 8×8 inch pan.
- Using your fingers or the back of a flat-bottomed measuring cup, press the mixture down firmly and evenly across the bottom of the pan. This is key to ensuring the base doesn’t crumble when you slice the bars.
- Place the pan in the freezer to set while you prepare the berry filling.
Step 5: Create the Creamy Berry Filling
- In the canister of a high-speed blender, combine the drained and rinsed soaked cashews, the frozen mixed berries, maple syrup, fresh lemon juice, and vanilla extract.
- Blend on low at first to break everything up, then gradually increase to high speed. Blend for 2-4 minutes, or until the mixture is completely smooth and creamy. You may need to stop and scrape down the sides of the blender a few times to ensure there are no lumps of cashew remaining.
- Once the mixture is perfectly smooth, add the ⅓ cup of melted coconut oil and blend again for just 15-20 seconds until it is fully incorporated. Do not over-blend at this stage.
Step 6: Assemble and Chill the Bars
- Remove the pan with the crust from the freezer.
- Pour the berry filling evenly over the chilled crust. Use a spatula to smooth the top into a flat, even layer.
- Gently tap the pan on the counter a few times to release any air bubbles.
- Place the pan back into the freezer and let the bars chill for a minimum of 4-6 hours, or preferably overnight. The bars must be completely firm to the touch before you attempt to slice them.
Step 7: Slice and Serve
- Once the bars are fully frozen and set, remove the pan from the freezer.
- Using the parchment paper handles, carefully lift the entire slab out of the pan and place it on a cutting board.
- For clean, sharp slices, run a large, sharp knife under hot water, wipe it dry, and then make a cut. Repeat this process for each slice.
- You can cut the slab into 16 mini squares (a 4×4 grid) or into small rectangular bars. Serve immediately or store as directed.
Nutrition Facts
These bars are a wonderful source of wholesome energy. While they are a treat, they are packed with nutrient-dense ingredients.
- Servings: 16 mini bars
- Calories Per Serving: Approximately 195 kcal
- Rich in Healthy Fats: The nuts, cashews, and coconut oil provide monounsaturated and polyunsaturated fats, which are essential for brain health and sustained energy levels.
- Excellent Source of Fiber: With oats, dates, nuts, and berries, each bar is packed with dietary fiber, which aids in digestion and helps you feel full and satisfied.
- Loaded with Antioxidants: Berries are renowned for their high antioxidant content, particularly anthocyanins, which help fight oxidative stress and inflammation in the body.
- Naturally Sweetened: This recipe forgoes refined white sugar, relying instead on the natural sweetness of Medjool dates and the gentle touch of pure maple syrup.
- Plant-Based Power: Entirely plant-based, these bars offer a good dose of protein from the nuts and cashews, making them a satisfying and energizing snack.
Preparation Time
This recipe is prized for its minimal active time, with most of the duration dedicated to hands-off chilling.
- Active Preparation: 20-25 minutes (This includes time for making the crust and blending the filling).
- Soaking Time: 1 hour minimum (For the cashews).
- Chilling/Setting Time: 4-6 hours, or overnight for best results.
- Total Time: Approximately 5 hours 25 minutes
How to Serve
These Mini No-Bake Berry Bars are delightful on their own, but they can be dressed up in numerous ways to suit any occasion. Here are some serving suggestions:
- Au Naturel:
- Serve the bars straight from the freezer for a firm, ice-cream-like treat. They are perfectly delicious and refreshing just as they are, making them an ideal grab-and-go snack.
- With a Creamy Topping:
- Add a dollop of whipped coconut cream or thick Greek yogurt (or a dairy-free alternative) on top of each square. The extra creaminess provides a lovely contrast to the tangy berry filling.
- Drizzled with Decadence:
- Melt a small amount of high-quality dark chocolate (70% cocoa or higher) and use a spoon to artfully drizzle it over the top of the bars before serving. The slight bitterness of the dark chocolate beautifully cuts through the sweetness.
- Garnished with Freshness:
- Top each mini bar with fresh berries (the same kind used in the filling or a contrasting one), a small mint leaf, or a sprinkle of lemon zest. This adds a pop of color and an extra layer of fresh flavor.
- As part of a Dessert Platter:
- Arrange the mini bars on a large platter alongside other small treats like chocolate-covered strawberries, energy balls, and fresh fruit. This creates a stunning and versatile dessert board perfect for parties.
- For a Healthier Breakfast:
- Enjoy a bar alongside your morning coffee or tea. It’s a much more nutrient-dense and satisfying option than a typical pastry, providing fiber and healthy fats to start your day right.
Additional Tips for Perfect No-Bake Berry Bars
Elevate your no-bake bar game with these eight expert tips, designed to ensure flawless results every time.
- Soaking Cashews is Non-Negotiable: For the smoothest, creamiest filling that truly mimics a cheesecake texture, you must soak the cashews. Using boiling water is a great shortcut, but an overnight soak in cold water yields the absolute best results. A powerful blender can’t fully compensate for un-soaked, hard cashews.
- Press the Crust Firmly and Evenly: The foundation of your bars is the crust. Take an extra minute to press it down very firmly into the pan using your fingertips or the flat bottom of a glass. This compacts the mixture and prevents it from being crumbly when you slice and eat the bars.
- Taste and Adjust Your Filling: Before you add the final ingredient (the coconut oil), taste your berry filling. Is it sweet enough? Does it need more tang? Berries can vary greatly in sweetness. Don’t be afraid to add another tablespoon of maple syrup or an extra squeeze of lemon juice to get the flavor balance just right for your palate.
- Parchment Paper Slings are a Lifesaver: Don’t skip the step of lining your pan with parchment paper, leaving an overhang on the sides. This simple trick makes removal effortless and stress-free. You can lift the entire block of bars out at once, preventing any damage to the edges and allowing for much cleaner slicing.
- Be Patient with the Chilling Process: The hardest part of this recipe is waiting! It can be tempting to slice into the bars early, but they need at least 4 hours in the freezer to fully set. Chilling overnight is even better. This ensures the coconut oil in the crust and filling has solidified, giving you clean, stable bars that don’t melt instantly.
- A High-Speed Blender is Your Best Friend: To achieve that luxuriously smooth filling, a high-speed blender (like a Vitamix or Blendtec) is ideal. If you don’t have one, a standard blender can work, but you’ll need to blend for longer, scrape the sides down frequently, and be extra diligent about soaking your cashews to get them as soft as possible.
- Embrace Berry Variations: This recipe is incredibly versatile. Feel free to use only one type of berry for a more focused flavor. A pure raspberry bar is wonderfully tart, while a pure blueberry bar is sweeter and a gorgeous deep purple. You can also try using cherries or mango for a completely different flavor profile.
- The Secret to Clean Slices: For photo-worthy, perfectly clean-cut bars, use a large, sharp chef’s knife. Fill a tall glass with hot water. Dip the knife into the water for a few seconds, wipe it completely dry with a towel, and make one firm cut. Repeat this process (dip, wipe, cut) for every single slice. The warm blade glides through the frozen bar without dragging the filling.
Frequently Asked Questions (FAQ)
Here are answers to some of the most common questions about making these Mini No-Bake Berry Bars.
1. Can I make these bars nut-free?
Yes, you can! For a nut-free crust, substitute the walnuts or almonds with an equal amount of raw sunflower seeds, pumpkin seeds (pepitas), or additional rolled oats. For the creamy filling, replacing the cashews is trickier, but you can achieve a good result by using 1 cup of full-fat coconut cream (the thick part from a can of chilled coconut milk) combined with ½ cup of raw sunflower seeds (soaked, just like the cashews). The texture will be slightly different but still delicious.
2. How do I store these Mini No-Bake Berry Bars?
These bars must be stored in the cold. For short-term storage (up to one week), keep them in an airtight container in the refrigerator. They will soften slightly to a cheesecake-like texture. For long-term storage (up to 3 months), store them in an airtight container in the freezer. It’s helpful to place a small piece of parchment paper between layers to prevent them from sticking together.
3. Can I use a different sweetener?
Absolutely. While maple syrup is recommended for its flavor and vegan properties, you can easily substitute it with agave nectar or brown rice syrup in equal amounts. If you are not strictly vegan, honey is also a wonderful option, though it has a stronger flavor. You could also experiment with date paste for an entirely fruit-sweetened filling.
4. My filling isn’t setting properly. What did I do wrong?
This is usually due to one of two things. First, ensure you used the correct amount of melted coconut oil, as it’s the primary setting agent. If you reduced the amount, the filling will be much softer. Second, the bars may simply need more time in the freezer. Give them at least the minimum of 4-6 hours, but overnight is always best to ensure they are rock solid before slicing.
5. Are these bars vegan and gluten-free?
Yes, this recipe is naturally vegan as written, using no dairy or animal products. To ensure it is completely gluten-free, you must use certified gluten-free rolled oats. While oats are naturally gluten-free, they are often processed in facilities that also handle wheat, leading to cross-contamination.
6. I don’t have an 8×8 inch pan. Can I use a different size?
Yes, you can. If you use a 9×9 inch pan, your bars will be thinner and may set a bit faster. If you use a loaf pan (e.g., 9×5 inch), your bars will be much thicker, and you should increase the chilling time by a couple of hours to ensure the center is fully set. You could also double the recipe and use a 9×13 inch pan for a larger party-sized batch.
7. What’s the best way to thaw the frozen berries for the filling?
There’s no need to thaw them! In fact, using the berries straight from the freezer is recommended. The cold temperature of the frozen fruit helps the filling to chill and set faster once it’s blended and poured over the crust. It also results in a thicker, icier blend that is easier to work with.
8. Can I make a full-sized dessert instead of mini bars?
Of course! This recipe works beautifully as a single, round “cheesecake.” Simply press the crust into the bottom of a 9-inch springform pan. Pour the filling over top and freeze until solid. To serve, you can let it sit at room temperature for about 15-20 minutes to soften slightly before slicing it into wedges, just like a traditional cheesecake.

Mini No-Bake Berry Bars
Ingredients
Here is everything you will need to create these vibrant and delicious no-bake treats. Each ingredient is chosen for a specific purpose, contributing to the perfect texture and flavor profile.
For the Chewy Oat Crust:
- 1 ½ cups Rolled Oats: (Use certified gluten-free if necessary) These provide the main structure and a wonderful chewy texture to the base.
- 1 cup Raw Walnuts or Almonds: These add a rich, nutty flavor, healthy fats, and a satisfying crunch that complements the creamy filling.
- ½ cup Medjool Dates, pitted: These are the star binder and natural sweetener for the crust, giving it a delicious caramel-like flavor and sticky, pressable consistency.
- ¼ cup Melted Coconut Oil: This helps bind the crust ingredients together and ensures it firms up perfectly in the freezer.
- ¼ teaspoon Sea Salt: A small pinch of salt is crucial for balancing the sweetness of the dates and enhancing all the nutty flavors.
For the Creamy Berry Filling:
- 1 ½ cups Raw Cashews, soaked: This is the secret to an incredibly creamy, dairy-free filling. Soaking them makes them soft and easy to blend into a smooth, cheesecake-like consistency.
- 3 cups Frozen Mixed Berries: (Such as raspberries, blueberries, and strawberries) Using frozen berries helps the filling set faster and provides an intense, concentrated fruit flavor and a stunning jewel-toned color.
- ½ cup Pure Maple Syrup or Agave Nectar: This provides sweetness to balance the tartness of the berries. You can adjust the amount based on your preference and the sweetness of your fruit.
- ¼ cup Fresh Lemon Juice: This brightens up the berry flavors, adds a necessary tang, and helps to naturally preserve the vibrant color of the filling.
- 1 teaspoon Vanilla Extract: Vanilla adds a layer of aromatic warmth that beautifully complements the fruit and nut flavors.
- ⅓ cup Melted Coconut Oil: Essential for the filling, this ingredient solidifies when chilled, helping the bars set firmly so they can be sliced cleanly.
Instructions
Follow these simple, step-by-step instructions to assemble your Mini No-Bake Berry Bars. The process is divided into preparing the crust, blending the filling, and final assembly.
Step 1: Prepare the Pan
- Line an 8×8 inch (20×20 cm) square baking pan with parchment paper, leaving some overhang on two opposite sides. This will act as “handles,” making it easy to lift the bars out of the pan for slicing later. Set aside.
Step 2: Prepare the Cashews for the Filling
- This is a crucial first step for a creamy filling. Place the raw cashews in a bowl and cover them completely with boiling water. Let them soak for at least 1 hour (or up to 4 hours). If you have more time, you can soak them in cold water for 4-6 hours or overnight in the refrigerator. Once soaked, drain the water completely and rinse the cashews.
Step 3: Make the Crust
- While the cashews are soaking, prepare the crust. In the bowl of a food processor, combine the rolled oats, walnuts (or almonds), pitted Medjool dates, and sea salt.
- Pulse the mixture 10-15 times until the nuts are broken down and the mixture resembles coarse, crumbly sand.
- Add the ¼ cup of melted coconut oil to the food processor. Process again until the mixture starts to clump together. When you pinch a small amount between your fingers, it should hold its shape. Be careful not to over-process into a paste.
Step 4: Press the Crust into the Pan
- Transfer the crust mixture to your prepared 8×8 inch pan.
- Using your fingers or the back of a flat-bottomed measuring cup, press the mixture down firmly and evenly across the bottom of the pan. This is key to ensuring the base doesn’t crumble when you slice the bars.
- Place the pan in the freezer to set while you prepare the berry filling.
Step 5: Create the Creamy Berry Filling
- In the canister of a high-speed blender, combine the drained and rinsed soaked cashews, the frozen mixed berries, maple syrup, fresh lemon juice, and vanilla extract.
- Blend on low at first to break everything up, then gradually increase to high speed. Blend for 2-4 minutes, or until the mixture is completely smooth and creamy. You may need to stop and scrape down the sides of the blender a few times to ensure there are no lumps of cashew remaining.
- Once the mixture is perfectly smooth, add the ⅓ cup of melted coconut oil and blend again for just 15-20 seconds until it is fully incorporated. Do not over-blend at this stage.
Step 6: Assemble and Chill the Bars
- Remove the pan with the crust from the freezer.
- Pour the berry filling evenly over the chilled crust. Use a spatula to smooth the top into a flat, even layer.
- Gently tap the pan on the counter a few times to release any air bubbles.
- Place the pan back into the freezer and let the bars chill for a minimum of 4-6 hours, or preferably overnight. The bars must be completely firm to the touch before you attempt to slice them.
Step 7: Slice and Serve
- Once the bars are fully frozen and set, remove the pan from the freezer.
- Using the parchment paper handles, carefully lift the entire slab out of the pan and place it on a cutting board.
- For clean, sharp slices, run a large, sharp knife under hot water, wipe it dry, and then make a cut. Repeat this process for each slice.
- You can cut the slab into 16 mini squares (a 4×4 grid) or into small rectangular bars. Serve immediately or store as directed.
Nutrition
- Serving Size: one normal portion
- Calories: 195


