
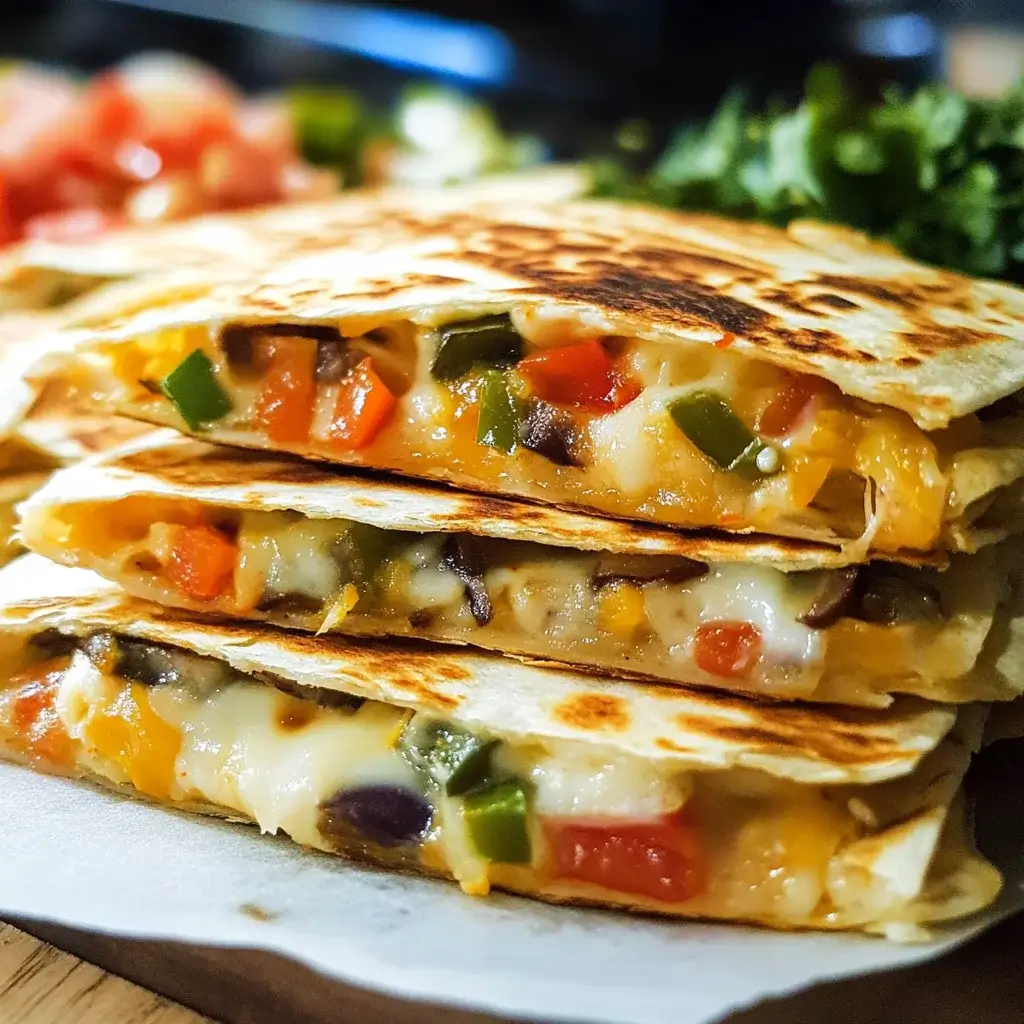

These Mini Cheese and Veggie Quesadillas have become an absolute sensation in our household, and I’m thrilled to share this gem with you. What started as a quick experiment to use up some leftover tortillas and a medley of colorful vegetables quickly transformed into a go-to snack, a speedy lunch, and even a party appetizer favorite. The kids, who can sometimes be a tad picky about their greens, devour these without a second thought. It’s the magic of melted cheese, I tell you! The beauty of these mini quesadillas lies in their simplicity, versatility, and the sheer joy they bring. They are perfectly portioned, making them ideal for little hands or for anyone practicing mindful eating. The combination of the warm, gooey cheese, the slightly crisp tortilla, and the tender-crisp vegetables creates a delightful texture and flavor explosion in every bite. I’ve served them at playdates where they vanished in minutes, packed them in lunchboxes much to my children’s delight, and even whipped up a batch for a casual get-together with friends, where they were praised for their cuteness and deliciousness. The fact that they are so quick to prepare means I can satisfy those sudden hunger pangs without spending ages in the kitchen. Plus, they are incredibly customizable – a blank canvas for your culinary creativity! This recipe is more than just a set of instructions; it’s an invitation to create something simple, wholesome, and utterly satisfying.
Ingredients
- 1 tablespoon Olive Oil: Extra virgin, for sautéing the vegetables, adding a hint of fruity flavor and ensuring the veggies don’t stick.
- 1/2 medium Red Onion, finely chopped: Adds a pungent sweetness and a beautiful color contrast. About 1/2 cup.
- 1 medium Bell Pepper (any color), finely chopped: Red, yellow, or orange bell peppers work best for sweetness and visual appeal. About 1 cup.
- 1 small Zucchini, finely chopped: Adds a subtle earthy flavor and a good dose of nutrients. Ensure it’s chopped small for even cooking. About 3/4 cup.
- 1/2 cup Corn Kernels (fresh or frozen): Provides pops of sweetness and a pleasing texture. If frozen, no need to thaw.
- 1/4 cup Black Beans, rinsed and drained (optional): Adds plant-based protein and a heartier feel.
- 1/2 teaspoon Cumin Powder: Lends a warm, earthy, and slightly smoky flavor, characteristic of Mexican cuisine.
- 1/4 teaspoon Chili Powder (optional, adjust to taste): For a mild kick. Use a good quality blend.
- Salt and freshly ground Black Pepper to taste: Essential for enhancing all the flavors.
- 8-10 Small (6-inch) Flour or Corn Tortillas: Flour tortillas are softer and fold easily; corn tortillas offer a more traditional flavor and can get crispier. Whole wheat tortillas are also a great option for added fiber.
- 1 1/2 – 2 cups Shredded Cheese Blend: A mix of Monterey Jack and Cheddar is classic for its meltability and flavor. Pepper Jack can add a nice kick. Grating your own cheese often results in better melting.
- Optional for Sautéing: 1 clove Garlic, minced: Can be added with the onions for an extra layer of aromatic flavor.
Instructions
- Prepare the Vegetable Filling:
- Heat the olive oil in a medium skillet or pan over medium heat.
- Add the finely chopped red onion and sauté for 2-3 minutes until softened and translucent. If using garlic, add it during the last minute of sautéing the onion.
- Add the finely chopped bell pepper and zucchini to the skillet. Cook for 5-7 minutes, stirring occasionally, until the vegetables are tender-crisp. You want them softened but still with a slight bite.
- Stir in the corn kernels (and black beans, if using). Cook for another 2-3 minutes, until heated through.
- Add the cumin powder, chili powder (if using), salt, and pepper. Stir well to combine and cook for 1 more minute to allow the spices to bloom.
- Remove the vegetable mixture from the heat and set aside. If there’s any excess liquid in the pan, try to drain it off to prevent soggy quesadillas.
- Assemble the Mini Quesadillas:
- Lay a small tortilla flat on a clean work surface.
- Sprinkle about 2-3 tablespoons of the shredded cheese blend evenly over one half of the tortilla, leaving a small border around the edge.
- Spoon about 2-3 tablespoons of the cooked vegetable mixture over the cheese on that same half.
- Sprinkle another tablespoon or so of cheese on top of the vegetables (this helps bind the quesadilla).
- Fold the other half of the tortilla over the filling to create a half-moon shape. Gently press down.
- Repeat with the remaining tortillas and filling.
- Cook the Quesadillas:
- You can use the same skillet (wipe it clean if necessary) or a griddle. Heat the skillet over medium-low to medium heat. You don’t want the heat too high, or the tortilla will burn before the cheese melts.
- Carefully place 1 or 2 assembled quesadillas in the hot, dry skillet (or lightly greased if you prefer, though often not necessary with non-stick pans).
- Cook for 2-4 minutes per side, or until the tortilla is golden brown and crispy, and the cheese is fully melted and gooey. Press down gently with a spatula occasionally to help it cook evenly and seal.
- Be cautious when flipping; a thin, flexible spatula works best.
- Serve:
- Once cooked, transfer the mini quesadillas to a cutting board.
- Let them cool for a minute or two, as the filling will be very hot.
- You can serve them whole or cut them into wedges (halves or thirds) for even smaller, bite-sized pieces, perfect for little hands or as appetizers.
- Serve immediately with your favorite dips like salsa, guacamole, or sour cream.
Nutrition Facts
- Servings: This recipe makes approximately 8-10 mini quesadillas.
- Calories per serving (1 mini quesadilla): Approximately 150-200 calories, depending on tortilla size and cheese amount.
- Protein: A good source, primarily from the cheese and black beans (if used), crucial for muscle repair and satiety.
- Fiber: Contains dietary fiber from the vegetables, corn, beans, and whole wheat tortillas (if used), aiding digestion and promoting fullness.
- Vitamin C: Bell peppers are rich in Vitamin C, an important antioxidant that supports immune function.
- Calcium: The cheese provides a significant amount of calcium, essential for bone health.
- Healthy Fats: Olive oil contributes monounsaturated fats, which are heart-healthy.
Preparation Time
- Prep Time (Chopping & Mixing): Approximately 15-20 minutes. This includes finely chopping all the vegetables and grating cheese if not using pre-shredded. Efficient chopping can speed this up.
- Cook Time (Sautéing Veggies & Cooking Quesadillas): Approximately 20-25 minutes. Sautéing vegetables takes about 10-12 minutes, and each batch of quesadillas will take 4-8 minutes.
- Total Time: Approximately 35-45 minutes from start to finish, making it a relatively quick and rewarding meal or snack option.
How to Serve
These Mini Cheese and Veggie Quesadillas are wonderfully versatile. Here are some delicious ways to serve them:
- Classic Dips Trio:
- Salsa: Offer a variety, from mild pico de gallo (fresh, chunky salsa) to a smoky chipotle salsa or a vibrant salsa verde. The acidity cuts through the richness of the cheese.
- Guacamole: Creamy, homemade guacamole is a perfect pairing, adding healthy fats and a cool contrast to the warm quesadilla.
- Sour Cream or Greek Yogurt: A dollop of cool sour cream or plain Greek yogurt (a healthier, protein-rich alternative) adds a tangy creaminess. You can even mix Greek yogurt with a squeeze of lime juice and some chopped cilantro.
- As a Light Lunch or Dinner:
- Serve alongside a simple side salad with a zesty vinaigrette.
- Pair with a cup of black bean soup or tomato soup for a more substantial meal.
- Offer a side of Mexican rice or cilantro-lime rice.
- For Kids’ Meals or Lunchboxes:
- Cut into fun shapes using cookie cutters (after cooking and slight cooling).
- Serve with a side of fruit slices like apple, orange, or mango.
- Include a small container of their favorite dip. They generally travel well if packed once cooled.
- Party Appetizers:
- Arrange them on a platter with various dips in the center.
- Cut each mini quesadilla into 2-3 wedges for easy-to-grab, bite-sized portions.
- Garnish the platter with fresh cilantro or lime wedges.
- Brunch Option:
- Serve alongside scrambled eggs or a fruit salad.
- Consider adding a fried egg on top for a “huevos rancheros” inspired quesadilla.
- Flavor Boosters (Serve on the side or sprinkle on top):
- Fresh Cilantro: Chopped fresh cilantro adds a burst of freshness.
- Pickled Jalapeños: For those who like an extra kick of spice and tang.
- Cotija Cheese: Crumbled Cotija cheese on top adds a salty, savory finish.
- Hot Sauce: A few dashes of your favorite hot sauce for a personalized heat level.
Additional Tips
- Grate Your Own Cheese: Pre-shredded cheese often contains anti-caking agents like cellulose, which can prevent it from melting as smoothly. Grating a block of cheese yourself will result in a gooier, more delicious melt. Monterey Jack, cheddar, Colby Jack, or a Mexican blend work wonderfully.
- Don’t Overstuff: It’s tempting to load up your quesadillas, but overstuffing can lead to the filling spilling out during cooking and making them difficult to flip. A moderate layer of cheese and veggies is key for a well-sealed, perfectly cooked quesadilla.
- Manage Moisture in Veggies: After sautéing the vegetables, if you notice a lot of liquid in the pan, try to drain it off or let it evaporate a bit more. Excess moisture can make your quesadillas soggy rather than crispy. Patting veggies dry before chopping can also help.
- Tortilla Choices Matter: Flour tortillas are generally softer and easier to fold, making them a good choice for beginners. Corn tortillas offer a more authentic flavor and can get wonderfully crispy, but they might crack if not warmed slightly before folding. Whole wheat tortillas are a great way to boost fiber. Experiment to find your favorite!
- Low and Slow is the Way to Go (for cooking): Cook your quesadillas over medium-low to medium heat. If the heat is too high, the tortilla will brown or even burn before the cheese has a chance to melt completely. Patience yields a perfectly golden, crispy exterior and a molten cheesy interior.
- Add Protein for a Heartier Meal: Feel free to incorporate cooked, shredded chicken, ground beef or turkey (seasoned with taco spices), or even crumbled tofu or tempeh into the vegetable mixture to make these mini quesadillas more substantial and protein-packed.
- Prep Ahead for Quick Assembly: Chop your vegetables and shred your cheese a day or two in advance and store them in airtight containers in the refrigerator. This makes assembly incredibly fast, perfect for busy weeknights or quick snacks. The cooked vegetable mixture can also be made ahead and stored.
- Get Creative with Fillings: Don’t limit yourself! Try other veggies like mushrooms, spinach (wilted), diced sweet potatoes (cooked), or roasted poblano peppers. Different spices like smoked paprika or a pinch of oregano can also change the flavor profile. This recipe is a fantastic base for experimentation.
FAQ Section
Q1: Can I make these Mini Cheese and Veggie Quesadillas gluten-free?
A1: Absolutely! To make them gluten-free, simply use certified gluten-free corn tortillas or other gluten-free tortilla alternatives available in most supermarkets. Corn tortillas naturally offer a great texture and flavor. Ensure your cheese and any pre-made seasonings are also certified gluten-free if celiac disease or severe gluten sensitivity is a concern.
Q2: How do I store and reheat leftover quesadillas?
A2: Store leftover quesadillas in an airtight container in the refrigerator for up to 3-4 days. To reheat and maintain crispiness, the best methods are:
* Skillet/Griddle: Reheat in a dry skillet over medium-low heat for a few minutes per side until warmed through and crispy again.
* Oven/Toaster Oven: Place on a baking sheet and reheat at 350°F (175°C) for 5-10 minutes, or until heated through.
* Air Fryer: Reheat at around 350°F (175°C) for 3-5 minutes.
Microwaving will make them soft and potentially soggy, so it’s less ideal if you want to retain crispiness.
Q3: Can I freeze these quesadillas?
A3: Yes, you can freeze them. It’s best to freeze them after they are cooked and fully cooled. You can either stack them with parchment paper between each quesadilla in a freezer-safe bag or container, or wrap them individually in plastic wrap and then place them in a freezer bag. They can be stored in the freezer for up to 2-3 months. Reheat from frozen in a skillet, oven, or air fryer until hot and crispy (you may need to lower the heat and extend the cooking time to ensure the center is warmed through).
Q4: What are some other vegetable combinations I can try?
A4: The possibilities are endless! Consider these combinations:
* Mushroom and Spinach: Sautéed mushrooms with wilted spinach and garlic.
* Roasted Sweet Potato and Black Bean: Diced roasted sweet potatoes with black beans and a hint of chipotle.
* Broccoli and Cheddar: Finely chopped, blanched broccoli florets with sharp cheddar.
* Corn, Poblano, and Onion: Roasted poblano peppers (diced), corn, and caramelized onions.
* Artichoke Hearts and Sun-Dried Tomatoes: Chopped artichoke hearts (canned, drained) with chopped sun-dried tomatoes (oil-packed, drained) and a bit of feta or mozzarella.
Remember to chop all veggies relatively small for even cooking and easy filling.
Q5: How can I make these quesadillas vegan?
A5: It’s easy to make a vegan version!
* Cheese: Use your favorite brand of vegan shredded cheese that melts well (vegan mozzarella, cheddar, or pepper jack style).
* Tortillas: Ensure your tortillas are vegan (most flour and corn tortillas are, but always check ingredients for things like lard or honey).
* Serving: Serve with vegan sour cream (cashew or tofu-based), salsa, and guacamole.
The vegetable filling is naturally vegan.
Q6: My tortillas sometimes tear or crack when I fold them. How can I prevent this?
A6: This is more common with corn tortillas or flour tortillas that are a bit dry. To prevent tearing:
* Warm them slightly: Before filling, warm the tortillas briefly. You can do this by microwaving them for 10-20 seconds wrapped in a damp paper towel, or by quickly heating them on a dry skillet for a few seconds per side. This makes them more pliable.
* Don’t overfill: As mentioned in the tips, overstuffing puts stress on the tortilla.
* Use fresh tortillas: Older tortillas tend to be drier and more brittle.
Q7: What’s the best way to get my quesadillas extra crispy?
A7: For extra crispy quesadillas:
* Moderate Heat: Don’t rush the process with high heat. Medium-low to medium allows the tortilla to crisp up gradually without burning.
* Little or No Oil (for cooking quesadillas): Often, a dry non-stick pan is enough. If you do use fat, a tiny bit of butter or a light spray of oil can enhance crispiness, but too much can make them greasy.
* Press Gently: Use a spatula to press the quesadilla down gently while it cooks. This increases contact with the hot pan.
* Corn Tortillas: Corn tortillas tend to get crispier than flour tortillas.
* Avoid Overcrowding: Cook in batches so the pan temperature stays consistent.
Q8: Why mini quesadillas instead of large ones? What are the advantages?
A8: Mini quesadillas, made with small (e.g., 6-inch) tortillas, offer several advantages:
* Portion Control: They are great for managing serving sizes, whether for kids or adults.
* Easier to Handle: Smaller quesadillas are much easier to flip and manage in the pan without the filling spilling out.
* Perfect for Appetizers/Snacks: Their small size makes them ideal for party platters or as a quick snack.
* Kid-Friendly: Easier for little hands to hold and eat.
* Quicker Cooking: They tend to cook a bit faster and more evenly due to their size.
* Variety: You can make several mini ones with slightly different fillings if you wish, offering more variety in one meal.
While large quesadillas are great for a substantial meal, the mini versions shine in convenience and versatility.

Mini Cheese and Veggie Quesadillas
Ingredients
- 1 tablespoon Olive Oil: Extra virgin, for sautéing the vegetables, adding a hint of fruity flavor and ensuring the veggies don’t stick.
- 1/2 medium Red Onion, finely chopped: Adds a pungent sweetness and a beautiful color contrast. About 1/2 cup.
- 1 medium Bell Pepper (any color), finely chopped: Red, yellow, or orange bell peppers work best for sweetness and visual appeal. About 1 cup.
- 1 small Zucchini, finely chopped: Adds a subtle earthy flavor and a good dose of nutrients. Ensure it’s chopped small for even cooking. About 3/4 cup.
- 1/2 cup Corn Kernels (fresh or frozen): Provides pops of sweetness and a pleasing texture. If frozen, no need to thaw.
- 1/4 cup Black Beans, rinsed and drained (optional): Adds plant-based protein and a heartier feel.
- 1/2 teaspoon Cumin Powder: Lends a warm, earthy, and slightly smoky flavor, characteristic of Mexican cuisine.
- 1/4 teaspoon Chili Powder (optional, adjust to taste): For a mild kick. Use a good quality blend.
- Salt and freshly ground Black Pepper to taste: Essential for enhancing all the flavors.
- 8–10 Small (6-inch) Flour or Corn Tortillas: Flour tortillas are softer and fold easily; corn tortillas offer a more traditional flavor and can get crispier. Whole wheat tortillas are also a great option for added fiber.
- 1 1/2 – 2 cups Shredded Cheese Blend: A mix of Monterey Jack and Cheddar is classic for its meltability and flavor. Pepper Jack can add a nice kick. Grating your own cheese often results in better melting.
- Optional for Sautéing: 1 clove Garlic, minced: Can be added with the onions for an extra layer of aromatic flavor.
Instructions
- Prepare the Vegetable Filling:
- Heat the olive oil in a medium skillet or pan over medium heat.
- Add the finely chopped red onion and sauté for 2-3 minutes until softened and translucent. If using garlic, add it during the last minute of sautéing the onion.
- Add the finely chopped bell pepper and zucchini to the skillet. Cook for 5-7 minutes, stirring occasionally, until the vegetables are tender-crisp. You want them softened but still with a slight bite.
- Stir in the corn kernels (and black beans, if using). Cook for another 2-3 minutes, until heated through.
- Add the cumin powder, chili powder (if using), salt, and pepper. Stir well to combine and cook for 1 more minute to allow the spices to bloom.
- Remove the vegetable mixture from the heat and set aside. If there’s any excess liquid in the pan, try to drain it off to prevent soggy quesadillas.
- Assemble the Mini Quesadillas:
- Lay a small tortilla flat on a clean work surface.
- Sprinkle about 2-3 tablespoons of the shredded cheese blend evenly over one half of the tortilla, leaving a small border around the edge.
- Spoon about 2-3 tablespoons of the cooked vegetable mixture over the cheese on that same half.
- Sprinkle another tablespoon or so of cheese on top of the vegetables (this helps bind the quesadilla).
- Fold the other half of the tortilla over the filling to create a half-moon shape. Gently press down.
- Repeat with the remaining tortillas and filling.
- Cook the Quesadillas:
- You can use the same skillet (wipe it clean if necessary) or a griddle. Heat the skillet over medium-low to medium heat. You don’t want the heat too high, or the tortilla will burn before the cheese melts.
- Carefully place 1 or 2 assembled quesadillas in the hot, dry skillet (or lightly greased if you prefer, though often not necessary with non-stick pans).
- Cook for 2-4 minutes per side, or until the tortilla is golden brown and crispy, and the cheese is fully melted and gooey. Press down gently with a spatula occasionally to help it cook evenly and seal.
- Be cautious when flipping; a thin, flexible spatula works best.
- Serve:
- Once cooked, transfer the mini quesadillas to a cutting board.
- Let them cool for a minute or two, as the filling will be very hot.
- You can serve them whole or cut them into wedges (halves or thirds) for even smaller, bite-sized pieces, perfect for little hands or as appetizers.
- Serve immediately with your favorite dips like salsa, guacamole, or sour cream.
Nutrition
- Serving Size: one normal portion
- Calories: 200


