

There are moments in life, usually on a frantic Tuesday evening after a long day, when a very specific and urgent need arises: the need for a rich, warm, decadent dessert, and you need it now. This exact scenario unfolded in my house last week. The craving for something deeply chocolatey and comforting was a palpable force in the kitchen. My kids were looking at me with that hopeful, sweet-tooth glint in their eyes, and frankly, so was my reflection in the microwave door. I had no time or energy to preheat the oven, haul out the stand mixer, and commit to a 45-minute baking project. Then, a lightbulb went off. I remembered the holy grail of instant gratification desserts: the microwave mug cake. I pulled out our favorite oversized mugs, the pantry staples, and in less than five minutes, the kitchen was filled with the intoxicating aroma of melting chocolate and warm, nutty peanut butter. Each of us sat down with our own personal-sized cake, a wisp of steam rising from the top. The first spoonful was pure magic—a fudgy, moist, and intensely flavorful cake that tasted like it had been lovingly baked for an hour, not zapped for 90 seconds. It was a resounding success, a moment of pure, unadulterated dessert bliss that saved our weeknight. This recipe isn’t just a recipe; it’s a secret weapon against cravings, a surefire way to bring a little joy into any day, and I am so excited to share it with you.
Ingredients
This recipe relies on simple pantry staples that come together to create something truly magical. Each component plays a crucial role in achieving that perfect, cakey-yet-fudgy texture right in your microwave.
- All-Purpose Flour (4 tablespoons): This is the structural backbone of our cake, providing the body and texture. Standard all-purpose flour works perfectly here.
- Granulated Sugar (4 tablespoons): For sweetness and a tender crumb. You can adjust this slightly based on your personal preference and the sweetness of your cocoa powder and peanut butter.
- Unsweetened Cocoa Powder (2 tablespoons): This delivers the deep, rich chocolate flavor. Use a good quality cocoa powder for the best results, as it’s the star of the chocolate show.
- Baking Powder (¼ teaspoon): This is our leavening agent. It’s the magic ingredient that gives the cake its lift and prevents it from being dense and heavy. Make sure your baking powder is fresh for the best rise.
- Salt (a pinch): A tiny pinch of salt doesn’t make the cake salty; it enhances and deepens the chocolate and peanut butter flavors, making them pop.
- Milk (3 tablespoons): This adds essential moisture, making the cake tender and preventing it from becoming dry. Whole milk, 2%, or even plant-based milks like almond or soy work beautifully.
- Vegetable Oil (1 tablespoon): Oil provides richness and a moist, fudgy texture. Any neutral oil like vegetable, canola, or even melted coconut oil will work.
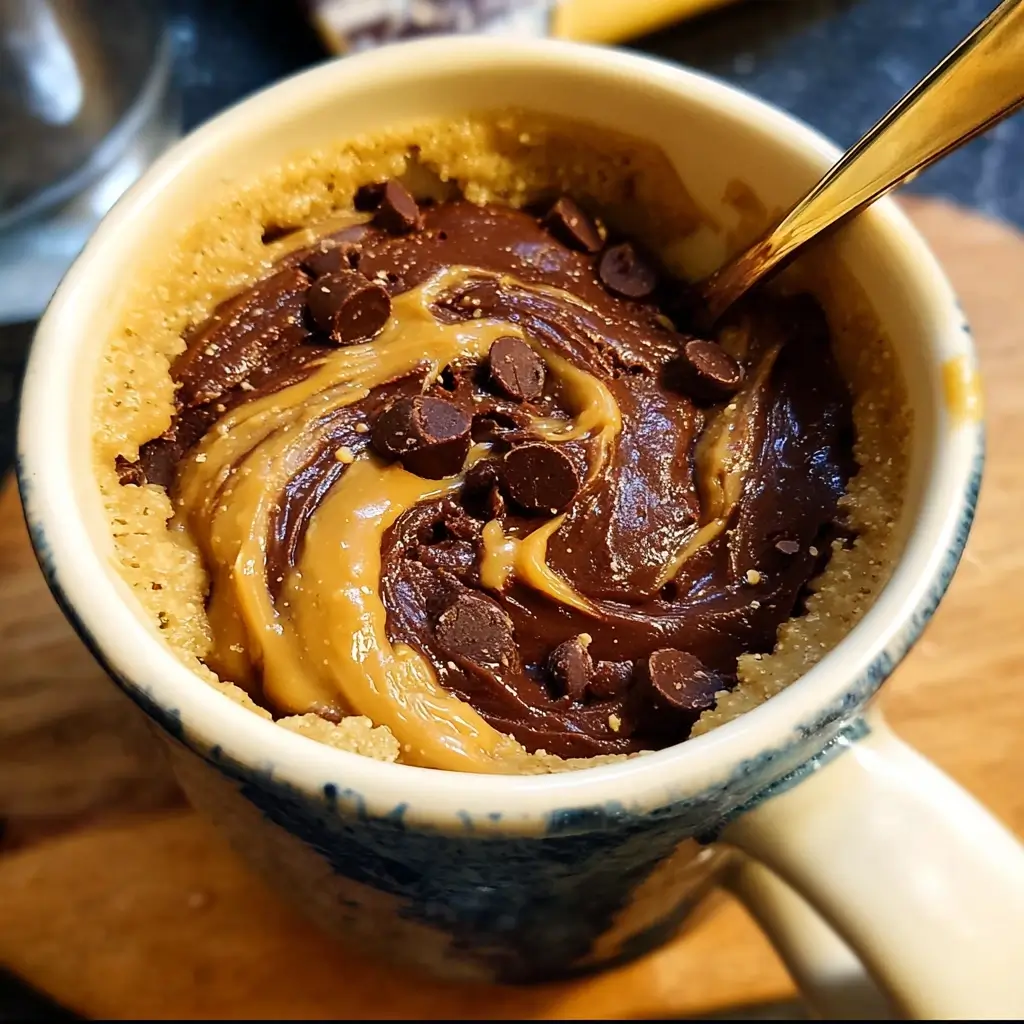
- Creamy Peanut Butter (1 heaping tablespoon): The co-star of our dessert. A generous dollop of creamy peanut butter melts into the center, creating a molten, gooey core that is simply irresistible.
- Vanilla Extract (¼ teaspoon): A small splash of vanilla extract elevates all the other flavors, adding a layer of aromatic warmth to the finished cake.
Instructions
Creating this single-serving masterpiece is incredibly simple and takes only a few minutes from start to finish. Follow these steps carefully for a perfect result every time.
- Choose Your Vessel: Select a large, microwave-safe mug (at least 12-14 ounces). A larger mug is crucial as it gives the cake batter room to rise without overflowing and creating a mess in your microwave. If you like, you can lightly grease the inside of the mug with a little butter or non-stick spray, but it’s not strictly necessary.
- Combine the Dry Ingredients: In the mug itself (for one-bowl cleanup!), add the flour, sugar, cocoa powder, baking powder, and salt. Use a small fork or a mini whisk to stir these ingredients together thoroughly. This step is important to ensure the baking powder is evenly distributed, which will lead to a consistent rise. Break up any clumps of cocoa powder.
- Add the Wet Ingredients: Pour the milk, vegetable oil, and vanilla extract directly into the mug on top of the dry ingredients.
- Mix the Batter: Using the same fork or whisk, mix everything together until just combined. Scrape the bottom and sides of the mug to make sure there are no pockets of dry flour. The key here is not to overmix. A few small lumps in the batter are perfectly fine. Overmixing can develop the gluten in the flour, resulting in a tough, rubbery cake.
- Create the Molten Center: Take your heaping tablespoon of creamy peanut butter and drop it right into the center of the batter. There’s no need to stir it in. As the cake cooks, the peanut butter will sink and melt, creating a delicious, molten core. For an extra decadent treat, you can add a few chocolate chips along with the peanut butter.
- Microwave to Perfection: Place the mug in the center of your microwave. Cook on high power for 70 to 90 seconds. Microwave wattages vary significantly, so your cooking time may differ. It’s better to undercook slightly than to overcook. The cake is done when the top looks set and springy to the touch, but the very center might still look a little wet. This “wet” spot is what contributes to the fudgy texture.
- Rest and Enjoy: Carefully remove the mug from the microwave—it will be very hot! Let the cake rest for a minute or two. This allows it to finish cooking from the residual heat and helps the flavors to meld together. Dive in with a spoon and enjoy your warm, gooey chocolate peanut butter creation!
Nutrition Facts
While this is an indulgent treat, here’s a general look at its nutritional profile. Please note these are estimates and can vary based on the specific ingredients used.
- Servings: 1 mug cake
- Calories per serving: Approximately 450-550 kcal
- Carbohydrates: As the primary source of the cake’s structure and sweetness, carbohydrates provide the quick burst of energy that often accompanies a satisfying dessert.
- Protein: Thanks to the peanut butter and milk, this mug cake offers a modest amount of protein, which contributes to a feeling of satiety and satisfaction.
- Fat: The oil and peanut butter provide richness and flavor. This fat content is what gives the cake its wonderfully moist and tender crumb.
- Sugar: This recipe contains granulated sugar for sweetness. The amount can be adjusted to your preference, but it’s a key component for both flavor and texture in this quick dessert.
Preparation Time
This recipe is the definition of a quick fix. The total time from gathering your ingredients to taking your first delicious bite is under 5 minutes. It takes about 2-3 minutes to measure and mix the ingredients in the mug, and the microwave cooking time is typically between 70 and 90 seconds. It’s the perfect solution for an impromptu dessert craving.
How to Serve
While this mug cake is absolutely delicious on its own, a few simple additions can elevate it from a simple snack to a truly show-stopping dessert. Here are some ideas to inspire you:
- The Classic Scoop:
- A scoop of vanilla bean or chocolate ice cream melting on top of the warm cake is a classic for a reason. The contrast between the hot cake and cold cream is divine.
- A Dollop of Cream:
- A generous dollop of freshly whipped cream.
- A spoonful of crème fraîche for a slightly tangy counterpoint.
- A scoop of marshmallow fluff that gets slightly toasted and gooey from the heat of the cake.
- Sauces and Drizzles:
- Drizzle with warm chocolate fudge sauce for an extra chocolatey hit.
- A swirl of caramel or salted caramel sauce.
- A drizzle of melted peanut butter or peanut sauce.
- A Touch of Crunch:
- Sprinkle with chopped peanuts or other nuts like pecans or walnuts.
- Add a handful of mini chocolate chips or chocolate shavings over the top.
- A sprinkle of toffee bits or crushed cookies (like Oreos or Biscoff).
- Fresh and Fruity:
- Top with fresh berries like raspberries or sliced strawberries, which cut through the richness.
- A few slices of fresh banana pair beautifully with the chocolate and peanut butter flavors.
Additional tips
To ensure your mug cake journey is a successful one every single time, keep these eight essential tips in mind.
- Know Your Microwave: The single most common reason for a failed mug cake is incorrect cooking time. Microwave ovens vary in power (wattage) from 600W to over 1200W. A recipe tested in a 1000W microwave might need more time in an 800W model and less time in a 1200W one. The first time you make this recipe, start with the lower end of the time range (70 seconds). You can always add 10-15 more seconds if it’s not done, but you can’t undo an overcooked, rubbery cake.
- Don’t Overmix the Batter: This tip cannot be stressed enough. When you mix flour with liquid, you begin to develop gluten. While gluten is great for chewy bread, it’s the enemy of a tender cake. Mix your batter only until the ingredients are just combined. A few lumps are perfectly acceptable and are a sign that you haven’t overworked it. A gentle hand leads to a tender crumb.
- The Mug Matters: Use a mug that is sufficiently large—at least 12 ounces, but 14-16 ounces is even safer. The batter will rise significantly as it cooks, and a small mug will cause it to overflow, creating a sticky, cakey mess on your microwave plate. A standard coffee mug is often too small. A wide, soup-style mug is an excellent choice.
- Give it a Moment to Rest: It’s incredibly tempting to dive in the second the microwave dings, but patience pays off. Letting the mug cake rest for 1-2 minutes after cooking is crucial. The residual heat will continue to gently cook the center, setting it to the perfect fudgy consistency. It also allows the molten-hot cake to cool down just enough to avoid burning your mouth.
- Don’t Skip the Fat: The tablespoon of oil is vital for moisture and richness. Skipping it or reducing it too much will result in a drier, more bread-like texture rather than a decadent, moist cake. The fat coats the flour proteins, inhibiting some gluten development and ensuring a tender result.
- Sift for Success: If you often find clumps in your cakes, take an extra 30 seconds to sift your dry ingredients, especially the cocoa powder and flour. You can do this by passing them through a small fine-mesh sieve into the mug. This aerates the ingredients and ensures there are no dense pockets of unincorporated powder in your final cake.
- Customize Your Sweetness: This recipe calls for 4 tablespoons of sugar, which creates a fairly sweet, dessert-like cake. However, you can easily adjust this. If you are using a very sweet peanut butter or plan to add sweet toppings like ice cream or caramel sauce, you might want to reduce the sugar to 3 tablespoons. Conversely, if you’re using a dark, bitter cocoa powder, you might prefer the full amount.
- The Molten Center Technique: For an even gooier center, try freezing a small ball of peanut butter (or even a chocolate truffle) for about 30 minutes before you start. After you mix the batter, push the frozen peanut butter ball into the center. As the cake cooks around it, it will melt much more slowly, guaranteeing a truly liquid, molten core when you dig in.
FAQ section
Here are answers to some of the most frequently asked questions about making the perfect Microwave Chocolate Peanut Butter Mug Cake.
1. Why did my mug cake turn out rubbery and tough?
This is the most common mug cake problem and it almost always comes down to one of two things: overcooking or overmixing. Overcooking is the primary culprit. Even 10-15 extra seconds in a powerful microwave can zap all the moisture and turn a tender cake into a rubbery puck. Always err on the side of caution and undercook slightly. Overmixing develops the gluten in the flour, which also leads to a tough texture. Mix the batter just until the ingredients are combined.
2. Can I make this recipe gluten-free?
Absolutely! You can easily make this mug cake gluten-free by swapping the all-purpose flour for a good quality 1-to-1 gluten-free baking flour blend (one that contains xanthan gum). The measurements remain the same. The texture will be slightly different, but still incredibly delicious and satisfying.
3. How can I make a vegan version of this mug cake?
This recipe is very easy to adapt for a vegan diet. Simply make two substitutions: use a plant-based milk (like almond, soy, or oat milk) instead of dairy milk, and ensure your granulated sugar and chocolate are certified vegan (as some sugar is processed with bone char and some chocolate contains dairy). Since this recipe is already egg-free, it’s a simple switch.
4. Can I prepare the batter ahead of time?
It is strongly recommended not to. The leavening power of baking powder is activated as soon as it comes into contact with liquid. If you let the batter sit for too long before microwaving, the baking powder will lose its effectiveness, and your cake will turn out dense and flat instead of light and fluffy. The beauty of this recipe is its speed, so it’s best to mix and cook it right when the craving strikes.
5. Why did my mug cake overflow in the microwave?
This happens for two main reasons: your mug was too small, or you accidentally added too much baking powder. The batter needs ample room to expand and rise. Always use a large, oversized mug (12oz or more). Also, be precise with your baking powder measurement—a ¼ teaspoon is all you need. Using more won’t make the cake fluffier; it will just make it rise too quickly and then collapse, often spilling over the sides in the process.
6. Can I make this mug cake without a microwave?
While this recipe is specifically designed for the speed and cooking method of a microwave, you could try baking it in a conventional oven. Pour the batter into an oven-safe ramekin and bake at 350°F (175°C) for approximately 12-18 minutes, or until a toothpick inserted into the edge comes out clean. The texture will be different—more like a traditional cake—but it will still be delicious.
7. Can I substitute the peanut butter with something else?
Yes, you can! If you have a peanut allergy or just want to try something different, you can substitute the peanut butter with other nut or seed butters. Almond butter, cashew butter, or sunflower seed butter would all be wonderful alternatives. You could also use a chocolate-hazelnut spread like Nutella for an even more decadent, chocolate-forward version.
8. Do I need to add an egg to this recipe?
No, this recipe is intentionally egg-free. Eggs can often make single-serving microwave cakes taste spongy or eggy. By using a combination of oil for fat and baking powder for leavening, we achieve a wonderfully rich and moist cake-like texture without needing an egg at all, making it simpler and accessible for those with egg allergies.

Microwave Chocolate Peanut Butter Mug
Ingredients
This recipe relies on simple pantry staples that come together to create something truly magical. Each component plays a crucial role in achieving that perfect, cakey-yet-fudgy texture right in your microwave.
- All-Purpose Flour (4 tablespoons): This is the structural backbone of our cake, providing the body and texture. Standard all-purpose flour works perfectly here.
- Granulated Sugar (4 tablespoons): For sweetness and a tender crumb. You can adjust this slightly based on your personal preference and the sweetness of your cocoa powder and peanut butter.
- Unsweetened Cocoa Powder (2 tablespoons): This delivers the deep, rich chocolate flavor. Use a good quality cocoa powder for the best results, as it’s the star of the chocolate show.
- Baking Powder (¼ teaspoon): This is our leavening agent. It’s the magic ingredient that gives the cake its lift and prevents it from being dense and heavy. Make sure your baking powder is fresh for the best rise.
- Salt (a pinch): A tiny pinch of salt doesn’t make the cake salty; it enhances and deepens the chocolate and peanut butter flavors, making them pop.
- Milk (3 tablespoons): This adds essential moisture, making the cake tender and preventing it from becoming dry. Whole milk, 2%, or even plant-based milks like almond or soy work beautifully.
- Vegetable Oil (1 tablespoon): Oil provides richness and a moist, fudgy texture. Any neutral oil like vegetable, canola, or even melted coconut oil will work.
- Creamy Peanut Butter (1 heaping tablespoon): The co-star of our dessert. A generous dollop of creamy peanut butter melts into the center, creating a molten, gooey core that is simply irresistible.
- Vanilla Extract (¼ teaspoon): A small splash of vanilla extract elevates all the other flavors, adding a layer of aromatic warmth to the finished cake.
Instructions
Creating this single-serving masterpiece is incredibly simple and takes only a few minutes from start to finish. Follow these steps carefully for a perfect result every time.
- Choose Your Vessel: Select a large, microwave-safe mug (at least 12-14 ounces). A larger mug is crucial as it gives the cake batter room to rise without overflowing and creating a mess in your microwave. If you like, you can lightly grease the inside of the mug with a little butter or non-stick spray, but it’s not strictly necessary.
- Combine the Dry Ingredients: In the mug itself (for one-bowl cleanup!), add the flour, sugar, cocoa powder, baking powder, and salt. Use a small fork or a mini whisk to stir these ingredients together thoroughly. This step is important to ensure the baking powder is evenly distributed, which will lead to a consistent rise. Break up any clumps of cocoa powder.
- Add the Wet Ingredients: Pour the milk, vegetable oil, and vanilla extract directly into the mug on top of the dry ingredients.
- Mix the Batter: Using the same fork or whisk, mix everything together until just combined. Scrape the bottom and sides of the mug to make sure there are no pockets of dry flour. The key here is not to overmix. A few small lumps in the batter are perfectly fine. Overmixing can develop the gluten in the flour, resulting in a tough, rubbery cake.
- Create the Molten Center: Take your heaping tablespoon of creamy peanut butter and drop it right into the center of the batter. There’s no need to stir it in. As the cake cooks, the peanut butter will sink and melt, creating a delicious, molten core. For an extra decadent treat, you can add a few chocolate chips along with the peanut butter.
- Microwave to Perfection: Place the mug in the center of your microwave. Cook on high power for 70 to 90 seconds. Microwave wattages vary significantly, so your cooking time may differ. It’s better to undercook slightly than to overcook. The cake is done when the top looks set and springy to the touch, but the very center might still look a little wet. This “wet” spot is what contributes to the fudgy texture.
- Rest and Enjoy: Carefully remove the mug from the microwave—it will be very hot! Let the cake rest for a minute or two. This allows it to finish cooking from the residual heat and helps the flavors to meld together. Dive in with a spoon and enjoy your warm, gooey chocolate peanut butter creation!
Nutrition
- Serving Size: one normal portion
- Calories: 550


