

I remember those frantic weekday mornings, staring into the fridge, desperately trying to conjure up a healthy and appealing lunch idea that wouldn’t involve yet another boring salad or an expensive takeout order. My family, especially the kids, needed something portable, satisfying, and, let’s be honest, something they would actually eat. Then came the revelation: Make-Ahead Grilled Veggie Wraps. The first time I made these, the aroma of smoky, charred vegetables grilling filled the kitchen, instantly promising something delicious. I prepped a big batch on Sunday afternoon, layering the colourful, tender veggies with creamy hummus and a sprinkle of tangy feta inside soft tortillas. Come Monday lunch, pulling these beauties out of the fridge felt like a minor miracle. They were incredibly flavourful, held together perfectly, and tasted even better than when freshly assembled, as the flavours had melded beautifully overnight. My partner raved about having a “real” lunch at work, and even my picky eater declared them “surprisingly good!” (high praise indeed). These wraps quickly became a staple in our household rotation – a lifesaver for busy weeks, a guaranteed healthy option, and a genuinely delicious way to eat more vegetables. They are versatile, forgiving, and the perfect solution to the perpetual “what’s for lunch?” dilemma.
Ingredients
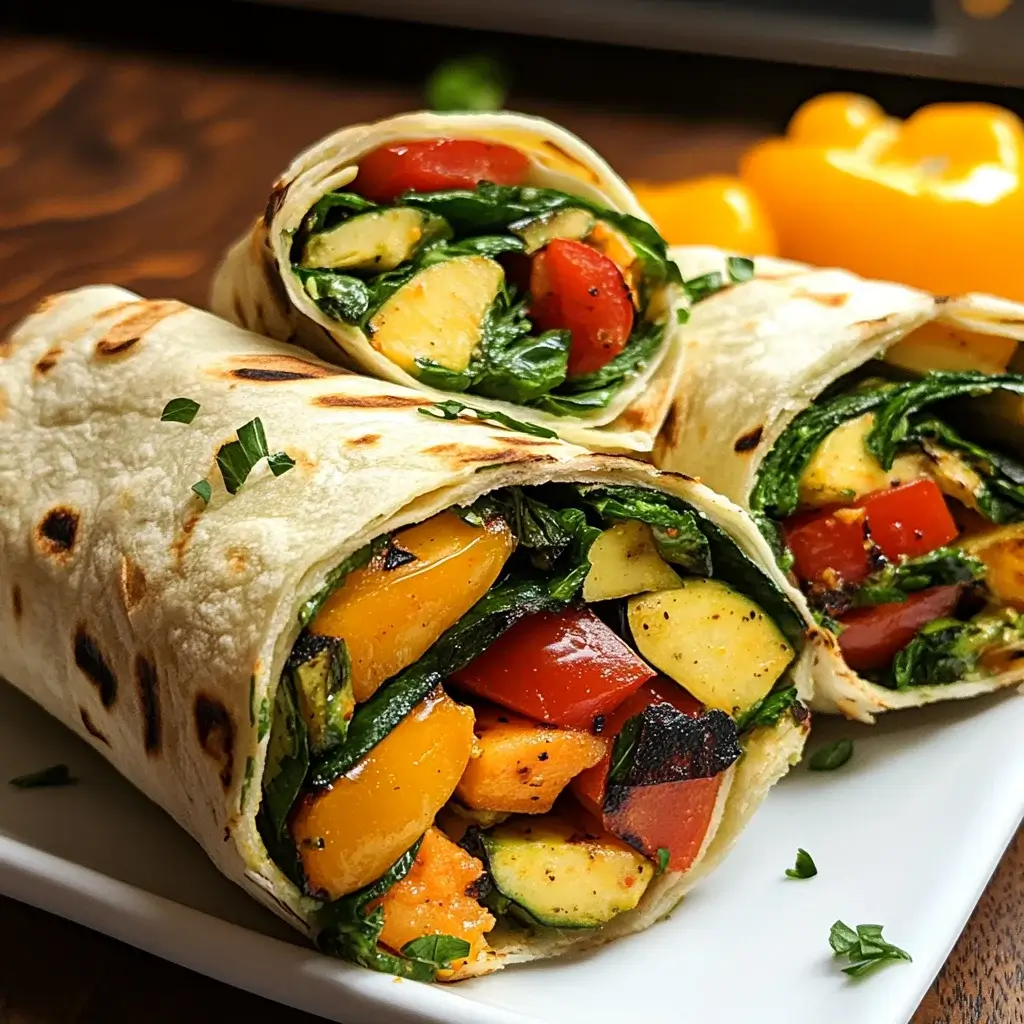
- 2 medium Zucchini: Sliced lengthwise into ¼-inch thick planks. Provides a tender bite and grills beautifully.
- 2 medium Yellow Squash: Sliced lengthwise into ¼-inch thick planks. Similar to zucchini, adds colour and a slightly sweeter flavour.
- 2 Red Bell Peppers: Seeded and cut into wide, flat strips. Offer sweetness and vibrant colour, becoming tender and slightly caramelised when grilled.
- 1 large Red Onion: Cut into ½-inch thick rounds. Grilling mellows its sharpness, bringing out a lovely sweetness.
- 8 ounces Cremini Mushrooms: Stems trimmed, left whole or halved if large. Add an earthy, umami depth and meaty texture.
- ⅓ cup Olive Oil: Extra virgin recommended. Used for coating the vegetables to prevent sticking and add flavour during grilling.
- 1 tablespoon Italian Seasoning: Or a mix of dried oregano, basil, and thyme. Infuses the vegetables with classic Mediterranean herbs.
- 1 teaspoon Salt: Or to taste. Enhances all the flavours.
- ½ teaspoon Black Pepper: Freshly ground preferred. Adds a touch of spice.
- 6-8 Large Flour Tortillas: (approx. 10-12 inch diameter) Whole wheat, spinach, or regular. The vessel for the wrap; choose sturdy ones that won’t tear easily.
- 1 cup Hummus: Plain or your favourite flavour (roasted garlic, red pepper). Acts as a creamy, flavourful binder and adds moisture.
- ½ cup Crumbled Feta Cheese: Optional, but recommended. Provides a tangy, salty counterpoint to the sweet grilled vegetables.
- Optional additions: Fresh spinach or arugula leaves, Kalamata olives, chopped fresh parsley or basil, balsamic glaze for drizzling. For added freshness, flavour, and texture.
Instructions
- Prepare the Vegetables: Wash and dry all your vegetables thoroughly. Slice the zucchini, yellow squash, bell peppers, and red onion as described in the ingredients list. Aim for relatively uniform thickness, especially for the zucchini and squash planks, to ensure even grilling. Trim the mushroom stems.
- Season the Vegetables: In a large bowl, combine the sliced zucchini, yellow squash, bell peppers, red onion rounds, and mushrooms. Drizzle generously with the olive oil. Sprinkle over the Italian seasoning, salt, and black pepper. Gently toss everything together until the vegetables are evenly coated with oil and seasonings. Be careful not to break the onion rounds apart too much.
- Preheat the Grill: Preheat your outdoor grill or indoor grill pan over medium-high heat (around 400°F or 200°C). If using an outdoor grill, clean the grates well. If you don’t have a grill, you can roast the vegetables in a single layer on a baking sheet in an oven preheated to 425°F (220°C) for 20-25 minutes, flipping halfway, or use the broiler (watching carefully).
- Grill the Vegetables: Place the seasoned vegetables onto the preheated grill grates or grill pan in a single layer. Avoid overcrowding the grill, as this will steam the vegetables rather than charring them; grill in batches if necessary. Grill for approximately 5-8 minutes per side, or until tender-crisp and nicely charred grill marks appear. The exact time will depend on your grill’s heat and the thickness of the vegetables. Red onions and peppers might take slightly longer than zucchini and squash. Mushrooms usually cook quicker. Use tongs to carefully flip the vegetables.
- Cool the Vegetables: Once grilled, transfer the vegetables to a large plate or cutting board. Let them cool for at least 15-20 minutes. This step is crucial for make-ahead wraps, as adding hot vegetables directly to the tortilla with the spread can make the wrap soggy.
- Chop the Grilled Vegetables: Once cooled, roughly chop the grilled vegetables into bite-sized pieces. This makes the wraps easier to assemble and eat. Discard any overly charred bits if desired.
- Warm the Tortillas (Optional but Recommended): Briefly warm the tortillas one by one in a dry skillet over medium heat for about 15-20 seconds per side, or wrap the stack in a slightly damp paper towel and microwave for 20-30 seconds. This makes them more pliable and easier to roll without cracking.
- Assemble the Wraps: Lay a warmed tortilla flat on your work surface. Spread a generous layer of hummus evenly over the tortilla, leaving about a ½-inch border around the edges. If using spinach or arugula, place a handful over the hummus (this can act as a moisture barrier).
- Add Fillings: Arrange a portion of the chopped grilled vegetables down the center of the tortilla, on top of the hummus/greens. Sprinkle with crumbled feta cheese (if using) and any other optional additions like fresh herbs or olives. Be mindful not to overfill the wrap, as this will make it difficult to roll tightly.
- Roll the Wraps: Fold in the two sides of the tortilla by about an inch. Then, starting from the bottom edge (closest to you), tightly roll the tortilla up and over the filling, keeping the sides tucked in. Continue rolling until you have a neat, compact cylinder.
- Serve or Store: The wraps can be served immediately. For make-ahead, wrap each rolled tortilla tightly in plastic wrap or beeswax wrap, or place them seam-side down in an airtight container. Refrigerate.
Nutrition Facts
- Servings: 6-8 wraps (depending on tortilla size and filling amount)
- Calories per Serving: Approximately 400-500 kcal (estimate based on 1 wrap using a large flour tortilla, standard hummus, and feta)
- Fiber: High (approx. 8-10g per wrap). Mainly from the abundance of vegetables and whole wheat tortillas (if used), promoting digestive health and satiety.
- Vitamins: Rich source of Vitamin C (from bell peppers) and Vitamin A. Supports immune function, skin health, and vision.
- Healthy Fats: Contains monounsaturated fats (from olive oil and potentially hummus). Beneficial for heart health when part of a balanced diet.
- Protein: Moderate (approx. 10-15g per wrap). Contributed by the tortilla, hummus, and feta cheese; helps with satiety and muscle maintenance.
- Sodium: Content varies based on salt added and feta used. Be mindful if monitoring sodium intake; using low-sodium hummus or less feta can help.
(Note: These are estimates. Actual nutritional values will vary based on specific ingredients, brands, and portion sizes used.)
Preparation Time
- Active Preparation Time: Approximately 25-30 minutes. This includes washing and chopping the vegetables, seasoning them, and assembling the wraps.
- Grilling Time: Approximately 15-20 minutes (may require multiple batches depending on grill size).
- Cooling Time: Allow at least 15-20 minutes for the vegetables to cool before assembly.
- Total Time: Approximately 60-75 minutes from start to finish (excluding extended chilling time if making well ahead). The beauty lies in investing this time upfront for quick grab-and-go meals later in the week.
How to Serve
These Make-Ahead Grilled Veggie Wraps are incredibly versatile. Here are some fantastic ways to serve them:
- The Perfect Packed Lunch:
- Keep them wrapped individually in plastic wrap, foil, or beeswax wraps for easy transport.
- Pack alongside some fruit (grapes, apple slices) and a small handful of nuts or seeds for a complete, balanced meal.
- Include a small container of extra hummus or tzatziki for dipping, if desired.
- Effortless Picnic Fare:
- Slice the wraps crosswise into 1-inch thick pinwheels for easy sharing and attractive presentation. Secure with toothpicks if needed.
- Arrange pinwheels on a platter. They hold up well at room temperature for a couple of hours.
- Pair with other picnic favourites like pasta salad, fruit salad, or chips and dip.
- Quick & Light Dinner:
- Serve a whole wrap alongside a simple side salad with a light vinaigrette.
- Pair with a cup of soup (tomato soup or lentil soup works well).
- Enjoy as is for a satisfying yet not overly heavy evening meal.
- Appetizer for Gatherings:
- Prepare pinwheels as described above.
- Offer a variety of dips on the side: different flavoured hummus, ranch dip, green goddess dressing, or a spicy yogurt dip.
- They add vibrant colour and a healthy option to any party spread.
- With Enhancements:
- Drizzle the inside with a touch of balsamic glaze before rolling for extra tang and sweetness.
- Serve with a side of pickled vegetables (like pickled red onions or pepperoncini) for a zesty contrast.
- Offer hot sauce on the side for those who like a spicy kick.
Additional Tips
- Master the Grill Marks: For those coveted grill marks, ensure your grill is properly preheated. Place the vegetables down and resist the urge to move them too soon. Let them cook undisturbed for 3-5 minutes before checking and flipping. Medium-high heat is key – too low and they steam, too high and they burn before cooking through.
- Veggie Variety is Key: Don’t feel limited by the suggested vegetables! Asparagus spears, eggplant slices, Portobello mushroom caps (sliced after grilling), corn on the cob (kernels cut off after grilling), or even slices of sweet potato (pre-cooked slightly) work wonderfully. Choose firm vegetables that hold up well to grilling.
- Spread the Love (Wisely): Hummus is fantastic, but explore other spreads! Try whipped feta, baba ghanoush, white bean dip, pesto (use sparingly or mix with cream cheese/yogurt), or a thick tzatziki sauce. For a dairy-free creaminess, mashed avocado with lime and salt is excellent (add just before serving if possible, or rely on lime juice to slow browning).
- Boost the Protein Power: To make these wraps even more substantial, incorporate a protein source. Add strips of grilled chicken or tofu, a sprinkle of cooked quinoa or lentils, or a layer of canned chickpeas (rinsed and drained) along with the grilled vegetables.
- Prevent the Sog: Soggy wraps are the enemy of make-ahead meals! Key strategies: COOL grilled vegetables completely before assembly. Don’t use overly watery spreads. Consider adding a layer of large lettuce leaves (like romaine) or spinach over the spread to act as a moisture barrier between the wet ingredients and the tortilla. Don’t overfill.
- Smart Storage Solutions: Wrap each wrap tightly in plastic wrap, ensuring no air pockets. Alternatively, use beeswax wraps. Store them seam-side down in an airtight container in the refrigerator. This prevents them from unrolling and keeps them fresh for up to 3-4 days.
- Flavour Finishers: A drizzle of good quality balsamic glaze just before rolling adds an incredible sweet and tangy dimension that complements the smoky vegetables beautifully. A squeeze of fresh lemon or lime juice over the veggies after grilling but before assembling can also brighten the flavours. Fresh herbs like parsley, basil, cilantro, or mint add another layer of freshness.
- Tortilla Tactics: Choose large, pliable tortillas. Whole wheat offers more fiber and a nuttier taste. Spinach or sun-dried tomato tortillas add colour and subtle flavour. Warming them slightly makes rolling much easier and prevents cracking, especially if the tortillas aren’t super fresh. If you find your wraps tend to get soggy at the bottom, try doubling the tortilla layer at the bottom fold before rolling.
FAQ Section
- Q: How long can I store these Make-Ahead Grilled Veggie Wraps in the fridge?
- A: When wrapped tightly and stored properly in an airtight container in the refrigerator, these wraps generally stay fresh and delicious for 3 to 4 days. The texture might soften slightly over time, but they remain very palatable.
- Q: Can I freeze these wraps for longer storage?
- A: Freezing is generally not recommended for these wraps. The vegetables can become watery and mushy upon thawing, and the texture of the tortilla and hummus can change undesirably. They are best enjoyed fresh within a few days of refrigeration.
- Q: My wraps always seem to get soggy. How can I prevent this?
- A: The key culprits for soggy wraps are excess moisture and heat. Ensure your grilled vegetables are completely cooled before assembling. Avoid overly juicy vegetables or drain them well. Use a thicker spread like hummus rather than thin sauces. Placing a layer of greens (spinach, arugula, lettuce) between the spread and the veggies acts as a great moisture barrier. Finally, wrap them tightly to prevent condensation build-up.
- Q: Can I make these grilled veggie wraps vegan?
- A: Absolutely! Simply omit the feta cheese or substitute it with a vegan feta alternative. Ensure your hummus is dairy-free (most are, but always check ingredients). All other core ingredients (vegetables, olive oil, seasonings, tortillas) are typically vegan, but double-check tortilla ingredients if unsure.
- Q: Are these wraps gluten-free?
- A: The filling itself (vegetables, hummus, cheese) is naturally gluten-free. To make the entire wrap gluten-free, simply use certified gluten-free tortillas, which are widely available now made from ingredients like corn, rice flour, or almond flour.
- Q: What if I don’t have an outdoor grill or grill pan?
- A: No problem! You can achieve a similar result by roasting the vegetables. Toss them with oil and seasoning as directed, then spread them in a single layer on a baking sheet. Roast in a hot oven (around 425°F or 220°C) for 20-30 minutes, flipping halfway, until tender and slightly browned. You can also use your oven’s broiler function for a charred effect, but watch them very carefully as they can burn quickly.
- Q: Can I add meat or other proteins to these wraps?
- A: Yes, these wraps are very adaptable. Grilled chicken breast strips, shredded rotisserie chicken, sliced steak, grilled shrimp, or even seasoned ground turkey would be delicious additions. For plant-based protein, consider adding baked or pan-fried tofu strips, tempeh, or a hearty serving of chickpeas or black beans.
- Q: What are the absolute best vegetables for grilling for these wraps?
- A: The best vegetables are those that hold their shape and develop great flavour when grilled. Zucchini, yellow squash, bell peppers (any colour), red onions, and mushrooms (cremini or Portobello) are classic choices. Eggplant planks and asparagus spears also grill beautifully and add great texture and taste. Choose a colourful mix for visual appeal and a range of nutrients.

Make-Ahead Grilled Veggie Wraps
Ingredients
- 2 medium Zucchini: Sliced lengthwise into ¼-inch thick planks. Provides a tender bite and grills beautifully.
- 2 medium Yellow Squash: Sliced lengthwise into ¼-inch thick planks. Similar to zucchini, adds colour and a slightly sweeter flavour.
- 2 Red Bell Peppers: Seeded and cut into wide, flat strips. Offer sweetness and vibrant colour, becoming tender and slightly caramelised when grilled.
- 1 large Red Onion: Cut into ½-inch thick rounds. Grilling mellows its sharpness, bringing out a lovely sweetness.
- 8 ounces Cremini Mushrooms: Stems trimmed, left whole or halved if large. Add an earthy, umami depth and meaty texture.
- ⅓ cup Olive Oil: Extra virgin recommended. Used for coating the vegetables to prevent sticking and add flavour during grilling.
- 1 tablespoon Italian Seasoning: Or a mix of dried oregano, basil, and thyme. Infuses the vegetables with classic Mediterranean herbs.
- 1 teaspoon Salt: Or to taste. Enhances all the flavours.
- ½ teaspoon Black Pepper: Freshly ground preferred. Adds a touch of spice.
- 6–8 Large Flour Tortillas: (approx. 10–12 inch diameter) Whole wheat, spinach, or regular. The vessel for the wrap; choose sturdy ones that won’t tear easily.
- 1 cup Hummus: Plain or your favourite flavour (roasted garlic, red pepper). Acts as a creamy, flavourful binder and adds moisture.
- ½ cup Crumbled Feta Cheese: Optional, but recommended. Provides a tangy, salty counterpoint to the sweet grilled vegetables.
- Optional additions: Fresh spinach or arugula leaves, Kalamata olives, chopped fresh parsley or basil, balsamic glaze for drizzling. For added freshness, flavour, and texture.
Instructions
- Prepare the Vegetables: Wash and dry all your vegetables thoroughly. Slice the zucchini, yellow squash, bell peppers, and red onion as described in the ingredients list. Aim for relatively uniform thickness, especially for the zucchini and squash planks, to ensure even grilling. Trim the mushroom stems.
- Season the Vegetables: In a large bowl, combine the sliced zucchini, yellow squash, bell peppers, red onion rounds, and mushrooms. Drizzle generously with the olive oil. Sprinkle over the Italian seasoning, salt, and black pepper. Gently toss everything together until the vegetables are evenly coated with oil and seasonings. Be careful not to break the onion rounds apart too much.
- Preheat the Grill: Preheat your outdoor grill or indoor grill pan over medium-high heat (around 400°F or 200°C). If using an outdoor grill, clean the grates well. If you don’t have a grill, you can roast the vegetables in a single layer on a baking sheet in an oven preheated to 425°F (220°C) for 20-25 minutes, flipping halfway, or use the broiler (watching carefully).
- Grill the Vegetables: Place the seasoned vegetables onto the preheated grill grates or grill pan in a single layer. Avoid overcrowding the grill, as this will steam the vegetables rather than charring them; grill in batches if necessary. Grill for approximately 5-8 minutes per side, or until tender-crisp and nicely charred grill marks appear. The exact time will depend on your grill’s heat and the thickness of the vegetables. Red onions and peppers might take slightly longer than zucchini and squash. Mushrooms usually cook quicker. Use tongs to carefully flip the vegetables.
- Cool the Vegetables: Once grilled, transfer the vegetables to a large plate or cutting board. Let them cool for at least 15-20 minutes. This step is crucial for make-ahead wraps, as adding hot vegetables directly to the tortilla with the spread can make the wrap soggy.
- Chop the Grilled Vegetables: Once cooled, roughly chop the grilled vegetables into bite-sized pieces. This makes the wraps easier to assemble and eat. Discard any overly charred bits if desired.
- Warm the Tortillas (Optional but Recommended): Briefly warm the tortillas one by one in a dry skillet over medium heat for about 15-20 seconds per side, or wrap the stack in a slightly damp paper towel and microwave for 20-30 seconds. This makes them more pliable and easier to roll without cracking.
- Assemble the Wraps: Lay a warmed tortilla flat on your work surface. Spread a generous layer of hummus evenly over the tortilla, leaving about a ½-inch border around the edges. If using spinach or arugula, place a handful over the hummus (this can act as a moisture barrier).
- Add Fillings: Arrange a portion of the chopped grilled vegetables down the center of the tortilla, on top of the hummus/greens. Sprinkle with crumbled feta cheese (if using) and any other optional additions like fresh herbs or olives. Be mindful not to overfill the wrap, as this will make it difficult to roll tightly.
- Roll the Wraps: Fold in the two sides of the tortilla by about an inch. Then, starting from the bottom edge (closest to you), tightly roll the tortilla up and over the filling, keeping the sides tucked in. Continue rolling until you have a neat, compact cylinder.
- Serve or Store: The wraps can be served immediately. For make-ahead, wrap each rolled tortilla tightly in plastic wrap or beeswax wrap, or place them seam-side down in an airtight container. Refrigerate.
Nutrition
- Serving Size: one normal portion
- Calories: 500
- Fiber: 10g
- Protein: 15g


