
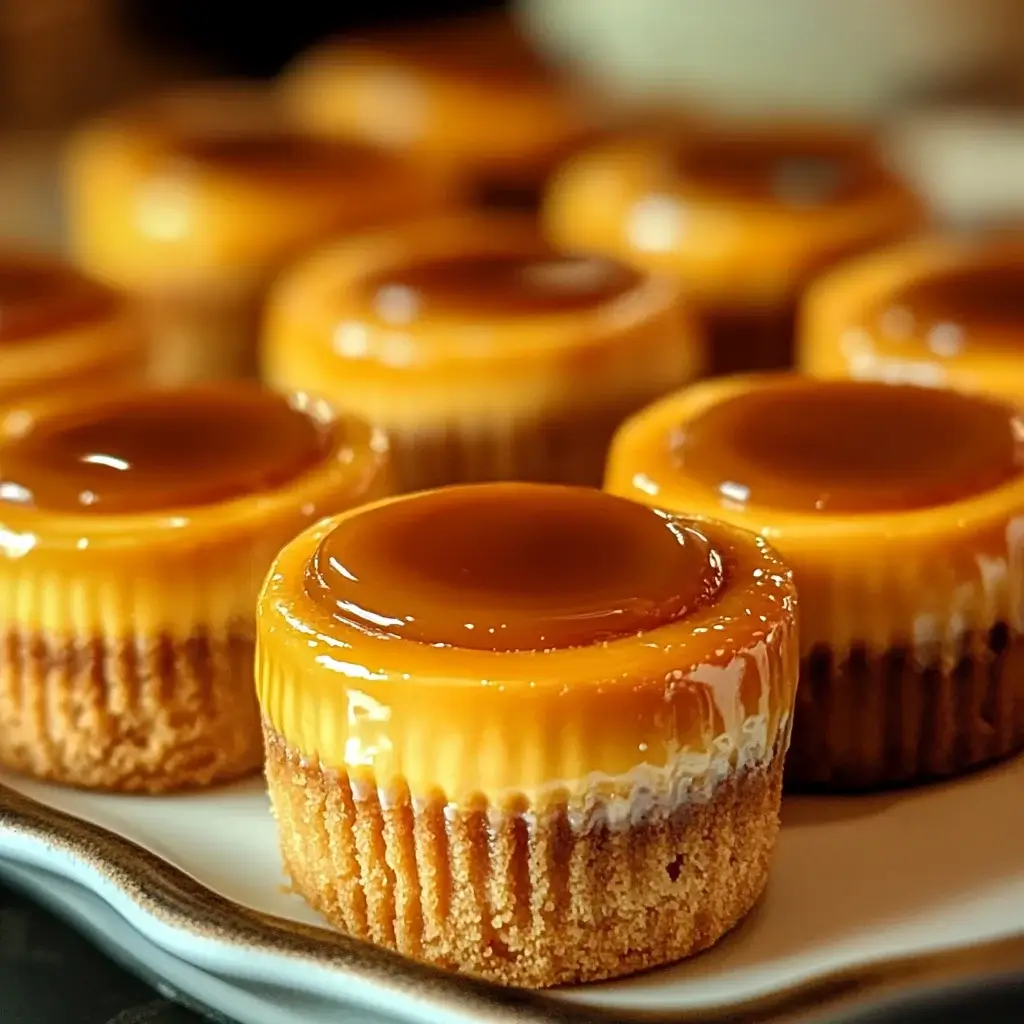

It’s funny how some recipes just become instant classics in your household. For us, these Mini Caramel Cheesecakes are definitely in that category. From the first time I baked a batch, the reaction was unanimous – pure delight! My kids, usually picky eaters, devoured them in minutes, and my husband declared them “the best dessert ever!” The combination of creamy, tangy cheesecake filling, the buttery graham cracker crust, and that luscious homemade caramel swirl is simply divine. They are the perfect size for individual servings, making them ideal for parties, potlucks, or just a special treat for the family. And let’s be honest, who can resist a mini dessert? These cheesecakes are not only incredibly delicious but also surprisingly easy to make, especially if you’re a bit intimidated by full-sized cheesecakes. The mini format takes away some of the pressure, and the results are consistently impressive. Get ready to fall in love with these little bites of caramel cheesecake heaven – you won’t be able to stop at just one!
Ingredients You’ll Need for Irresistible Mini Caramel Cheesecakes
To create these delectable mini caramel cheesecakes, you’ll need a selection of simple, high-quality ingredients. Each component plays a crucial role in achieving the perfect flavor and texture. Here’s a detailed breakdown of what you’ll need:
- For the Graham Cracker Crust:
- Graham Cracker Crumbs (1 ½ cups): The foundation of our mini cheesecakes, graham cracker crumbs provide a subtly sweet and slightly nutty base. Pre-made graham cracker crumbs are convenient, or you can easily crush whole graham crackers yourself using a food processor or by placing them in a zip-top bag and crushing them with a rolling pin.
- Unsalted Butter, melted (6 tablespoons): Melted butter binds the graham cracker crumbs together, creating a moist and flavorful crust that holds its shape during baking and chilling. Unsalted butter allows you to control the overall saltiness of the crust.
- Granulated Sugar (3 tablespoons): A touch of granulated sugar enhances the sweetness of the graham cracker crust, complementing the richer cheesecake filling and caramel topping.
- For the Creamy Cheesecake Filling:
- Cream Cheese, softened (24 ounces, about 3 packages): The star of the show! Full-fat cream cheese is essential for achieving the signature creamy and tangy texture of cheesecake. Make sure your cream cheese is properly softened to room temperature for smooth blending and to prevent lumps in your filling.
- Granulated Sugar (1 cup): Granulated sugar sweetens the cheesecake filling and contributes to its smooth texture. The amount is carefully balanced to complement the tanginess of the cream cheese and the sweetness of the caramel.
- Sour Cream (½ cup): Sour cream adds moisture and tanginess to the cheesecake filling, creating a richer and more complex flavor profile. Full-fat sour cream is recommended for the best texture.
- Eggs (2 large): Eggs act as a binder in the cheesecake filling, helping it set properly during baking and contributing to its richness and structure. Use large eggs and incorporate them one at a time, mixing just until combined to avoid overmixing.
- Vanilla Extract (1 teaspoon): Vanilla extract enhances the overall flavor of the cheesecake, adding a warm and aromatic note that complements the cream cheese and caramel beautifully. Pure vanilla extract is preferred for the best flavor.
- Salt (¼ teaspoon): A pinch of salt balances the sweetness and enhances all the other flavors in the cheesecake filling, preventing it from being overly sweet.
- For the Homemade Caramel Sauce:
- Granulated Sugar (½ cup): Granulated sugar forms the base of our homemade caramel sauce. As it melts and caramelizes, it develops complex, nutty, and sweet flavors.
- Unsalted Butter (4 tablespoons): Butter enriches the caramel sauce, adding a smooth, velvety texture and a rich, buttery flavor that complements the caramelized sugar.
- Heavy Cream (¼ cup): Heavy cream cools down the hot caramelized sugar and butter mixture, stopping the cooking process and creating a smooth, pourable caramel sauce. It also adds richness and creaminess to the caramel.
- Salt (¼ teaspoon): A pinch of salt in the caramel sauce is crucial for balancing the sweetness and enhancing the depth of flavor. It transforms the caramel from simply sweet to a complex and addictive treat.
These carefully selected ingredients, when combined in the right proportions and techniques, will result in mini caramel cheesecakes that are truly irresistible. Using high-quality ingredients, especially full-fat cream cheese and real vanilla extract, will elevate the flavor of your cheesecakes to the next level.
Step-by-Step Instructions for Making Mini Caramel Cheesecakes
Creating these delightful mini caramel cheesecakes is easier than you might think! Follow these detailed instructions for perfect results every time. Remember to read through the entire recipe before you begin to ensure you have all the ingredients and equipment ready.
Step 1: Prepare the Graham Cracker Crust
- Preheat Oven and Prepare Muffin Tin: Preheat your oven to 325°F (160°C). Line a standard 12-cup muffin tin with paper liners. This makes removing the cheesecakes easy and ensures they don’t stick. If you don’t have paper liners, you can lightly grease the muffin tin cups.
- Combine Crust Ingredients: In a medium bowl, combine the graham cracker crumbs, melted butter, and granulated sugar. Mix well with a fork until the crumbs are evenly moistened and resemble wet sand.
- Press Crust into Muffin Cups: Divide the graham cracker mixture evenly among the lined muffin cups, about 1 ½ to 2 tablespoons per cup. Use your fingers or the bottom of a small glass to firmly press the crumbs into the bottom of each cup, creating a compact and even crust layer.
- Pre-bake the Crusts: Bake the crusts in the preheated oven for 5-7 minutes, or until they are lightly golden and fragrant. This pre-baking step helps to set the crust and prevent it from becoming soggy.
- Cool the Crusts: Remove the muffin tin from the oven and let the crusts cool completely while you prepare the cheesecake filling. This cooling time is important as it allows the crust to firm up and be ready for the filling.
Step 2: Make the Creamy Cheesecake Filling
- Beat Cream Cheese and Sugar: In a large bowl, using an electric mixer (hand mixer or stand mixer), beat the softened cream cheese and granulated sugar together until smooth, creamy, and completely combined. Make sure there are no lumps of cream cheese remaining. Scrape down the sides of the bowl as needed to ensure even mixing.
- Incorporate Sour Cream: Add the sour cream to the cream cheese mixture and beat until just combined. Do not overmix at this stage. Overmixing can incorporate too much air into the batter, which can lead to cracking during baking.
- Add Eggs One at a Time: Beat in the eggs one at a time, mixing just until each egg is incorporated. Again, avoid overmixing. Mix until the batter is smooth and homogenous.
- Stir in Vanilla and Salt: Stir in the vanilla extract and salt. Mix until just combined. The cheesecake filling should be smooth, creamy, and slightly thick.
Step 3: Assemble and Bake the Mini Cheesecakes
- Pour Filling into Crusts: Pour the cheesecake filling evenly over the cooled graham cracker crusts in each muffin cup, filling them almost to the top, leaving a little space for expansion.
- Bake in a Water Bath (Optional but Recommended): For the creamiest texture and to prevent cracking, bake the mini cheesecakes in a water bath. To do this, place the muffin tin inside a larger baking pan (like a 9×13 inch pan). Carefully pour hot water into the larger pan until it reaches about halfway up the sides of the muffin tin. If you choose to skip the water bath, the cheesecakes will still be delicious, but may be slightly more prone to cracking.
- Bake Until Set: Bake in the preheated oven for 20-25 minutes, or until the cheesecakes are mostly set around the edges but still slightly jiggly in the center. They should not be browned.
- Cool in Oven with Door Ajar: Turn off the oven and open the oven door slightly (prop it open with a wooden spoon or oven mitt). Let the cheesecakes cool in the oven for 30 minutes with the door ajar. This gradual cooling helps prevent cracking.
- Cool at Room Temperature: Remove the muffin tin from the oven and water bath (if used). Let the mini cheesecakes cool completely at room temperature for about an hour.
- Chill in Refrigerator: Cover the muffin tin with plastic wrap and refrigerate for at least 4 hours, or preferably overnight, to allow the cheesecakes to fully set and chill. Chilling is crucial for the best texture and flavor.
Step 4: Prepare the Homemade Caramel Sauce
- Melt Sugar: In a medium saucepan over medium heat, pour in the granulated sugar in an even layer. Heat the sugar, without stirring, until it begins to melt around the edges.
- Caramelize Sugar: Once the edges start to melt, gently swirl the pan occasionally to help the sugar melt evenly. Continue heating until all the sugar is melted and turns a deep amber color. Be careful not to burn the sugar – burnt caramel will taste bitter.
- Add Butter: Remove the pan from the heat and immediately add the unsalted butter. It will bubble up vigorously. Stir with a whisk until the butter is completely melted and incorporated into the caramelized sugar.
- Pour in Heavy Cream: Slowly pour in the heavy cream while whisking constantly. The mixture will bubble up again. Continue whisking until the caramel sauce is smooth and creamy.
- Stir in Salt: Stir in the salt to balance the sweetness and enhance the flavor of the caramel.
- Cool Caramel Sauce: Let the caramel sauce cool slightly at room temperature. As it cools, it will thicken to a perfect drizzling consistency. If it becomes too thick, you can gently warm it up again.
Step 5: Assemble and Serve
- Remove Cheesecakes from Muffin Tin: Once the cheesecakes are fully chilled, gently remove them from the muffin tin by lifting them out using the paper liners or by carefully running a thin knife around the edges if you didn’t use liners.
- Drizzle with Caramel Sauce: Drizzle the cooled caramel sauce generously over the top of each mini cheesecake. You can use a spoon or a piping bag for a more decorative swirl.
- Optional Garnishes: For an extra touch, you can garnish the cheesecakes with a sprinkle of flaky sea salt, chopped pecans or walnuts, or a dusting of cocoa powder.
- Serve and Enjoy! Serve the mini caramel cheesecakes chilled and enjoy their irresistible combination of creamy cheesecake, buttery crust, and luscious homemade caramel.
Following these detailed instructions will guide you through each step of making these delectable mini caramel cheesecakes. The process is broken down into manageable parts, making it enjoyable and achievable for bakers of all skill levels.
Nutrition Facts for Mini Caramel Cheesecakes (per serving)
Please note that nutritional information is an estimate and can vary based on specific ingredients and portion sizes. The following nutrition facts are approximate per mini cheesecake serving (assuming 12 servings from the recipe):
- Serving Size: 1 mini cheesecake
- Calories: Approximately 350-400 kcal
- Total Fat: 25-30g
These mini caramel cheesecakes are a decadent treat and are best enjoyed in moderation as part of a balanced diet. The richness comes from the cream cheese, butter, and caramel, contributing to the higher fat and calorie content.
Preparation Time for Mini Caramel Cheesecakes
Making these mini caramel cheesecakes involves a few stages, from preparation to chilling. Here’s a breakdown of the approximate time commitment:
- Prep Time: 30-40 minutes (This includes making the crust, cheesecake filling, and caramel sauce. It also includes preheating the oven and preparing the muffin tin.)
- Bake Time: 20-25 minutes (The time the mini cheesecakes spend baking in the oven.)
- Cooling Time (in oven): 30 minutes (Cooling in the oven with the door ajar to prevent cracking.)
- Cooling Time (room temperature): 1 hour (Cooling at room temperature before refrigeration.)
- Chill Time (refrigerator): Minimum 4 hours, preferably overnight (Essential for setting the cheesecakes and developing the best flavor and texture.)
Total Time (excluding chilling): Approximately 2 hours.
Total Time (including chilling): Minimum 6 hours, ideally overnight.
While the total time might seem lengthy due to chilling, the active preparation and baking time is relatively short. Most of the time is hands-off, allowing you to do other things while the cheesecakes bake, cool, and chill. Planning ahead and starting the day before you want to serve them is recommended, especially for the chilling step.
How to Serve Irresistible Mini Caramel Cheesecakes
These mini caramel cheesecakes are versatile and can be served in numerous delightful ways. Here are some serving suggestions to elevate your dessert experience:
- Classic Chilled: The most straightforward and delicious way to serve them is simply chilled straight from the refrigerator. The cold temperature enhances the creamy texture and allows the caramel to set beautifully.
- With Extra Caramel Drizzle: For the ultimate caramel lover, serve with an extra drizzle of warm or cold caramel sauce on the side. This allows guests to customize their sweetness and indulge in even more caramel goodness.
- Topped with Flaky Sea Salt: A sprinkle of flaky sea salt on top of the caramel drizzle just before serving enhances the sweet and salty flavor profile, creating a sophisticated and balanced taste.
- Accompanied by Fresh Berries: The richness of the cheesecake and caramel is beautifully balanced by the tartness of fresh berries. Serve with a side of raspberries, strawberries, blueberries, or a mixed berry medley.
- With Whipped Cream: A dollop of lightly sweetened whipped cream adds a light and airy contrast to the dense cheesecake. You can also flavor the whipped cream with a hint of vanilla or caramel extract.
- Alongside Coffee or Tea: Mini caramel cheesecakes are the perfect accompaniment to a cup of hot coffee or tea. The rich flavors pair wonderfully with the warmth and slight bitterness of these beverages.
- As Part of a Dessert Platter: Include these mini cheesecakes as part of a dessert platter with other treats like cookies, brownies, fruit tarts, or chocolate-covered strawberries for a variety of flavors and textures.
- For Special Occasions: These mini cheesecakes are elegant enough for special occasions like birthdays, holidays, dinner parties, or celebrations. They are a crowd-pleasing dessert that is sure to impress.
- Individual Dessert Cups: For a more elegant presentation, you can carefully remove the mini cheesecakes from their crusts and crumble the crusts in the bottom of individual dessert cups or glasses. Layer with cheesecake filling and caramel sauce for a deconstructed version.
- Frozen Treat: For a refreshing twist, you can freeze the mini cheesecakes. They become like mini cheesecake ice cream bites, perfect for a hot day. Let them thaw slightly for a softer texture before serving.
No matter how you choose to serve them, these mini caramel cheesecakes are sure to be a hit. Their delicious flavor and elegant presentation make them a perfect dessert for any occasion.
Additional Tips for Perfect Mini Caramel Cheesecakes
To ensure your mini caramel cheesecakes are absolutely flawless, here are eight essential tips to keep in mind:
- Use Room Temperature Cream Cheese: Softening your cream cheese to room temperature is crucial for a smooth, lump-free cheesecake filling. If the cream cheese is cold, it will be difficult to blend smoothly, resulting in a grainy texture. Let it sit at room temperature for at least an hour before starting.
- Don’t Overmix the Batter: Overmixing the cheesecake batter can incorporate too much air, which can lead to cracks on the surface during baking and a less creamy texture. Mix just until the ingredients are combined and smooth, especially after adding the eggs.
- Bake in a Water Bath (Recommended): While optional, baking the mini cheesecakes in a water bath helps to create a gentle, even baking environment, which minimizes cracking and ensures a supremely creamy texture. The steam from the water bath prevents the edges from drying out too quickly.
- Don’t Overbake: Overbaking will result in dry and crumbly cheesecakes. Bake them just until the edges are set and the center is still slightly jiggly. They will continue to set as they cool.
- Cool Slowly to Prevent Cracking: Rapid temperature changes can cause cheesecakes to crack. The gradual cooling process in the oven with the door ajar, followed by room temperature cooling, helps to minimize this risk.
- Chill Thoroughly: Chilling the mini cheesecakes for at least 4 hours, or preferably overnight, is essential for them to fully set and develop their best flavor and texture. Chilling also makes them easier to remove from the muffin tin and serve.
- Make Caramel Sauce Ahead of Time: The homemade caramel sauce can be made a day or two in advance and stored in an airtight container in the refrigerator. Simply reheat it gently before drizzling over the cheesecakes. This saves time on the day you plan to serve them.
- Use High-Quality Ingredients: Using high-quality ingredients, especially full-fat cream cheese, real vanilla extract, and good quality butter, will significantly enhance the flavor of your mini caramel cheesecakes. The quality of the ingredients directly impacts the final taste of the dessert.
By following these tips, you’ll be well on your way to creating mini caramel cheesecakes that are not only irresistible but also perfectly textured and beautifully presented. These small details make a big difference in the overall success of your baking endeavor.
Frequently Asked Questions (FAQ) About Mini Caramel Cheesecakes
Here are some frequently asked questions to help you troubleshoot and perfect your mini caramel cheesecake baking experience:
Q1: Can I use a different type of crust instead of graham crackers?
A: Yes, you can definitely experiment with different crusts! Gingersnap cookies, Oreo cookies (without the cream filling), or even shortbread cookies would make delicious alternatives. Simply crush them into crumbs and follow the same crust preparation instructions.
Q2: My cheesecake filling is lumpy. What did I do wrong?
A: Lumpy cheesecake filling is usually caused by using cold cream cheese. Make sure your cream cheese is fully softened to room temperature before mixing. Also, avoid overmixing once you add the eggs. If you still have lumps, you can try passing the filling through a fine-mesh sieve before pouring it into the crusts.
Q3: My mini cheesecakes cracked on top. How can I prevent this?
A: Cracking can be caused by several factors: overbaking, baking at too high a temperature, or rapid temperature changes. Ensure you don’t overbake them, use the recommended oven temperature, and cool them gradually in the oven with the door ajar. Baking in a water bath also significantly reduces cracking.
Q4: Can I make these mini cheesecakes ahead of time?
A: Absolutely! Mini caramel cheesecakes are perfect for making ahead of time. They actually taste even better the next day after the flavors have had time to meld. You can bake them up to 2-3 days in advance and store them covered in the refrigerator. The caramel sauce can also be made ahead and stored separately.
Q5: How should I store leftover mini caramel cheesecakes?
A: Store leftover mini caramel cheesecakes in an airtight container in the refrigerator for up to 5 days. For longer storage, you can freeze them for up to 2-3 months. Thaw them in the refrigerator overnight before serving.
Q6: Can I double the recipe?
A: Yes, you can easily double or even triple this recipe if you need to make a larger batch. Simply multiply all the ingredient quantities by the desired factor. You may need to bake them in batches depending on the size of your oven and muffin tins.
Q7: Can I use store-bought caramel sauce instead of making homemade?
A: Yes, you can use store-bought caramel sauce for convenience. Choose a good quality caramel sauce for the best flavor. However, homemade caramel sauce is relatively easy to make and tastes significantly better, so it’s highly recommended if you have the time.
Q8: What if I don’t have paper liners for my muffin tin?
A: If you don’t have paper liners, you can lightly grease each muffin cup with butter or cooking spray. After the cheesecakes are fully chilled, you can carefully loosen the edges with a thin knife to help remove them from the muffin tin. Lining with parchment paper squares that overhang the sides can also work as makeshift liners.
This FAQ section addresses common questions and concerns, providing helpful tips and solutions to ensure your mini caramel cheesecake baking experience is smooth and successful. Happy baking!
Print
Irresistible Mini Caramel Cheesecakes
Ingredients
To create these delectable mini caramel cheesecakes, you’ll need a selection of simple, high-quality ingredients. Each component plays a crucial role in achieving the perfect flavor and texture. Here’s a detailed breakdown of what you’ll need:
- For the Graham Cracker Crust:
- Graham Cracker Crumbs (1 ½ cups): The foundation of our mini cheesecakes, graham cracker crumbs provide a subtly sweet and slightly nutty base. Pre-made graham cracker crumbs are convenient, or you can easily crush whole graham crackers yourself using a food processor or by placing them in a zip-top bag and crushing them with a rolling pin.
- Unsalted Butter, melted (6 tablespoons): Melted butter binds the graham cracker crumbs together, creating a moist and flavorful crust that holds its shape during baking and chilling. Unsalted butter allows you to control the overall saltiness of the crust.
- Granulated Sugar (3 tablespoons): A touch of granulated sugar enhances the sweetness of the graham cracker crust, complementing the richer cheesecake filling and caramel topping.
- For the Creamy Cheesecake Filling:
- Cream Cheese, softened (24 ounces, about 3 packages): The star of the show! Full-fat cream cheese is essential for achieving the signature creamy and tangy texture of cheesecake. Make sure your cream cheese is properly softened to room temperature for smooth blending and to prevent lumps in your filling.
- Granulated Sugar (1 cup): Granulated sugar sweetens the cheesecake filling and contributes to its smooth texture. The amount is carefully balanced to complement the tanginess of the cream cheese and the sweetness of the caramel.
- Sour Cream (½ cup): Sour cream adds moisture and tanginess to the cheesecake filling, creating a richer and more complex flavor profile. Full-fat sour cream is recommended for the best texture.
- Eggs (2 large): Eggs act as a binder in the cheesecake filling, helping it set properly during baking and contributing to its richness and structure. Use large eggs and incorporate them one at a time, mixing just until combined to avoid overmixing.
- Vanilla Extract (1 teaspoon): Vanilla extract enhances the overall flavor of the cheesecake, adding a warm and aromatic note that complements the cream cheese and caramel beautifully. Pure vanilla extract is preferred for the best flavor.
- Salt (¼ teaspoon): A pinch of salt balances the sweetness and enhances all the other flavors in the cheesecake filling, preventing it from being overly sweet.
- For the Homemade Caramel Sauce:
- Granulated Sugar (½ cup): Granulated sugar forms the base of our homemade caramel sauce. As it melts and caramelizes, it develops complex, nutty, and sweet flavors.
- Unsalted Butter (4 tablespoons): Butter enriches the caramel sauce, adding a smooth, velvety texture and a rich, buttery flavor that complements the caramelized sugar.
- Heavy Cream (¼ cup): Heavy cream cools down the hot caramelized sugar and butter mixture, stopping the cooking process and creating a smooth, pourable caramel sauce. It also adds richness and creaminess to the caramel.
- Salt (¼ teaspoon): A pinch of salt in the caramel sauce is crucial for balancing the sweetness and enhancing the depth of flavor. It transforms the caramel from simply sweet to a complex and addictive treat.
Instructions
Creating these delightful mini caramel cheesecakes is easier than you might think! Follow these detailed instructions for perfect results every time. Remember to read through the entire recipe before you begin to ensure you have all the ingredients and equipment ready.
Step 1: Prepare the Graham Cracker Crust
- Preheat Oven and Prepare Muffin Tin: Preheat your oven to 325°F (160°C). Line a standard 12-cup muffin tin with paper liners. This makes removing the cheesecakes easy and ensures they don’t stick. If you don’t have paper liners, you can lightly grease the muffin tin cups.
- Combine Crust Ingredients: In a medium bowl, combine the graham cracker crumbs, melted butter, and granulated sugar. Mix well with a fork until the crumbs are evenly moistened and resemble wet sand.
- Press Crust into Muffin Cups: Divide the graham cracker mixture evenly among the lined muffin cups, about 1 ½ to 2 tablespoons per cup. Use your fingers or the bottom of a small glass to firmly press the crumbs into the bottom of each cup, creating a compact and even crust layer.
- Pre-bake the Crusts: Bake the crusts in the preheated oven for 5-7 minutes, or until they are lightly golden and fragrant. This pre-baking step helps to set the crust and prevent it from becoming soggy.
- Cool the Crusts: Remove the muffin tin from the oven and let the crusts cool completely while you prepare the cheesecake filling. This cooling time is important as it allows the crust to firm up and be ready for the filling.
Step 2: Make the Creamy Cheesecake Filling
- Beat Cream Cheese and Sugar: In a large bowl, using an electric mixer (hand mixer or stand mixer), beat the softened cream cheese and granulated sugar together until smooth, creamy, and completely combined. Make sure there are no lumps of cream cheese remaining. Scrape down the sides of the bowl as needed to ensure even mixing.
- Incorporate Sour Cream: Add the sour cream to the cream cheese mixture and beat until just combined. Do not overmix at this stage. Overmixing can incorporate too much air into the batter, which can lead to cracking during baking.
- Add Eggs One at a Time: Beat in the eggs one at a time, mixing just until each egg is incorporated. Again, avoid overmixing. Mix until the batter is smooth and homogenous.
- Stir in Vanilla and Salt: Stir in the vanilla extract and salt. Mix until just combined. The cheesecake filling should be smooth, creamy, and slightly thick.
Step 3: Assemble and Bake the Mini Cheesecakes
- Pour Filling into Crusts: Pour the cheesecake filling evenly over the cooled graham cracker crusts in each muffin cup, filling them almost to the top, leaving a little space for expansion.
- Bake in a Water Bath (Optional but Recommended): For the creamiest texture and to prevent cracking, bake the mini cheesecakes in a water bath. To do this, place the muffin tin inside a larger baking pan (like a 9×13 inch pan). Carefully pour hot water into the larger pan until it reaches about halfway up the sides of the muffin tin. If you choose to skip the water bath, the cheesecakes will still be delicious, but may be slightly more prone to cracking.
- Bake Until Set: Bake in the preheated oven for 20-25 minutes, or until the cheesecakes are mostly set around the edges but still slightly jiggly in the center. They should not be browned.
- Cool in Oven with Door Ajar: Turn off the oven and open the oven door slightly (prop it open with a wooden spoon or oven mitt). Let the cheesecakes cool in the oven for 30 minutes with the door ajar. This gradual cooling helps prevent cracking.
- Cool at Room Temperature: Remove the muffin tin from the oven and water bath (if used). Let the mini cheesecakes cool completely at room temperature for about an hour.
- Chill in Refrigerator: Cover the muffin tin with plastic wrap and refrigerate for at least 4 hours, or preferably overnight, to allow the cheesecakes to fully set and chill. Chilling is crucial for the best texture and flavor.
Step 4: Prepare the Homemade Caramel Sauce
- Melt Sugar: In a medium saucepan over medium heat, pour in the granulated sugar in an even layer. Heat the sugar, without stirring, until it begins to melt around the edges.
- Caramelize Sugar: Once the edges start to melt, gently swirl the pan occasionally to help the sugar melt evenly. Continue heating until all the sugar is melted and turns a deep amber color. Be careful not to burn the sugar – burnt caramel will taste bitter.
- Add Butter: Remove the pan from the heat and immediately add the unsalted butter. It will bubble up vigorously. Stir with a whisk until the butter is completely melted and incorporated into the caramelized sugar.
- Pour in Heavy Cream: Slowly pour in the heavy cream while whisking constantly. The mixture will bubble up again. Continue whisking until the caramel sauce is smooth and creamy.
- Stir in Salt: Stir in the salt to balance the sweetness and enhance the flavor of the caramel.
- Cool Caramel Sauce: Let the caramel sauce cool slightly at room temperature. As it cools, it will thicken to a perfect drizzling consistency. If it becomes too thick, you can gently warm it up again.
Step 5: Assemble and Serve
- Remove Cheesecakes from Muffin Tin: Once the cheesecakes are fully chilled, gently remove them from the muffin tin by lifting them out using the paper liners or by carefully running a thin knife around the edges if you didn’t use liners.
- Drizzle with Caramel Sauce: Drizzle the cooled caramel sauce generously over the top of each mini cheesecake. You can use a spoon or a piping bag for a more decorative swirl.
- Optional Garnishes: For an extra touch, you can garnish the cheesecakes with a sprinkle of flaky sea salt, chopped pecans or walnuts, or a dusting of cocoa powder.
- Serve and Enjoy! Serve the mini caramel cheesecakes chilled and enjoy their irresistible combination of creamy cheesecake, buttery crust, and luscious homemade caramel.
Nutrition
- Serving Size: one normal portion
- Calories: 400
- Fat: 30g


