

Let me tell you, these Honey Glazed Chicken Drumsticks have become an absolute staple in our household, a dish that brings smiles to everyone’s faces, from the littlest picky eater to the adults craving something both comforting and exciting. The first time I made them, the aroma wafting from the oven was simply intoxicating – a sweet, savory, garlicky promise of deliciousness to come. My kids, who can sometimes be a bit hesitant with new chicken dishes, devoured these with gusto, their fingers sticky and their expressions blissful. It wasn’t just the kids; my partner and I found ourselves reaching for seconds, then thirds, marveling at how such simple ingredients could transform humble chicken drumsticks into something so incredibly flavorful. The glaze! Oh, that glorious glaze – it caramelizes to perfection, creating a sticky, irresistible coating that clings beautifully to the juicy, tender meat underneath. What I particularly love about this recipe is its versatility. It’s elegant enough for a weekend dinner with friends, yet so easy and quick to prepare that it’s become a go-to for busy weeknights when I need a win without much fuss. The balance of sweet honey, savory soy sauce, tangy apple cider vinegar, and a hint of garlic and ginger creates a symphony of flavors that’s truly addictive. It’s one of those recipes that, once you try it, you’ll find yourself making it again and again, tweaking it slightly perhaps, but always coming back to that core, undeniable deliciousness. It’s a crowd-pleaser, a family-pleaser, and most importantly, a cook-pleaser!
Ingredients
Here’s what you’ll need to create these mouth-watering Honey Glazed Chicken Drumsticks:
- 8-10 Chicken Drumsticks (about 2-2.5 lbs): The star of our show! Opt for skin-on drumsticks as the skin crisps up beautifully and helps keep the meat moist. Fresh, good-quality chicken will yield the best results.
- 1/2 cup Honey: This provides the signature sweetness and helps create that lovely sticky glaze. Raw, unfiltered honey can add a more complex flavor, but any good quality liquid honey will work.
- 1/4 cup Soy Sauce (low sodium recommended): Adds a deep, savory, umami flavor that perfectly complements the sweetness of the honey. Low sodium helps control the saltiness of the final dish.
- 2 tablespoons Apple Cider Vinegar: Introduces a crucial tangy element that balances the richness and sweetness. It also helps tenderize the chicken.
- 2 tablespoons Olive Oil (or vegetable oil): Aids in browning the chicken and adds a touch of richness to the glaze.
- 4 cloves Garlic (minced): Aromatic and flavorful, fresh garlic is a must for a robust taste. Mince it finely to distribute its flavor evenly.
- 1 tablespoon Ginger (freshly grated): Adds a warm, zesty kick that elevates the glaze. Fresh ginger is highly recommended over powdered for its vibrant flavor.
- 1 teaspoon Smoked Paprika: Imparts a subtle smoky depth and a beautiful reddish hue to the chicken.
- 1/2 teaspoon Black Pepper (freshly ground): For a touch of spice and to enhance the other flavors.
- Optional: 1/4 teaspoon Red Pepper Flakes: If you enjoy a little heat, a pinch of red pepper flakes will add a nice spicy counterpoint to the sweetness.
- Optional Garnish: Sesame Seeds and Chopped Green Onions/Parsley: For a lovely visual appeal and a fresh finishing touch.
Instructions
Follow these simple steps to create perfectly glazed, delicious chicken drumsticks:
- Preheat and Prepare: Preheat your oven to 400°F (200°C). Line a large baking sheet or roasting pan with parchment paper or aluminum foil for easier cleanup. If using foil, lightly grease it to prevent sticking.
- Prepare the Chicken: Pat the chicken drumsticks thoroughly dry with paper towels. This is a crucial step for achieving crispier skin. Place the drumsticks in a large bowl or a sturdy zip-top bag.
- Make the Glaze: In a medium-sized bowl, whisk together the honey, soy sauce, apple cider vinegar, olive oil, minced garlic, grated ginger, smoked paprika, and black pepper (and red pepper flakes, if using). Stir well until all the ingredients are thoroughly combined and the honey is fully dissolved.
- Marinate the Chicken (Quick Marination): Pour about two-thirds of the honey glaze mixture over the chicken drumsticks in the bowl or bag. Reserve the remaining one-third of the glaze in a separate small bowl for basting later. Toss or massage the chicken to ensure each drumstick is evenly coated with the glaze. If time permits, you can let the chicken marinate in the refrigerator for at least 30 minutes, or up to 4 hours, for deeper flavor. If you’re short on time, you can proceed directly to baking.
- Arrange for Baking: Arrange the glazed chicken drumsticks in a single layer on the prepared baking sheet, ensuring they are not overcrowded. Overcrowding will cause them to steam rather than roast, preventing that desirable crispy skin. Leave a little space between each drumstick.
- First Bake: Place the baking sheet in the preheated oven and bake for 20-25 minutes. The chicken will start to cook through, and the glaze will begin to set.
- Baste and Continue Baking: After the initial 20-25 minutes, remove the chicken from the oven. Using a pastry brush, generously baste the drumsticks with some of the reserved glaze. This layering of glaze is key to a deeply flavorful and sticky coating.
- Second Bake & Final Basting: Return the chicken to the oven and bake for another 15-20 minutes. Baste again with the remaining glaze during this final stage. Continue baking until the chicken is cooked through, the internal temperature reaches 165-175°F (74-79°C) when checked with a meat thermometer inserted into the thickest part of the drumstick (avoiding the bone), and the glaze is bubbly, caramelized, and sticky. The skin should be beautifully golden brown.
- Optional Broil for Extra Crispiness: If you desire even crispier skin and a deeper caramelization, you can switch the oven to the broil setting (high) for the last 2-3 minutes of cooking. Keep a very close eye on the chicken during this step, as the honey in the glaze can burn quickly under the broiler.
- Rest: Once cooked, remove the chicken from the oven and let it rest on the baking sheet for 5-10 minutes before serving. This allows the juices to redistribute, resulting in more tender and flavorful meat.
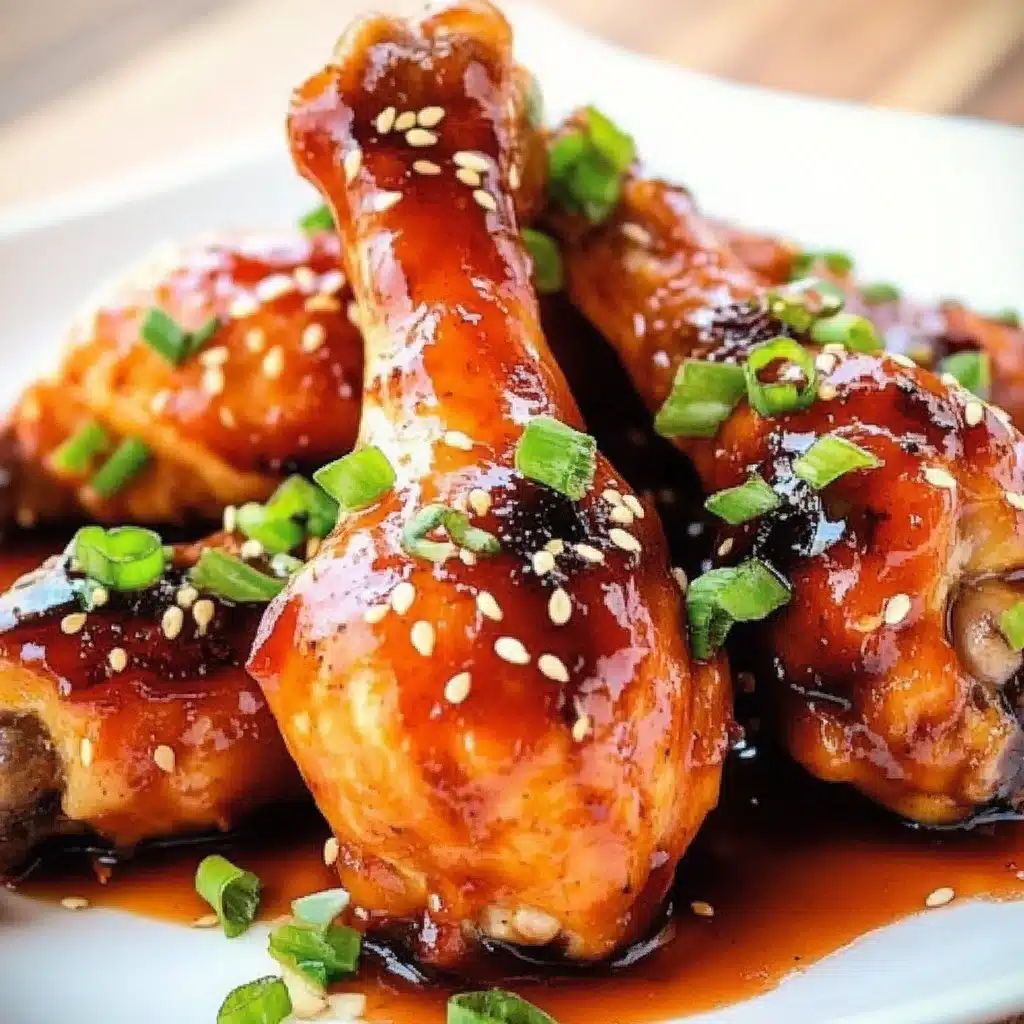
- Garnish and Serve: If desired, sprinkle the honey glazed chicken drumsticks with toasted sesame seeds and freshly chopped green onions or parsley just before serving. This adds a lovely freshness and visual appeal.
Nutrition Facts
- Servings: This recipe typically yields 4-5 servings (assuming 2 drumsticks per person).
- Calories per serving (approx. 2 drumsticks): Approximately 380-480 calories. (This is an estimate and can vary based on the size of the drumsticks and specific ingredient brands).
- Protein: Rich in protein, essential for muscle repair and growth. Each serving provides a significant portion of daily protein needs.
- Fat: Contains a moderate amount of fat, primarily from the chicken skin and olive oil. Skin-on drumsticks will have more fat than skinless.
- Carbohydrates: Primarily from the honey, contributing to the dish’s sweetness and calorie count.
Disclaimer: Nutritional information is an estimate and may vary depending on specific ingredients and portion sizes.
Preparation Time
- Active Preparation Time: Approximately 15-20 minutes (patting chicken dry, mincing garlic, grating ginger, whisking glaze).
- Marinating Time (Optional but Recommended): 30 minutes to 4 hours. Even a short marination period enhances flavor.
- Cooking Time: Approximately 40-50 minutes in the oven, plus an optional 2-3 minutes for broiling.
- Resting Time: 5-10 minutes.
- Total Time (excluding extended marination): Roughly 1 hour to 1 hour 20 minutes. If marinating for the full 4 hours, the total time from start to finish will be longer, but the active hands-on time remains low.
How to Serve
These Honey Glazed Chicken Drumsticks are wonderfully versatile and pair well with a variety of side dishes. Here are some serving suggestions:
- Classic Comfort Meal:
- Serve with a generous helping of fluffy steamed white rice or brown rice to soak up that delicious extra glaze.
- Add a side of steamed or roasted green vegetables like broccoli, green beans, or asparagus for a balanced meal.
- Potato Pairings:
- Creamy mashed potatoes are a fantastic accompaniment, offering a soft texture against the sticky chicken.
- Roasted potatoes or potato wedges, perhaps seasoned with herbs, provide a heartier option.
- A refreshing potato salad can be great for a more casual or outdoor meal.
- Lighter Options:
- Pair with a crisp garden salad dressed with a light vinaigrette to cut through the richness of the glaze.
- Quinoa salad or a couscous salad with fresh vegetables and herbs can make for a wholesome and flavorful meal.
- Coleslaw, either creamy or vinegar-based, adds a refreshing crunch.
- Asian-Inspired Spread:
- Serve alongside stir-fried noodles or vegetable stir-fry.
- A side of cucumber salad dressed with rice vinegar and sesame oil can be a cool contrast.
- For Parties and Gatherings:
- Arrange them on a platter as a fantastic appetizer or main dish for potlucks, game days, or family get-togethers.
- Provide extra napkins – they are delightfully sticky!
- Garnishes:
- Always finish with a sprinkle of toasted sesame seeds for nuttiness and crunch.
- Freshly chopped green onions (scallions) or cilantro/parsley add color and a burst of freshness.
Additional Tips
To ensure your Honey Glazed Chicken Drumsticks are perfect every time, consider these additional tips:
- Don’t Skip Drying the Chicken: Patting the chicken drumsticks thoroughly dry with paper towels before adding the glaze is essential. Excess moisture will steam the chicken and prevent the skin from getting that desirable crispiness.
- Control the Glaze Thickness: If your glaze seems too thin, you can simmer the reserved portion in a small saucepan over low heat for a few minutes until it thickens slightly. Be careful not to reduce it too much, as it will thicken further as it cools and bakes.
- Avoid Burning the Glaze: Honey can burn easily due to its sugar content. Keep an eye on the chicken, especially during the last few minutes of baking or if using the broiler. If the glaze starts to get too dark too quickly, you can loosely tent the chicken with aluminum foil.
- Use a Meat Thermometer: The safest and most accurate way to ensure your chicken is cooked through without drying out is to use a meat thermometer. Insert it into the thickest part of the drumstick, avoiding the bone. It should read 165-175°F (74-79°C). Dark meat like drumsticks is more forgiving and can even be more tender at the higher end of this range.
- Double the Batch for Meal Prep: This recipe is excellent for meal prepping. Cook a larger batch, allow it to cool completely, and then store in an airtight container in the refrigerator. It reheats well and can be enjoyed for lunches or quick dinners throughout the week.
- Experiment with Spices: Feel free to adjust the spices to your liking. Add a pinch of cayenne pepper for more heat, a teaspoon of onion powder for added savory notes, or even a dash of Chinese five-spice powder for an exotic twist.
- Line Your Baking Sheet Well: This glaze gets very sticky and can be a challenge to clean up. Using parchment paper or heavy-duty aluminum foil (lightly greased) on your baking sheet will save you a lot of scrubbing time.
- Don’t Overcrowd the Pan: Give your drumsticks some space on the baking sheet. If they’re too close together, they will steam instead of roast, resulting in softer skin and less caramelization. Use two baking sheets if necessary.
FAQ Section
Here are answers to some frequently asked questions about making Honey Glazed Chicken Drumsticks:
Q1: Can I use chicken thighs or wings instead of drumsticks?
A1: Absolutely! This glaze works wonderfully with other chicken parts. Chicken thighs (bone-in, skin-on) are a great choice as they remain juicy. Chicken wings will also be delicious but may require a slightly shorter cooking time. Adjust cooking time accordingly and always ensure the internal temperature reaches 165°F (74°C).
Q2: Can I make these honey glazed chicken drumsticks on the grill?
A2: Yes, you can! For grilling, preheat your grill to medium heat. Grill the chicken indirectly at first, then move to direct heat to get char marks and caramelize the glaze. Baste frequently, especially towards the end of cooking. Be mindful that the honey can cause flare-ups, so watch carefully.
Q3: How do I make this recipe gluten-free?
A3: To make this recipe gluten-free, simply substitute the regular soy sauce with a gluten-free soy sauce alternative, such as tamari or coconut aminos. Ensure all other ingredients, like smoked paprika, are also certified gluten-free if Celiac disease is a concern.
Q4: My honey glaze is burning before the chicken is cooked. What can I do?
A4: If the glaze starts to darken too quickly, reduce the oven temperature by 25°F (about 15°C) or loosely tent the chicken with aluminum foil for the remainder of the cooking time. Also, ensure your oven rack isn’t too close to the top heating element.
Q5: Can I prepare the chicken and glaze ahead of time?
A5: Yes! You can mix the glaze ingredients and store it in an airtight container in the refrigerator for up to 3 days. You can also marinate the chicken in the glaze (covered in the refrigerator) for up to 4 hours, or even overnight for maximum flavor. Then, just bake as directed when ready.
Q6: What if my glaze is too thick or too thin?
A6: If your glaze is too thick before coating the chicken, you can whisk in a teaspoon or two of warm water or a little more apple cider vinegar until it reaches the desired consistency. If the reserved glaze for basting is too thin, you can simmer it gently in a small saucepan for a few minutes to reduce and thicken it.
Q7: Can I use a different type of sweetener instead of honey?
A7: While honey provides the signature flavor and stickiness, you could experiment with maple syrup for a different flavor profile. Brown sugar could also be used, perhaps mixed with a little water to create a syrup, but the texture and taste will be different. The caramelization properties might also vary.
Q8: How do I store and reheat leftovers?
A8: Store leftover honey glazed chicken drumsticks in an airtight container in the refrigerator for up to 3-4 days. To reheat, you can place them on a baking sheet in an oven preheated to 350°F (175°C) for 10-15 minutes, or until warmed through. You can also microwave them, but the skin might not be as crispy. For crispier skin upon reheating, a few minutes in an air fryer also works wonders.

Honey Glazed Chicken Drumsticks
Ingredients
Here’s what you’ll need to create these mouth-watering Honey Glazed Chicken Drumsticks:
- 8–10 Chicken Drumsticks (about 2–2.5 lbs): The star of our show! Opt for skin-on drumsticks as the skin crisps up beautifully and helps keep the meat moist. Fresh, good-quality chicken will yield the best results.
- 1/2 cup Honey: This provides the signature sweetness and helps create that lovely sticky glaze. Raw, unfiltered honey can add a more complex flavor, but any good quality liquid honey will work.
- 1/4 cup Soy Sauce (low sodium recommended): Adds a deep, savory, umami flavor that perfectly complements the sweetness of the honey. Low sodium helps control the saltiness of the final dish.
- 2 tablespoons Apple Cider Vinegar: Introduces a crucial tangy element that balances the richness and sweetness. It also helps tenderize the chicken.
- 2 tablespoons Olive Oil (or vegetable oil): Aids in browning the chicken and adds a touch of richness to the glaze.
- 4 cloves Garlic (minced): Aromatic and flavorful, fresh garlic is a must for a robust taste. Mince it finely to distribute its flavor evenly.
- 1 tablespoon Ginger (freshly grated): Adds a warm, zesty kick that elevates the glaze. Fresh ginger is highly recommended over powdered for its vibrant flavor.
- 1 teaspoon Smoked Paprika: Imparts a subtle smoky depth and a beautiful reddish hue to the chicken.
- 1/2 teaspoon Black Pepper (freshly ground): For a touch of spice and to enhance the other flavors.
- Optional: 1/4 teaspoon Red Pepper Flakes: If you enjoy a little heat, a pinch of red pepper flakes will add a nice spicy counterpoint to the sweetness.
- Optional Garnish: Sesame Seeds and Chopped Green Onions/Parsley: For a lovely visual appeal and a fresh finishing touch.
Instructions
Follow these simple steps to create perfectly glazed, delicious chicken drumsticks:
- Preheat and Prepare: Preheat your oven to 400°F (200°C). Line a large baking sheet or roasting pan with parchment paper or aluminum foil for easier cleanup. If using foil, lightly grease it to prevent sticking.
- Prepare the Chicken: Pat the chicken drumsticks thoroughly dry with paper towels. This is a crucial step for achieving crispier skin. Place the drumsticks in a large bowl or a sturdy zip-top bag.
- Make the Glaze: In a medium-sized bowl, whisk together the honey, soy sauce, apple cider vinegar, olive oil, minced garlic, grated ginger, smoked paprika, and black pepper (and red pepper flakes, if using). Stir well until all the ingredients are thoroughly combined and the honey is fully dissolved.
- Marinate the Chicken (Quick Marination): Pour about two-thirds of the honey glaze mixture over the chicken drumsticks in the bowl or bag. Reserve the remaining one-third of the glaze in a separate small bowl for basting later. Toss or massage the chicken to ensure each drumstick is evenly coated with the glaze. If time permits, you can let the chicken marinate in the refrigerator for at least 30 minutes, or up to 4 hours, for deeper flavor. If you’re short on time, you can proceed directly to baking.
- Arrange for Baking: Arrange the glazed chicken drumsticks in a single layer on the prepared baking sheet, ensuring they are not overcrowded. Overcrowding will cause them to steam rather than roast, preventing that desirable crispy skin. Leave a little space between each drumstick.
- First Bake: Place the baking sheet in the preheated oven and bake for 20-25 minutes. The chicken will start to cook through, and the glaze will begin to set.
- Baste and Continue Baking: After the initial 20-25 minutes, remove the chicken from the oven. Using a pastry brush, generously baste the drumsticks with some of the reserved glaze. This layering of glaze is key to a deeply flavorful and sticky coating.
- Second Bake & Final Basting: Return the chicken to the oven and bake for another 15-20 minutes. Baste again with the remaining glaze during this final stage. Continue baking until the chicken is cooked through, the internal temperature reaches 165-175°F (74-79°C) when checked with a meat thermometer inserted into the thickest part of the drumstick (avoiding the bone), and the glaze is bubbly, caramelized, and sticky. The skin should be beautifully golden brown.
- Optional Broil for Extra Crispiness: If you desire even crispier skin and a deeper caramelization, you can switch the oven to the broil setting (high) for the last 2-3 minutes of cooking. Keep a very close eye on the chicken during this step, as the honey in the glaze can burn quickly under the broiler.
- Rest: Once cooked, remove the chicken from the oven and let it rest on the baking sheet for 5-10 minutes before serving. This allows the juices to redistribute, resulting in more tender and flavorful meat.
- Garnish and Serve: If desired, sprinkle the honey glazed chicken drumsticks with toasted sesame seeds and freshly chopped green onions or parsley just before serving. This adds a lovely freshness and visual appeal.
Nutrition
- Serving Size: one normal portion
- Calories: 480


