
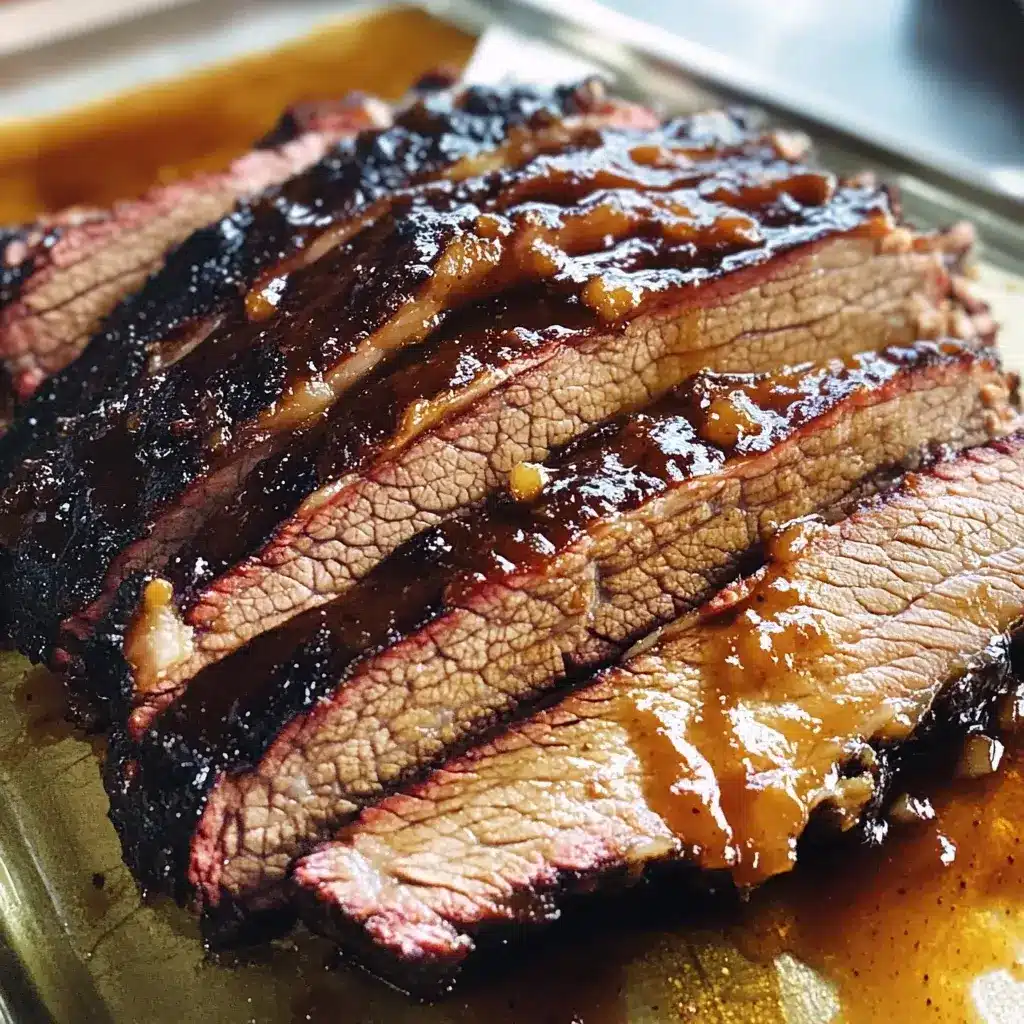

It was a Sunday afternoon, and the aroma wafting from my kitchen was simply divine. I had decided to try my hand at Honey Glazed Beef Brisket, a recipe that had been bookmarked for far too long. The anticipation was palpable, and as the brisket slowly braised in the oven, the house filled with the sweet and savory scent of caramelized honey and tender beef. When it was finally time to serve, the reaction was unanimous – pure delight. My family devoured every last slice, praising the melt-in-your-mouth texture and the perfect balance of sweet and smoky flavors. This Honey Glazed Beef Brisket has now become a family favorite, a guaranteed crowd-pleaser that’s surprisingly easy to make and utterly unforgettable. If you’re looking for a show-stopping centerpiece for your next gathering, or just a comforting, flavorful meal for a special Sunday dinner, look no further. This recipe is a winner.
Ingredients
- Beef Brisket (3-4 lbs): The star of the show! Choose a brisket with good marbling for maximum flavor and tenderness. Look for a packer brisket or a point cut for this recipe.
- Kosher Salt: Essential for seasoning the brisket and drawing out moisture for a better sear.
- Black Pepper: Freshly ground black pepper adds a robust, peppery note that complements the sweetness of the honey glaze.
- Olive Oil: Used for searing the brisket, providing a flavorful crust and preventing sticking.
- Yellow Onion: Adds a savory base to the braising liquid, contributing depth of flavor.
- Garlic Cloves: Aromatic garlic enhances the overall flavor profile, adding a pungent and savory element.
- Beef Broth: The braising liquid, providing moisture and richness to tenderize the brisket. Low sodium is recommended to control saltiness.
- Apple Cider Vinegar: Adds a touch of acidity to balance the sweetness of the honey and tenderize the meat.
- Honey: The key ingredient for the glaze! Choose a good quality honey for the best flavor.
- Soy Sauce: Adds umami and saltiness to the glaze, creating a complex and balanced flavor. Low sodium is preferred.
- Dijon Mustard: Adds a subtle tang and depth to the glaze, helping to emulsify and balance the sweetness.
- Smoked Paprika: Adds a smoky depth and vibrant color to both the brisket rub and the glaze, enhancing the overall flavor profile.
- Dried Thyme: An earthy herb that complements beef beautifully, adding a savory and aromatic note.
Instructions
This Honey Glazed Beef Brisket recipe is surprisingly straightforward, though it does require some time to allow the brisket to become wonderfully tender. Follow these step-by-step instructions to create a show-stopping dish that will impress your family and friends.
Step 1: Preparing the Brisket
- Trim Excess Fat (Optional but Recommended): While brisket needs fat for flavor and moisture, excessively thick fat caps can hinder the seasoning and glaze from penetrating the meat. Using a sharp knife, trim down the thickest parts of the fat cap to about ¼ inch thickness. Leave some fat for rendering and flavor.
- Season Generously: This is crucial for flavorful brisket. In a small bowl, combine the kosher salt, black pepper, and smoked paprika. Liberally season all sides of the brisket with this mixture. Don’t be shy with the seasoning; brisket is a large cut of meat and needs ample flavor. Pat the seasoning into the brisket to ensure it adheres well.
- Rest in the Refrigerator (Optional but Recommended for Deeper Flavor): For even better flavor penetration, wrap the seasoned brisket tightly in plastic wrap and refrigerate for at least 2 hours, or ideally overnight. This allows the salt to work its magic and tenderize the meat. If you are short on time, you can skip this step, but the flavor will be enhanced with resting.
Step 2: Searing the Brisket
- Preheat Oven and Prepare Searing Pan: Preheat your oven to 325°F (160°C). Choose a large, oven-safe Dutch oven or a heavy-bottomed roasting pan with a tight-fitting lid. If using a roasting pan without a lid, you will need heavy-duty aluminum foil to cover it tightly later.
- Heat Olive Oil: Place the Dutch oven or roasting pan over medium-high heat on the stovetop. Add the olive oil and let it heat until it shimmers and is just about to smoke. This indicates the oil is hot enough for searing.
- Sear the Brisket on All Sides: Carefully place the brisket in the hot pan. Sear it for about 3-4 minutes per side, until deeply browned and crusty. Use tongs to flip the brisket and sear all sides, including the edges if possible. Searing creates a Maillard reaction, which develops rich, complex flavors and adds texture to the brisket. Don’t overcrowd the pan; if your brisket is very large, you may need to sear it in batches. Remove the seared brisket from the pan and set aside.
Step 3: Building the Braising Base
- Sauté Aromatics: In the same pan (without cleaning it, to retain the flavorful browned bits from searing), add the chopped yellow onion. Sauté over medium heat for about 5-7 minutes, until softened and translucent. Scrape up any browned bits from the bottom of the pan while sautéing – these are called fond and are packed with flavor.
- Add Garlic and Thyme: Add the minced garlic and dried thyme to the pan with the onions. Sauté for another minute until fragrant, being careful not to burn the garlic.
Step 4: Braising the Brisket
- Deglaze the Pan: Pour in the beef broth and apple cider vinegar into the pan with the onions and garlic. Bring to a simmer, scraping up any remaining browned bits from the bottom of the pan with a wooden spoon. This process is called deglazing and adds even more depth of flavor to the braising liquid.
- Return Brisket to the Pan: Place the seared brisket back into the pan, fat-cap side up, nestled in the braising liquid. The liquid should come about halfway up the sides of the brisket. If needed, add a little more beef broth to reach this level.
- Cover and Braise: Cover the Dutch oven or roasting pan tightly with the lid or heavy-duty aluminum foil. Transfer to the preheated oven and braise for 3-4 hours, or until the brisket is fork-tender. The exact braising time will depend on the size and thickness of your brisket, as well as your oven. Check for tenderness after 3 hours by inserting a fork into the thickest part of the brisket. It should slide in easily with little resistance. If it’s still tough, continue braising and check again every 30 minutes.
Step 5: Making the Honey Glaze
- Prepare the Glaze Ingredients: While the brisket is braising, prepare the honey glaze. In a small bowl, whisk together the honey, soy sauce, Dijon mustard, and smoked paprika until well combined. Set aside.
Step 6: Glazing and Finishing the Brisket
- Remove Brisket from Oven and Increase Temperature: Once the brisket is fork-tender, carefully remove the Dutch oven or roasting pan from the oven. Increase the oven temperature to 375°F (190°C).
- Drain Braising Liquid (Optional but Recommended for a More Intense Glaze): For a richer glaze, you can optionally remove the brisket from the pan and set it aside on a cutting board. Pour the braising liquid into a separate container and skim off excess fat if desired. Return the brisket to the pan. (Alternatively, you can leave the brisket in the braising liquid and simply remove the lid).
- Apply Honey Glaze: Generously brush the honey glaze all over the top and sides of the brisket. Ensure the entire surface is coated with the glaze.
- Return to Oven for Glazing: Return the uncovered Dutch oven or roasting pan to the oven and bake for another 15-20 minutes, or until the glaze is caramelized and sticky, and the brisket is beautifully browned. Keep a close eye on it during this time to prevent the glaze from burning. If the glaze starts to darken too quickly, you can loosely tent the brisket with foil.
- Rest the Brisket: Once the glaze is caramelized, remove the brisket from the oven and let it rest for at least 20-30 minutes before slicing. Resting allows the juices to redistribute throughout the meat, resulting in a more tender and flavorful brisket. Tent it loosely with foil while resting to keep it warm.
Step 7: Slicing and Serving
- Slice Against the Grain: Identify the direction of the meat fibers (grain) in the brisket. Using a sharp carving knife, slice the brisket against the grain into ¼ to ½ inch thick slices. Slicing against the grain is crucial for tender brisket, as it shortens the muscle fibers, making it easier to chew.
- Serve and Enjoy! Arrange the sliced Honey Glazed Beef Brisket on a platter. You can spoon some of the reserved braising liquid (skimmed of excess fat) or any pan juices over the brisket for extra flavor and moisture. Garnish with fresh herbs like parsley or thyme, if desired. Serve hot and enjoy!
Nutrition Facts
(Per Serving, estimated, assuming 8 servings and using lean brisket. Nutritional values can vary based on specific ingredients and portion sizes)
- Servings: 8
- Calories per Serving: Approximately 450-550 kcal
- Protein: 40-50g
Please note: These are estimated values. For accurate nutritional information, use a nutrition calculator with the specific brands and quantities of ingredients you use.
Preparation Time
Prep Time: 30 minutes (including trimming, seasoning, and chopping vegetables)
Cook Time: 3.5 – 4.5 hours (including searing, braising, and glazing)
Resting Time: 30 minutes
Total Time: Approximately 4.5 – 5.5 hours
This Honey Glazed Beef Brisket requires a good amount of time due to the slow braising process, which is essential for achieving its signature tenderness. While mostly hands-off during braising, factor in the prep and resting times when planning your meal. The result is well worth the wait!
How to Serve Honey Glazed Beef Brisket
Honey Glazed Beef Brisket is incredibly versatile and pairs beautifully with a variety of side dishes. Here are some serving suggestions to create a complete and satisfying meal:
- Classic Comfort Sides:
- Creamy Mashed Potatoes: A timeless pairing that soaks up the delicious brisket juices and glaze.
- Roasted Root Vegetables: Carrots, parsnips, and potatoes roasted until caramelized offer a sweet and earthy complement.
- Mac and Cheese: For an extra indulgent meal, creamy mac and cheese is always a crowd-pleaser.
- Coleslaw: A refreshing and tangy coleslaw cuts through the richness of the brisket.
- Fresh and Bright Sides:
- Green Salad with Vinaigrette: A simple green salad provides a light and refreshing contrast.
- Roasted Asparagus or Green Beans: These green vegetables offer a healthy and vibrant side.
- Corn on the Cob: Grilled or boiled corn on the cob is a perfect summer side dish.
- Cucumber and Tomato Salad: A light and refreshing salad with a vinegar-based dressing.
- Bread and Grains:
- Crusty Bread: Perfect for soaking up the delicious braising liquid and glaze.
- Dinner Rolls: Soft and fluffy dinner rolls are always a welcome addition.
- Quinoa or Rice Pilaf: For a slightly lighter option, serve with a fluffy quinoa or rice pilaf.
- Serving Occasions:
- Sunday Dinner: Honey Glazed Beef Brisket is the perfect centerpiece for a special Sunday family meal.
- Holiday Gatherings: Impress your guests at Thanksgiving, Christmas, or Easter with this show-stopping dish.
- BBQs and Cookouts: While braised, brisket can be finished on the grill for a smoky BBQ flavor.
- Potlucks and Parties: Brisket travels well and is always a hit at potlucks and parties.
Additional Tips for Perfect Honey Glazed Beef Brisket
To ensure your Honey Glazed Beef Brisket turns out perfectly every time, here are some helpful tips and tricks:
- Choose the Right Brisket Cut: Opt for a packer brisket (whole brisket) or a brisket point cut. These cuts have good marbling and fat content, which are essential for flavor and tenderness during slow cooking. Avoid brisket flat cut on its own, as it can be drier.
- Don’t Skimp on Seasoning: Brisket is a large, dense cut of meat and needs generous seasoning. Salt is especially important for drawing out moisture and enhancing flavor. Season liberally with kosher salt, pepper, and smoked paprika, and don’t be afraid to rub it in well.
- Sear for Flavor and Texture: Searing the brisket before braising is a crucial step. It creates a flavorful crust and adds depth of flavor that you can’t get from braising alone. Ensure your pan is hot and sear the brisket on all sides until deeply browned.
- Braise Low and Slow: Low and slow braising is the key to tender brisket. Braising at a low temperature (325°F/160°C) for a long time (3-4 hours or more) allows the collagen in the brisket to break down, resulting in incredibly tender and melt-in-your-mouth meat.
- Check for Tenderness, Not Just Time: Brisket cooking times can vary depending on the size and thickness of the cut, as well as your oven. Instead of relying solely on time, check for tenderness using a fork. It should slide easily into the thickest part of the brisket with minimal resistance when it’s ready.
- Rest is Essential: Resting the brisket after cooking is just as important as the cooking itself. Allow the brisket to rest for at least 20-30 minutes before slicing. This allows the juices to redistribute throughout the meat, resulting in a more tender and flavorful brisket.
- Slice Against the Grain: Always slice brisket against the grain for maximum tenderness. Identify the direction of the muscle fibers and slice perpendicular to them. This shortens the fibers and makes the brisket much easier to chew.
- Customize Your Glaze: Feel free to adjust the honey glaze to your liking. Add a pinch of red pepper flakes for a touch of heat, a splash of bourbon or whiskey for extra depth, or a squeeze of lemon or orange juice for added brightness. Experiment to find your perfect flavor combination!
Frequently Asked Questions (FAQ) about Honey Glazed Beef Brisket
Here are some frequently asked questions to help you master this delicious Honey Glazed Beef Brisket recipe:
Q1: Can I make Honey Glazed Beef Brisket in a slow cooker?
A: Yes, you can adapt this recipe for a slow cooker. Sear the brisket as instructed, then place it in the slow cooker with the onions, garlic, thyme, beef broth, and apple cider vinegar. Cook on low for 8-10 hours or on high for 4-5 hours, or until fork-tender. Remove the brisket, make the honey glaze, and brush it over the brisket. You can broil it briefly in the oven for a caramelized glaze, or simply serve it glazed from the slow cooker.
Q2: What if I don’t have a Dutch oven? Can I use a regular roasting pan?
A: Yes, a regular roasting pan will work. Just make sure it’s heavy-bottomed and large enough to hold the brisket. You’ll need to cover the roasting pan tightly with heavy-duty aluminum foil to create a sealed environment for braising, similar to a Dutch oven.
Q3: Can I make this recipe ahead of time?
A: Absolutely! Honey Glazed Beef Brisket is a great make-ahead dish. You can braise the brisket a day or two in advance. Let it cool completely, then store it in the braising liquid in the refrigerator. When ready to serve, remove the brisket, slice it, and reheat it gently in the oven with some of the braising liquid. Glaze it just before serving for the best results.
Q4: Can I freeze leftover Honey Glazed Beef Brisket?
A: Yes, leftover brisket freezes well. Let the brisket cool completely, then slice it. Store the sliced brisket in freezer-safe containers or bags, along with some of the braising liquid to keep it moist. Freeze for up to 2-3 months. Thaw overnight in the refrigerator before reheating.
Q5: What should I do if my brisket is tough after braising?
A: If your brisket is still tough after the initial braising time, it simply needs to cook longer. Brisket needs time for the collagen to break down. Return it to the oven, covered, and continue braising for another 30-60 minutes, checking for tenderness every 30 minutes.
Q6: Can I use a different type of honey for the glaze?
A: Yes, you can experiment with different types of honey. Each type will impart a slightly different flavor profile. Wildflower honey, clover honey, or even buckwheat honey will all work well. Darker honeys like buckwheat will have a more robust flavor.
Q7: Can I add vegetables to the braising liquid?
A: Yes, you can add root vegetables like carrots, potatoes, and parsnips to the braising liquid. Add them in large chunks about halfway through the braising time so they don’t become too mushy. They will absorb the flavorful braising liquid and make a delicious side dish.
Q8: My honey glaze burned while glazing. What did I do wrong?
A: Honey glaze can burn easily because of the high sugar content. Several factors could contribute to burning: oven temperature too high, glazing for too long, or the glaze being applied too thickly. Ensure your oven temperature is accurate (375°F/190°C), glaze for only 15-20 minutes, and apply a moderate layer of glaze. If you notice the glaze darkening too quickly, tent the brisket loosely with foil to protect it from direct heat. Keep a close eye on it during the glazing process.
Print
Honey Glazed Beef Brisket
Ingredients
- Beef Brisket (3-4 lbs): The star of the show! Choose a brisket with good marbling for maximum flavor and tenderness. Look for a packer brisket or a point cut for this recipe.
- Kosher Salt: Essential for seasoning the brisket and drawing out moisture for a better sear.
- Black Pepper: Freshly ground black pepper adds a robust, peppery note that complements the sweetness of the honey glaze.
- Olive Oil: Used for searing the brisket, providing a flavorful crust and preventing sticking.
- Yellow Onion: Adds a savory base to the braising liquid, contributing depth of flavor.
- Garlic Cloves: Aromatic garlic enhances the overall flavor profile, adding a pungent and savory element.
- Beef Broth: The braising liquid, providing moisture and richness to tenderize the brisket. Low sodium is recommended to control saltiness.
- Apple Cider Vinegar: Adds a touch of acidity to balance the sweetness of the honey and tenderize the meat.
- Honey: The key ingredient for the glaze! Choose a good quality honey for the best flavor.
- Soy Sauce: Adds umami and saltiness to the glaze, creating a complex and balanced flavor. Low sodium is preferred.
- Dijon Mustard: Adds a subtle tang and depth to the glaze, helping to emulsify and balance the sweetness.
- Smoked Paprika: Adds a smoky depth and vibrant color to both the brisket rub and the glaze, enhancing the overall flavor profile.
- Dried Thyme: An earthy herb that complements beef beautifully, adding a savory and aromatic note.
Instructions
This Honey Glazed Beef Brisket recipe is surprisingly straightforward, though it does require some time to allow the brisket to become wonderfully tender. Follow these step-by-step instructions to create a show-stopping dish that will impress your family and friends.
Step 1: Preparing the Brisket
- Trim Excess Fat (Optional but Recommended): While brisket needs fat for flavor and moisture, excessively thick fat caps can hinder the seasoning and glaze from penetrating the meat. Using a sharp knife, trim down the thickest parts of the fat cap to about ¼ inch thickness. Leave some fat for rendering and flavor.
- Season Generously: This is crucial for flavorful brisket. In a small bowl, combine the kosher salt, black pepper, and smoked paprika. Liberally season all sides of the brisket with this mixture. Don’t be shy with the seasoning; brisket is a large cut of meat and needs ample flavor. Pat the seasoning into the brisket to ensure it adheres well.
- Rest in the Refrigerator (Optional but Recommended for Deeper Flavor): For even better flavor penetration, wrap the seasoned brisket tightly in plastic wrap and refrigerate for at least 2 hours, or ideally overnight. This allows the salt to work its magic and tenderize the meat. If you are short on time, you can skip this step, but the flavor will be enhanced with resting.
Step 2: Searing the Brisket
- Preheat Oven and Prepare Searing Pan: Preheat your oven to 325°F (160°C). Choose a large, oven-safe Dutch oven or a heavy-bottomed roasting pan with a tight-fitting lid. If using a roasting pan without a lid, you will need heavy-duty aluminum foil to cover it tightly later.
- Heat Olive Oil: Place the Dutch oven or roasting pan over medium-high heat on the stovetop. Add the olive oil and let it heat until it shimmers and is just about to smoke. This indicates the oil is hot enough for searing.
- Sear the Brisket on All Sides: Carefully place the brisket in the hot pan. Sear it for about 3-4 minutes per side, until deeply browned and crusty. Use tongs to flip the brisket and sear all sides, including the edges if possible. Searing creates a Maillard reaction, which develops rich, complex flavors and adds texture to the brisket. Don’t overcrowd the pan; if your brisket is very large, you may need to sear it in batches. Remove the seared brisket from the pan and set aside.
Step 3: Building the Braising Base
- Sauté Aromatics: In the same pan (without cleaning it, to retain the flavorful browned bits from searing), add the chopped yellow onion. Sauté over medium heat for about 5-7 minutes, until softened and translucent. Scrape up any browned bits from the bottom of the pan while sautéing – these are called fond and are packed with flavor.
- Add Garlic and Thyme: Add the minced garlic and dried thyme to the pan with the onions. Sauté for another minute until fragrant, being careful not to burn the garlic.
Step 4: Braising the Brisket
- Deglaze the Pan: Pour in the beef broth and apple cider vinegar into the pan with the onions and garlic. Bring to a simmer, scraping up any remaining browned bits from the bottom of the pan with a wooden spoon. This process is called deglazing and adds even more depth of flavor to the braising liquid.
- Return Brisket to the Pan: Place the seared brisket back into the pan, fat-cap side up, nestled in the braising liquid. The liquid should come about halfway up the sides of the brisket. If needed, add a little more beef broth to reach this level.
- Cover and Braise: Cover the Dutch oven or roasting pan tightly with the lid or heavy-duty aluminum foil. Transfer to the preheated oven and braise for 3-4 hours, or until the brisket is fork-tender. The exact braising time will depend on the size and thickness of your brisket, as well as your oven. Check for tenderness after 3 hours by inserting a fork into the thickest part of the brisket. It should slide in easily with little resistance. If it’s still tough, continue braising and check again every 30 minutes.
Step 5: Making the Honey Glaze
- Prepare the Glaze Ingredients: While the brisket is braising, prepare the honey glaze. In a small bowl, whisk together the honey, soy sauce, Dijon mustard, and smoked paprika until well combined. Set aside.
Step 6: Glazing and Finishing the Brisket
- Remove Brisket from Oven and Increase Temperature: Once the brisket is fork-tender, carefully remove the Dutch oven or roasting pan from the oven. Increase the oven temperature to 375°F (190°C).
- Drain Braising Liquid (Optional but Recommended for a More Intense Glaze): For a richer glaze, you can optionally remove the brisket from the pan and set it aside on a cutting board. Pour the braising liquid into a separate container and skim off excess fat if desired. Return the brisket to the pan. (Alternatively, you can leave the brisket in the braising liquid and simply remove the lid).
- Apply Honey Glaze: Generously brush the honey glaze all over the top and sides of the brisket. Ensure the entire surface is coated with the glaze.
- Return to Oven for Glazing: Return the uncovered Dutch oven or roasting pan to the oven and bake for another 15-20 minutes, or until the glaze is caramelized and sticky, and the brisket is beautifully browned. Keep a close eye on it during this time to prevent the glaze from burning. If the glaze starts to darken too quickly, you can loosely tent the brisket with foil.
- Rest the Brisket: Once the glaze is caramelized, remove the brisket from the oven and let it rest for at least 20-30 minutes before slicing. Resting allows the juices to redistribute throughout the meat, resulting in a more tender and flavorful brisket. Tent it loosely with foil while resting to keep it warm.
Step 7: Slicing and Serving
- Slice Against the Grain: Identify the direction of the meat fibers (grain) in the brisket. Using a sharp carving knife, slice the brisket against the grain into ¼ to ½ inch thick slices. Slicing against the grain is crucial for tender brisket, as it shortens the muscle fibers, making it easier to chew.
- Serve and Enjoy! Arrange the sliced Honey Glazed Beef Brisket on a platter. You can spoon some of the reserved braising liquid (skimmed of excess fat) or any pan juices over the brisket for extra flavor and moisture. Garnish with fresh herbs like parsley or thyme, if desired. Serve hot and enjoy!
Nutrition
- Serving Size: one normal portion
- Calories: 550
- Protein: 50g


