


I still remember the first time I decided to ditch the jar and make marshmallow fluff from scratch. Honestly, I was a bit intimidated. Candy thermometers? Cooked sugar syrup? It sounded like something best left to professional bakers. But the lure of truly homemade, ethereal, cloud-like fluff for our weekend s’mores dip and hot chocolate extravaganza was too strong to resist. My kids, notorious marshmallow fiends, were skeptical. “Why mess with perfection?” my eldest asked, clutching a familiar plastic tub. But the moment that stand mixer whirred to life, transforming simple ingredients into a snowy, glossy mountain of pure sweetness, fascination took over. The final verdict? Utter triumph. It was lighter, less cloyingly sweet, and had a delicate vanilla flavour that the store-bought stuff just couldn’t match. It spread like a dream, toasted beautifully under the broiler, and vanished from the bowl at record speed. Seeing my family’s eyes light up, spoons dipping back for “just one more taste,” confirmed it: homemade marshmallow fluff wasn’t just worth the effort; it was a game-changer, elevating everything it touched from mundane to magical. This recipe has since become a staple, a simple joy we whip up for special occasions, lazy Sundays, or whenever a craving for pure, unadulterated sweet comfort strikes.
Ingredients
- Large Egg Whites (3): The foundation of the fluff, providing structure and volume when whipped. Ensure they are at room temperature and completely free of any yolk.
- Granulated Sugar (1 ½ cups / 300g): Provides sweetness and, when cooked into a syrup, the structure and stability for the fluff. Standard white granulated sugar works best.
- Water (½ cup / 120ml): Used to dissolve the sugar and create the hot sugar syrup.
- Light Corn Syrup (¼ cup / 60ml): Helps prevent the sugar syrup from crystallizing, ensuring a smooth final texture.
- Cream of Tartar (½ teaspoon): An acid that helps stabilize the egg whites, allowing them to whip up higher and hold their shape better.
- Salt (¼ teaspoon): Enhances the overall flavor and balances the sweetness.
- Pure Vanilla Extract (1 ½ teaspoons): Adds the classic, warm marshmallow flavour. Add this after the hot syrup is incorporated to prevent the flavour from cooking off.
Instructions
Making homemade marshmallow fluff is a fascinating process that involves creating a stable meringue by cooking sugar syrup to a specific temperature and slowly incorporating it into whipped egg whites. Follow these steps carefully for perfect results:
- Prepare Your Equipment: Attach the whisk attachment to your stand mixer. Ensure the bowl and whisk are impeccably clean and completely dry. Even a tiny speck of grease or fat can prevent the egg whites from whipping up properly. Have a candy thermometer ready. Prepare a small bowl of water and a pastry brush.
- Combine Sugar Syrup Ingredients: In a medium-sized, heavy-bottomed saucepan, combine the granulated sugar, water, light corn syrup, and salt. Stir gently only until the sugar is moistened. Avoid splashing sugar crystals onto the sides of the pan.
- Cook the Sugar Syrup: Place the saucepan over medium-high heat. Attach the candy thermometer to the side of the pan, ensuring the tip is submerged in the syrup but not touching the bottom of the pan. Bring the mixture to a boil without stirring. Stirring at this stage can encourage crystallization.
- Wash Down the Sides: As the syrup heats up, sugar crystals might form on the sides of the saucepan. Dip the pastry brush in water and carefully brush down the inside walls of the pan, just above the syrup line, to dissolve any stray crystals. This is crucial for preventing a grainy texture later.
- Monitor the Temperature: Continue boiling the syrup, without stirring, until it reaches the “soft-ball stage,” which is precisely 240°F (115°C) on the candy thermometer. This temperature is critical; undercooking will result in a runny fluff, while overcooking can make it too firm or even candy-like. This process usually takes about 8-12 minutes, but rely on the thermometer, not the timer.
- Whip the Egg Whites: While the sugar syrup is approaching its target temperature (around 230°F or 110°C is a good time to start), place the room temperature egg whites and cream of tartar into the clean bowl of your stand mixer. Beat on medium-high speed until soft peaks form. Soft peaks mean that when you lift the whisk, a peak forms, but the tip gently curls over. Don’t overwhip them to stiff peaks at this stage.
- Combine Syrup and Egg Whites: Once the sugar syrup reaches exactly 240°F (115°C), immediately remove the saucepan from the heat. Turn the stand mixer down to low speed. Very carefully and slowly, pour the hot syrup in a thin, steady stream down the side of the mixer bowl into the whipping egg whites. Avoid pouring the syrup directly onto the moving whisk, as this can cause hot syrup to splash or create hard candy threads. Be extremely cautious as the syrup is incredibly hot.
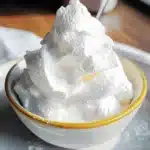
- Whip to Glossy Perfection: After all the syrup has been added, increase the mixer speed to high. Continue whipping the mixture for another 7-10 minutes. During this time, the fluff will increase significantly in volume, become incredibly glossy, thick, and cool down. It’s ready when the outside of the mixer bowl feels barely warm to the touch, and the fluff forms stiff, glossy peaks when the whisk is lifted.
- Add Flavour: Add the pure vanilla extract during the last minute of whipping. Mix just until combined. Over-mixing after adding vanilla isn’t necessary.
- Use or Store: Your homemade marshmallow fluff is now ready! Use it immediately for the best texture, or transfer it to an airtight container for storage.
Nutrition Facts
- Servings: This recipe yields approximately 4-5 cups of marshmallow fluff. A typical serving size might be considered 2 tablespoons.
- Calories per Serving (approx. 2 tbsp): Around 60-80 calories.
- Sugar: The primary component. Each serving contains a significant amount of sugar, providing quick energy but should be consumed in moderation.
- Protein: Contains a small amount of protein derived from the egg whites.
- Fat: Virtually fat-free, as the main ingredients (sugar, egg whites, water) contain no fat. Ensure equipment is grease-free during preparation.
- Sodium: Contains a minimal amount of sodium from the added salt, which primarily functions as a flavour enhancer.
(Note: These are estimates. Actual nutritional values can vary based on specific ingredient brands and exact serving sizes.)
Preparation Time
- Active Time: Approximately 20-25 minutes (includes measuring ingredients, cooking the syrup, and whipping the fluff).
- Inactive Time: Minimal, aside from allowing egg whites to come to room temperature (approx. 30 minutes if starting with cold eggs). The fluff is ready to use almost immediately after whipping.
- Total Time: Roughly 25-30 minutes from start to finish (excluding egg tempering time).
How to Serve Marshmallow Fluff
Homemade Marshmallow Fluff is incredibly versatile! Its sweet, airy texture lends itself beautifully to a wide range of culinary applications. Here are some delightful ways to enjoy your creation:
- Classic Spreads & Sandwiches:
- Fluffernutter: The iconic sandwich! Spread peanut butter on one slice of bread and a generous layer of marshmallow fluff on another. Combine for a sweet and salty treat. Use white, wheat, or even brioche bread.
- Fruit & Fluff: Spread on toast or crackers and top with fresh berries or sliced bananas.
- Dessert Toppings & Fillings:
- Cupcake Frosting/Filling: Pipe or spread onto cooled cupcakes for a light, marshmallowy topping. It can also be used as a surprise filling inside cupcakes. Toasting it lightly with a kitchen torch adds a beautiful s’mores effect.
- Cake Filling: Use as a luscious filling between cake layers, especially chocolate or red velvet cake.
- Brownie & Bar Topping: Spread over slightly cooled brownies or blondies. You can even swirl it in before baking or torch it lightly after spreading.
- Pie Topping: A fantastic alternative to whipped cream on pumpkin pie, sweet potato pie, or chocolate pudding pie. Dollop generously and toast lightly if desired.
- Fruit Dip: Serve alongside a platter of fresh fruit (strawberries, apple slices, pineapple chunks) for a simple, crowd-pleasing dessert dip.
- Ice Cream Sundae Topping: Drizzle (or dollop!) over scoops of your favourite ice cream. It pairs wonderfully with chocolate sauce, sprinkles, and a cherry on top.
- Hot & Cold Beverages:
- Hot Chocolate Topper: Float a generous spoonful on top of rich hot chocolate instead of standard marshmallows. It melts slightly into a creamy layer.
- Coffee Enhancer: Add a small dollop to your coffee for a sweet, creamy twist, similar to a marshmallow latte.
- Milkshake Ingredient: Blend into milkshakes (especially chocolate or strawberry) for extra sweetness and a lighter texture.
- S’mores Variations:
- S’mores Dip: Spread fluff in an oven-safe dish, top with chocolate chips, and bake until bubbly and golden. Serve with graham crackers for dipping.
- Indoor S’mores: Spread fluff on a graham cracker, top with a piece of chocolate, and briefly toast under the broiler or with a kitchen torch.
- Other Creative Uses:
- Sweet Potato Casserole Topping: Use instead of mini marshmallows for a smoother, more elegant topping.
- Whoopie Pie Filling: The perfect classic filling for chocolate whoopie pies.
- Ingredient in Fudge: Incorporate into certain fudge recipes for a creamy, light texture.
Additional Tips for Perfect Homemade Marshmallow Fluff
Achieving that perfect, billowy texture requires attention to detail. Here are 8 tips to ensure your homemade marshmallow fluff turns out flawlessly every time:
- Candy Thermometer Accuracy is Key: Don’t guess the syrup temperature! A reliable candy thermometer is non-negotiable. Ensure it’s calibrated correctly (check its reading in boiling water; it should read 212°F or 100°C at sea level, adjusting for altitude). Reaching exactly 240°F (115°C) creates the stable structure needed. Even a few degrees off can impact the final consistency.
- Immaculate Equipment: Fat is the enemy of whipped egg whites. Ensure your mixer bowl, whisk attachment, saucepan, and any spatulas are completely free of grease or residual fat. Wash them thoroughly with hot, soapy water and dry them completely before starting. Wiping the bowl and whisk with a little white vinegar and then rinsing and drying can provide extra insurance.
- Room Temperature Egg Whites: While cold eggs separate more easily, room temperature egg whites whip up faster and achieve greater volume. Let your eggs sit out on the counter for about 30 minutes before you start, or place whole eggs in a bowl of warm (not hot) water for 5-10 minutes.
- Mind the Humidity: Meringue-based recipes like marshmallow fluff can be sensitive to humidity. On very humid days, the sugar can absorb extra moisture from the air, potentially making the fluff slightly stickier or taking longer to reach the desired consistency. While usually manageable, aim to make it on a drier day if possible, or be prepared to whip it a little longer.
- Flavor Variations – Timing Matters: While vanilla is classic, feel free to experiment! Add peppermint extract for a minty version, citrus zest (lemon or orange) for brightness, or even a tablespoon or two of unsweetened cocoa powder (sifted) for a chocolatey twist. Crucially, add these flavourings during the last minute of whipping. Adding them earlier, especially extracts with alcohol or oil, can potentially deflate the fluff slightly. Add zest or cocoa powder gently at the very end.
- Proper Storage Technique: Store leftover marshmallow fluff in a truly airtight container at room temperature for up to two weeks. Refrigeration can make it denser and stickier, altering the lovely texture. Ensure the container lid seals tightly to prevent it from drying out or absorbing ambient odours.
- Troubleshooting: Grainy Fluff? If your fluff feels gritty or grainy, it’s likely due to undissolved sugar crystals. This usually happens if sugar crystals weren’t properly washed down from the sides of the pan during cooking or if the syrup was stirred after it started boiling. Prevention (washing down sides, no stirring) is the best cure. Unfortunately, it’s very difficult to fix once it’s grainy.
- Troubleshooting: Fluff Won’t Whip Up? If your mixture isn’t becoming thick and glossy, common culprits include:
- Fat Contamination: Even a trace of yolk or grease on the equipment.
- Undercooked Syrup: Didn’t reach 240°F (115°C).
- Over-whipped Egg Whites: If egg whites were whipped to stiff, dry peaks before adding the syrup, they might not incorporate the syrup properly. Aim for soft peaks initially.
- Syrup Added Too Quickly: Pouring the syrup too fast can ‘cook’ the egg whites unevenly or prevent proper incorporation. A slow, steady stream is essential. Sometimes, continued whipping can help, but major issues are hard to reverse.
Frequently Asked Questions (FAQ) about Homemade Marshmallow Fluff
Here are answers to some common questions about making and using homemade marshmallow fluff:
- Q: How long does homemade marshmallow fluff last?
- A: When stored properly in a truly airtight container at room temperature, homemade marshmallow fluff will typically last for up to two weeks. Avoid refrigeration, as it can negatively affect the texture, making it denser and stickier. Ensure the container is sealed tightly to prevent drying out.
- Q: Can I make this recipe vegan?
- A: Traditional marshmallow fluff relies heavily on egg whites for its structure and volume. While you can experiment with aquafaba (the liquid from canned chickpeas) as an egg white substitute, the results may vary. Aquafaba can be whipped into a meringue, but it might not be as stable or have the exact same light, airy texture as egg white-based fluff. You’ll need about 3 tablespoons of aquafaba per egg white and follow the same process. Be prepared for potential differences in texture and stability.
- Q: Can I freeze homemade marshmallow fluff?
- A: Freezing is generally not recommended. While it might seem like a good way to preserve it longer, freezing and thawing can significantly alter the delicate texture of the fluff. It can become watery, separate, or lose its characteristic airy quality upon defrosting. It’s best enjoyed fresh or within its two-week room temperature shelf life.
- Q: What’s the difference between marshmallow fluff and meringue?
- A: While both involve whipped egg whites and sugar, the key difference lies in the sugar preparation. Basic meringue (like for meringue cookies) often uses uncooked granulated sugar beaten directly into egg whites, or sometimes a Swiss or Italian meringue method where sugar is heated but not necessarily to the soft-ball stage required for fluff. Marshmallow fluff specifically uses a sugar syrup cooked to 240°F (115°C), which gives it a much more stable, dense, sticky, and marshmallow-like texture compared to lighter, crispier baked meringues or softer meringue toppings.
- Q: Why is my homemade marshmallow fluff so sticky?
- A: Stickiness is inherent to marshmallow fluff! It’s primarily made of sugar syrup and whipped egg whites. The high concentration of sugar makes it naturally sticky. This is normal and part of what makes it adhere well to breads, cakes, and cookies. Using corn syrup helps manage the texture, but stickiness is part of its charm (and function).
- Q: Can I use a different type of sugar, like brown sugar or powdered sugar?
- A: It’s best to stick with granulated sugar for this recipe. Powdered sugar contains cornstarch, which would alter the texture and isn’t suitable for making the cooked syrup. Brown sugar contains molasses, which adds moisture and flavour but can interfere with achieving the correct syrup consistency and might make the fluff less stable or overly soft. For predictable, reliable results, white granulated sugar is the standard.
- Q: Can I toast homemade marshmallow fluff with a kitchen torch?
- A: Absolutely! Homemade marshmallow fluff toasts beautifully. Spread it on your dessert (cupcakes, pies, s’mores dip) and use a kitchen torch, holding it a few inches away and moving it continuously, until the surface is golden brown and caramelized to your liking. Keep a close eye on it, as the high sugar content means it can burn quickly.
- Q: My marshmallow fluff turned out runny. Can I fix it?
- A: Runny marshmallow fluff is usually caused by undercooking the sugar syrup (not reaching 240°F/115°C) or adding the syrup too quickly. Unfortunately, it’s very difficult to fix once it’s fully combined and whipped. Re-whipping usually doesn’t help thicken it significantly if the sugar structure wasn’t properly formed. Your best bet is prevention: use a reliable thermometer, ensure it reaches the target temperature, and add the syrup slowly. If it’s only slightly loose, sometimes extended whipping (an extra few minutes) might help, but don’t count on it rescuing seriously undercooked syrup. You could potentially try using the runnier version as a glaze or sauce where thickness isn’t paramount.
Homemade Marshmallow Fluff
Ingredients
- Large Egg Whites (3): The foundation of the fluff, providing structure and volume when whipped. Ensure they are at room temperature and completely free of any yolk.
- Granulated Sugar (1 ½ cups / 300g): Provides sweetness and, when cooked into a syrup, the structure and stability for the fluff. Standard white granulated sugar works best.
- Water (½ cup / 120ml): Used to dissolve the sugar and create the hot sugar syrup.
- Light Corn Syrup (¼ cup / 60ml): Helps prevent the sugar syrup from crystallizing, ensuring a smooth final texture.
- Cream of Tartar (½ teaspoon): An acid that helps stabilize the egg whites, allowing them to whip up higher and hold their shape better.
- Salt (¼ teaspoon): Enhances the overall flavor and balances the sweetness.
- Pure Vanilla Extract (1 ½ teaspoons): Adds the classic, warm marshmallow flavour. Add this after the hot syrup is incorporated to prevent the flavour from cooking off.
Instructions
Making homemade marshmallow fluff is a fascinating process that involves creating a stable meringue by cooking sugar syrup to a specific temperature and slowly incorporating it into whipped egg whites. Follow these steps carefully for perfect results:
- Prepare Your Equipment: Attach the whisk attachment to your stand mixer. Ensure the bowl and whisk are impeccably clean and completely dry. Even a tiny speck of grease or fat can prevent the egg whites from whipping up properly. Have a candy thermometer ready. Prepare a small bowl of water and a pastry brush.
- Combine Sugar Syrup Ingredients: In a medium-sized, heavy-bottomed saucepan, combine the granulated sugar, water, light corn syrup, and salt. Stir gently only until the sugar is moistened. Avoid splashing sugar crystals onto the sides of the pan.
- Cook the Sugar Syrup: Place the saucepan over medium-high heat. Attach the candy thermometer to the side of the pan, ensuring the tip is submerged in the syrup but not touching the bottom of the pan. Bring the mixture to a boil without stirring. Stirring at this stage can encourage crystallization.
- Wash Down the Sides: As the syrup heats up, sugar crystals might form on the sides of the saucepan. Dip the pastry brush in water and carefully brush down the inside walls of the pan, just above the syrup line, to dissolve any stray crystals. This is crucial for preventing a grainy texture later.
- Monitor the Temperature: Continue boiling the syrup, without stirring, until it reaches the “soft-ball stage,” which is precisely 240°F (115°C) on the candy thermometer. This temperature is critical; undercooking will result in a runny fluff, while overcooking can make it too firm or even candy-like. This process usually takes about 8-12 minutes, but rely on the thermometer, not the timer.
- Whip the Egg Whites: While the sugar syrup is approaching its target temperature (around 230°F or 110°C is a good time to start), place the room temperature egg whites and cream of tartar into the clean bowl of your stand mixer. Beat on medium-high speed until soft peaks form. Soft peaks mean that when you lift the whisk, a peak forms, but the tip gently curls over. Don’t overwhip them to stiff peaks at this stage.
- Combine Syrup and Egg Whites: Once the sugar syrup reaches exactly 240°F (115°C), immediately remove the saucepan from the heat. Turn the stand mixer down to low speed. Very carefully and slowly, pour the hot syrup in a thin, steady stream down the side of the mixer bowl into the whipping egg whites. Avoid pouring the syrup directly onto the moving whisk, as this can cause hot syrup to splash or create hard candy threads. Be extremely cautious as the syrup is incredibly hot.
- Whip to Glossy Perfection: After all the syrup has been added, increase the mixer speed to high. Continue whipping the mixture for another 7-10 minutes. During this time, the fluff will increase significantly in volume, become incredibly glossy, thick, and cool down. It’s ready when the outside of the mixer bowl feels barely warm to the touch, and the fluff forms stiff, glossy peaks when the whisk is lifted.
- Add Flavour: Add the pure vanilla extract during the last minute of whipping. Mix just until combined. Over-mixing after adding vanilla isn’t necessary.
- Use or Store: Your homemade marshmallow fluff is now ready! Use it immediately for the best texture, or transfer it to an airtight container for storage.
Nutrition
- Serving Size: one normal portion
- Calories: 80


