

Of all the recipes that have become staples in my kitchen, the Grilled Veggie and Hummus Wrap holds a special place. It started as a desperate attempt to use up the lingering vegetables in the crisper drawer before our weekly grocery run. I fired up the grill pan, threw on some sliced zucchini and bell peppers, and hoped for the best. What emerged was nothing short of a revelation. I slathered a warm tortilla with creamy hummus, piled on the smoky, tender-crisp veggies, and took a bite. It was a perfect symphony of textures and flavors—the char of the grill, the sweetness of the peppers, the earthiness of the zucchini, and the smooth, garlicky punch of the hummus. When I served it to my family for a quick weeknight dinner, the usual chorus of “what’s this?” was replaced by a surprising, appreciative silence, followed by requests for seconds. It has since become our go-to for healthy lunches, light dinners, and even packable picnic fare. It’s the kind of meal that feels indulgent and gourmet yet is astonishingly simple and wholesome, proving that the best food doesn’t need to be complicated.
The Ultimate Grilled Veggie and Hummus Wrap: Ingredients You’ll Need
Crafting the perfect wrap starts with fresh, high-quality ingredients. Each component plays a vital role in building layers of flavor and texture. Here’s what you’ll need to create this vibrant and satisfying meal.
For the Grilled Vegetables:
- 1 medium Zucchini: Sliced into ¼-inch thick planks. Zucchini becomes wonderfully tender and slightly sweet when grilled, offering a soft, earthy base.
- 1 medium Yellow Squash: Sliced into ¼-inch thick planks. Similar to zucchini, it adds a delicate, buttery flavor and a beautiful golden color.
- 1 large Red Bell Pepper: Cored, seeded, and cut into wide, flat strips. Grilling caramelizes the natural sugars in red peppers, making them intensely sweet and smoky.
- 1 large Red Onion: Sliced into ½-inch thick rounds. Grilling tames the onion’s sharp bite, leaving it sweet, jammy, and delicious.
- 8 ounces Baby Bella Mushrooms: Cleaned and halved or quartered if large. These add a deep, umami-rich, and meaty texture to the wrap.
- 2 tablespoons Olive Oil: Extra virgin is preferred for its robust flavor, used to coat the vegetables before grilling to prevent sticking and add richness.
- 1 teaspoon Dried Oregano: Provides a classic, aromatic Mediterranean flavor that complements the grilled vegetables beautifully.
- ½ teaspoon Garlic Powder: Adds a savory, aromatic depth without the risk of burning fresh garlic on the grill.
- Salt and freshly ground Black Pepper: To taste, for enhancing all the other flavors.
For the Wrap Assembly:
- 4 large Flour or Whole Wheat Tortillas (10-12 inches): Choose large, pliable tortillas that can hold a generous amount of filling without tearing. Whole wheat adds a nutty flavor and extra fiber.
- 1 cup Hummus: Use your favorite store-bought brand or a homemade version. Classic, roasted garlic, or roasted red pepper hummus all work exceptionally well.
- 2 cups Fresh Spinach or Arugula: A handful of fresh greens adds a peppery bite (arugula) or a mild freshness (spinach), along with a pleasant textural contrast.
- ¼ cup Crumbled Feta Cheese (optional): For a briny, salty kick that cuts through the richness of the hummus and veggies. Omit for a fully vegan wrap.
Step-by-Step Instructions to Craft the Perfect Wrap
Follow these detailed steps to ensure your wrap is perfectly grilled, expertly assembled, and bursting with flavor from the first bite to the last.
Step 1: Prepare and Season the Vegetables
First, wash and dry all your vegetables thoroughly. Proper preparation is key. Slice the zucchini, yellow squash, red bell pepper, and red onion as directed in the ingredients list. Keeping the slices relatively uniform in thickness will ensure they cook evenly. Place all the prepared vegetables into a large mixing bowl. Drizzle them with the 2 tablespoons of olive oil. Sprinkle the dried oregano, garlic powder, salt, and freshly ground black pepper over the top. Use your hands or a large spoon to toss everything together gently, making sure every piece of vegetable is lightly coated in the oil and seasonings. This step is crucial as it seasons the veggies from the inside out and prevents them from sticking to the grill.
Step 2: Preheat Your Grill
Whether you’re using an outdoor gas or charcoal grill, an indoor grill pan, or even the broiler in your oven, the principle is the same: you need high, direct heat. Preheat your grill to a medium-high heat, around 400-450°F (200-230°C). A hot surface is essential for achieving those beautiful, dark char marks and a smoky flavor without turning the vegetables to mush. If using a grill pan, place it over medium-high heat on your stovetop and let it get hot for about 5-7 minutes. You can test if it’s ready by flicking a drop of water on it; if it sizzles and evaporates instantly, you’re good to go.
Step 3: Grill the Vegetables to Perfection
Place the seasoned vegetables onto the hot grill in a single layer. It’s very important not to overcrowd the grill. Grilling in batches if necessary will ensure each piece has direct contact with the heat, allowing it to char rather than steam. Grill the vegetables for about 3-5 minutes per side. The exact time will depend on the thickness of your slices and the heat of your grill. You are looking for them to be tender-crisp with distinct grill marks. The red onions and bell peppers might take a minute or two longer to soften and caramelize. Once grilled, transfer the vegetables to a cutting board. Let them cool for a few minutes before roughly chopping them into bite-sized pieces. This makes the wrap much easier to eat.
Step 4: Warm the Tortillas
Warming the tortillas makes them softer, more pliable, and less likely to crack or tear when you roll them. You can do this in a few ways. Place them directly on the still-warm grill for about 15-20 seconds per side. Alternatively, you can heat them one at a time in a dry skillet over medium heat, or wrap the stack of tortillas in a slightly damp paper towel and microwave them for 30-45 seconds.
Step 5: Assemble Your Masterpiece
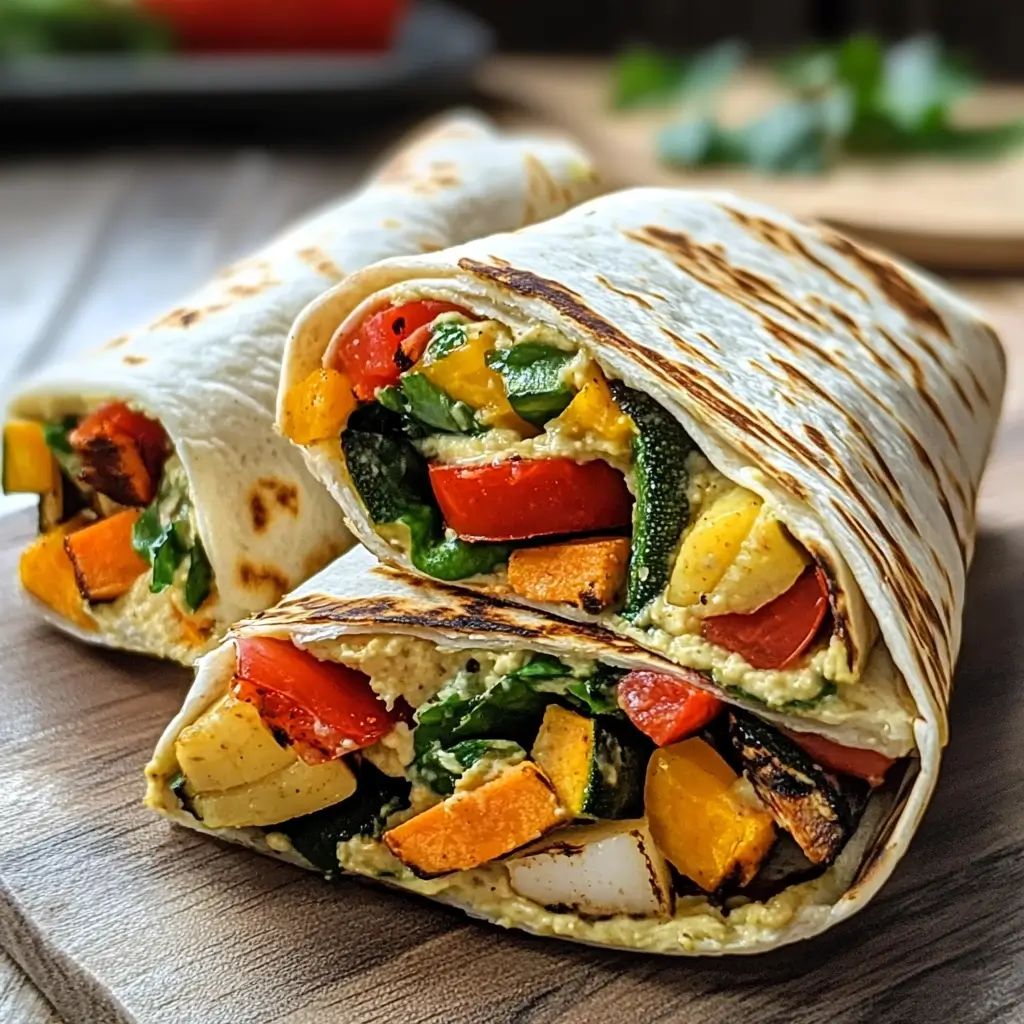
Lay one warm tortilla flat on a clean surface. Spread a generous layer (about ¼ cup) of hummus evenly over the entire surface, leaving a small half-inch border around the edges. This hummus layer acts as a delicious “glue” and a barrier to prevent the wrap from getting soggy. Next, layer a large handful of fresh spinach or arugula over the hummus. Pile about one-quarter of the chopped grilled vegetables down the center of the tortilla. If using, sprinkle the crumbled feta cheese over the vegetables.
Step 6: Roll It Up Tight
This is the final, crucial step. To roll the wrap, first fold in the two sides (the left and right edges) over the filling. Then, take the bottom edge (the one closest to you) and pull it up and over the filling, tucking it in snugly. Continue to roll the wrap away from you, keeping it tight as you go, until it’s a compact and secure cylinder. The initial fold of the sides prevents the filling from spilling out of the ends. Slice the wrap in half on a diagonal for a professional-looking presentation, or leave it whole. Repeat with the remaining ingredients to make four wraps.
A Quick Look at the Nutrition Facts
This wrap isn’t just delicious; it’s a powerhouse of nutrition, making it a meal you can feel great about eating.
- Servings: 4 wraps
- Calories per serving: Approximately 450-500 kcal (This can vary based on the type of tortilla and hummus used).
- High in Fiber (Approx. 10g per serving): The combination of whole wheat tortillas, a plethora of vegetables, and hummus (made from chickpeas) provides a significant amount of dietary fiber, which is crucial for digestive health, blood sugar regulation, and promoting a feeling of fullness.
- Excellent Source of Vitamins (A & C): The colorful array of vegetables, especially the red bell peppers and fresh spinach, delivers a potent dose of essential vitamins. Vitamin C is a powerful antioxidant, while Vitamin A is vital for vision and immune function.
- Plant-Based Protein (Approx. 15g per serving): Hummus and whole grains contribute a solid amount of plant-based protein, making this wrap a satisfying and muscle-supporting meal, even without the inclusion of meat.
- Rich in Healthy Fats: The olive oil used for grilling and the tahini in the hummus are fantastic sources of monounsaturated fats. These fats are heart-healthy and can help lower bad cholesterol levels.
- Low in Saturated Fat: As a plant-forward recipe, this wrap is naturally low in saturated fat, making it a heart-conscious choice for any day of the week.
Preparation and Cooking Time
This recipe is designed to be efficient, making it perfect for a weeknight dinner or a quick lunch. Here’s a breakdown of the time you’ll need:
- Preparation Time: 15 minutes. This includes washing and chopping all the vegetables and gathering your other ingredients. You can do this part ahead of time to make assembly even faster.
- Cooking Time: 15-20 minutes. This accounts for the time it takes to grill the vegetables in batches. While one batch is grilling, you can be preparing the tortillas and other components.
- Total Time: Approximately 30-35 minutes. From start to finish, you can have a fresh, hot, and incredibly flavorful meal on the table in just over half an hour.
How to Serve Your Grilled Veggie and Hummus Wrap
Presentation can elevate a simple wrap into a special meal. Here are some creative and delicious ways to serve it:
- The Classic Cut:
- Slice the wrap in half on a sharp diagonal.
- Stand the halves up next to each other on a plate to show off the colorful layers of filling.
- Serve immediately while the vegetables are still warm.
- As Pinwheels for a Party:
- After rolling the wrap tightly, use a sharp serrated knife to slice it into 1-inch thick rounds.
- Arrange the pinwheels on a platter for a beautiful, bite-sized appetizer or lunchbox treat.
- Secure with a toothpick if needed, especially for transport.
- Deconstructed Wrap Bowl:
- For a gluten-free or low-carb option, skip the tortilla altogether.
- Place the fresh spinach/arugula in the bottom of a bowl.
- Top with the chopped grilled vegetables and a large dollop of hummus.
- Sprinkle with feta cheese and serve with a fork.
- Paired with Perfect Sides:
- Soups: A cup of creamy tomato soup or a light lentil soup makes for a classic and comforting soup-and-sandwich combination.
- Salads: Serve with a simple side salad with a lemon-tahini dressing or a scoop of quinoa tabbouleh for an extra boost of freshness and grains.
- Chips and Dip: Pair with a side of crunchy pita chips or tortilla chips and extra hummus for dipping.
- Fruit: A small bowl of fresh berries or melon provides a sweet and refreshing contrast to the savory wrap.
Additional Tips for an Unforgettable Wrap
Take your wrap from great to gourmet with these eight professional tips and tricks.
- Don’t Crowd the Grill: This is the golden rule of grilling. Giving your vegetables space on the grill allows the hot air to circulate and the surface to make direct contact, creating that desirable char and smoky flavor. Overcrowding will trap steam, resulting in soft, soggy, and gray-looking veggies.
- Master the Marinade: While oil and spices are great, you can elevate the flavor by marinating the vegetables for 20-30 minutes before grilling. A simple mix of olive oil, lemon juice, minced garlic, and fresh herbs like rosemary or thyme can infuse the veggies with incredible depth.
- Choose Your Tortilla Wisely: The vessel is just as important as the filling. Look for large, “burrito-style” tortillas that are fresh and pliable. Whole wheat, spinach, or sun-dried tomato tortillas can add an extra layer of flavor and nutrition.
- Make Your Own Hummus: Store-bought is convenient, but homemade hummus is a game-changer. It’s incredibly easy: just blend a can of chickpeas (drained, liquid reserved), a few tablespoons of tahini, a clove of garlic, the juice of one lemon, and a pinch of salt. Drizzle in a little of the reserved chickpea liquid or water until you reach your desired consistency. The fresh, vibrant flavor is unparalleled.
- Don’t Overfill: It’s tempting to load your wrap with as much filling as possible, but this is the leading cause of tearing and messy eating. A good rule of thumb is to keep your filling contained to the center third of the tortilla, leaving ample room on all sides for folding and rolling.
- Let Veggies Cool Slightly: Don’t transfer piping hot vegetables directly from the grill into your wrap, especially if you’re using tender greens like spinach. The intense heat can wilt the greens instantly and make the hummus runny. Let them cool for just a few minutes so they are warm, not scorching.
- Add a Crunch Factor: Texture is key to a satisfying wrap. Introduce a crunchy element for contrast. Toasted pine nuts, sunflower seeds, crispy chickpeas, or even a sprinkle of chopped walnuts can add a delightful crunch in every bite.
- Embrace Meal Prep: This recipe is a meal-prepper’s dream. Grill a large batch of vegetables on a Sunday. Store them in an airtight container in the refrigerator for up to 4 days. When you’re ready for a quick lunch or dinner, just warm a tortilla, assemble, and go. This saves an immense amount of time during a busy week.
Frequently Asked Questions (FAQ)
Here are answers to some common questions about making the perfect Grilled Veggie and Hummus Wrap.
1. Can I make this wrap gluten-free?
Absolutely! The filling is naturally gluten-free. Simply swap the traditional flour tortilla for a certified gluten-free wrap. There are many great options available made from ingredients like corn, brown rice, or even almond flour. For a grain-free option, you can use large, sturdy lettuce leaves like romaine or butter lettuce to create a “lettuce wrap.”
2. What other vegetables work well in this wrap?
This recipe is incredibly versatile. Feel free to substitute or add other vegetables based on what’s in season or what you have on hand. Excellent grilling options include asparagus spears, eggplant planks, sliced portobello mushrooms, broccoli florets (par-boil them for 2 minutes first), and even thick slices of sweet potato (slice them thin so they cook through).
3. Can I make these wraps ahead of time? How do I store them?
Yes, but with a caveat. Fully assembled wraps can get soggy if stored for too long. For best results, prepare and store the components separately. Keep the grilled vegetables in one airtight container and the hummus and other fresh ingredients in another. Assemble the wrap just before serving. If you must pre-assemble them (for lunch the next day), try to place the spinach as a barrier between the hummus and the other veggies to minimize sogginess. Wrap them tightly in plastic wrap or beeswax wrap and store in the fridge for up to 24 hours.
4. My wraps always get soggy. How can I prevent this?
Sogginess is usually caused by excess moisture. Here are a few tricks: First, ensure your grilled vegetables aren’t overly oily or wet. Let them cool a bit before assembling. Second, use a thick spread of hummus to create a moisture barrier. Third, place a layer of dry greens, like spinach, between the hummus and the chopped vegetables. Finally, avoid adding watery ingredients like fresh tomatoes unless you are eating the wrap immediately.
5. I don’t have a grill or a grill pan. What are my options?
No grill, no problem! You can achieve a similar result by roasting the vegetables. Toss the seasoned vegetables on a baking sheet and roast them in a preheated oven at 425°F (220°C) for 20-25 minutes, flipping halfway through, until they are tender and slightly caramelized at the edges. You won’t get the char marks, but the flavor will still be fantastic.
6. Can I add another protein source to make it more filling?
Of course. This wrap is a great base for additional protein. For a plant-based boost, add a handful of seasoned chickpeas or some pan-fried marinated tofu or tempeh. If you eat meat, grilled chicken strips, sliced steak, or even shrimp would be delicious additions. Just be mindful not to overfill the wrap.
7. What kind of hummus is best for this recipe?
The “best” hummus is largely a matter of personal preference. A classic, plain hummus allows the flavor of the grilled vegetables to shine. Roasted garlic hummus complements the smoky notes beautifully. Roasted red pepper hummus will double down on the sweet pepper flavor. Even a spicy or jalapeño hummus would be great if you enjoy a bit of heat.
8. Is this recipe vegan?
Yes, the base recipe is 100% vegan. It contains no meat, dairy, or other animal products. The optional feta cheese is the only non-vegan component listed. To keep the wrap fully vegan, simply omit the feta cheese or substitute it with a plant-based feta alternative, which are widely available in most grocery stores.

Grilled Veggie and Hummus Wrap
Ingredients
Crafting the perfect wrap starts with fresh, high-quality ingredients. Each component plays a vital role in building layers of flavor and texture. Here’s what you’ll need to create this vibrant and satisfying meal.
For the Grilled Vegetables:
- 1 medium Zucchini: Sliced into ¼-inch thick planks. Zucchini becomes wonderfully tender and slightly sweet when grilled, offering a soft, earthy base.
- 1 medium Yellow Squash: Sliced into ¼-inch thick planks. Similar to zucchini, it adds a delicate, buttery flavor and a beautiful golden color.
- 1 large Red Bell Pepper: Cored, seeded, and cut into wide, flat strips. Grilling caramelizes the natural sugars in red peppers, making them intensely sweet and smoky.
- 1 large Red Onion: Sliced into ½-inch thick rounds. Grilling tames the onion’s sharp bite, leaving it sweet, jammy, and delicious.
- 8 ounces Baby Bella Mushrooms: Cleaned and halved or quartered if large. These add a deep, umami-rich, and meaty texture to the wrap.
- 2 tablespoons Olive Oil: Extra virgin is preferred for its robust flavor, used to coat the vegetables before grilling to prevent sticking and add richness.
- 1 teaspoon Dried Oregano: Provides a classic, aromatic Mediterranean flavor that complements the grilled vegetables beautifully.
- ½ teaspoon Garlic Powder: Adds a savory, aromatic depth without the risk of burning fresh garlic on the grill.
- Salt and freshly ground Black Pepper: To taste, for enhancing all the other flavors.
For the Wrap Assembly:
- 4 large Flour or Whole Wheat Tortillas (10-12 inches): Choose large, pliable tortillas that can hold a generous amount of filling without tearing. Whole wheat adds a nutty flavor and extra fiber.
- 1 cup Hummus: Use your favorite store-bought brand or a homemade version. Classic, roasted garlic, or roasted red pepper hummus all work exceptionally well.
- 2 cups Fresh Spinach or Arugula: A handful of fresh greens adds a peppery bite (arugula) or a mild freshness (spinach), along with a pleasant textural contrast.
- ¼ cup Crumbled Feta Cheese (optional): For a briny, salty kick that cuts through the richness of the hummus and veggies. Omit for a fully vegan wrap.
Instructions
Follow these detailed steps to ensure your wrap is perfectly grilled, expertly assembled, and bursting with flavor from the first bite to the last.
Step 1: Prepare and Season the Vegetables
First, wash and dry all your vegetables thoroughly. Proper preparation is key. Slice the zucchini, yellow squash, red bell pepper, and red onion as directed in the ingredients list. Keeping the slices relatively uniform in thickness will ensure they cook evenly. Place all the prepared vegetables into a large mixing bowl. Drizzle them with the 2 tablespoons of olive oil. Sprinkle the dried oregano, garlic powder, salt, and freshly ground black pepper over the top. Use your hands or a large spoon to toss everything together gently, making sure every piece of vegetable is lightly coated in the oil and seasonings. This step is crucial as it seasons the veggies from the inside out and prevents them from sticking to the grill.
Step 2: Preheat Your Grill
Whether you’re using an outdoor gas or charcoal grill, an indoor grill pan, or even the broiler in your oven, the principle is the same: you need high, direct heat. Preheat your grill to a medium-high heat, around 400-450°F (200-230°C). A hot surface is essential for achieving those beautiful, dark char marks and a smoky flavor without turning the vegetables to mush. If using a grill pan, place it over medium-high heat on your stovetop and let it get hot for about 5-7 minutes. You can test if it’s ready by flicking a drop of water on it; if it sizzles and evaporates instantly, you’re good to go.
Step 3: Grill the Vegetables to Perfection
Place the seasoned vegetables onto the hot grill in a single layer. It’s very important not to overcrowd the grill. Grilling in batches if necessary will ensure each piece has direct contact with the heat, allowing it to char rather than steam. Grill the vegetables for about 3-5 minutes per side. The exact time will depend on the thickness of your slices and the heat of your grill. You are looking for them to be tender-crisp with distinct grill marks. The red onions and bell peppers might take a minute or two longer to soften and caramelize. Once grilled, transfer the vegetables to a cutting board. Let them cool for a few minutes before roughly chopping them into bite-sized pieces. This makes the wrap much easier to eat.
Step 4: Warm the Tortillas
Warming the tortillas makes them softer, more pliable, and less likely to crack or tear when you roll them. You can do this in a few ways. Place them directly on the still-warm grill for about 15-20 seconds per side. Alternatively, you can heat them one at a time in a dry skillet over medium heat, or wrap the stack of tortillas in a slightly damp paper towel and microwave them for 30-45 seconds.
Step 5: Assemble Your Masterpiece
Lay one warm tortilla flat on a clean surface. Spread a generous layer (about ¼ cup) of hummus evenly over the entire surface, leaving a small half-inch border around the edges. This hummus layer acts as a delicious “glue” and a barrier to prevent the wrap from getting soggy. Next, layer a large handful of fresh spinach or arugula over the hummus. Pile about one-quarter of the chopped grilled vegetables down the center of the tortilla. If using, sprinkle the crumbled feta cheese over the vegetables.
Step 6: Roll It Up Tight
This is the final, crucial step. To roll the wrap, first fold in the two sides (the left and right edges) over the filling. Then, take the bottom edge (the one closest to you) and pull it up and over the filling, tucking it in snugly. Continue to roll the wrap away from you, keeping it tight as you go, until it’s a compact and secure cylinder. The initial fold of the sides prevents the filling from spilling out of the ends. Slice the wrap in half on a diagonal for a professional-looking presentation, or leave it whole. Repeat with the remaining ingredients to make four wraps.
Nutrition
- Serving Size: one normal portion
- Calories: 500
- Fiber: 10g
- Protein: 15g


