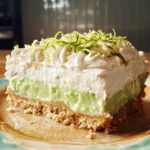

Growing up, summer afternoons were synonymous with my grandmother’s kitchen. The air, thick with the sweet scent of vanilla and something subtly comforting, always hinted at a treat in the making. And more often than not, that treat was her famous Graham Cracker Icebox Cake. It wasn’t just a dessert; it was a ritual. No-bake, effortlessly cool, and utterly satisfying, it was the perfect antidote to the summer heat. Now, years later, I still find myself craving that simple yet divine combination of creamy sweetness and the slightly crisp, then wonderfully soft, graham crackers. This recipe isn’t just about recreating a dessert; it’s about bringing back those cherished memories with every single bite. My family devours it every time I make it, and I know yours will too. Prepare to fall in love with the timeless classic that is the Graham Cracker Icebox Cake.
Ingredients: Your Simple Path to Sweetness
- Graham Crackers: (1 box, about 14.4 oz) The star of the show! Opt for regular graham crackers for that classic flavor and texture. Honey-flavored or cinnamon graham crackers can add a subtle twist if you’re feeling adventurous.
- Heavy Cream: (2 cups, chilled) This is the key to the rich and decadent cream filling. Make sure it’s well-chilled for optimal whipping volume.
- Sweetened Condensed Milk: (1 can, 14 oz) The magic ingredient that adds sweetness and a luscious, creamy texture without being overly sugary.
- Vanilla Extract: (1 teaspoon) Enhances the overall flavor profile, adding a warm and comforting note to the cream.
- Optional Toppings: (Chocolate shavings, fresh berries, chopped nuts, caramel sauce) For adding visual appeal and an extra layer of flavor and texture. Choose your favorites to personalize your cake!
Instructions: Crafting Your Icebox Cake Masterpiece
- Prepare Your Workspace: Gather all your ingredients and equipment. You’ll need a 9×13 inch baking dish or a similar sized dish. Line it with parchment paper, leaving an overhang on the sides. This will make it easier to lift the cake out later. While not strictly necessary, it’s highly recommended for clean serving.
- Whip the Cream: In a large, chilled bowl, pour in the chilled heavy cream and vanilla extract. Using an electric mixer (hand mixer or stand mixer) fitted with the whisk attachment, beat the heavy cream on medium-high speed until stiff peaks form. This means that when you lift the whisk, the cream holds its shape and stands up firmly. Be careful not to overwhip, or you’ll end up with butter! Start on a lower speed and gradually increase to avoid splattering. Keep an eye on the cream as it whips; it can go from soft peaks to stiff peaks quite quickly.
- Sweeten the Cream: Gently fold in the sweetened condensed milk into the whipped cream using a rubber spatula. Fold until just combined. Be careful not to deflate the whipped cream. Overmixing at this stage can cause the cream to lose its airy texture. Use a gentle folding motion, scraping down the sides of the bowl as needed to ensure everything is evenly incorporated. The mixture should be smooth and creamy.
- Layer the Cake – First Layer of Graham Crackers: Begin layering the graham crackers in the prepared baking dish. You may need to break some crackers to fit snugly and cover the bottom of the dish in a single layer. Think of it like creating a graham cracker “crust” on the bottom. Don’t worry about perfect alignment; the cream will fill in any gaps. The goal is to have a solid base layer of crackers.
- Layer the Cream – First Cream Layer: Spread approximately one-third of the whipped cream mixture evenly over the graham cracker layer. Use a spatula or the back of a spoon to smooth it out. Make sure the cream reaches all the edges of the dish. This layer of cream will start to soften the graham crackers and bind the layers together.
- Repeat Layers – Second Layer of Graham Crackers: Add another layer of graham crackers over the cream layer, again breaking them as needed to fit and create a relatively even layer. Try to stagger the crackers slightly compared to the layer below to create a more stable structure.
- Repeat Layers – Second Cream Layer: Spread another one-third of the whipped cream mixture over the graham cracker layer, smoothing it out evenly. You’re building up the cake layer by layer, creating that classic icebox cake texture and flavor.
- Final Graham Cracker Layer: Add the final layer of graham crackers, ensuring they cover the cream layer as completely as possible. This top layer will be visible when you serve the cake, so you can arrange them a bit more neatly if you like.
- Final Cream Layer (Top Layer): Spread the remaining whipped cream mixture over the top graham cracker layer, creating a smooth and even top surface. This is your final layer of cream, and it should completely cover the graham crackers. You can create swirls or patterns on the top with a spatula for a more decorative look if desired.
- Chill in the Refrigerator: Cover the baking dish tightly with plastic wrap or aluminum foil. Refrigerate for at least 4 hours, or preferably overnight. This chilling time is crucial! It allows the graham crackers to soften and absorb the moisture from the cream, creating that signature soft and cake-like texture. The flavors also meld and deepen as it chills. The longer it chills, the better the texture will be.
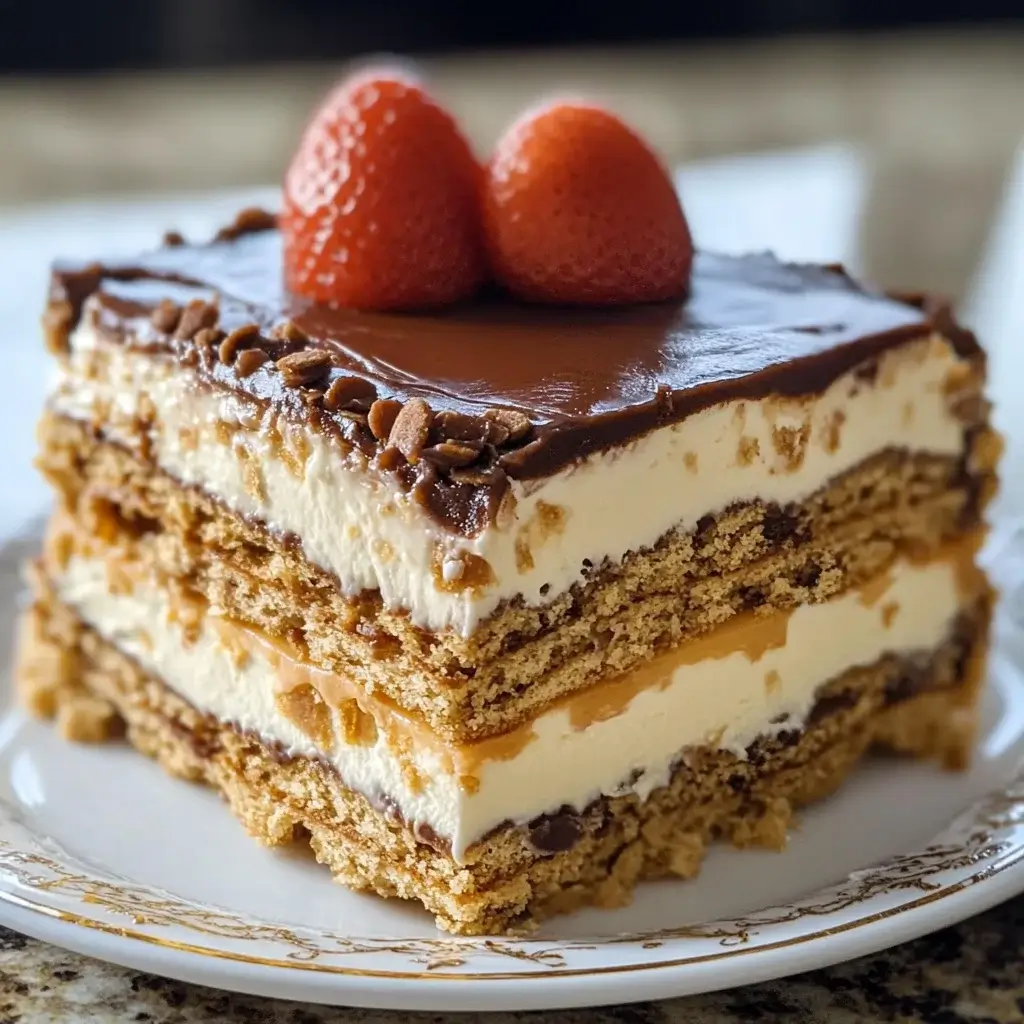
- Decorate and Serve: Once chilled, remove the cake from the refrigerator. If using parchment paper, lift the cake out of the dish using the paper overhang. Place it on a serving platter or cutting board. Now it’s time to decorate! Add your desired toppings like chocolate shavings, fresh berries, chopped nuts, or a drizzle of caramel sauce. Slice into squares or rectangles and serve chilled. Enjoy the delightful taste and texture of your homemade Graham Cracker Icebox Cake!
Nutrition Facts: A Sweet Treat in Moderation
(Approximate values per serving, assuming 12 servings per cake. Nutritional values can vary based on specific ingredients and serving size.)
- Serving Size: 1 slice (approximately 1/12th of the cake)
- Calories: Approximately 350-400 kcal
- Fat: 20-25g
(Please note: These are estimated values. For precise nutritional information, use a nutrition calculator with the specific brands and quantities of ingredients used.)
Preparation Time: Quick and Easy Sweetness
- Prep Time: 20-25 minutes (This includes whipping the cream, layering the cake, and cleaning up)
- Chill Time: Minimum 4 hours, ideally overnight (This is inactive time, allowing the cake to set in the refrigerator)
- Total Time: Approximately 4 hours 20 minutes (mostly inactive chilling time)
This recipe is incredibly fast to assemble, making it perfect for last-minute desserts or when you want a sweet treat without spending hours in the kitchen. The majority of the time is hands-off chilling, leaving you free to do other things while your delicious dessert sets.
How to Serve: Elevating Your Icebox Cake Experience
- Classic Slices: The most straightforward way to serve is to cut the chilled cake into neat squares or rectangles. This is perfect for casual gatherings and everyday enjoyment.
- Individual Portions: For a more elegant presentation, use a large cookie cutter to create individual portions. You can use round, square, or even heart-shaped cutters for a festive touch.
- Layered in Glasses or Parfaits: Break up the cake into smaller pieces and layer it in individual glasses or parfait dishes with extra whipped cream, fruit, or chocolate sauce. This creates a visually appealing and easy-to-eat dessert.
- With Fresh Fruit: Serve slices of icebox cake alongside a bowl of fresh berries, sliced peaches, or other seasonal fruits. The fresh fruit provides a delightful contrast to the richness of the cake.
- Drizzled with Sauce: Enhance the flavor with a drizzle of chocolate sauce, caramel sauce, or even a fruit coulis. This adds extra sweetness and visual appeal.
- Topped with Whipped Cream: A dollop of freshly whipped cream on top of each slice adds an extra layer of creamy indulgence and makes the presentation even more inviting.
- Frozen Treat: For an even colder and more refreshing dessert, you can freeze the icebox cake for a few hours or even overnight. It will become more like an ice cream cake – a perfect summer treat!
- Coffee or Tea Pairing: Graham Cracker Icebox Cake pairs wonderfully with a cup of hot coffee or tea. The creamy sweetness complements the bitterness of coffee and the warmth of tea beautifully.
Additional Tips: Mastering the Art of Icebox Cake Perfection
- Chill Everything: Ensure your heavy cream and mixing bowl are thoroughly chilled before whipping. This is crucial for achieving stiff peaks and a light, airy whipped cream. Cold cream whips much more easily and to a greater volume. You can even chill your whisk attachment in the freezer for 15 minutes before whipping.
- Don’t Overwhip: Keep a close eye on the heavy cream while whipping. Overwhipping can result in butter. Stop whipping as soon as stiff peaks form. If you accidentally overwhip, you might be able to salvage it by gently folding in a tablespoon or two of cold heavy cream.
- Soak Graham Crackers (Optional for Softer Cake): For an even softer cake texture, you can briefly dip each graham cracker in milk or coffee before layering. Be careful not to soak them for too long, or they will become soggy. A quick dip is all you need. This is especially helpful if you prefer a very soft, almost pudding-like consistency.
- Use Different Extracts: While vanilla extract is classic, experiment with other extracts like almond, lemon, or even peppermint extract to create different flavor profiles. Almond extract pairs beautifully with berries, lemon extract adds a refreshing citrus note, and peppermint extract is perfect for a holiday twist.
- Layer Variations: Get creative with your layers! Add a layer of sliced bananas, strawberries, or chocolate pudding between the cream and graham crackers for added flavor and texture. You can also sprinkle chopped nuts or chocolate chips between layers.
- Make it Ahead: This icebox cake is the perfect make-ahead dessert. It actually tastes better the longer it chills as the flavors meld and the textures soften. You can easily prepare it a day or two in advance, making it ideal for parties and gatherings.
- Freezing for Longer Storage: For longer storage, you can freeze the assembled icebox cake. Wrap it tightly in plastic wrap and then foil. It will keep well in the freezer for up to a month. Thaw in the refrigerator overnight before serving.
- Adjust Sweetness: If you prefer a less sweet cake, you can reduce the amount of sweetened condensed milk slightly. You can also use less sweet toppings or pair it with tart fruits to balance the sweetness. Taste the whipped cream mixture before layering and adjust to your liking.
FAQ: Your Graham Cracker Icebox Cake Questions Answered
Q1: Can I use low-fat cream cheese or whipped topping instead of heavy cream?
A: While you can technically use cream cheese or whipped topping, the texture and flavor will be different. Heavy cream provides the richest, most decadent flavor and the best whipped texture. For a lighter option, you could try a combination of whipped cream and mascarpone cheese for a slightly tangy and less heavy result. Whipped topping will be lighter in calories but will lack the richness and depth of flavor of heavy cream.
Q2: How long does Graham Cracker Icebox Cake last in the refrigerator?
A: Properly stored in an airtight container in the refrigerator, Graham Cracker Icebox Cake will last for 3-4 days. The texture will continue to soften over time, but it will still be delicious. After 4 days, the texture may become too soft, and the flavor may start to decline.
Q3: Can I make this cake gluten-free?
A: Yes, you can easily make this cake gluten-free by using gluten-free graham crackers. Many brands now offer gluten-free graham crackers that work perfectly in this recipe. Just ensure all other ingredients are also certified gluten-free if necessary for dietary restrictions.
Q4: Can I use different types of cookies instead of graham crackers?
A: Absolutely! While graham crackers are traditional, you can experiment with other cookies like chocolate wafers, vanilla wafers, gingersnaps, or even Oreo cookies (without the cream filling). Each cookie will impart a different flavor and texture to the cake, allowing for endless variations.
Q5: My graham crackers are still crunchy after chilling. What did I do wrong?
A: This usually means the cake hasn’t chilled long enough. Ensure you chill it for at least 4 hours, preferably overnight. The moisture from the cream needs time to soften the crackers. Also, ensure the cream is spread evenly and making good contact with the crackers. If you prefer softer crackers, consider briefly dipping them in milk before layering as mentioned in the tips.
Q6: Can I add chocolate to this recipe?
A: Yes, definitely! You can add chocolate in several ways. Melt semi-sweet or dark chocolate and drizzle it over the cream layers or the top of the cake. You can also add a layer of chocolate pudding between the graham crackers and cream. Chocolate shavings or mini chocolate chips make excellent toppings as well.
Q7: Is it necessary to line the dish with parchment paper?
A: No, it’s not strictly necessary, but it is highly recommended. Parchment paper makes it much easier to lift the cake out of the dish for serving and keeps the dish cleaner. If you don’t use parchment paper, you can still serve it directly from the baking dish.
Q8: Can I double this recipe for a larger crowd?
A: Yes, you can easily double this recipe. Simply double all the ingredient quantities and use a larger baking dish, such as a 9×18 inch dish or two 9×13 inch dishes. The chilling time will remain the same. Doubling the recipe is a great way to serve a larger group or have leftovers for later.
Print
Graham Cracker Icebox Cake
Ingredients
- Graham Crackers: (1 box, about 14.4 oz) The star of the show! Opt for regular graham crackers for that classic flavor and texture. Honey-flavored or cinnamon graham crackers can add a subtle twist if you’re feeling adventurous.
- Heavy Cream: (2 cups, chilled) This is the key to the rich and decadent cream filling. Make sure it’s well-chilled for optimal whipping volume.
- Sweetened Condensed Milk: (1 can, 14 oz) The magic ingredient that adds sweetness and a luscious, creamy texture without being overly sugary.
- Vanilla Extract: (1 teaspoon) Enhances the overall flavor profile, adding a warm and comforting note to the cream.
- Optional Toppings: (Chocolate shavings, fresh berries, chopped nuts, caramel sauce) For adding visual appeal and an extra layer of flavor and texture. Choose your favorites to personalize your cake!
Instructions
- Prepare Your Workspace: Gather all your ingredients and equipment. You’ll need a 9×13 inch baking dish or a similar sized dish. Line it with parchment paper, leaving an overhang on the sides. This will make it easier to lift the cake out later. While not strictly necessary, it’s highly recommended for clean serving.
- Whip the Cream: In a large, chilled bowl, pour in the chilled heavy cream and vanilla extract. Using an electric mixer (hand mixer or stand mixer) fitted with the whisk attachment, beat the heavy cream on medium-high speed until stiff peaks form. This means that when you lift the whisk, the cream holds its shape and stands up firmly. Be careful not to overwhip, or you’ll end up with butter! Start on a lower speed and gradually increase to avoid splattering. Keep an eye on the cream as it whips; it can go from soft peaks to stiff peaks quite quickly.
- Sweeten the Cream: Gently fold in the sweetened condensed milk into the whipped cream using a rubber spatula. Fold until just combined. Be careful not to deflate the whipped cream. Overmixing at this stage can cause the cream to lose its airy texture. Use a gentle folding motion, scraping down the sides of the bowl as needed to ensure everything is evenly incorporated. The mixture should be smooth and creamy.
- Layer the Cake – First Layer of Graham Crackers: Begin layering the graham crackers in the prepared baking dish. You may need to break some crackers to fit snugly and cover the bottom of the dish in a single layer. Think of it like creating a graham cracker “crust” on the bottom. Don’t worry about perfect alignment; the cream will fill in any gaps. The goal is to have a solid base layer of crackers.
- Layer the Cream – First Cream Layer: Spread approximately one-third of the whipped cream mixture evenly over the graham cracker layer. Use a spatula or the back of a spoon to smooth it out. Make sure the cream reaches all the edges of the dish. This layer of cream will start to soften the graham crackers and bind the layers together.
- Repeat Layers – Second Layer of Graham Crackers: Add another layer of graham crackers over the cream layer, again breaking them as needed to fit and create a relatively even layer. Try to stagger the crackers slightly compared to the layer below to create a more stable structure.
- Repeat Layers – Second Cream Layer: Spread another one-third of the whipped cream mixture over the graham cracker layer, smoothing it out evenly. You’re building up the cake layer by layer, creating that classic icebox cake texture and flavor.
- Final Graham Cracker Layer: Add the final layer of graham crackers, ensuring they cover the cream layer as completely as possible. This top layer will be visible when you serve the cake, so you can arrange them a bit more neatly if you like.
- Final Cream Layer (Top Layer): Spread the remaining whipped cream mixture over the top graham cracker layer, creating a smooth and even top surface. This is your final layer of cream, and it should completely cover the graham crackers. You can create swirls or patterns on the top with a spatula for a more decorative look if desired.
- Chill in the Refrigerator: Cover the baking dish tightly with plastic wrap or aluminum foil. Refrigerate for at least 4 hours, or preferably overnight. This chilling time is crucial! It allows the graham crackers to soften and absorb the moisture from the cream, creating that signature soft and cake-like texture. The flavors also meld and deepen as it chills. The longer it chills, the better the texture will be.
- Decorate and Serve: Once chilled, remove the cake from the refrigerator. If using parchment paper, lift the cake out of the dish using the paper overhang. Place it on a serving platter or cutting board. Now it’s time to decorate! Add your desired toppings like chocolate shavings, fresh berries, chopped nuts, or a drizzle of caramel sauce. Slice into squares or rectangles and serve chilled. Enjoy the delightful taste and texture of your homemade Graham Cracker Icebox Cake!
Nutrition
- Serving Size: one normal portion
- Calories: 400
- Fat: 25g