

My family absolutely adores grilling season, and we are always on the lookout for recipes that are both delicious and easy to prepare for those sunny backyard barbecues. These Glazed Teriyaki Chicken Skewers have become a recent favorite in our household, and for very good reason! The tender, juicy chicken, marinated in a homemade teriyaki sauce and then grilled to perfection before being slathered with an extra layer of glaze, is simply irresistible. Even my picky eaters devour them! What I love most about this recipe, aside from the incredible flavor, is its versatility. It’s perfect for a casual weeknight dinner, but impressive enough to serve at a weekend cookout with friends. The preparation is straightforward, and the result is always a crowd-pleaser. If you’re looking for a guaranteed hit for your next BBQ, look no further – these Glazed Teriyaki Chicken Skewers are it!
The Star Ingredients for Glazed Teriyaki Chicken Skewers
The magic of these Glazed Teriyaki Chicken Skewers lies in the harmonious blend of simple yet impactful ingredients. Each component plays a crucial role in building layers of flavor, from the savory marinade to the luscious glaze that coats the grilled chicken. Let’s break down each ingredient and understand its importance in creating this delectable dish.
- Chicken Thighs: The heart of our skewers, chicken thighs are the star protein. For this recipe, we wholeheartedly recommend using boneless, skinless chicken thighs over breasts. Why? Because chicken thighs boast a higher fat content, which translates to incredibly juicy and tender skewers even when grilled at higher temperatures. Chicken breasts, while leaner, can often dry out on the grill if not cooked perfectly. Thighs are also more forgiving and hold their moisture beautifully during both marinating and grilling. If you must use chicken breasts, be sure to cut them into uniform, slightly larger cubes to prevent them from overcooking and drying out.
- Soy Sauce: The cornerstone of any authentic teriyaki sauce, soy sauce provides the fundamental umami richness and salty depth. We suggest using low-sodium soy sauce to control the overall saltiness of the dish, especially since we’ll be adding other salty components. You can use regular soy sauce, but be mindful of the salt content and adjust other ingredients accordingly. For a gluten-free option, tamari is an excellent substitute that offers a similar flavor profile.
- Mirin (Sweet Rice Wine): Mirin is a subtly sweet Japanese rice wine that adds a crucial layer of sweetness and complexity to the teriyaki sauce. It also contributes to the beautiful glossy sheen of the glaze and helps to tenderize the chicken. If you can’t find mirin, dry sherry or even a sweet white wine like Marsala can be used as a substitute, although they won’t replicate the flavor perfectly. In a pinch, you can also use rice vinegar with a teaspoon of sugar added to mimic some of the sweetness and acidity of mirin.
- Sake (Japanese Rice Wine): Sake, another Japanese rice wine, adds a delicate dryness and subtle fruity notes to the teriyaki marinade. It enhances the overall depth of flavor and complements the sweetness of the mirin and brown sugar. If sake is unavailable, dry sherry or even dry white wine can be used as a substitute. If you prefer to omit alcohol entirely, you can replace it with water or chicken broth, although the flavor profile will be slightly less complex.
- Brown Sugar: Brown sugar brings a warm, molasses-like sweetness to the teriyaki sauce, balancing the saltiness of the soy sauce and the tanginess of the ginger and garlic. It also contributes to the rich, caramelized color of the glaze as it cooks down. You can use light or dark brown sugar depending on your preference; dark brown sugar will offer a slightly more intense molasses flavor. In a pinch, you can substitute with granulated sugar, but the brown sugar adds a depth of flavor that is highly recommended.
- Fresh Ginger: Fresh ginger is essential for its pungent, zesty flavor that cuts through the sweetness and richness of the sauce. It adds a bright, aromatic note that elevates the entire dish. We strongly recommend using fresh ginger for the best flavor. Peel and finely grate the ginger to release its maximum flavor. If you must use ground ginger, start with a smaller amount (about 1/2 teaspoon) and taste, adding more as needed, but fresh ginger is truly superior.
- Garlic: Garlic is another aromatic powerhouse that adds a savory, pungent depth to the teriyaki marinade. Fresh garlic cloves, minced or grated, are ideal for this recipe. Similar to ginger, fresh garlic provides a much more vibrant flavor compared to garlic powder. If using garlic powder, start with about 1/2 teaspoon and adjust to taste, but fresh is always best.
- Sesame Oil: Toasted sesame oil adds a distinctive nutty aroma and flavor that is characteristic of Asian cuisine and perfectly complements the teriyaki profile. A little goes a long way, so just a tablespoon is enough to infuse the marinade and glaze with its wonderful fragrance. Be sure to use toasted sesame oil, as it has a much richer and more pronounced flavor than regular sesame oil.
- Green Onions (Scallions): Fresh green onions, both white and green parts, are used for garnish and to add a final touch of fresh, mild onion flavor. They provide a pop of color and a subtle sharpness that balances the richness of the glaze. Slice them thinly and sprinkle generously over the finished skewers.
- Sesame Seeds: Sesame seeds, toasted for extra flavor, are another classic garnish that adds a visual appeal and a subtle nutty crunch to the skewers. They enhance the overall presentation and complement the sesame oil in the marinade and glaze. Toasting sesame seeds is easy – simply dry toast them in a small pan over medium heat until fragrant and lightly golden, being careful not to burn them.
By carefully selecting and combining these ingredients, we create a symphony of flavors that make these Glazed Teriyaki Chicken Skewers an unforgettable culinary experience. The balance of sweet, savory, salty, and aromatic notes is what makes this recipe so addictive and satisfying.
Step-by-Step Guide: Making Perfect Glazed Teriyaki Chicken Skewers
Creating these mouthwatering Glazed Teriyaki Chicken Skewers is surprisingly simple, even for beginner cooks. The process can be broken down into a few key steps: marinating the chicken, preparing the teriyaki glaze, assembling the skewers, and finally, grilling or cooking them to juicy perfection. Let’s walk through each step in detail to ensure your skewers are a guaranteed success.
Step 1: Marinating the Chicken for Maximum Flavor
- Prepare the Chicken: Begin by cutting the boneless, skinless chicken thighs into approximately 1-inch cubes. Uniformly sized pieces will ensure even cooking on the grill. If using chicken breasts, take extra care to cut them into slightly larger, uniform cubes to prevent them from drying out.
- Whisk the Marinade Ingredients: In a medium-sized bowl, whisk together the low-sodium soy sauce, mirin, sake, brown sugar, grated fresh ginger, minced garlic, and toasted sesame oil. Whisk until the brown sugar is mostly dissolved and the marinade is well combined. This aromatic mixture is the foundation of our teriyaki flavor.
- Marinate the Chicken: Place the cubed chicken thighs into the bowl with the marinade. Toss to coat the chicken pieces thoroughly, ensuring every piece is generously covered in the flavorful liquid.
- Marinating Time is Key: Cover the bowl with plastic wrap or transfer the chicken and marinade to a resealable plastic bag. Refrigerate and let the chicken marinate for at least 30 minutes, but ideally for 2-4 hours, or even overnight for the most intense flavor. The longer the chicken marinates, the more deeply the flavors will penetrate, resulting in more flavorful and tender skewers. However, avoid marinating for longer than 24 hours, as the acidity in the marinade can start to break down the chicken and make it mushy.
Step 2: Crafting the Luscious Teriyaki Glaze
While the chicken is marinating, we’ll prepare the teriyaki glaze. This glaze is essentially a thickened and intensified version of the marinade, designed to coat the cooked skewers in a glossy, flavorful layer.
- Strain the Marinade (Optional but Recommended): If you prefer a smoother glaze, you can strain the marinade through a fine-mesh sieve into a saucepan, discarding the solids (ginger and garlic pieces). Straining is optional, but it will result in a more refined glaze. If you don’t mind a slightly rustic glaze with small bits of ginger and garlic, you can skip this step and simply pour the entire marinade into the saucepan.
- Simmer and Reduce: Pour the strained (or unstrained) marinade into a small saucepan. Bring it to a simmer over medium heat. Reduce the heat to low and let it simmer gently for about 10-15 minutes, or until the glaze has thickened to your desired consistency. The glaze should be thick enough to coat the back of a spoon. As it simmers, the sauce will reduce and intensify in flavor, becoming richer and sweeter.
- Adjust Consistency (if needed): If the glaze becomes too thick, you can add a tablespoon or two of water to thin it out slightly. If it’s not thick enough after simmering, you can continue to simmer for a few more minutes until it reaches the desired consistency. Remember that the glaze will thicken slightly as it cools.
- Set Aside: Once the glaze has reached the perfect thickness, remove the saucepan from the heat and set it aside to cool slightly.
Step 3: Assembling the Flavorful Skewers
- Soak Wooden Skewers (if using): If you’re using wooden skewers, it’s crucial to soak them in water for at least 30 minutes before grilling. This prevents them from burning or catching fire on the grill. If using metal skewers, no soaking is necessary.
- Thread the Chicken: Thread the marinated chicken pieces onto the skewers. Aim to get about 4-5 pieces of chicken per skewer, depending on the length of your skewers and the size of the chicken cubes. Don’t overcrowd the skewers, as this can hinder even cooking. Leave a little space between each piece of chicken.
- Prepare for Grilling (or other cooking methods): Once all the chicken is skewered, they are ready to be grilled, baked, or pan-fried according to your preference.
Step 4: Grilling, Baking, or Pan-Frying to Perfection
- Grilling (Recommended): Preheat your grill to medium-high heat (about 375-450°F or 190-230°C). Lightly oil the grill grates to prevent sticking. Place the chicken skewers on the hot grill and cook for about 4-5 minutes per side, or until the chicken is cooked through and has beautiful grill marks. Turn the skewers occasionally to ensure even cooking and prevent burning. The internal temperature of the chicken should reach 165°F (74°C).
- Baking (Oven): Preheat your oven to 400°F (200°C). Place the chicken skewers on a baking sheet lined with parchment paper or foil for easy cleanup. Bake for 15-20 minutes, or until the chicken is cooked through. For a slightly charred effect, you can broil the skewers for the last 1-2 minutes, keeping a close eye on them to prevent burning.
- Pan-Frying (Stovetop): Heat a tablespoon of oil in a large skillet or grill pan over medium-high heat. Add the chicken skewers to the hot pan, working in batches if necessary to avoid overcrowding. Cook for about 4-5 minutes per side, or until the chicken is cooked through and nicely browned.
Step 5: Glazing and Finishing Touches
- Glaze During the Last Few Minutes: During the last 2-3 minutes of cooking time, brush the teriyaki glaze generously over the chicken skewers on all sides. The heat from the grill (or oven/pan) will help the glaze caramelize and create a sticky, flavorful coating. You can apply multiple layers of glaze for an even more intense teriyaki flavor.
- Final Glaze After Cooking (Optional): For an extra glossy finish and even more teriyaki flavor, you can brush the cooked skewers with another layer of glaze immediately after removing them from the grill, oven, or pan.
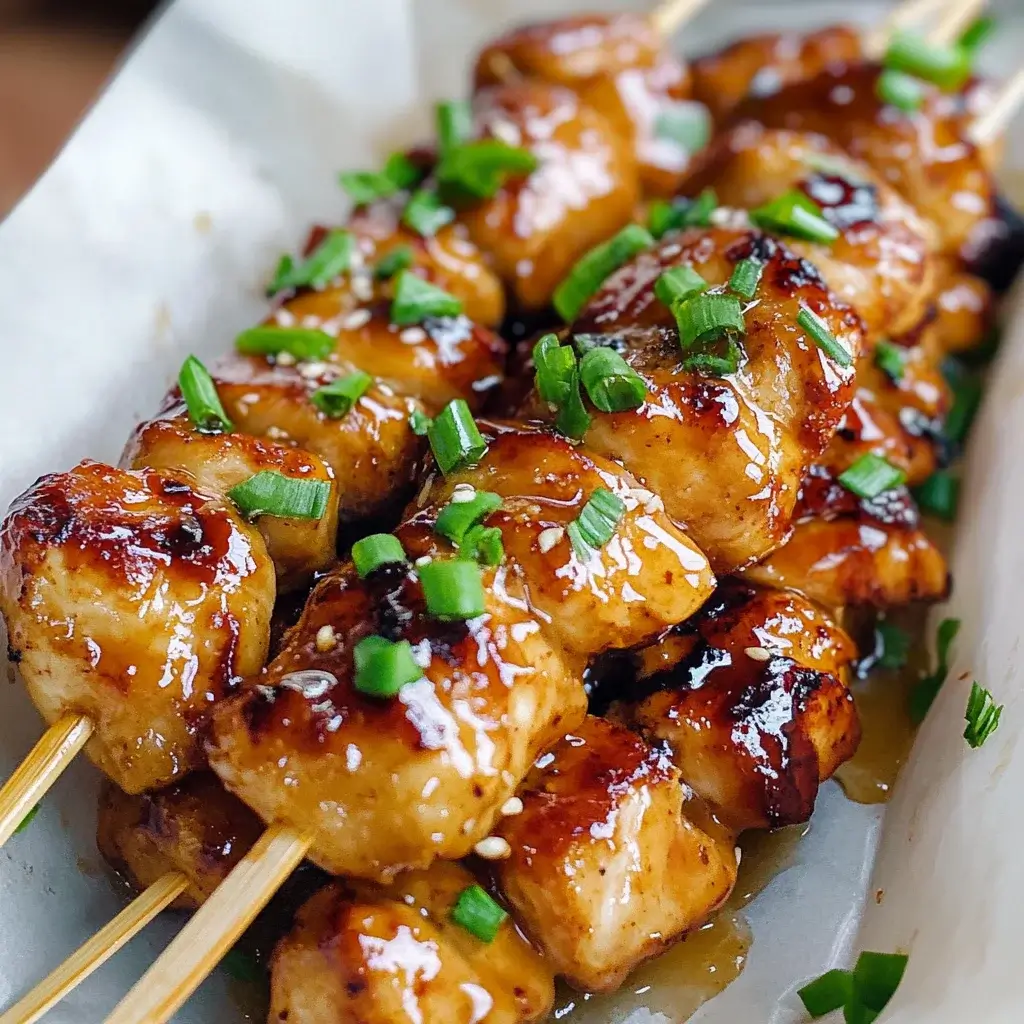
- Garnish and Serve: Transfer the Glazed Teriyaki Chicken Skewers to a serving platter. Garnish generously with sliced green onions and toasted sesame seeds. Serve immediately and enjoy the explosion of flavors!
Following these detailed steps will guide you to create incredibly delicious and perfectly cooked Glazed Teriyaki Chicken Skewers every time. The combination of the flavorful marinade, the luscious glaze, and the cooking method of your choice will result in a dish that is sure to impress your family and friends.
Nutritional Information for Glazed Teriyaki Chicken Skewers
(Estimated, per serving – Note: Nutritional values can vary based on specific ingredients and portion sizes.)
- Serving Size: Approximately 2 skewers
- Calories per Serving: 350-450 calories (depending on portion size and glaze amount)
Approximate Macronutrients per Serving:
- Protein: 35-45 grams
- Fat: 15-25 grams (depending on chicken thigh fat content and glaze)
- Carbohydrates: 20-30 grams (primarily from brown sugar and mirin in the glaze)
Important Notes:
- These are estimated values and can vary based on the specific brands and types of ingredients used.
- Using low-sodium soy sauce will reduce the sodium content of the dish.
- Adjusting portion sizes will directly impact the calorie and macronutrient values.
- Consider using a nutrition calculator app or website for more precise nutritional information based on your specific ingredient measurements.
This recipe, while delicious, is moderate in calories and carbohydrates due to the glaze. Enjoy in moderation as part of a balanced diet.
Preparation Time Breakdown
- Marinating Time: 30 minutes to 4 hours (or overnight for best results)
- Preparation Time (Chopping, Measuring, Skewering): 20-30 minutes
- Cooking Time (Grilling, Baking, or Pan-Frying): 10-20 minutes
Total Time (excluding marinating): Approximately 30-50 minutes
Plan Ahead: For optimal flavor, factor in at least 2 hours of marinating time. You can prepare the marinade and chicken in the morning or the day before and let it marinate in the refrigerator until you are ready to cook. This makes it a great recipe for meal prepping or for busy weeknights when you want a flavorful meal without spending hours in the kitchen.
How to Serve Glazed Teriyaki Chicken Skewers
Glazed Teriyaki Chicken Skewers are incredibly versatile and can be served in a variety of ways, making them perfect for different occasions and meals. Here are some delicious serving suggestions to elevate your teriyaki skewer experience:
- Classic Sides for a BBQ Feast:
- Steamed White Rice or Brown Rice: A simple and classic accompaniment that perfectly soaks up the delicious teriyaki glaze.
- Quinoa or Couscous: For a healthier grain option, quinoa or couscous provides a light and fluffy base.
- Grilled Vegetables: Grilled bell peppers, zucchini, asparagus, or corn on the cob complement the skewers beautifully and add a healthy dose of vegetables to your meal.
- Asian Slaw: A crunchy and refreshing slaw made with cabbage, carrots, and a light Asian-inspired vinaigrette.
- Potato Salad or Macaroni Salad: Classic BBQ sides that always please a crowd.
- Cornbread or Garlic Bread: For soaking up any leftover glaze and adding a comforting carbohydrate element.
- Make it a Complete Meal:
- Teriyaki Chicken Skewer Bowls: Serve the skewers over a bed of rice or quinoa with a variety of toppings such as edamame, avocado, shredded carrots, sliced cucumbers, and a drizzle of sriracha mayo for a customizable and satisfying bowl meal.
- Teriyaki Chicken Skewer Salad: Slice the cooked chicken off the skewers and toss it with a fresh green salad with mixed greens, cherry tomatoes, cucumbers, and a light sesame ginger dressing for a lighter yet flavorful meal.
- Teriyaki Chicken Skewer Lettuce Wraps: Serve the skewers with crisp lettuce cups (like butter lettuce or romaine lettuce), shredded carrots, bean sprouts, and a drizzle of hoisin sauce for a fun and interactive appetizer or light meal.
- Perfect for Gatherings and Parties:
- Appetizers or Party Snacks: Cut the chicken into smaller pieces before skewering to make bite-sized appetizers perfect for parties and gatherings. Serve with extra teriyaki glaze for dipping.
- BBQ Main Course: The skewers are a fantastic main course for any BBQ or cookout. Prepare a larger batch to feed a crowd and let everyone enjoy grilling their own skewers or have them ready-grilled for easy serving.
- Potlucks and Picnics: Glazed Teriyaki Chicken Skewers are easy to transport and serve at potlucks and picnics. They can be served warm or at room temperature and are always a crowd-pleaser.
No matter how you choose to serve them, Glazed Teriyaki Chicken Skewers are sure to be a hit. Their versatility and delicious flavor make them a welcome addition to any menu.
Additional Tips for Glazed Teriyaki Chicken Skewer Success
To ensure your Glazed Teriyaki Chicken Skewers are absolutely perfect every time, here are five essential tips to keep in mind:
- Don’t Over-Marinate: While marinating is crucial for flavor, avoid marinating the chicken for too long, especially if using acidic marinades. Excessive marinating can make the chicken texture mushy. For this teriyaki marinade, 2-4 hours is ideal, and overnight is acceptable, but avoid going beyond 24 hours.
- Cut Chicken Pieces Uniformly: Ensuring that the chicken pieces are cut into roughly the same size is essential for even cooking. This prevents some pieces from being overcooked and dry while others are still undercooked. Aim for 1-inch cubes for chicken thighs.
- Don’t Overcrowd the Skewers or the Grill/Pan: Overcrowding skewers with too much chicken can hinder even cooking and result in chicken that steams rather than grills or browns properly. Similarly, overcrowding the grill or pan will lower the temperature and lead to uneven cooking. Cook in batches if necessary to ensure each skewer and each piece of chicken cooks perfectly.
- Control the Heat and Don’t Overcook: Grill or cook the skewers over medium-high heat to achieve nice grill marks and ensure the chicken is cooked through without drying out. Overcooking chicken skewers is a common mistake that results in dry and tough meat. Use a meat thermometer to ensure the internal temperature reaches 165°F (74°C) and remove them from the heat as soon as they are cooked through.
- Glaze Strategically: Apply the teriyaki glaze during the last few minutes of cooking to prevent it from burning or becoming too sticky too early. Brushing the glaze on towards the end allows it to caramelize beautifully without burning and creates a perfectly glossy and flavorful coating. You can also brush with an extra layer of glaze after cooking for added shine and flavor.
By following these simple yet effective tips, you can confidently create Glazed Teriyaki Chicken Skewers that are juicy, flavorful, and perfectly cooked every single time.
Frequently Asked Questions (FAQ) About Glazed Teriyaki Chicken Skewers
Q1: Can I use chicken breasts instead of chicken thighs?
A: Yes, you can use chicken breasts, but chicken thighs are highly recommended for their higher fat content, which makes them more forgiving and juicier when grilled. If using chicken breasts, be sure to cut them into slightly larger, uniform cubes to prevent them from drying out. Also, be extra careful not to overcook them on the grill.
Q2: Can I make the teriyaki glaze ahead of time?
A: Absolutely! The teriyaki glaze can be made ahead of time and stored in an airtight container in the refrigerator for up to 3-4 days. In fact, making it in advance can save you time on the day of cooking. Simply reheat the glaze gently on the stovetop or in the microwave before using.
Q3: What if I don’t have mirin or sake? Can I substitute them?
A: Yes, you can substitute mirin with dry sherry or a sweet white wine like Marsala. In a pinch, you can also use rice vinegar with a teaspoon of sugar added. For sake, dry sherry or dry white wine can also be used as substitutes. If you prefer to omit alcohol entirely, you can replace both with water or chicken broth, although the flavor profile will be slightly less complex.
Q4: How can I prevent the chicken skewers from sticking to the grill?
A: To prevent sticking, make sure your grill grates are clean and preheated to medium-high heat. Lightly oil the grates with cooking oil (vegetable oil, canola oil, or grilling spray) before placing the skewers on the grill. Also, avoid moving the skewers around too much in the first few minutes of grilling, as they will naturally release from the grates as they cook and develop a sear.
Q5: Can I bake or pan-fry these skewers instead of grilling?
A: Yes, definitely! You can bake the skewers in a preheated oven at 400°F (200°C) for 15-20 minutes, or pan-fry them in a skillet or grill pan over medium-high heat for about 4-5 minutes per side. Both methods will yield delicious results if grilling is not an option or if the weather isn’t cooperating. Just remember to glaze them towards the end of the cooking time regardless of the cooking method you choose.
Print
Glazed Teriyaki Chicken Skewers
Ingredients
The magic of these Glazed Teriyaki Chicken Skewers lies in the harmonious blend of simple yet impactful ingredients. Each component plays a crucial role in building layers of flavor, from the savory marinade to the luscious glaze that coats the grilled chicken. Let’s break down each ingredient and understand its importance in creating this delectable dish.
- Chicken Thighs: The heart of our skewers, chicken thighs are the star protein. For this recipe, we wholeheartedly recommend using boneless, skinless chicken thighs over breasts. Why? Because chicken thighs boast a higher fat content, which translates to incredibly juicy and tender skewers even when grilled at higher temperatures. Chicken breasts, while leaner, can often dry out on the grill if not cooked perfectly. Thighs are also more forgiving and hold their moisture beautifully during both marinating and grilling. If you must use chicken breasts, be sure to cut them into uniform, slightly larger cubes to prevent them from overcooking and drying out.
- Soy Sauce: The cornerstone of any authentic teriyaki sauce, soy sauce provides the fundamental umami richness and salty depth. We suggest using low-sodium soy sauce to control the overall saltiness of the dish, especially since we’ll be adding other salty components. You can use regular soy sauce, but be mindful of the salt content and adjust other ingredients accordingly. For a gluten-free option, tamari is an excellent substitute that offers a similar flavor profile.
- Mirin (Sweet Rice Wine): Mirin is a subtly sweet Japanese rice wine that adds a crucial layer of sweetness and complexity to the teriyaki sauce. It also contributes to the beautiful glossy sheen of the glaze and helps to tenderize the chicken. If you can’t find mirin, dry sherry or even a sweet white wine like Marsala can be used as a substitute, although they won’t replicate the flavor perfectly. In a pinch, you can also use rice vinegar with a teaspoon of sugar added to mimic some of the sweetness and acidity of mirin.
- Sake (Japanese Rice Wine): Sake, another Japanese rice wine, adds a delicate dryness and subtle fruity notes to the teriyaki marinade. It enhances the overall depth of flavor and complements the sweetness of the mirin and brown sugar. If sake is unavailable, dry sherry or even dry white wine can be used as a substitute. If you prefer to omit alcohol entirely, you can replace it with water or chicken broth, although the flavor profile will be slightly less complex.
- Brown Sugar: Brown sugar brings a warm, molasses-like sweetness to the teriyaki sauce, balancing the saltiness of the soy sauce and the tanginess of the ginger and garlic. It also contributes to the rich, caramelized color of the glaze as it cooks down. You can use light or dark brown sugar depending on your preference; dark brown sugar will offer a slightly more intense molasses flavor. In a pinch, you can substitute with granulated sugar, but the brown sugar adds a depth of flavor that is highly recommended.
- Fresh Ginger: Fresh ginger is essential for its pungent, zesty flavor that cuts through the sweetness and richness of the sauce. It adds a bright, aromatic note that elevates the entire dish. We strongly recommend using fresh ginger for the best flavor. Peel and finely grate the ginger to release its maximum flavor. If you must use ground ginger, start with a smaller amount (about 1/2 teaspoon) and taste, adding more as needed, but fresh ginger is truly superior.
- Garlic: Garlic is another aromatic powerhouse that adds a savory, pungent depth to the teriyaki marinade. Fresh garlic cloves, minced or grated, are ideal for this recipe. Similar to ginger, fresh garlic provides a much more vibrant flavor compared to garlic powder. If using garlic powder, start with about 1/2 teaspoon and adjust to taste, but fresh is always best.
- Sesame Oil: Toasted sesame oil adds a distinctive nutty aroma and flavor that is characteristic of Asian cuisine and perfectly complements the teriyaki profile. A little goes a long way, so just a tablespoon is enough to infuse the marinade and glaze with its wonderful fragrance. Be sure to use toasted sesame oil, as it has a much richer and more pronounced flavor than regular sesame oil.
- Green Onions (Scallions): Fresh green onions, both white and green parts, are used for garnish and to add a final touch of fresh, mild onion flavor. They provide a pop of color and a subtle sharpness that balances the richness of the glaze. Slice them thinly and sprinkle generously over the finished skewers.
- Sesame Seeds: Sesame seeds, toasted for extra flavor, are another classic garnish that adds a visual appeal and a subtle nutty crunch to the skewers. They enhance the overall presentation and complement the sesame oil in the marinade and glaze. Toasting sesame seeds is easy – simply dry toast them in a small pan over medium heat until fragrant and lightly golden, being careful not to burn them.
Instructions
Creating these mouthwatering Glazed Teriyaki Chicken Skewers is surprisingly simple, even for beginner cooks. The process can be broken down into a few key steps: marinating the chicken, preparing the teriyaki glaze, assembling the skewers, and finally, grilling or cooking them to juicy perfection. Let’s walk through each step in detail to ensure your skewers are a guaranteed success.
Step 1: Marinating the Chicken for Maximum Flavor
- Prepare the Chicken: Begin by cutting the boneless, skinless chicken thighs into approximately 1-inch cubes. Uniformly sized pieces will ensure even cooking on the grill. If using chicken breasts, take extra care to cut them into slightly larger, uniform cubes to prevent them from drying out.
- Whisk the Marinade Ingredients: In a medium-sized bowl, whisk together the low-sodium soy sauce, mirin, sake, brown sugar, grated fresh ginger, minced garlic, and toasted sesame oil. Whisk until the brown sugar is mostly dissolved and the marinade is well combined. This aromatic mixture is the foundation of our teriyaki flavor.
- Marinate the Chicken: Place the cubed chicken thighs into the bowl with the marinade. Toss to coat the chicken pieces thoroughly, ensuring every piece is generously covered in the flavorful liquid.
- Marinating Time is Key: Cover the bowl with plastic wrap or transfer the chicken and marinade to a resealable plastic bag. Refrigerate and let the chicken marinate for at least 30 minutes, but ideally for 2-4 hours, or even overnight for the most intense flavor. The longer the chicken marinates, the more deeply the flavors will penetrate, resulting in more flavorful and tender skewers. However, avoid marinating for longer than 24 hours, as the acidity in the marinade can start to break down the chicken and make it mushy.
Step 2: Crafting the Luscious Teriyaki Glaze
While the chicken is marinating, we’ll prepare the teriyaki glaze. This glaze is essentially a thickened and intensified version of the marinade, designed to coat the cooked skewers in a glossy, flavorful layer.
- Strain the Marinade (Optional but Recommended): If you prefer a smoother glaze, you can strain the marinade through a fine-mesh sieve into a saucepan, discarding the solids (ginger and garlic pieces). Straining is optional, but it will result in a more refined glaze. If you don’t mind a slightly rustic glaze with small bits of ginger and garlic, you can skip this step and simply pour the entire marinade into the saucepan.
- Simmer and Reduce: Pour the strained (or unstrained) marinade into a small saucepan. Bring it to a simmer over medium heat. Reduce the heat to low and let it simmer gently for about 10-15 minutes, or until the glaze has thickened to your desired consistency. The glaze should be thick enough to coat the back of a spoon. As it simmers, the sauce will reduce and intensify in flavor, becoming richer and sweeter.
- Adjust Consistency (if needed): If the glaze becomes too thick, you can add a tablespoon or two of water to thin it out slightly. If it’s not thick enough after simmering, you can continue to simmer for a few more minutes until it reaches the desired consistency. Remember that the glaze will thicken slightly as it cools.
- Set Aside: Once the glaze has reached the perfect thickness, remove the saucepan from the heat and set it aside to cool slightly.
Step 3: Assembling the Flavorful Skewers
- Soak Wooden Skewers (if using): If you’re using wooden skewers, it’s crucial to soak them in water for at least 30 minutes before grilling. This prevents them from burning or catching fire on the grill. If using metal skewers, no soaking is necessary.
- Thread the Chicken: Thread the marinated chicken pieces onto the skewers. Aim to get about 4-5 pieces of chicken per skewer, depending on the length of your skewers and the size of the chicken cubes. Don’t overcrowd the skewers, as this can hinder even cooking. Leave a little space between each piece of chicken.
- Prepare for Grilling (or other cooking methods): Once all the chicken is skewered, they are ready to be grilled, baked, or pan-fried according to your preference.
Step 4: Grilling, Baking, or Pan-Frying to Perfection
- Grilling (Recommended): Preheat your grill to medium-high heat (about 375-450°F or 190-230°C). Lightly oil the grill grates to prevent sticking. Place the chicken skewers on the hot grill and cook for about 4-5 minutes per side, or until the chicken is cooked through and has beautiful grill marks. Turn the skewers occasionally to ensure even cooking and prevent burning. The internal temperature of the chicken should reach 165°F (74°C).
- Baking (Oven): Preheat your oven to 400°F (200°C). Place the chicken skewers on a baking sheet lined with parchment paper or foil for easy cleanup. Bake for 15-20 minutes, or until the chicken is cooked through. For a slightly charred effect, you can broil the skewers for the last 1-2 minutes, keeping a close eye on them to prevent burning.
- Pan-Frying (Stovetop): Heat a tablespoon of oil in a large skillet or grill pan over medium-high heat. Add the chicken skewers to the hot pan, working in batches if necessary to avoid overcrowding. Cook for about 4-5 minutes per side, or until the chicken is cooked through and nicely browned.
Step 5: Glazing and Finishing Touches
- Glaze During the Last Few Minutes: During the last 2-3 minutes of cooking time, brush the teriyaki glaze generously over the chicken skewers on all sides. The heat from the grill (or oven/pan) will help the glaze caramelize and create a sticky, flavorful coating. You can apply multiple layers of glaze for an even more intense teriyaki flavor.
- Final Glaze After Cooking (Optional): For an extra glossy finish and even more teriyaki flavor, you can brush the cooked skewers with another layer of glaze immediately after removing them from the grill, oven, or pan.
- Garnish and Serve: Transfer the Glazed Teriyaki Chicken Skewers to a serving platter. Garnish generously with sliced green onions and toasted sesame seeds. Serve immediately and enjoy the explosion of flavors!
Nutrition
- Serving Size: one normal portion
- Calories: 450
- Fat: 25 grams
- Carbohydrates: 30 grams
- Cholesterol: 45 grams


