


The constant hum of the morning rush used to be the soundtrack to my life. Juggling work emails, finding matching socks for the kids, and trying to get a decent breakfast into everyone was a daily triathlon I rarely felt I was winning. We fell into the trap of store-bought breakfast bars, which promised health and convenience but often delivered a sugar crash and a hefty grocery bill. I knew there had to be a better way. I wanted something wholesome, packed with real energy, and delicious enough that my family would actually ask for it. After countless weekends of experimenting—some batches too crumbly, others too sweet, a few downright forgettable—I finally perfected this recipe for Fruit and Nut Breakfast Bars. The first time I nailed it, the kitchen filled with the warm, toasty aroma of baked oats and cinnamon. My partner, usually a breakfast-skipper, grabbed one on his way out the door and texted me an hour later: “This bar is incredible. Make more.” My kids, notorious critics of anything “too healthy,” devoured them, thinking they were a special treat. These bars have become our go-to solution for hectic mornings, afternoon slumps, and pre-hike fuel. They are endlessly customizable, wonderfully chewy, and packed with the kind of goodness that makes you feel great about what you’re eating and serving. They are not just a recipe; they are our delicious little secret to a calmer, healthier start to the day.
Ingredients
- 2 cups (180g) Rolled Oats: Use old-fashioned rolled oats, not quick-cook or steel-cut. They provide the perfect chewy, hearty texture that forms the backbone of these bars.
- 1 cup (150g) Mixed Raw Nuts, roughly chopped: A blend of almonds, walnuts, and pecans works beautifully. Chopping them provides a wonderful crunch without making the bars difficult to cut.
- 1/2 cup (65g) Raw Seeds: A combination of pumpkin seeds and sunflower seeds adds another layer of texture and a boost of nutrients.
- 1/2 cup (80g) Mixed Dried Fruit, chopped: Use a vibrant mix like apricots, cranberries, and raisins. Chopping larger fruits ensures even distribution of sweetness and chewiness.
- 1/4 cup (20g) Unsweetened Shredded Coconut: This adds a subtle tropical sweetness and a lovely chewy texture throughout the bars.
- 2 tablespoons (15g) Chia Seeds or Ground Flaxseed: These nutritional powerhouses act as a secondary binder and add a dose of healthy omega-3 fatty acids and fiber.
- 1 teaspoon Ground Cinnamon: A dash of cinnamon brings a wonderful warmth and depth of flavor that complements the fruit and nuts perfectly.
- 1/2 teaspoon Fine Sea Salt: Salt is a crucial flavor enhancer; it balances the sweetness of the honey and dried fruit and makes all the other flavors pop.
- 1 cup (240ml) Creamy Nut Butter: Almond butter or peanut butter are excellent choices. Ensure it’s a creamy, natural variety where the only ingredients are nuts and maybe a little salt.
- 1/2 cup (120ml) Honey or Maple Syrup: This is the primary binder that holds everything together. It also provides a natural, unrefined sweetness.
- 1 teaspoon Vanilla Extract: Pure vanilla extract enhances all the sweet, warm flavors in the bars, giving them a more complex, dessert-like quality.
Instructions
- Prepare the Pan: Line an 8×8 inch (20×20 cm) square baking pan with parchment paper, leaving some overhang on two sides. This overhang will act as “handles” to easily lift the bars out of the pan later. Lightly grease the parchment paper to ensure absolutely no sticking. Set aside.
- Toast the Dry Ingredients (Optional but Recommended): Preheat your oven to 350°F (175°C). Spread the rolled oats, chopped nuts, and seeds onto a large, rimmed baking sheet in a single layer. Toast for 8-10 minutes, or until they are lightly golden and your kitchen smells wonderfully fragrant. This step is optional but deeply enhances the flavor of the bars, giving them a rich, nutty taste. Let the mixture cool for a few minutes.
- Combine All Dry Ingredients: In a large mixing bowl, combine the toasted (or raw) oats, nuts, and seeds. Add the chopped dried fruit, shredded coconut, chia seeds (or flaxseed), ground cinnamon, and sea salt. Use a whisk or a large spoon to stir everything together thoroughly. Your goal is to ensure all the smaller ingredients are evenly distributed, so you get a perfect mix of flavors and textures in every single bite.
- Warm the Wet Ingredients: In a small saucepan over low-medium heat, gently warm the nut butter and honey (or maple syrup). Stir constantly until the mixture is smooth, well-combined, and easily pourable. You are not trying to boil it; you just want to warm it enough to make it fluid, which will help it coat the dry ingredients more effectively. Once smooth, remove from the heat and stir in the vanilla extract.
- Combine Wet and Dry: Pour the warm nut butter mixture over the dry ingredients in the large bowl. Using a sturdy spatula or wooden spoon, mix until every single oat, nut, and piece of fruit is completely coated. This may take a minute or two of diligent stirring. Scrape the bottom and sides of the bowl to ensure there are no dry pockets left. The final mixture should be sticky and well-incorporated.
- Press into the Pan: Transfer the sticky mixture into your prepared baking pan. This next step is the most critical for ensuring your bars hold together: pressing. Use the back of your spatula to spread the mixture evenly to all corners. Then, take a flat-bottomed glass or measuring cup (you can lightly grease the bottom or cover it with parchment paper to prevent sticking) and press down firmly and evenly across the entire surface of the bars. The harder you press, the more compressed and cohesive your bars will be.
- Chill and Set: Cover the pan with plastic wrap or foil and place it in the refrigerator to chill for at least 2-3 hours, or preferably overnight. This chilling time is essential; it allows the nut butter and honey to solidify, binding all the ingredients together into a firm slab. Do not rush this step.
- Cut and Store: Once the bars are completely firm, use the parchment paper handles to lift the entire slab out of the pan and onto a cutting board. Use a large, sharp knife to cut into 16 squares or 12 rectangles. For the cleanest cuts, you can run the knife under hot water and wipe it dry between slices. The bars are now ready to be enjoyed!
Nutrition Facts
- Servings: 16 bars
- Calories per serving: Approximately 250-280 kcal
- Fiber (approx. 4g): Sourced from the oats, nuts, seeds, and fruit, fiber is essential for digestive health and helps keep you feeling full and satisfied long after breakfast.
- Protein (approx. 8g): The nuts, seeds, and nut butter provide a solid plant-based protein punch, which aids in muscle repair and contributes to satiety, helping to stave off mid-morning hunger.
- Healthy Fats (approx. 15g): Primarily monounsaturated and polyunsaturated fats from the nuts, seeds, and nut butter. These fats are crucial for brain health and providing sustained, slow-release energy.
- Natural Sugars (approx. 12g): The sweetness comes from the honey/maple syrup and dried fruit, not refined white sugar. While still sugar, it’s accompanied by the fiber and nutrients of the whole food ingredients, leading to a more stable energy release.
- Micronutrients: These bars are a good source of minerals like magnesium (from almonds and seeds) and manganese (from oats), which are vital for energy production and bone health.
Preparation Time
The total hands-on preparation time for these Fruit and Nut Breakfast Bars is approximately 15-20 minutes. This includes gathering and measuring ingredients, toasting the oats and nuts, mixing, and pressing into the pan. However, please factor in a crucial, non-negotiable chilling time of at least 2-3 hours (or overnight for best results) for the bars to set properly before cutting.
How to Serve
These bars are incredibly versatile. While perfect on their own, here are a few creative ways to serve and enjoy them:
- The On-the-Go Breakfast: The most classic way to enjoy them. Grab a bar as you’re running out the door for a no-fuss, nutrient-dense breakfast that you can eat in the car, on the train, or at your desk.
- The Yogurt Parfait Power-Up:
- Crumble a bar over a bowl of Greek yogurt.
- Add a handful of fresh berries like blueberries or raspberries.
- Drizzle with a tiny bit of extra honey or maple syrup for a decadent and satisfying breakfast bowl that feels like a treat.
- The Pre- or Post-Workout Fuel: The combination of complex carbs for energy and protein for muscle recovery makes this an ideal snack to have about an hour before a workout or within 30 minutes after.
- The Lunchbox Hero: Cut the bars into smaller, bite-sized squares and pack them in your kids’ (or your own) lunchbox for a healthy alternative to processed snacks. They provide a much-needed energy boost to get through the afternoon.
- The Healthy Dessert: For a guilt-free sweet treat after dinner, gently warm a bar in the microwave for 10-15 seconds until it’s soft and gooey. You can even serve it with a small scoop of vanilla bean ice cream or a dollop of whipped coconut cream.
- The Afternoon Pick-Me-Up: Pair a bar with a hot cup of coffee or tea for the perfect answer to that 3 PM slump. It will revive your energy levels far better than a sugary cookie.
- The Hiking Trail Companion: These bars are sturdy, portable, and energy-dense, making them the perfect snack to tuck into your backpack for a day of hiking or outdoor adventure.
Additional Tips
- The Art of Pressing Firmly: I cannot overstate this: the key to bars that don’t crumble is aggressive pressing. After spreading the mixture in the pan, lay a piece of parchment paper on top and use the bottom of a heavy, flat object (like a cast iron pan or a large book) to press down with your full body weight. This compacts the ingredients and ensures the binders hold everything tightly.
- Ingredient Temperature Matters: For the smoothest mixing experience, ensure your nut butter is at room temperature before you start. If it’s cold and hard from the fridge, it will be difficult to mix with the honey. A quick 15-20 seconds in the microwave can help soften it if needed.
- Customize Your Flavor Profile: This recipe is a fantastic template. Feel free to experiment!
- Tropical Twist: Use macadamia nuts, dried mango, and extra coconut.
- Chocolate Cherry Bomb: Use almonds, dried cherries, and add 1/2 cup of dark chocolate chips (stir them in after the wet mixture has cooled slightly).
- Autumn Spice: Use pecans, dried apples, and add 1/4 teaspoon of nutmeg and a pinch of allspice along with the cinnamon.
- Clean Cutting Technique: For perfectly clean, sharp-edged bars, a cold, firm slab is essential. But the knife matters too. Use your largest, sharpest chef’s knife. Fill a tall glass with hot water, dip the knife in for a few seconds, wipe it dry, and make one clean cut. Repeat this process for every single cut. The hot blade will slice through the chilled bars like butter.
- Boost the Protein Content: If you want to use these as a serious post-workout recovery bar, you can add a scoop (about 1/4 cup) of your favorite vanilla or unflavored protein powder. Add it to the dry ingredients, but be prepared to add an extra tablespoon or two of honey or nut butter to ensure the mixture isn’t too dry.
- Making Them Allergy-Friendly (Gluten-Free & Vegan): This recipe is easily adaptable. To make them certified gluten-free, simply use certified gluten-free rolled oats. To make them vegan, swap the honey for an equal amount of pure maple syrup or brown rice syrup. Both work perfectly as binders.
- Don’t Overlook the Salt: It might seem like a small amount, but the 1/2 teaspoon of salt is a non-negotiable flavor workhorse. It cuts through the richness of the nut butter and the sweetness of the honey and fruit, creating a more balanced and complex flavor profile. Without it, the bars can taste flat.
- Long-Term Storage for Meal Prep: These bars are a meal-prepper’s dream. For maximum freshness, wrap each bar individually in plastic wrap or beeswax wrap. You can then store them in a large, airtight container or a freezer bag. They keep for a week on the counter, two weeks in the fridge, and up to 3 months in the freezer. Freezing them is a great way to have a healthy snack ready at a moment’s notice.
FAQ Section
1. Why are my breakfast bars falling apart and crumbly?
This is the most common issue and almost always comes down to one of two things: the binder ratio or the pressing technique. First, ensure you used the full amount of nut butter and honey/maple syrup, as this sticky “glue” is what holds everything together. If you reduce the amount, you reduce the binding power. Second, you must press the mixture into the pan very, very firmly. Don’t be gentle! You need to compact the ingredients so there are no air pockets. Finally, make sure you’ve chilled the bars for long enough (at least 2-3 hours) so the binders can solidify and do their job.
2. Can I make these bars nut-free for school lunches or allergies?
Absolutely! To make a nut-free version, substitute the mixed nuts with an equal amount of extra seeds, like a mix of pumpkin, sunflower, and sesame seeds. For the nut butter, use sunflower seed butter (SunButter) or tahini. Both work wonderfully as binders and provide a delicious, earthy flavor that is a great alternative to traditional nut butters.
3. Can I reduce the amount of sugar in this recipe?
You can, but with a caveat. The honey or maple syrup is not just for sweetness; it’s a primary structural binder. If you reduce it significantly, your bars will be much more crumbly. You could try reducing it by a couple of tablespoons and adding a bit more nut butter to compensate. Another option is to use a binder like date paste (made from soaking and blending Medjool dates), which provides sweetness and stickiness with more fiber. You can also ensure the dried fruit you use has no added sugar.
4. What type of oats are best? Should I use quick oats?
For the best texture, old-fashioned rolled oats are highly recommended. They retain their shape and provide a satisfying, chewy bite. Quick oats are thinner and more processed, which can result in a mushier, pastier texture. Steel-cut oats are too hard and will not soften enough in this no-bake recipe, resulting in unpleasantly hard and raw-tasting bars. Stick with rolled oats for guaranteed success.
5. How long do these homemade breakfast bars last?
Their shelf life depends on how you store them. In an airtight container at room temperature, they will stay fresh for about one week. If you store them in the refrigerator, they will last for up to two weeks (and will be firmer, which some people prefer). For long-term storage, they freeze exceptionally well for up to 3 months. Just thaw one on the counter for 15-20 minutes or give it a quick 10-second zap in the microwave.
6. I want to add chocolate chips. When is the best time to do that?
Chocolate chips are a fantastic addition! The key is to add them at the right time. Do not add them to the main dry ingredient bowl initially. After you have mixed the warm wet ingredients into the dry ingredients, let the mixture cool for 5-10 minutes. If you add the chocolate chips while the mixture is still hot, they will melt completely and turn your bars into a chocolatey mass (which isn’t necessarily bad, but not the goal if you want distinct chips). Once slightly cooled, gently fold in about 1/2 to 3/4 cup of mini or regular chocolate chips before pressing the mixture into the pan.
7. My mixture seems too dry or too wet. How can I fix it?
This can happen due to variations in nut butter brands (some are drippier than others) or the accuracy of measurements. If the mixture seems too dry and isn’t coming together, add more nut butter or honey/maple syrup, one tablespoon at a time, until it becomes sticky and cohesive. If the mixture seems overly wet or greasy, add a bit more rolled oats, one or two tablespoons at a time, to help absorb some of the excess liquid.
8. Are these fruit and nut bars actually healthy?
Compared to most commercially produced breakfast bars, yes, these are significantly healthier. You control every ingredient, so there are no preservatives, artificial flavors, or high-fructose corn syrup. They are made from whole foods like oats, nuts, and seeds, providing a balanced mix of complex carbohydrates for energy, protein and fiber for satiety, and healthy fats for brain function. While they do contain calories and natural sugars, these come packaged with valuable nutrients, making them a genuinely wholesome and energizing choice.
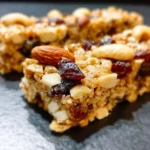
Fruit and Nut Breakfast Bars
Ingredients
- 2 cups (180g) Rolled Oats: Use old-fashioned rolled oats, not quick-cook or steel-cut. They provide the perfect chewy, hearty texture that forms the backbone of these bars.
- 1 cup (150g) Mixed Raw Nuts, roughly chopped: A blend of almonds, walnuts, and pecans works beautifully. Chopping them provides a wonderful crunch without making the bars difficult to cut.
- 1/2 cup (65g) Raw Seeds: A combination of pumpkin seeds and sunflower seeds adds another layer of texture and a boost of nutrients.
- 1/2 cup (80g) Mixed Dried Fruit, chopped: Use a vibrant mix like apricots, cranberries, and raisins. Chopping larger fruits ensures even distribution of sweetness and chewiness.
- 1/4 cup (20g) Unsweetened Shredded Coconut: This adds a subtle tropical sweetness and a lovely chewy texture throughout the bars.
- 2 tablespoons (15g) Chia Seeds or Ground Flaxseed: These nutritional powerhouses act as a secondary binder and add a dose of healthy omega-3 fatty acids and fiber.
- 1 teaspoon Ground Cinnamon: A dash of cinnamon brings a wonderful warmth and depth of flavor that complements the fruit and nuts perfectly.
- 1/2 teaspoon Fine Sea Salt: Salt is a crucial flavor enhancer; it balances the sweetness of the honey and dried fruit and makes all the other flavors pop.
- 1 cup (240ml) Creamy Nut Butter: Almond butter or peanut butter are excellent choices. Ensure it’s a creamy, natural variety where the only ingredients are nuts and maybe a little salt.
- 1/2 cup (120ml) Honey or Maple Syrup: This is the primary binder that holds everything together. It also provides a natural, unrefined sweetness.
- 1 teaspoon Vanilla Extract: Pure vanilla extract enhances all the sweet, warm flavors in the bars, giving them a more complex, dessert-like quality.
Instructions
- Prepare the Pan: Line an 8×8 inch (20×20 cm) square baking pan with parchment paper, leaving some overhang on two sides. This overhang will act as “handles” to easily lift the bars out of the pan later. Lightly grease the parchment paper to ensure absolutely no sticking. Set aside.
- Toast the Dry Ingredients (Optional but Recommended): Preheat your oven to 350°F (175°C). Spread the rolled oats, chopped nuts, and seeds onto a large, rimmed baking sheet in a single layer. Toast for 8-10 minutes, or until they are lightly golden and your kitchen smells wonderfully fragrant. This step is optional but deeply enhances the flavor of the bars, giving them a rich, nutty taste. Let the mixture cool for a few minutes.
- Combine All Dry Ingredients: In a large mixing bowl, combine the toasted (or raw) oats, nuts, and seeds. Add the chopped dried fruit, shredded coconut, chia seeds (or flaxseed), ground cinnamon, and sea salt. Use a whisk or a large spoon to stir everything together thoroughly. Your goal is to ensure all the smaller ingredients are evenly distributed, so you get a perfect mix of flavors and textures in every single bite.
- Warm the Wet Ingredients: In a small saucepan over low-medium heat, gently warm the nut butter and honey (or maple syrup). Stir constantly until the mixture is smooth, well-combined, and easily pourable. You are not trying to boil it; you just want to warm it enough to make it fluid, which will help it coat the dry ingredients more effectively. Once smooth, remove from the heat and stir in the vanilla extract.
- Combine Wet and Dry: Pour the warm nut butter mixture over the dry ingredients in the large bowl. Using a sturdy spatula or wooden spoon, mix until every single oat, nut, and piece of fruit is completely coated. This may take a minute or two of diligent stirring. Scrape the bottom and sides of the bowl to ensure there are no dry pockets left. The final mixture should be sticky and well-incorporated.
- Press into the Pan: Transfer the sticky mixture into your prepared baking pan. This next step is the most critical for ensuring your bars hold together: pressing. Use the back of your spatula to spread the mixture evenly to all corners. Then, take a flat-bottomed glass or measuring cup (you can lightly grease the bottom or cover it with parchment paper to prevent sticking) and press down firmly and evenly across the entire surface of the bars. The harder you press, the more compressed and cohesive your bars will be.
- Chill and Set: Cover the pan with plastic wrap or foil and place it in the refrigerator to chill for at least 2-3 hours, or preferably overnight. This chilling time is essential; it allows the nut butter and honey to solidify, binding all the ingredients together into a firm slab. Do not rush this step.
- Cut and Store: Once the bars are completely firm, use the parchment paper handles to lift the entire slab out of the pan and onto a cutting board. Use a large, sharp knife to cut into 16 squares or 12 rectangles. For the cleanest cuts, you can run the knife under hot water and wipe it dry between slices. The bars are now ready to be enjoyed!
Nutrition
- Serving Size: one normal portion
- Calories: 280
- Sugar: 12g
- Fat: 15g
- Fiber: 4g
- Protein: 8g


