


I still remember the first time I whipped up a batch of these Frozen Cherry Yogurt Clusters. It was a sweltering summer afternoon, the kids were restless, and I was desperately searching for a snack that was both refreshing and relatively healthy. I stumbled upon the idea, tweaked it slightly with what I had on hand (a big bag of frozen cherries and some Greek yogurt), and hoped for the best. Honestly, I wasn’t expecting much – just something cold to tide us over. But when I pulled that first tray out of the freezer, looking like little ruby-studded snowballs, I had a good feeling. The reaction was immediate and unanimous: pure delight! The kids devoured them, my husband snagged a few commenting on the satisfying ‘pop’ of the frozen cherry, and even I found myself reaching for more. They hit that perfect spot between a healthy snack and a decadent treat – creamy, tangy, sweet, and incredibly cooling. Since then, these little bites of frozen goodness have become a staple in our freezer, especially during warmer months. They are ridiculously easy to make, require minimal ingredients, and satisfy cravings without the guilt. They feel special enough for guests but are simple enough for a Tuesday afternoon pick-me-up. They are, quite simply, a little bite of frosty perfection.
Ingredients
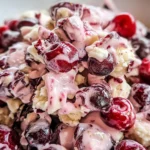
- 2 cups Fresh or Frozen Cherries: (approx. 300-350g) Pitted. Sweet or tart cherries both work beautifully, offering slightly different flavour profiles. Frozen cherries work perfectly and save you the pitting step! If using fresh, ensure they are pitted. These provide the vibrant colour, juicy burst, and antioxidant boost.
- 2 cups Plain Greek Yogurt: (approx. 450-500g) Full-fat or low-fat. Greek yogurt is recommended for its thick, creamy texture which helps the clusters hold their shape better and provides a good dose of protein. Regular yogurt can be used but may result in icier clusters.
- 2-4 tablespoons Honey or Maple Syrup: (Optional, adjust to taste). This adds a touch of sweetness to balance the tartness of the yogurt and cherries. Start with less and add more if desired, depending on the sweetness of your cherries and personal preference. You can also use agave nectar or omit sweetener altogether.
- 1 teaspoon Vanilla Extract: (Optional). Enhances the overall flavour profile, adding a warm, sweet note that complements the cherries and yogurt beautifully.
- Pinch of Salt: (Optional). A tiny pinch helps to balance the sweetness and enhance the other flavours.
Instructions
- Prepare the Cherries: If using fresh cherries, wash them thoroughly, remove the stems, and pit them. You can leave them whole or roughly chop them into halves or quarters, depending on your preference for texture. If using frozen cherries, you can use them directly from the freezer; chopping them might be slightly more difficult but is still possible if you prefer smaller pieces. Pat the cherries gently with a paper towel, especially if fresh or if your frozen ones have excess ice crystals, to remove excess moisture. This helps the yogurt adhere better.
- Combine Ingredients: In a medium-sized mixing bowl, combine the Greek yogurt, pitted (and potentially chopped) cherries, vanilla extract (if using), and sweetener (if using). Start with the lower amount of sweetener and taste the mixture; add more if you prefer it sweeter. Add the pinch of salt, if desired.
- Mix Gently: Using a spatula or spoon, gently fold the ingredients together until the cherries are evenly distributed throughout the yogurt. Be careful not to overmix, especially if using fresh cherries, as you don’t want to crush them completely or turn the yogurt entirely pink (unless that’s the look you’re going for!). You want distinct pieces of cherry within the yogurt.
- Prepare Baking Sheet: Line a large baking sheet, tray, or platter that will fit comfortably in your freezer with parchment paper or a silicone baking mat. This is crucial to prevent the clusters from sticking, making them easy to remove once frozen.
- Portion the Clusters: Using a spoon (a tablespoon or a small cookie scoop works well), drop dollops of the cherry-yogurt mixture onto the prepared baking sheet. Aim for bite-sized clusters, roughly 1-2 tablespoons each. Space them slightly apart so they don’t freeze together into one large mass. You can shape them slightly with the back of the spoon if you want neater rounds, but rustic clusters look great too.
- Freeze: Carefully place the baking sheet into the freezer. Let the clusters freeze until they are completely firm. This typically takes at least 2-3 hours, depending on the size of your clusters and the temperature of your freezer. For best results and a truly solid freeze, leave them for 3-4 hours or even overnight. They should be hard to the touch.
- Store: Once the clusters are solidly frozen, you can transfer them from the baking sheet into an airtight, freezer-safe container or a zip-top freezer bag. This prevents them from absorbing freezer odours and helps maintain their quality. Layering them with small pieces of parchment paper between layers can help prevent sticking, although if fully frozen, they usually separate easily.
- Enjoy: Serve the frozen cherry yogurt clusters straight from the freezer. They will start to soften relatively quickly at room temperature, so enjoy them immediately for the best frosty texture.
Nutrition Facts
(Approximate values based on using 2% Greek yogurt and 2 tbsp honey for about 12-15 clusters. Actual values may vary based on specific ingredients and cluster size.)
- Servings: Makes approximately 12-15 clusters.
- Calories per Serving (per cluster): Roughly 40-60 kcal. A light and refreshing treat that fits easily into a balanced diet.
- Protein: Approx. 3-4g per cluster. Primarily from the Greek yogurt, contributing to satiety and making it a more substantial snack than sugary alternatives.
- Fiber: Approx. 0.5-1g per cluster. Cherries provide dietary fiber, which is beneficial for digestion and overall health.
- Vitamin C: Cherries are a good source of Vitamin C, an important antioxidant that supports immune function. Each cluster offers a small contribution to your daily intake.
- Calcium: Greek yogurt provides calcium, essential for bone health.
(Disclaimer: Nutritional information is an estimate only and may vary depending on ingredients used, portion sizes, and specific brands.)
Preparation Time
- Active Preparation Time: 10-15 minutes. This includes pitting fresh cherries (if needed), mixing the ingredients, and portioning the clusters onto the baking sheet. Using pre-pitted frozen cherries significantly speeds up this step.
- Freezing Time: 2-4 hours (minimum), or until completely firm. The total time from start to enjoyment is primarily determined by the necessary freezing period.
How to Serve
These Frozen Cherry Yogurt Clusters are wonderfully versatile. Here are a few ways to enjoy them:
- Straight Up Snack:
- Serve them directly from the freezer in a small bowl for a quick, cooling, and healthy snack, perfect for hot afternoons or after a workout.
- Offer them as a light and refreshing alternative to ice cream or popsicles.
- Dessert Delight:
- Arrange a few clusters on a small plate for an elegant yet simple dessert.
- Drizzle with a little melted dark chocolate or a swirl of cherry coulis for extra indulgence.
- Serve alongside a small bowl of fresh berries or other fruit.
- Breakfast Boost:
- Add a couple of clusters to your morning smoothie bowl for a frosty element and flavour boost.
- Chop slightly softened clusters and sprinkle over granola or oatmeal instead of plain yogurt or fruit.
- Party Pleaser:
- Arrange them attractively on a chilled platter for parties or gatherings. They are great finger food!
- Offer them as part of a dessert buffet, especially for health-conscious guests or children’s parties.
- Creative Pairings:
- Sprinkle with chopped pistachios, almonds, or toasted coconut flakes just before serving for added texture and flavour.
- Serve with a sprig of fresh mint for a touch of colour and freshness.
Important Note: Remember they melt! Serve immediately after taking them out of the freezer, especially if serving to guests or outdoors. Using chilled bowls or platters can help them stay frozen slightly longer.
Additional Tips
- Choosing Your Cherries: Both sweet cherries (like Bing or Rainier) and tart cherries (like Montmorency) work well. Sweet cherries will result in a naturally sweeter cluster, while tart cherries offer a more tangy flavour that contrasts nicely with the yogurt. Using frozen cherries is often more convenient as they are usually already pitted.
- Yogurt Matters: Greek yogurt is ideal due to its low water content and thickness, resulting in creamier, less icy clusters. If you only have regular yogurt, you can strain it through cheesecloth for a few hours to remove excess whey and thicken it up before using. Flavoured yogurts (like vanilla or even cherry) can be used, but be mindful of added sugars and adjust or omit extra sweeteners accordingly.
- Sweetness Control: Adjust the sweetener to your liking. Taste the yogurt mixture before freezing. Factors influencing sweetness include the type of cherries used (sweet vs. tart), the tartness of the yogurt, and personal preference. You can use honey, maple syrup, agave, date syrup, or even a sugar substitute like stevia or erythritol. For a completely unsweetened version, simply omit the sweetener.
- Preventing Iciness: Using full-fat Greek yogurt helps create a creamier texture. Ensuring cherries are patted dry also reduces excess water. While some iciness is inherent in frozen yogurt treats, these steps minimize it. Don’t refreeze significantly melted clusters, as this will definitely make them icier.
- Flavor Variations: Get creative! Add other ingredients to the mix:
- Citrus Zest: Lemon or orange zest adds brightness.
- Chocolate Chips: Mini dark or white chocolate chips fold in nicely.
- Nuts/Seeds: Finely chopped almonds, pistachios, or chia seeds add texture (add just before freezing).
- Other Fruits: Swap cherries for blueberries, raspberries, chopped strawberries, or mango chunks. Combine fruits for multi-flavour clusters!
- Spices: A pinch of cardamom or cinnamon can add warmth.
- Perfect Portions: Using a small cookie scoop (about 1-1.5 tablespoons) ensures uniformly sized clusters, which helps them freeze evenly and looks neat for serving. If you don’t have one, two spoons work just fine.
- Optimal Storage: Once frozen solid on the baking sheet, transfer the clusters immediately to an airtight container or heavy-duty freezer bag. This prevents freezer burn and stops them from absorbing odours. They are best consumed within 2-4 weeks for optimal flavour and texture, though they can technically last longer.
- Working Quickly: Especially in warmer kitchens, the yogurt mixture can start to become runnier as you work. If needed, you can place the mixing bowl in the fridge for 10-15 minutes to firm up slightly before scooping, making it easier to handle. Similarly, get the scooped clusters into the freezer promptly.
FAQ
- Q: Can I use regular yogurt instead of Greek yogurt?
- A: Yes, you can, but the texture will likely be icier and less creamy because regular yogurt has a higher water content. The clusters might also spread more on the baking sheet. For a better result with regular yogurt, try straining it through a cheesecloth-lined sieve for a few hours (or overnight) in the refrigerator to remove excess whey and thicken it considerably, making it more like Greek yogurt.
- Q: Do I have to use a sweetener?
- A: No, sweetener is optional. If you are using very sweet cherries and prefer a more tart flavour profile, you can omit the honey or maple syrup entirely. Plain Greek yogurt is naturally tangy, so the sweetener helps balance that. Taste the mixture before freezing and decide based on your preference.
- Q: Can I use frozen cherries? Are fresh cherries better?
- A: Absolutely! Frozen cherries are often more convenient as they usually come pitted. They work perfectly in this recipe, and you can use them straight from the freezer. There’s no significant difference in the final product’s quality whether you use fresh or frozen cherries, so choose whichever is easier or available to you. If using frozen, ensure there aren’t large ice crystals attached.
- Q: How long do these Frozen Cherry Yogurt Clusters last in the freezer?
- A: When stored properly in an airtight container or freezer bag, they will last for about 2-4 weeks for the best quality, flavour, and texture. While they might be safe to eat beyond that, they can start to develop ice crystals or freezer burn, which affects the texture.
- Q: Can I make these dairy-free or vegan?
- A: Yes! Simply substitute the Greek yogurt with your favourite dairy-free yogurt alternative. Look for thicker varieties like coconut-based, soy-based, or almond-based Greek-style yogurts for the best texture, similar to traditional Greek yogurt. Ensure you use a plant-based sweetener like maple syrup or agave if needed.
- Q: My clusters are too icy. How can I make them creamier?
- A: Iciness usually comes from water content. To make them creamier:
- Use full-fat Greek yogurt, as fat inhibits ice crystal formation.
- Ensure your cherries are patted dry to remove surface moisture.
- Consider adding a tiny bit more sweetener (like honey or maple syrup), as sugar slightly lowers the freezing point and can improve texture.
- Make sure your freezer isn’t set too cold, though standard freezer temperatures are fine.
- Eat them relatively soon after making (within a couple of weeks) as prolonged storage can increase iciness.
- A: Iciness usually comes from water content. To make them creamier:
- Q: Can I use other fruits instead of cherries?
- A: Definitely! This recipe is very adaptable. Blueberries, raspberries, blackberries, chopped strawberries, mango chunks, or even pineapple tidbits work great. Adjust sweetener based on the fruit’s natural sweetness. Keep fruit pieces relatively small for bite-sized clusters.
- Q: Are these Frozen Cherry Yogurt Clusters healthy?
- A: Generally, yes! They are a healthier alternative to many store-bought frozen desserts or sugary snacks. They contain protein from the Greek yogurt, vitamins, antioxidants, and fiber from the cherries. Using minimal or no added sugar keeps them lighter. They offer probiotics (if your yogurt contains live cultures) and calcium. As with any treat, moderation is key, but they are certainly a nutritious choice for a snack or light dessert.
Frozen Cherry Yogurt Clusters
Ingredients
- 2 cups Fresh or Frozen Cherries: (approx. 300-350g) Pitted. Sweet or tart cherries both work beautifully, offering slightly different flavour profiles. Frozen cherries work perfectly and save you the pitting step! If using fresh, ensure they are pitted. These provide the vibrant colour, juicy burst, and antioxidant boost.
- 2 cups Plain Greek Yogurt: (approx. 450-500g) Full-fat or low-fat. Greek yogurt is recommended for its thick, creamy texture which helps the clusters hold their shape better and provides a good dose of protein. Regular yogurt can be used but may result in icier clusters.
- 2–4 tablespoons Honey or Maple Syrup: (Optional, adjust to taste). This adds a touch of sweetness to balance the tartness of the yogurt and cherries. Start with less and add more if desired, depending on the sweetness of your cherries and personal preference. You can also use agave nectar or omit sweetener altogether.
- 1 teaspoon Vanilla Extract: (Optional). Enhances the overall flavour profile, adding a warm, sweet note that complements the cherries and yogurt beautifully.
- Pinch of Salt: (Optional). A tiny pinch helps to balance the sweetness and enhance the other flavours.
Instructions
- Prepare the Cherries: If using fresh cherries, wash them thoroughly, remove the stems, and pit them. You can leave them whole or roughly chop them into halves or quarters, depending on your preference for texture. If using frozen cherries, you can use them directly from the freezer; chopping them might be slightly more difficult but is still possible if you prefer smaller pieces. Pat the cherries gently with a paper towel, especially if fresh or if your frozen ones have excess ice crystals, to remove excess moisture. This helps the yogurt adhere better.
- Combine Ingredients: In a medium-sized mixing bowl, combine the Greek yogurt, pitted (and potentially chopped) cherries, vanilla extract (if using), and sweetener (if using). Start with the lower amount of sweetener and taste the mixture; add more if you prefer it sweeter. Add the pinch of salt, if desired.
- Mix Gently: Using a spatula or spoon, gently fold the ingredients together until the cherries are evenly distributed throughout the yogurt. Be careful not to overmix, especially if using fresh cherries, as you don’t want to crush them completely or turn the yogurt entirely pink (unless that’s the look you’re going for!). You want distinct pieces of cherry within the yogurt.
- Prepare Baking Sheet: Line a large baking sheet, tray, or platter that will fit comfortably in your freezer with parchment paper or a silicone baking mat. This is crucial to prevent the clusters from sticking, making them easy to remove once frozen.
- Portion the Clusters: Using a spoon (a tablespoon or a small cookie scoop works well), drop dollops of the cherry-yogurt mixture onto the prepared baking sheet. Aim for bite-sized clusters, roughly 1-2 tablespoons each. Space them slightly apart so they don’t freeze together into one large mass. You can shape them slightly with the back of the spoon if you want neater rounds, but rustic clusters look great too.
- Freeze: Carefully place the baking sheet into the freezer. Let the clusters freeze until they are completely firm. This typically takes at least 2-3 hours, depending on the size of your clusters and the temperature of your freezer. For best results and a truly solid freeze, leave them for 3-4 hours or even overnight. They should be hard to the touch.
- Store: Once the clusters are solidly frozen, you can transfer them from the baking sheet into an airtight, freezer-safe container or a zip-top freezer bag. This prevents them from absorbing freezer odours and helps maintain their quality. Layering them with small pieces of parchment paper between layers can help prevent sticking, although if fully frozen, they usually separate easily.
- Enjoy: Serve the frozen cherry yogurt clusters straight from the freezer. They will start to soften relatively quickly at room temperature, so enjoy them immediately for the best frosty texture.
Nutrition
- Serving Size: one normal portion
- Calories: 60
- Fiber: 1g
- Protein: 4g


