


Of all the scents that can fill a home, few are as comforting and deeply nostalgic to me as the smell of steaming puto. I remember weekends at my Lola’s (grandmother’s) house, where the rhythmic hiss of the steamer was the soundtrack to our afternoons. She would make the classic white cheese puto, and we’d devour them, still warm and pillowy, often alongside a savory dish like dinuguan. When I started experimenting in my own kitchen, I wanted to capture that same cloud-like texture but infuse it with a modern, vibrant twist that my own family would adore. That’s when I turned to the undisputed king of Filipino flavors: ube. The first time I pulled a batch of these Fluffy Ube Puto Cups from the steamer, my kids’ eyes went wide. The brilliant purple hue was an instant showstopper. But the real magic happened with the first bite. The subtle, sweet, and slightly nutty flavor of the purple yam, combined with the impossibly soft and airy crumb of the steamed cake, was a revelation. It was the taste of my childhood, elevated. These little cups of joy have since become a staple for our family gatherings, birthday parties, and quiet weekend meriendas (afternoon snacks). They are a bridge between generations—a taste of tradition that feels excitingly new. This recipe is the culmination of much trial and error to achieve that perfect balance of fluffiness, moisture, and deep ube flavor. It’s more than just a recipe; it’s a piece of my heart and my heritage, ready to be shared and create new memories in your own home.
What Exactly Are Fluffy Ube Puto Cups? A Dive into a Filipino Classic
Before we tie on our aprons and get to steaming, let’s take a moment to appreciate what we’re about to create. For those unfamiliar with this delightful treat, understanding its components is key to appreciating its magic. Ube Puto is a beautiful marriage of two beloved elements in Filipino cuisine: Puto and Ube.
Puto: The Quintessential Filipino Steamed Rice Cake
At its core, Puto is a type of kakanin, a broad category of Filipino delicacies made from glutinous rice or rice flour. These are the soul food of the Philippines, often associated with celebrations, fiestas, and the simple joy of an afternoon snack. Traditional puto is made from rice that has been soaked, ground, and fermented, giving it a unique, slightly sour tang that pairs wonderfully with savory dishes.
However, the modern puto, and the one we are making today, has evolved for the home cook. We use readily available flours like rice flour and even all-purpose or cake flour to create a texture that is less about fermentation and more about achieving a light, cake-like fluffiness. Baking powder acts as the leavening agent, giving the puto its signature rise and airy crumb. Puto is incredibly versatile; it can be plain white, topped with a sliver of cheese or a salted egg, or infused with a myriad of flavors—which brings us to our star ingredient.
Ube: The Royal Purple Yam
Ube (pronounced OO-beh) is a species of purple yam native to the Philippines. It is not to be confused with taro or the purple sweet potato; ube has a distinct flavor and a more vibrant, deep purple color. Its taste is difficult to pin down but is often described as a gentle blend of vanilla, pistachio, and a subtle nuttiness. It’s sweet but in a mellow, earthy way that is incredibly satisfying.
For centuries, ube has been a staple in Filipino desserts. It’s most famously prepared as ube halaya, a rich, thick jam made by boiling and mashing the yam with coconut milk, condensed milk, and butter. This ube jam is a dessert in its own right but is also the foundational ingredient for countless other treats, from ice cream and cakes to bread and, of course, our puto.
The Perfect Union: Ube Puto
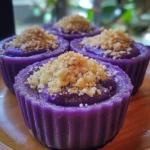
When you combine the soft, pillowy texture of puto with the sweet, aromatic, and visually stunning essence of ube, you create something truly special. The Ube Puto Cup is a perfect single-serving treat that captures the best of both worlds. The ube not only lends its gorgeous color and flavor but also adds a wonderful moisture content to the steamed cake, ensuring it stays soft and delicious for longer. It’s a modern classic that pays homage to traditional Filipino culinary techniques while embracing a flavor that has captivated the world. Making this recipe is not just about baking; it’s about participating in a rich cultural tradition.
Ingredients
To create these vibrant and airy Ube Puto Cups, you will need a combination of simple yet specific ingredients. Each one plays a crucial role in achieving the perfect texture and flavor.
- 2 cups (260g) Cake Flour: This is the secret to an exceptionally light and tender crumb. Its lower protein content results in a softer texture compared to all-purpose flour.
- 1 cup (200g) Granulated Sugar: Provides the perfect amount of sweetness to complement the ube flavor without being overpowering.
- 1 tablespoon + 1 teaspoon Baking Powder: This is the primary leavening agent. The precise amount is critical for achieving the signature dome and fluffy rise of the puto.
- ½ teaspoon Salt: A small but vital ingredient that enhances all the other flavors and balances the sweetness.
- 2 large Eggs: Act as a binder and add richness and structure to the steamed cakes.
- ½ cup (120ml) Melted Butter, unsalted: Adds incredible richness, flavor, and moisture, contributing to a tender mouthfeel.
- 1 can (13.5 oz or 400ml) Full-Fat Coconut Milk: This provides the primary liquid and a creamy, tropical flavor that pairs beautifully with ube. Full-fat is essential for richness.
- ½ cup (130g) Ube Halaya (Purple Yam Jam): This is the heart of our recipe, providing the authentic ube flavor, color, and moisture. Store-bought or homemade will work.
- 1 teaspoon Ube Extract: This intensifies the ube flavor and, more importantly, enhances the beautiful purple color, which can sometimes be muted by the other ingredients.
- ½ cup Quick-Melt Cheese, cut into small cubes: This is the classic topping. As the puto steams, the cheese melts into a delicious, savory pocket on top, contrasting perfectly with the sweet cake.
Instructions
Follow these step-by-step instructions carefully to ensure your Ube Puto Cups are perfectly fluffy, moist, and delicious every time. The process is divided into preparation, mixing, and steaming for clarity.
Part 1: Preparation
- Prepare the Steamer: Fill the bottom of your steamer with water, ensuring it’s about two-thirds full. Place it over medium-high heat and bring it to a rolling boil. Having the steamer hot and ready is crucial for a good rise.
- Grease the Molds: Lightly grease your individual puto molds or mini muffin tins with a neutral oil or non-stick spray. This will prevent the delicate cakes from sticking and ensure they release easily after steaming. Set them aside.
- Prepare the Cheese: Cut your quick-melt cheese into small cubes, approximately ½-inch in size. Having these ready will make the assembly process smoother.
Part 2: Creating the Perfect Batter
- Sift the Dry Ingredients: In a large mixing bowl, place a fine-mesh sieve. Add the cake flour, granulated sugar, baking powder, and salt. Sift them together into the bowl. This step is non-negotiable; it aerates the flour and removes any lumps, which is essential for a smooth batter and a fluffy final product. Whisk the sifted ingredients together to ensure they are evenly distributed.
- Combine the Wet Ingredients: In a separate medium-sized bowl, whisk together the wet ingredients. Start by whisking the two large eggs until they are pale and slightly frothy. Add the melted butter, full-fat coconut milk, ube halaya, and ube extract. Whisk vigorously until the ube halaya has dissolved and the mixture is smooth and uniform in its vibrant purple color. It’s okay if there are a few tiny specks of ube jam remaining.
- Combine Wet and Dry: Pour the wet ingredient mixture into the bowl with the sifted dry ingredients. Using a rubber spatula or a whisk, gently fold the ingredients together. Mix only until there are no more visible streaks of dry flour. It is critically important not to overmix the batter. A few small lumps are perfectly fine. Overmixing develops gluten, which will result in tough, dense puto instead of light, fluffy ones.
Part 3: Steaming to Perfection
- Fill the Molds: Carefully pour or spoon the ube puto batter into your prepared molds. Fill each mold about three-quarters of the way full. This leaves enough room for the puto to rise and form its classic dome without spilling over.
- Add the Cheese Topping: Place one cube of the prepared cheese in the center of the batter in each mold. Gently press it down just slightly, but don’t submerge it completely.
- Steam the Puto: By now, your steamer should be producing a steady amount of steam. Carefully arrange the filled molds inside the steamer basket, ensuring they are not touching each other to allow for even steam circulation.
- Wrap the Lid: To prevent water condensation from dripping onto your puto (which can cause them to become dense and soggy), wrap the steamer lid with a clean kitchen towel or a few layers of cheesecloth.
- Steam: Place the towel-wrapped lid on the steamer. Steam the puto for 10 to 15 minutes. The exact time will depend on the size of your molds and the intensity of your steamer.
- Check for Doneness: After 10 minutes, you can check for doneness. Carefully remove the lid (opening it away from you to avoid a steam burn) and insert a toothpick into the center of one puto cup. If the toothpick comes out clean, they are done. If there is wet batter on it, steam for another 2-3 minutes and check again.
- Cool and Serve: Once cooked, carefully remove the steamer basket from the pot. Let the puto cups cool in the molds for about 5 minutes. This allows them to set and makes them easier to handle. Afterwards, you can gently remove them from the molds and transfer them to a wire rack to cool further. They are best enjoyed warm.
Nutrition Facts
This recipe yields approximately 24-30 puto cups, depending on the size of your molds. The nutritional information is an estimate per serving (1 puto cup).
- Servings: 24 Puto Cups
- Calories per serving: Approximately 145 kcal
- Carbohydrates (20g): The primary source of energy in this recipe, coming mainly from the cake flour and sugar. This provides the fuel needed to get you through your afternoon.
- Fat (6g): Sourced from the rich coconut milk and melted butter, the fat content contributes to the moist texture and satisfying mouthfeel of the puto.
- Protein (2.5g): The eggs and flour provide a small amount of protein, which gives the steamed cakes their essential structure.
- Sugar (10g): The granulated sugar and the sugars present in the ube halaya give the puto its characteristic sweetness, making it a delightful dessert or snack.
- Sodium (120mg): The salt added to the batter plays a crucial role not just in flavor but in balancing the overall taste profile of this sweet treat.
Preparation Time
Creating these delightful Ube Puto Cups is a relatively quick process, with most of the time being hands-off while they steam.
- Active Preparation Time: 15 minutes. This includes gathering and measuring your ingredients, greasing the molds, sifting the dry ingredients, and mixing the batter.
- Steaming Time: 15 minutes. This is the hands-off time where the steamer does all the magic. You might need to do this in batches depending on the size of your steamer.
- Total Time: Approximately 30 minutes (for one batch).
How to Serve
Ube Puto is wonderfully versatile and can be served in many delightful ways. Here are some of the best ways to enjoy your freshly made treats:
- As a Standalone Merienda (Afternoon Snack):
- Serve them warm, fresh from the steamer, when they are at their fluffiest.
- Pair them with a hot cup of coffee, tsokolate (Filipino hot chocolate), or a simple black tea. The warmth of the beverage beautifully complements the sweet, moist cake.
- The Classic Savory Pairing:
- For a traditional Filipino meal, serve Ube Puto alongside Dinuguan (pork blood stew). The sweet and savory combination is a beloved classic for a reason—the sweetness of the puto cuts through the rich, savory flavor of the stew in a perfect balance.
- They also pair well with other savory soups and noodle dishes like Pancit or Batchoy.
- For Parties and Gatherings:
- Arrange them on a platter as part of a dessert table. Their vibrant purple color makes them a stunning centerpiece.
- Include them in a kakanin platter, alongside other Filipino delicacies like kutsinta, sapin-sapin, and pichi-pichi.
- With Extra Toppings:
- For an even more decadent treat, serve with a small dollop of extra ube halaya on top.
- Sprinkle with a little bit of toasted desiccated coconut for a lovely crunch and nutty flavor.
- If you’re not a fan of cheese, you can steam them plain and top with a small pat of salted butter while they are still warm.
Additional Tips
To elevate your Ube Puto from great to absolutely perfect, keep these eight professional tips in mind.
- Room Temperature is Key: For a smooth, well-emulsified batter, ensure your eggs and coconut milk are at room temperature. Cold ingredients don’t mix as well with the melted butter, which can cause it to re-solidify into small clumps, affecting the final texture.
- Don’t Skip the Sifting: This might seem like a tedious step, but it is the most important tip for achieving a fluffy texture. Sifting not only removes lumps from the flour and baking powder but also aerates them, which is the first step in creating a light and airy crumb.
- Mind the Condensation: The towel-wrapped lid is a classic Filipino kitchen hack for a reason. Steam condenses into water droplets on the lid of the steamer. If this water drips onto the surface of your puto as they cook, it will create dense, wet spots and prevent them from rising properly. A clean, dry kitchen towel absorbs this moisture perfectly.
- Preheat Your Steamer: Do not put your puto into a cold or lukewarm steamer. The initial blast of hot, powerful steam is what activates the baking powder and gives the puto their signature “poof” and dome-shaped top. The steamer should be at a full, rolling boil before the molds go in.
- Choose Your Ube Wisely: The quality of your ube halaya will directly impact the final flavor. If possible, use a good quality store-bought brand or, even better, homemade ube halaya. Some brands are sweeter or have a stronger flavor than others, so you can slightly adjust the sugar in the recipe if you know your jam is particularly sweet.
- Avoid Opening the Steamer Lid: Resist the temptation to peek at your puto while they are steaming, at least for the first 10 minutes. Opening the lid releases all the trapped steam and heat, causing a sudden temperature drop that can make your puto collapse and become dense.
- The Gentle Fold: When combining the wet and dry ingredients, use a gentle folding motion with a spatula rather than vigorous whisking. Scrape the bottom of the bowl and bring the batter up and over. Stop as soon as the ingredients are just combined. A few lumps are better than over-mixed, tough puto.
- Batch Steaming Strategy: If your steamer can’t fit all the molds at once, keep your remaining batter covered at room temperature while the first batch cooks. Do not refrigerate it. Give the batter a very gentle stir before pouring it into the molds for the next batch, as some ingredients may have settled.
Frequently Asked Questions (FAQ)
Here are answers to some of the most common questions about making Fluffy Ube Puto Cups.
1. Why did my puto come out dense and rubbery instead of fluffy?
This is the most common issue and is almost always caused by one of two things: over-mixing the batter, which develops too much gluten, or not having a hot enough steamer. Mix the batter only until combined, and make sure your steamer is at a full, rolling boil before you put the puto inside.
2. Can I use all-purpose flour instead of cake flour?
Yes, you can, but the texture will be slightly different. Puto made with all-purpose flour will be a bit denser and chewier compared to the ultra-light and tender crumb you get from cake flour. If using all-purpose flour, you can approximate cake flour by measuring 2 cups of AP flour, removing 4 tablespoons, and replacing it with 4 tablespoons of cornstarch, then sifting everything together.
3. How do I store leftover Ube Puto?
Store any leftover puto in an airtight container at room temperature for up to 2 days. Storing them in the refrigerator tends to make them hard and dry. If you must refrigerate them, you can restore some of their softness by re-steaming them for 2-3 minutes or microwaving them for 10-15 seconds before serving.
4. Can I make this recipe without ube halaya and just use ube extract?
While you can, it’s not recommended for the best results. Ube halaya provides not just flavor and color, but also crucial moisture and body to the batter. Using only extract will give you a purple-colored, vaguely ube-flavored cake, but it will lack the authentic, rich taste and moist texture.
5. Why did the color of my ube puto fade after steaming?
This can happen for a few reasons. The ube halaya you used might have had a lighter, more natural color. This is why the ube extract is important—it helps boost and stabilize the purple hue. Also, some chemical reactions with certain types of baking powder can affect the color. Ensure you are using fresh, double-acting baking powder.
6. Can I make this recipe vegan?
Yes, this recipe can be adapted for a vegan version with a few substitutions. Use a vegan butter substitute or neutral oil (like canola or coconut oil) instead of dairy butter. For the eggs, you can use a commercial egg replacer or a “flax egg” (2 tablespoons of ground flaxseed mixed with 6 tablespoons of water, rested for 10 minutes). Ensure your ube halaya is also vegan (some recipes contain dairy).
7. I don’t have puto molds. What can I use instead?
No problem! A standard mini muffin tin works perfectly as a substitute. Just be sure to grease it well. You can place the entire tin inside a large steamer or a large pot with a steaming rack. You can also use silicone cupcake liners, which are naturally non-stick and flexible.
8. Can I freeze Ube Puto?
Yes, you can freeze puto. Let them cool completely, then arrange them in a single layer on a baking sheet and flash-freeze them for an hour. Once solid, transfer them to a freezer-safe bag or container. They can be stored for up to a month. To serve, thaw them at room temperature and then re-steam for a few minutes to bring back their soft, fluffy texture.
Fluffy Ube Puto Cups
Ingredients
To create these vibrant and airy Ube Puto Cups, you will need a combination of simple yet specific ingredients. Each one plays a crucial role in achieving the perfect texture and flavor.
- 2 cups (260g) Cake Flour: This is the secret to an exceptionally light and tender crumb. Its lower protein content results in a softer texture compared to all-purpose flour.
- 1 cup (200g) Granulated Sugar: Provides the perfect amount of sweetness to complement the ube flavor without being overpowering.
- 1 tablespoon + 1 teaspoon Baking Powder: This is the primary leavening agent. The precise amount is critical for achieving the signature dome and fluffy rise of the puto.
- ½ teaspoon Salt: A small but vital ingredient that enhances all the other flavors and balances the sweetness.
- 2 large Eggs: Act as a binder and add richness and structure to the steamed cakes.
- ½ cup (120ml) Melted Butter, unsalted: Adds incredible richness, flavor, and moisture, contributing to a tender mouthfeel.
- 1 can (13.5 oz or 400ml) Full-Fat Coconut Milk: This provides the primary liquid and a creamy, tropical flavor that pairs beautifully with ube. Full-fat is essential for richness.
- ½ cup (130g) Ube Halaya (Purple Yam Jam): This is the heart of our recipe, providing the authentic ube flavor, color, and moisture. Store-bought or homemade will work.
- 1 teaspoon Ube Extract: This intensifies the ube flavor and, more importantly, enhances the beautiful purple color, which can sometimes be muted by the other ingredients.
- ½ cup Quick-Melt Cheese, cut into small cubes: This is the classic topping. As the puto steams, the cheese melts into a delicious, savory pocket on top, contrasting perfectly with the sweet cake.
Instructions
Follow these step-by-step instructions carefully to ensure your Ube Puto Cups are perfectly fluffy, moist, and delicious every time. The process is divided into preparation, mixing, and steaming for clarity.
Part 1: Preparation
- Prepare the Steamer: Fill the bottom of your steamer with water, ensuring it’s about two-thirds full. Place it over medium-high heat and bring it to a rolling boil. Having the steamer hot and ready is crucial for a good rise.
- Grease the Molds: Lightly grease your individual puto molds or mini muffin tins with a neutral oil or non-stick spray. This will prevent the delicate cakes from sticking and ensure they release easily after steaming. Set them aside.
- Prepare the Cheese: Cut your quick-melt cheese into small cubes, approximately ½-inch in size. Having these ready will make the assembly process smoother.
Part 2: Creating the Perfect Batter
- Sift the Dry Ingredients: In a large mixing bowl, place a fine-mesh sieve. Add the cake flour, granulated sugar, baking powder, and salt. Sift them together into the bowl. This step is non-negotiable; it aerates the flour and removes any lumps, which is essential for a smooth batter and a fluffy final product. Whisk the sifted ingredients together to ensure they are evenly distributed.
- Combine the Wet Ingredients: In a separate medium-sized bowl, whisk together the wet ingredients. Start by whisking the two large eggs until they are pale and slightly frothy. Add the melted butter, full-fat coconut milk, ube halaya, and ube extract. Whisk vigorously until the ube halaya has dissolved and the mixture is smooth and uniform in its vibrant purple color. It’s okay if there are a few tiny specks of ube jam remaining.
- Combine Wet and Dry: Pour the wet ingredient mixture into the bowl with the sifted dry ingredients. Using a rubber spatula or a whisk, gently fold the ingredients together. Mix only until there are no more visible streaks of dry flour. It is critically important not to overmix the batter. A few small lumps are perfectly fine. Overmixing develops gluten, which will result in tough, dense puto instead of light, fluffy ones.
Part 3: Steaming to Perfection
- Fill the Molds: Carefully pour or spoon the ube puto batter into your prepared molds. Fill each mold about three-quarters of the way full. This leaves enough room for the puto to rise and form its classic dome without spilling over.
- Add the Cheese Topping: Place one cube of the prepared cheese in the center of the batter in each mold. Gently press it down just slightly, but don’t submerge it completely.
- Steam the Puto: By now, your steamer should be producing a steady amount of steam. Carefully arrange the filled molds inside the steamer basket, ensuring they are not touching each other to allow for even steam circulation.
- Wrap the Lid: To prevent water condensation from dripping onto your puto (which can cause them to become dense and soggy), wrap the steamer lid with a clean kitchen towel or a few layers of cheesecloth.
- Steam: Place the towel-wrapped lid on the steamer. Steam the puto for 10 to 15 minutes. The exact time will depend on the size of your molds and the intensity of your steamer.
- Check for Doneness: After 10 minutes, you can check for doneness. Carefully remove the lid (opening it away from you to avoid a steam burn) and insert a toothpick into the center of one puto cup. If the toothpick comes out clean, they are done. If there is wet batter on it, steam for another 2-3 minutes and check again.
- Cool and Serve: Once cooked, carefully remove the steamer basket from the pot. Let the puto cups cool in the molds for about 5 minutes. This allows them to set and makes them easier to handle. Afterwards, you can gently remove them from the molds and transfer them to a wire rack to cool further. They are best enjoyed warm.
Nutrition
- Serving Size: one normal portion
- Calories: 145
- Sugar: 10g
- Sodium: 120mg
- Fat: 6g
- Carbohydrates: 20g
- Protein: 2.5g


