

There are some recipes that just sing to your soul, and for my family, these Family-Favorite Chicken Tacos are a full-blown culinary opera. I remember the first time I made them; I was a bit skeptical, wondering if they could truly live up to the “family-favorite” title I was already bestowing upon them in my head. The aroma that filled the kitchen as the chicken simmered with those vibrant spices was the first clue – a warm, inviting scent that had little feet and big feet alike gravitating towards the stove, asking, “What smells SO good?” When we finally sat down to assemble our tacos, the scene was pure, chaotic joy. My youngest, usually a picky eater, was meticulously building his taco with a look of intense concentration, while my teenager, who often communicates in monosyllables, actually declared them “epic.” My partner and I exchanged a knowing smile – this recipe was a keeper. The chicken was unbelievably tender and packed with flavor, a perfect balance of smoky, savory, and just a hint of citrusy brightness. Since that day, these chicken tacos have become a beloved ritual in our home, a guaranteed way to bring everyone to the table for a meal that’s not just delicious, but also fun, interactive, and brimming with happy memories. They are our go-to for busy weeknights, casual weekend gatherings, and anytime we need a guaranteed crowd-pleaser.
Ingredients
Here’s what you’ll need to create these incredibly popular and delicious Family-Favorite Chicken Tacos. Each ingredient plays a crucial role in building the layers of flavor that make this recipe so special.
- 1.5 lbs Boneless, Skinless Chicken Breasts (or Thighs): The heart of our tacos, providing a substantial and lean protein base. We often opt for chicken breasts for their lower fat content, but boneless, skinless chicken thighs are an excellent alternative if you prefer extra juiciness and richer flavor. Ensure they are trimmed of any excess fat.
- 2-3 Tablespoons Taco Seasoning (Homemade or Store-Bought): This is where the magic happens! A robust blend of spices typically including chili powder, cumin, paprika, garlic powder, onion powder, and oregano. Using a quality store-bought seasoning works perfectly, but a homemade blend (see our tips section for a quick recipe!) allows you to control the sodium and heat levels to your family’s preference.
- 1 Tablespoon Olive Oil (or Avocado Oil): Essential for achieving a beautiful sear on the chicken and preventing it from sticking to the pan. Olive oil adds a subtle fruity note, while avocado oil has a higher smoke point and neutral flavor, both are excellent choices.
- Juice of 1 Medium Lime (about 2 tablespoons): A non-negotiable ingredient in our book! Freshly squeezed lime juice adds a vital burst of acidity and brightness that cuts through the richness of the spices and tenderizes the chicken beautifully.
- 1/4 cup Chicken Broth (or Water): This liquid gold helps to create a wonderfully saucy consistency for the chicken filling, ensuring every bite is moist and flavorful. It also aids in deglazing the pan, capturing all those delicious browned bits. Low-sodium chicken broth is a great option if you’re watching your salt intake.
- 1 Small Yellow Onion, finely chopped (optional but recommended): Adding a chopped onion creates a foundational layer of sweet and savory aromatic flavor that deeply infuses the chicken.
- 2 Cloves Garlic, minced (optional but recommended): Freshly minced garlic complements the onion and spices, contributing its pungent, irresistible aroma and taste.
- 12-16 Small Corn or Flour Tortillas: The trusty vessel for your taco masterpiece! Traditional corn tortillas offer an authentic, slightly nutty flavor and a more rustic texture, especially when lightly charred. Flour tortillas are generally softer, more pliable, and a favorite for their mild taste. Choose whichever your family enjoys most, or offer both for variety!
- Salt and Freshly Ground Black Pepper to taste: While the taco seasoning will contain salt, you may want to adjust the seasoning of the chicken, especially if using low-sodium broth or homemade seasoning without much salt. Freshly ground black pepper always adds a better flavor than pre-ground.
Instructions
Follow these detailed steps to create the most flavorful and tender chicken taco filling, setting the stage for an unforgettable meal.
- Prepare the Chicken:
Begin by patting your boneless, skinless chicken breasts (or thighs) thoroughly dry with paper towels. This simple step is crucial as it helps to remove excess surface moisture, allowing the chicken to sear properly and develop a beautiful golden-brown crust rather than steaming in the pan. Once dried, you have a choice in how you prepare the chicken for cooking. You can dice the chicken into small, uniform, bite-sized pieces, roughly ½-inch to ¾-inch cubes. Dicing before cooking ensures more surface area for the seasoning to cling to and generally speeds up the cooking process. Alternatively, you can cook the chicken breasts whole and then shred them once cooked. For this particular family-favorite recipe, we often prefer dicing the chicken first as it makes for easy, perfectly portioned bites within the taco. If using chicken thighs, ensure they are also trimmed of any large pieces of fat before dicing. - Season the Chicken Generously:
Place the prepared chicken (diced or whole) into a medium-sized mixing bowl. Sprinkle the taco seasoning evenly over the chicken. Whether you’re using a pre-made packet or your own signature homemade blend, don’t be shy with the seasoning – you want every piece of chicken to be generously coated. Add a pinch of extra salt and freshly ground black pepper if your taco seasoning is low in sodium or if you prefer a more seasoned flavor profile. Use your clean hands or a large spoon to toss the chicken pieces, ensuring that each one is thoroughly enveloped in the aromatic spice mixture. For an enhanced flavor experience, if time permits, cover the bowl and allow the seasoned chicken to marinate in the refrigerator for at least 15-30 minutes. This marination period allows the spices to penetrate the meat more deeply, resulting in a more flavorful end product. You can even marinate it for up to 4 hours if preparing ahead. - Sear the Chicken to Perfection:
Place a large, heavy-bottomed skillet (cast iron works wonderfully here, but a good quality non-stick or stainless steel skillet is also fine) or a Dutch oven over medium-high heat. Add the tablespoon of olive oil (or avocado oil) to the skillet. Allow the oil to heat up until it shimmers lightly or a drop of water sizzles and evaporates instantly. Carefully add the seasoned chicken to the hot skillet, spreading it out in a single, even layer. It’s important not to overcrowd the pan; if your skillet isn’t large enough to hold all the chicken in a single layer without pieces overlapping, it’s best to cook the chicken in two batches. Overcrowding lowers the pan’s temperature and causes the chicken to steam rather than sear, preventing that desirable browning. Let the chicken cook undisturbed for about 3-4 minutes on the first side, or until it develops a rich, golden-brown crust. Then, use tongs or a spatula to flip or stir the chicken pieces and continue to cook for another 3-5 minutes, stirring occasionally, until it’s browned on all sides and nearly cooked through. - Build the Flavor Base (Aromatics):
If you’re incorporating the optional (but highly recommended!) onion and garlic for an extra dimension of flavor, now is the time to add them. Push the browned chicken to one side of the skillet. If the pan seems dry, you can add a tiny drizzle more olive oil to the empty side. Add the finely chopped yellow onion to the cleared space in the skillet and sauté for about 2-3 minutes, stirring frequently, until the onion softens and becomes translucent, releasing its sweet aroma. Next, add the minced garlic to the onions and cook for another minute, stirring constantly, until the garlic is fragrant. Be very careful not to burn the garlic, as it can become bitter quickly. Once the aromatics are softened and fragrant, stir them thoroughly into the browned chicken, combining all the elements. - Deglaze and Simmer to Tenderness:
Pour in the 1/4 cup of chicken broth (or water) and the freshly squeezed lime juice over the chicken and aromatics. As the liquid hits the hot pan, use a wooden spoon or spatula to gently scrape up any browned bits (fond) that have stuck to the bottom of the skillet. This process, known as deglazing, is packed with concentrated flavor and will enrich your taco filling immensely. Bring the mixture to a gentle simmer. Once simmering, reduce the heat to low, cover the skillet with a lid, and allow the chicken to cook for another 5-10 minutes. The exact simmering time will depend on the size of your chicken pieces (if diced) or the thickness (if whole). The goal is for the chicken to be completely cooked through and exceptionally tender, and for the sauce to have thickened slightly, beautifully coating each piece of chicken. The internal temperature of the chicken should reach 165°F (74°C) when checked with a meat thermometer. If you cooked whole chicken breasts, remove them from the skillet at this point and place them on a clean cutting board. Allow them to rest for a few minutes, then use two forks to shred the chicken. Return the shredded chicken back into the skillet with the sauce, tossing well to ensure all the shredded meat is coated. - Warm the Tortillas – An Essential Step:
While the chicken is finishing its simmer or while you’re shredding it, it’s time to warm your tortillas. Warm tortillas are more pliable, less likely to tear when folded, and simply taste better. There are several easy ways to do this:- Gas Stove (for Corn Tortillas): Using tongs, carefully place corn tortillas one at a time directly over a low to medium gas flame for a few seconds per side, until they are lightly charred in spots and puffed. Be cautious and keep an eye on them.
- Dry Skillet: Heat a dry (no oil) skillet (cast iron or non-stick) over medium heat. Warm tortillas one by one for about 20-30 seconds per side, until they are soft and warmed through. You can stack them in a tortilla warmer or wrapped in a clean kitchen towel as you go to keep them warm.
- Microwave: Stack up to 6-8 tortillas, wrap them in a slightly damp paper towel or a clean, damp kitchen towel, and microwave on high for 30-60 seconds, depending on the power of your microwave and the number of tortillas.
- Oven: Wrap a stack of tortillas in foil and warm them in a preheated 300°F (150°C) oven for about 10-15 minutes.
- Assemble Your Family-Favorite Chicken Tacos:
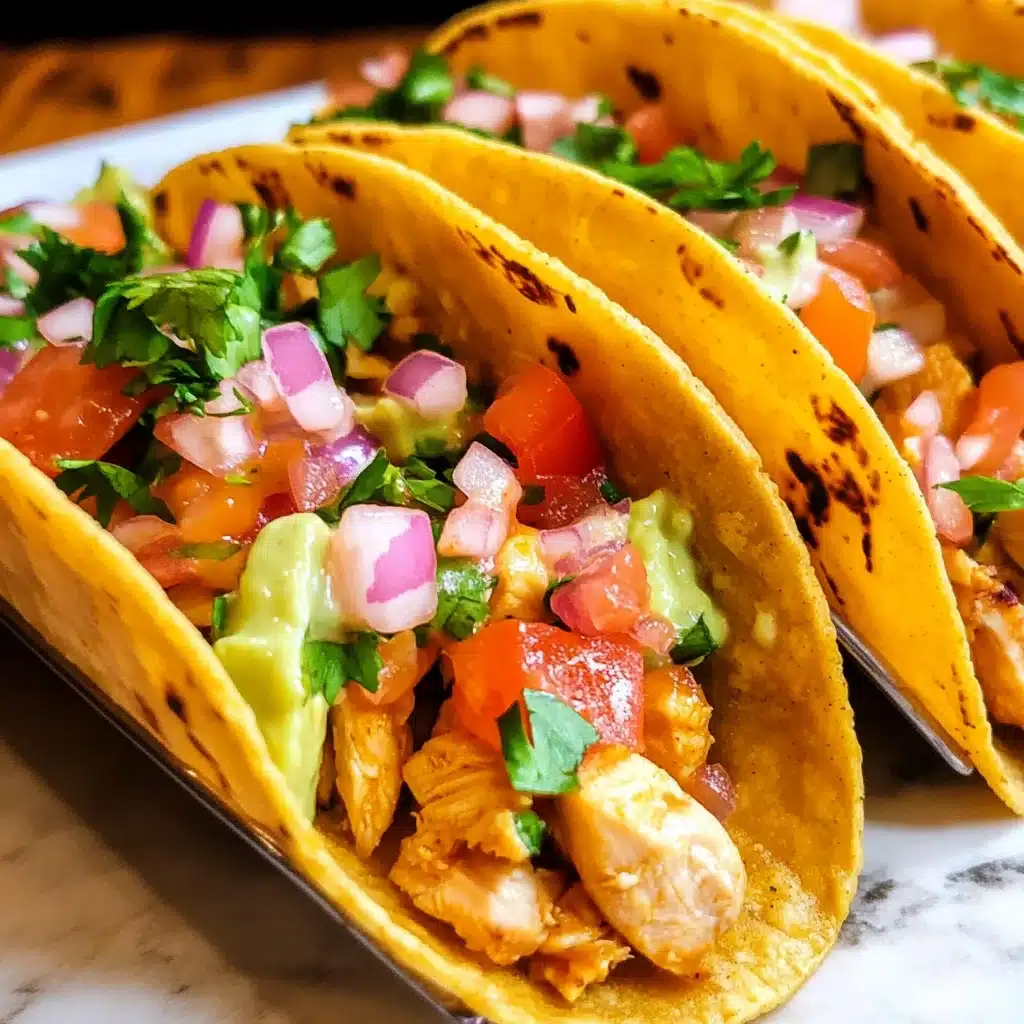
The moment everyone has been waiting for! It’s time to assemble your delicious chicken tacos. The best and most enjoyable way to do this, especially with family, is to set up a “taco bar.” Arrange the bowl of warm, savory chicken taco filling, your stack of warmed tortillas, and an array of your favorite toppings (see our “How to Serve” section for a plethora of ideas) in separate bowls or on a large platter. Let each person customize their own tacos by spooning a generous amount of the chicken filling into a warm tortilla and then piling on their preferred toppings. This interactive approach not only caters to individual tastes and dietary preferences but also makes dinnertime a fun and engaging experience for everyone, from the youngest to the oldest.
Nutrition Facts
Understanding the nutritional profile of your meals is important. Here’s an approximate breakdown for these Family-Favorite Chicken Tacos. Please note that these values are estimates and can vary based on the specific brands of ingredients used, the type of tortillas chosen, and the quantity and type of toppings added.
- Servings: This recipe typically yields about 6 servings, assuming 2-3 tacos per person, depending on appetite and the size of the tortillas.
- Calories per Serving (Chicken Filling & Tortillas, before toppings): Approximately 350-450 calories. This range accounts for variations in chicken cut (breast vs. thigh) and tortilla type (corn vs. flour, size). Adding cheese, sour cream, and guacamole will increase the calorie count.
- Protein: Approximately 30-35 grams per serving. Chicken is an excellent source of high-quality, lean protein, which is essential for muscle repair and growth, as well as promoting feelings of fullness and satiety.
- Fat: Approximately 12-18 grams per serving. The fat content comes primarily from the olive oil used for cooking and the natural fats in the chicken (thighs will have more than breasts). Choosing leaner chicken and using oil moderately can help manage this. Healthy fats from avocado or guacamole, if added, will contribute to this.
- Carbohydrates: Approximately 25-35 grams per serving. The main source of carbohydrates is the tortillas. Corn tortillas and whole wheat flour tortillas will generally offer more fiber compared to standard white flour tortillas. The rest comes from ingredients like onion and trace amounts in spices.
- Sodium: Approximately 500-800mg per serving. This can vary significantly based on whether you use store-bought or homemade taco seasoning, and the sodium content of your chicken broth. Making your own seasoning and using low-sodium broth are effective ways to reduce sodium intake.
Preparation Time
One of the many reasons these chicken tacos are a family favorite is their relatively quick turnaround, making them perfect for those busy weeknights when you want a delicious, home-cooked meal without spending hours in the kitchen.
- Prep Time: Approximately 15-20 minutes. This includes the time taken for dicing the chicken (if not buying pre-diced), chopping the onion and mincing the garlic (if using), measuring out the spices (especially if you’re whipping up a quick homemade taco seasoning blend), and juicing the lime. If you have pre-chopped vegetables or use pre-shredded chicken, you can certainly reduce this time. Getting all your toppings prepped (shredding lettuce, dicing tomatoes, etc.) also falls into this timeframe if you do it while the chicken marinates or cooks.
- Cook Time: Approximately 20-25 minutes. This encompasses the time needed to sear the chicken until it’s nicely browned, sauté the aromatics, and then simmer the chicken in the broth and lime juice mixture until it’s perfectly tender, flavorful, and the sauce has slightly thickened. Warming the tortillas also happens during this period. The exact cooking duration can fluctuate slightly depending on factors like the efficiency of your stovetop, the thickness of your chicken pieces, and how crowded your pan is.
- Total Time: Approximately 35-45 minutes. From the moment you start prepping your ingredients to the exciting point when everyone is assembling their tacos, you can typically have this vibrant and satisfying meal on the table in under an hour. This efficiency, combined with its incredible taste, solidifies its status as a reliable and much-loved recipe in any household.
How to Serve
Serving these Family-Favorite Chicken Tacos is all about customization and fun! Creating a taco bar is undoubtedly the best approach, allowing everyone to build their perfect taco. Here’s a comprehensive guide to setting up an irresistible spread:
The Foundation:
- Warm Chicken Taco Filling: Present the star of the show in a prominent bowl, kept warm if possible (a small slow cooker on low or a chafing dish works for parties).
- Warm Tortillas: Have a stack of your warmed corn and/or flour tortillas ready, kept pliable in a tortilla warmer, wrapped in a clean kitchen towel, or covered in foil.
Essential Toppings (The Classics):
- Shredded Lettuce: Iceberg or romaine lettuce, thinly shredded, adds a delightful cool crunch and freshnes
- Diced Tomatoes: Juicy Roma or cherry tomatoes, diced, provide sweetness, acidity, and vibrant color.
- Shredded Cheese: A generous bowl of shredded cheese is a must for many. Popular choices include:
- Cheddar (mild, medium, or sharp)
- Monterey Jack
- A Mexican blend (often a mix of Monterey Jack, Cheddar, Asadero, and Queso Quesadilla)
- Sour Cream or Plain Greek Yogurt: A dollop of cool, creamy sour cream offers a tangy counterpoint to the spiced chicken. Plain Greek yogurt is a healthier, protein-rich alternative with a similar tang.
- Salsa Selection: Offer a variety to cater to different heat preferences and flavor profiles:
- Pico de Gallo (Salsa Fresca): A chunky mix of fresh diced tomatoes, onion, cilantro, jalapeño, and lime juice.
- Restaurant-Style Salsa: A smoother, often blended salsa, available in mild, medium, or hot.
- Salsa Verde: A tangy green salsa made with tomatillos, chili peppers, cilantro, and lime.
- Guacamole or Sliced Avocado: Creamy, rich guacamole or simple slices of fresh avocado add healthy fats and an irresistible texture.
Extra Toppings for the Adventurous (Level Up Your Tacos):
- Fresh Chopped Cilantro: For those who love its bright, herbaceous flavor.
- Sliced Jalapeños (Fresh or Pickled): For a significant kick of heat. Fresh jalapeños offer a crisp heat, while pickled ones provide a tangy spice.
- Diced Red Onion or Quick Pickled Red Onions: Adds a sharp, zesty bite. Pickled red onions are particularly delicious, offering tang and sweetness.
- Lime Wedges: Always a fantastic addition! A final squeeze of fresh lime juice over the assembled taco brightens all the flavors.
- Crumbled Cotija Cheese: A salty, crumbly, dry Mexican cheese that adds an authentic and delicious finish. Feta can be a substitute if Cotija is unavailable.
- Favorite Hot Sauce: From Tabasco to Cholula to Sriracha or artisanal varieties, let everyone add their preferred brand and heat level.
- Black Olives, Sliced: A mild, salty addition that some taco lovers enjoy.
- Corn Kernels (Roasted or Plain): Adds a touch of sweetness and texture.
Setting Up the Taco Bar:
- Arrange all toppings in individual small bowls or compartments on a large platter.
- Place the chicken and tortillas at the beginning of the “line.”
- Provide serving spoons for each topping to avoid cross-contamination.
- Don’t forget plates and napkins!
Delicious Side Dishes to Complement Your Tacos:
- Mexican Rice (Spanish Rice): A classic, flavorful rice dish.
- Refried Beans or Black Beans (seasoned with cumin and chili powder): Creamy refried beans or simple seasoned black beans are perfect accompaniments.
- Cilantro-Lime Rice: A lighter, fresher rice option.
- Mexican Street Corn Salad (Esquites): A creamy, tangy, and slightly spicy corn salad.
- Simple Green Salad with a Citrus Vinaigrette: For a lighter, refreshing side.
- Cornbread or Corn Muffins: A slightly sweet counterpoint.
- Tortilla Chips with Extra Salsa and Guacamole: Because you can never have too many chips and dip!
Drink Pairings:
- Agua Frescas: Refreshing fruit-infused waters like watermelon, lime, or hibiscus.
- Mexican Lager Beer (e.g., Corona, Modelo) with a lime wedge: A classic pairing.
- Margaritas: For an adult fiesta vibe.
- Horchata: A sweet, creamy rice milk drink.
- Sparkling water with lime: A simple, refreshing non-alcoholic option.
By offering a wide array of choices, you ensure that everyone, from the pickiest eater to the most adventurous foodie, can create their ultimate Family-Favorite Chicken Taco.
Additional Tips
To elevate your Family-Favorite Chicken Tacos from great to absolutely unforgettable, here are eight additional tips and tricks straight from our kitchen to yours:
- Craft Your Own Taco Seasoning: While store-bought is convenient, making your own taco seasoning is incredibly easy and allows you to control the ingredients, especially sodium and spice levels. A fantastic basic blend includes: 2 tablespoons chili powder, 1 tablespoon ground cumin, 2 teaspoons paprika (smoked paprika adds a lovely depth), 1 teaspoon garlic powder, 1 teaspoon onion powder, 1/2 teaspoon dried oregano, 1/2 teaspoon salt (or to taste), and 1/4 teaspoon black pepper. Feel free to add a pinch of cayenne pepper for heat or a teaspoon of cornstarch for a slightly thicker sauce. Store in an airtight container.
- Embrace Chicken Thighs for Extra Flavor: While chicken breasts are leaner, boneless, skinless chicken thighs offer a richer flavor and tend to stay more moist and tender due to their higher fat content. If you’re not strictly counting calories, give thighs a try – many find the difference in taste and texture well worth it for tacos. You can also use a combination of breasts and thighs.
- The Power of a Good Marinade: Don’t underestimate the impact of marinating. Even just 30 minutes of letting the chicken sit in the taco seasoning, a squeeze of lime juice, and perhaps a drizzle of olive oil can significantly deepen the flavor profile. For an even more intense taste, marinate the chicken for 2-4 hours (or even overnight if diced small) in the refrigerator.
- Achieve the Perfect Sear – Don’t Crowd the Pan!: This is a golden rule for cooking any meat. When you add the chicken to the hot skillet, ensure it’s in a single layer with some space between the pieces. If you overcrowd the pan, the temperature will drop, and the chicken will steam in its own juices rather than browning. This browning (Maillard reaction) is key to developing deep, savory flavors. Cook in batches if necessary; it’s worth the extra couple of minutes.
- Deglaze Like a Pro for Maximum Flavor: After browning the chicken and cooking any aromatics, those little browned bits stuck to the bottom of the pan are pure flavor gold. When you add your liquid (chicken broth, water, or lime juice), use a wooden spoon or firm spatula to scrape these bits up, incorporating them into the sauce. This technique, called deglazing, adds an incredible depth that you won’t want to miss.
- Tortilla TLC – Warm Them Right: Never serve cold or stiff tortillas! Warming them makes them pliable, enhances their flavor, and improves their texture. For corn tortillas, a quick char over an open gas flame or a hot, dry skillet imparts a wonderful smoky note. Flour tortillas become soft and delightful when warmed in a skillet, microwave (wrapped in a damp paper towel), or oven (wrapped in foil).
- Batch Cook for Easy Weeknight Wins: The chicken taco filling is fantastic for meal prepping. You can easily double the recipe, cook the chicken filling completely, let it cool, and then store it in an airtight container in the refrigerator for up to 3-4 days, or freeze it for up to 3 months. Reheat gently on the stovetop (add a splash of broth if needed) or in the microwave for a super-fast taco night.
- Customize Spice Levels for All Palates: Catering to different heat preferences in a family can be tricky. Start with a mild to medium taco seasoning for the chicken itself. Then, offer a range of spicy toppings on the side: sliced fresh or pickled jalapeños, a variety of hot sauces (from mild to fiery), a sprinkle of red pepper flakes, or even a spicier salsa. This way, those who love heat can add it to their heart’s content, while others can enjoy a milder version.
FAQ Section
Here are answers to some frequently asked questions about making these delicious Family-Favorite Chicken Tacos:
- Q: Can I use ground chicken instead of chicken breasts or thighs for this recipe?
A: Absolutely! Ground chicken is an excellent and often quicker alternative. To adapt the recipe, simply brown the ground chicken in the skillet over medium-high heat, breaking it apart with a spoon as it cooks. Once it’s no longer pink, drain off any excess fat. Then, add your taco seasoning and about 1/4 to 1/2 cup of water or chicken broth. Stir well and let it simmer for 5-10 minutes for the flavors to meld and the sauce to thicken slightly. - Q: How can I make these chicken tacos gluten-free?
A: Making these tacos gluten-free is very straightforward. The most important step is to use 100% corn tortillas, as they are naturally gluten-free. Always double-check the packaging to ensure they are not a corn-wheat blend. Additionally, verify that your taco seasoning is certified gluten-free or make your own homemade version, as some commercial seasonings can contain gluten-based fillers or anti-caking agents. Ensure all your chosen toppings are also gluten-free. - Q: What is the best way to store and reheat leftover chicken taco filling?
A: Allow the cooked chicken taco filling to cool completely to room temperature. Then, transfer it to an airtight container and store it in the refrigerator. It will keep well for 3-4 days. For longer storage, you can freeze the filling for up to 2-3 months. To reheat, you can gently warm it in a skillet over medium-low heat, adding a splash of chicken broth or water if it seems a bit dry. Alternatively, microwave it in a covered, microwave-safe dish until heated through. - Q: Can I prepare the chicken filling in a slow cooker or Instant Pot for even easier cooking?
A: Yes, both are great options!- Slow Cooker: Place 1.5 lbs of chicken breasts or thighs in the slow cooker. Sprinkle with the taco seasoning and pour about 1/4 cup of chicken broth or salsa over the top. Cook on LOW for 4-6 hours or on HIGH for 2-3 hours, or until the chicken is tender and easily shreds. Remove chicken, shred with two forks, and return to the slow cooker, stirring it into the juices.
- Instant Pot: You can sear diced chicken using the Sauté function if desired. Add the chicken, taco seasoning, and 1/4 cup of chicken broth or water to the Instant Pot. Secure the lid, set the valve to sealing, and cook on HIGH pressure for 8-10 minutes for chicken breasts (6-8 minutes for thighs). Allow a 5-10 minute natural pressure release before quick releasing any remaining pressure. Shred the chicken and toss with the sauce in the pot.
- Q: My chicken sometimes turns out a bit dry. What can I do to prevent this?
A: Dry chicken is usually due to overcooking, especially when using lean chicken breasts. Using a meat thermometer is the best way to prevent this; cook chicken until it reaches an internal temperature of 165°F (74°C) and no higher. Chicken thighs, with their higher fat content, are more forgiving and tend to stay juicier. Also, ensure you’re not cooking it on too high a heat for too long during the simmering phase, and that there’s enough liquid (broth/water) in the pan to create some steam and keep it moist. Dicing the chicken into smaller, uniform pieces also helps it cook more evenly and quickly, reducing the chance of some pieces overcooking while others are still catching up. - Q: What are some particularly kid-friendly topping variations for these tacos?
A: For children, especially picky eaters, simplicity is often key. Offer very finely shredded mild cheddar cheese, plain shredded iceberg lettuce (it’s often preferred for its crunch and mildness), finely diced tomatoes (you might remove seeds for texture-sensitive kids), and plain sour cream. Some kids also enjoy sweetcorn kernels or very mild salsa. The act of building their own taco is usually a big hit and can encourage them to try new things at their own pace. - Q: How can I easily adjust the spiciness of the chicken tacos?
A: There are several ways to tailor the heat. To make them spicier, you can: add 1/4 to 1/2 teaspoon of cayenne pepper or a pinch of red pepper flakes to your taco seasoning; use a “hot” variety of chili powder; include minced jalapeño or serrano pepper when cooking the chicken and onions. For individual spice adjustment, offer hot sauce, fresh or pickled jalapeño slices, and spicy salsas as toppings. To make them milder, ensure your taco seasoning is mild, omit any cayenne, and use bell peppers instead of chili peppers if adding fresh ones to the chicken mix. - Q: Are these Family-Favorite Chicken Tacos considered a healthy meal option?
A: They absolutely can be a very healthy and balanced meal! To maximize the health benefits:- Choose lean boneless, skinless chicken breast.
- Use homemade taco seasoning to control sodium and avoid artificial additives.
- Load up on fresh vegetable toppings like lettuce, tomatoes, onions, bell peppers, and cilantro.
- Opt for whole grain corn tortillas or whole wheat flour tortillas for added fiber.
- Be mindful of high-fat toppings: use cheese and sour cream in moderation, or substitute plain Greek yogurt for sour cream and add healthy fats with avocado or guacamole.
- Serve with a side of beans (black beans or pinto beans) for extra fiber and protein.

Family-Favorite Chicken Tacos
Ingredients
Here’s what you’ll need to create these incredibly popular and delicious Family-Favorite Chicken Tacos. Each ingredient plays a crucial role in building the layers of flavor that make this recipe so special.
- 1.5 lbs Boneless, Skinless Chicken Breasts (or Thighs): The heart of our tacos, providing a substantial and lean protein base. We often opt for chicken breasts for their lower fat content, but boneless, skinless chicken thighs are an excellent alternative if you prefer extra juiciness and richer flavor. Ensure they are trimmed of any excess fat.
- 2–3 Tablespoons Taco Seasoning (Homemade or Store-Bought): This is where the magic happens! A robust blend of spices typically including chili powder, cumin, paprika, garlic powder, onion powder, and oregano. Using a quality store-bought seasoning works perfectly, but a homemade blend (see our tips section for a quick recipe!) allows you to control the sodium and heat levels to your family’s preference.
- 1 Tablespoon Olive Oil (or Avocado Oil): Essential for achieving a beautiful sear on the chicken and preventing it from sticking to the pan. Olive oil adds a subtle fruity note, while avocado oil has a higher smoke point and neutral flavor, both are excellent choices.
- Juice of 1 Medium Lime (about 2 tablespoons): A non-negotiable ingredient in our book! Freshly squeezed lime juice adds a vital burst of acidity and brightness that cuts through the richness of the spices and tenderizes the chicken beautifully.
- 1/4 cup Chicken Broth (or Water): This liquid gold helps to create a wonderfully saucy consistency for the chicken filling, ensuring every bite is moist and flavorful. It also aids in deglazing the pan, capturing all those delicious browned bits. Low-sodium chicken broth is a great option if you’re watching your salt intake.
- 1 Small Yellow Onion, finely chopped (optional but recommended): Adding a chopped onion creates a foundational layer of sweet and savory aromatic flavor that deeply infuses the chicken.
- 2 Cloves Garlic, minced (optional but recommended): Freshly minced garlic complements the onion and spices, contributing its pungent, irresistible aroma and taste.
- 12–16 Small Corn or Flour Tortillas: The trusty vessel for your taco masterpiece! Traditional corn tortillas offer an authentic, slightly nutty flavor and a more rustic texture, especially when lightly charred. Flour tortillas are generally softer, more pliable, and a favorite for their mild taste. Choose whichever your family enjoys most, or offer both for variety!
- Salt and Freshly Ground Black Pepper to taste: While the taco seasoning will contain salt, you may want to adjust the seasoning of the chicken, especially if using low-sodium broth or homemade seasoning without much salt. Freshly ground black pepper always adds a better flavor than pre-ground.
Instructions
Follow these detailed steps to create the most flavorful and tender chicken taco filling, setting the stage for an unforgettable meal.
- Prepare the Chicken:
Begin by patting your boneless, skinless chicken breasts (or thighs) thoroughly dry with paper towels. This simple step is crucial as it helps to remove excess surface moisture, allowing the chicken to sear properly and develop a beautiful golden-brown crust rather than steaming in the pan. Once dried, you have a choice in how you prepare the chicken for cooking. You can dice the chicken into small, uniform, bite-sized pieces, roughly ½-inch to ¾-inch cubes. Dicing before cooking ensures more surface area for the seasoning to cling to and generally speeds up the cooking process. Alternatively, you can cook the chicken breasts whole and then shred them once cooked. For this particular family-favorite recipe, we often prefer dicing the chicken first as it makes for easy, perfectly portioned bites within the taco. If using chicken thighs, ensure they are also trimmed of any large pieces of fat before dicing. - Season the Chicken Generously:
Place the prepared chicken (diced or whole) into a medium-sized mixing bowl. Sprinkle the taco seasoning evenly over the chicken. Whether you’re using a pre-made packet or your own signature homemade blend, don’t be shy with the seasoning – you want every piece of chicken to be generously coated. Add a pinch of extra salt and freshly ground black pepper if your taco seasoning is low in sodium or if you prefer a more seasoned flavor profile. Use your clean hands or a large spoon to toss the chicken pieces, ensuring that each one is thoroughly enveloped in the aromatic spice mixture. For an enhanced flavor experience, if time permits, cover the bowl and allow the seasoned chicken to marinate in the refrigerator for at least 15-30 minutes. This marination period allows the spices to penetrate the meat more deeply, resulting in a more flavorful end product. You can even marinate it for up to 4 hours if preparing ahead. - Sear the Chicken to Perfection:
Place a large, heavy-bottomed skillet (cast iron works wonderfully here, but a good quality non-stick or stainless steel skillet is also fine) or a Dutch oven over medium-high heat. Add the tablespoon of olive oil (or avocado oil) to the skillet. Allow the oil to heat up until it shimmers lightly or a drop of water sizzles and evaporates instantly. Carefully add the seasoned chicken to the hot skillet, spreading it out in a single, even layer. It’s important not to overcrowd the pan; if your skillet isn’t large enough to hold all the chicken in a single layer without pieces overlapping, it’s best to cook the chicken in two batches. Overcrowding lowers the pan’s temperature and causes the chicken to steam rather than sear, preventing that desirable browning. Let the chicken cook undisturbed for about 3-4 minutes on the first side, or until it develops a rich, golden-brown crust. Then, use tongs or a spatula to flip or stir the chicken pieces and continue to cook for another 3-5 minutes, stirring occasionally, until it’s browned on all sides and nearly cooked through. - Build the Flavor Base (Aromatics):
If you’re incorporating the optional (but highly recommended!) onion and garlic for an extra dimension of flavor, now is the time to add them. Push the browned chicken to one side of the skillet. If the pan seems dry, you can add a tiny drizzle more olive oil to the empty side. Add the finely chopped yellow onion to the cleared space in the skillet and sauté for about 2-3 minutes, stirring frequently, until the onion softens and becomes translucent, releasing its sweet aroma. Next, add the minced garlic to the onions and cook for another minute, stirring constantly, until the garlic is fragrant. Be very careful not to burn the garlic, as it can become bitter quickly. Once the aromatics are softened and fragrant, stir them thoroughly into the browned chicken, combining all the elements. - Deglaze and Simmer to Tenderness:
Pour in the 1/4 cup of chicken broth (or water) and the freshly squeezed lime juice over the chicken and aromatics. As the liquid hits the hot pan, use a wooden spoon or spatula to gently scrape up any browned bits (fond) that have stuck to the bottom of the skillet. This process, known as deglazing, is packed with concentrated flavor and will enrich your taco filling immensely. Bring the mixture to a gentle simmer. Once simmering, reduce the heat to low, cover the skillet with a lid, and allow the chicken to cook for another 5-10 minutes. The exact simmering time will depend on the size of your chicken pieces (if diced) or the thickness (if whole). The goal is for the chicken to be completely cooked through and exceptionally tender, and for the sauce to have thickened slightly, beautifully coating each piece of chicken. The internal temperature of the chicken should reach 165°F (74°C) when checked with a meat thermometer. If you cooked whole chicken breasts, remove them from the skillet at this point and place them on a clean cutting board. Allow them to rest for a few minutes, then use two forks to shred the chicken. Return the shredded chicken back into the skillet with the sauce, tossing well to ensure all the shredded meat is coated. - Warm the Tortillas – An Essential Step:
While the chicken is finishing its simmer or while you’re shredding it, it’s time to warm your tortillas. Warm tortillas are more pliable, less likely to tear when folded, and simply taste better. There are several easy ways to do this:- Gas Stove (for Corn Tortillas): Using tongs, carefully place corn tortillas one at a time directly over a low to medium gas flame for a few seconds per side, until they are lightly charred in spots and puffed. Be cautious and keep an eye on them.
- Dry Skillet: Heat a dry (no oil) skillet (cast iron or non-stick) over medium heat. Warm tortillas one by one for about 20-30 seconds per side, until they are soft and warmed through. You can stack them in a tortilla warmer or wrapped in a clean kitchen towel as you go to keep them warm.
- Microwave: Stack up to 6-8 tortillas, wrap them in a slightly damp paper towel or a clean, damp kitchen towel, and microwave on high for 30-60 seconds, depending on the power of your microwave and the number of tortillas.
- Oven: Wrap a stack of tortillas in foil and warm them in a preheated 300°F (150°C) oven for about 10-15 minutes.
- Assemble Your Family-Favorite Chicken Tacos:
The moment everyone has been waiting for! It’s time to assemble your delicious chicken tacos. The best and most enjoyable way to do this, especially with family, is to set up a “taco bar.” Arrange the bowl of warm, savory chicken taco filling, your stack of warmed tortillas, and an array of your favorite toppings (see our “How to Serve” section for a plethora of ideas) in separate bowls or on a large platter. Let each person customize their own tacos by spooning a generous amount of the chicken filling into a warm tortilla and then piling on their preferred toppings. This interactive approach not only caters to individual tastes and dietary preferences but also makes dinnertime a fun and engaging experience for everyone, from the youngest to the oldest.
Nutrition
- Serving Size: one normal portion
- Calories: 450
- Sodium: 800mg
- Fat: 18 grams
- Carbohydrates: 35 grams
- Protein: 35 grams


