
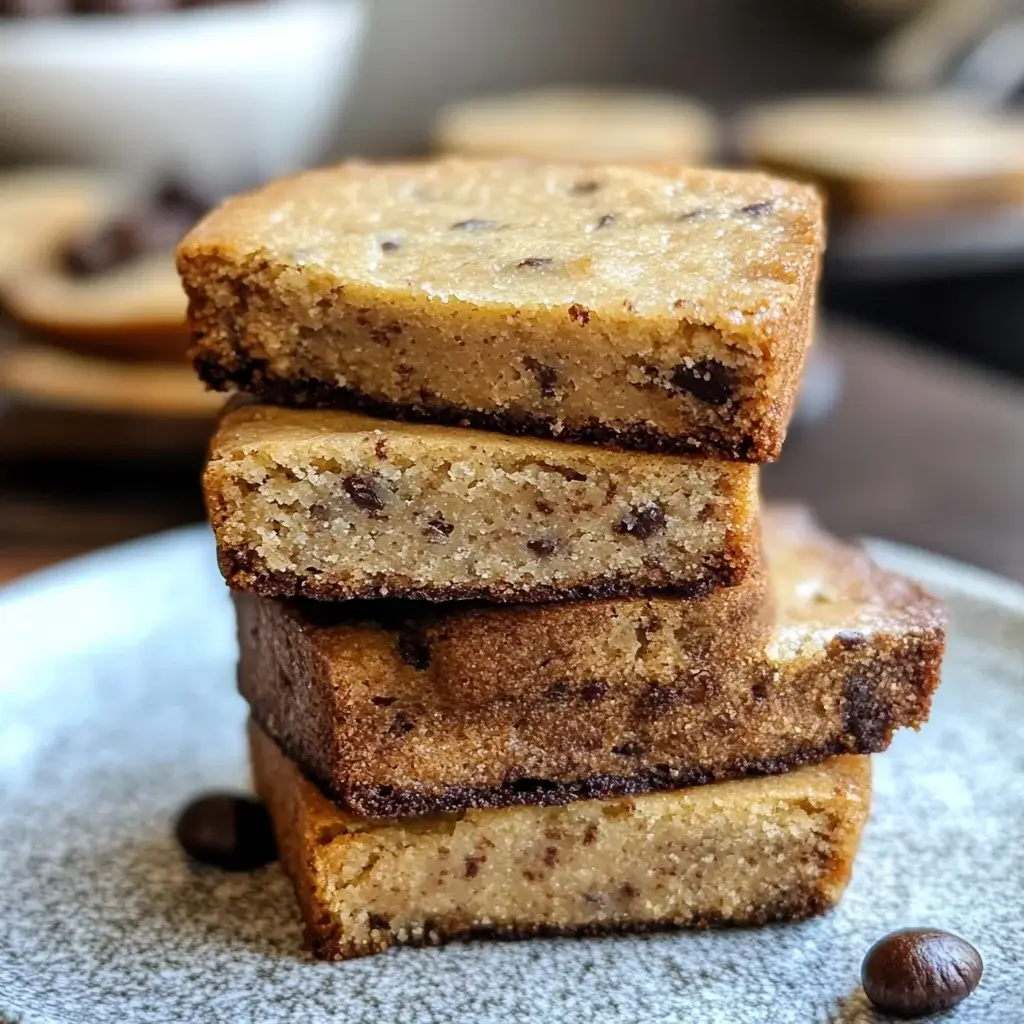

The first time I baked these Espresso Ricotta Shortbread cookies, my kitchen was filled with the most intoxicating aroma – a rich blend of buttery shortbread and deep, dark espresso, with a subtle, creamy undertone I couldn’t quite place until I remembered the secret ingredient: ricotta. I’d been searching for a cookie recipe that was a little different, something sophisticated yet comforting, and this one absolutely hit the mark. When my family finally got to taste them, the reaction was unanimous delight. My husband, a self-proclaimed coffee aficionado, declared them the “perfect coffee companion,” while my kids, initially skeptical about “coffee cookies,” were won over by their tender, melt-in-your-mouth texture and the surprisingly harmonious flavors. The ricotta, a rather unconventional addition to shortbread, worked wonders, lending a subtle moistness and a delicate crumb that set these cookies apart from any shortbread I’d made before. They weren’t overly sweet, allowing the robust espresso and rich butter to truly shine. Since that first batch, these Espresso Ricotta Shortbreads have become a staple in our home, perfect for a quiet afternoon treat, an elegant offering for guests, or even a thoughtful homemade gift. They strike a beautiful balance between rustic charm and refined flavor, proving that sometimes the most unexpected combinations yield the most delightful results. I’ve tweaked and perfected the recipe over time, and I’m thrilled to share what I believe is the ultimate version of this uniquely delicious treat.
Ingredients
Here’s what you’ll need to create these delightful Espresso Ricotta Shortbread cookies. Each ingredient plays a crucial role in achieving the perfect balance of flavor and texture.
- All-Purpose Flour (2 ½ cups / 300g): The structural backbone of the cookies. Standard all-purpose flour provides the right amount of gluten for a tender yet sturdy shortbread.
- Unsalted Butter (1 cup / 226g), softened: The star of any shortbread, providing unparalleled richness, flavor, and that classic melt-in-your-mouth texture. Ensure it’s softened to room temperature, not melted, for proper creaming.
- Granulated Sugar (¾ cup / 150g): Adds sweetness and contributes to the cookies’ crisp edges and tender interior. You can slightly adjust this based on your preference, but this amount balances the espresso’s bitterness well.
- Whole Milk Ricotta Cheese (½ cup / 125g), well-drained: The secret weapon! Ricotta adds a subtle tang, incredible moisture, and a uniquely tender crumb. Draining it well is key to prevent the dough from being too wet.
- Instant Espresso Powder (2 to 3 tablespoons): This provides the deep, robust coffee flavor. Use high-quality powder for the best taste. Adjust the amount based on how intense you want the coffee flavor to be.
- Large Egg Yolk (1): Enriches the dough, adds to the tenderness, and helps bind the ingredients. The fat in the yolk contributes to a softer crumb.
- Vanilla Extract (1 teaspoon): Enhances all the other flavors in the cookie, particularly the butter and espresso, adding a layer of aromatic warmth.
- Salt (½ teaspoon): Balances the sweetness and sharpens the other flavors. Don’t skip it, even in sweet baked goods!
- Optional: Powdered Sugar (for dusting): A light dusting after baking adds a touch of elegance and an extra hint of sweetness.
- Optional: Chocolate Drizzle (2 oz / 56g good quality dark chocolate, melted): For an extra decadent touch, a drizzle of dark chocolate complements the espresso beautifully.
Instructions
Follow these steps carefully to bake the perfect batch of Espresso Ricotta Shortbread. Precision in baking often leads to the best results!
- Prepare the Ricotta: If your ricotta seems watery, line a fine-mesh sieve with a coffee filter or a double layer of cheesecloth. Place the ricotta in the sieve set over a bowl and let it drain in the refrigerator for at least 30 minutes, or even an hour, to remove excess moisture. Press gently to extract more liquid if needed. This step is crucial for the right dough consistency.
- Combine Dry Ingredients: In a medium bowl, whisk together the all-purpose flour and salt. Set aside.
- Cream Butter and Sugar: In a large bowl, using a stand mixer fitted with the paddle attachment or a hand mixer, beat the softened unsalted butter and granulated sugar together on medium speed until light and fluffy. This usually takes about 3-4 minutes. Scrape down the sides of the bowl occasionally to ensure even mixing. This step incorporates air, which contributes to the cookie’s texture.
- Add Wet Ingredients: Add the well-drained ricotta cheese, instant espresso powder, egg yolk, and vanilla extract to the creamed butter and sugar mixture. Beat on low speed until just combined. Be careful not to overmix at this stage; you just want everything incorporated. The mixture might look slightly curdled due to the ricotta, which is normal.
- Incorporate Dry Ingredients: Gradually add the flour mixture to the wet ingredients in two or three additions. Mix on low speed until the flour is just incorporated and a soft dough forms. Again, avoid overmixing, as this can develop too much gluten and result in tough cookies. The dough will be soft but should not be overly sticky if the ricotta was well-drained.
- Chill the Dough (Crucial Step): Divide the dough in half. Shape each half into a flat disc, about 1-inch thick. Wrap each disc tightly in plastic wrap. Refrigerate for at least 2 hours, or preferably overnight. Chilling the dough is essential for several reasons: it allows the flour to hydrate, the flavors to meld, and most importantly, it solidifies the butter, which prevents the cookies from spreading too much during baking and makes the dough easier to handle.
- Preheat Oven and Prepare Baking Sheets: When ready to bake, preheat your oven to 350°F (175°C). Line two large baking sheets with parchment paper or silicone baking mats. This prevents sticking and helps with even baking.
- Roll and Cut: Lightly flour a clean work surface. Unwrap one disc of chilled dough (keep the other refrigerated). If the dough is very firm, let it sit at room temperature for 5-10 minutes to become slightly more pliable. Roll the dough out to approximately ¼ to ⅓ inch thickness. Use cookie cutters of your desired shape to cut out the shortbread. Reroll scraps gently and cut more cookies until all the dough is used. If the dough becomes too soft at any point, return it to the refrigerator for 15-20 minutes to firm up.
- Arrange on Baking Sheets: Carefully transfer the cut-out cookies to the prepared baking sheets, leaving about 1 inch of space between them as they will spread slightly.
- Chill Before Baking (Optional but Recommended): For extra sharp edges and to further prevent spreading, you can place the baking sheets with the cut-out cookies into the refrigerator or freezer for another 15-20 minutes before baking.
- Bake: Bake in the preheated oven for 12-16 minutes, or until the edges are lightly golden brown and the centers are set. Baking time will vary depending on the thickness of your cookies and your oven’s quirks. Keep a close eye on them, as shortbread can go from perfectly baked to overdone quickly.
- Cool: Let the cookies cool on the baking sheets for 5-10 minutes before carefully transferring them to a wire rack to cool completely. They will be delicate when warm but will firm up as they cool.
- Decorate (Optional): Once completely cooled, you can dust the cookies with powdered sugar or drizzle them with melted dark chocolate if desired. Let any chocolate set before storing.
Nutrition Facts
While these are indulgent treats, here’s a general idea of their nutritional profile.
- Servings: This recipe yields approximately 24-30 cookies, depending on the size and thickness.
- Calories per serving (1 cookie): Approximately 120-160 calories.
- Key Nutrition Facts (per cookie, approximate):
- Fat (approx. 7-9g): Primarily from the butter and ricotta, contributing to the rich flavor and satisfying texture. A portion of this will be saturated fat.
- Carbohydrates (approx. 12-15g): Mainly from the flour and sugar, providing energy.
- Sugar (approx. 5-7g): From the granulated sugar, contributing to sweetness and browning.
- Protein (approx. 1-2g): From the flour, egg yolk, and ricotta.
- Sodium (approx. 40-60mg): Primarily from the added salt, which enhances flavor.
Disclaimer: Nutritional information is an estimate and can vary based on specific ingredients used, exact serving size, and any modifications made to the recipe.
Preparation Time
Understanding the time commitment helps in planning your baking adventure.
- Active Preparation Time: Approximately 30-40 minutes (mixing dough, rolling, cutting).
- Ricotta Draining Time: 30 minutes to 1 hour (passive).
- Dough Chilling Time: Minimum 2 hours, preferably overnight (passive).
- Baking Time: 12-16 minutes per batch.
- Cooling Time: At least 30 minutes (passive).
- Total Time (including chilling): Approximately 3.5 hours to overnight, with much of this being inactive chilling time.
- Short Description: This Espresso Ricotta Shortbread recipe involves a relatively quick active preparation, but it’s crucial to factor in the extended chilling periods for the dough. These chilling times are non-negotiable for achieving the best texture and preventing the cookies from spreading excessively during baking. Plan ahead, and you’ll be rewarded with perfectly tender, flavorful shortbread.
How to Serve
These Espresso Ricotta Shortbread cookies are wonderfully versatile. Here are some delightful ways to serve and enjoy them:
- Classic Coffee or Tea Pairing:
- With Espresso or Strong Coffee: The most natural pairing! The robust coffee notes in the cookie harmonize beautifully with a cup of freshly brewed espresso, Americano, or a rich dark roast.
- With Lattes or Cappuccinos: The creamy milkiness of a latte or cappuccino complements the buttery texture of the shortbread.
- With Herbal or Black Tea: A cup of Earl Grey, English Breakfast, or even a chamomile tea provides a lovely contrast or complement, depending on your tea choice.
- As a Dessert Accompaniment:
- Alongside Ice Cream: Serve a cookie or two with a scoop of vanilla bean, coffee, or chocolate ice cream for an elevated dessert. The contrast in temperatures and textures is divine.
- With Fresh Berries and Cream: The slight tartness of fresh raspberries or strawberries, perhaps with a dollop of lightly sweetened whipped cream, balances the richness of the shortbread.
- As part of a Dessert Platter: Include these cookies on a platter with other small treats like mini tarts, chocolates, and fruit for a sophisticated offering.
- For Special Occasions:
- Afternoon Tea: These are an elegant addition to any afternoon tea spread, alongside scones and finger sandwiches.
- Holiday Cookie Trays: Their unique flavor profile makes them stand out on a Christmas or holiday cookie assortment.
- Hostess Gifts: Beautifully packaged in a tin or cellophane bag tied with a ribbon, they make a thoughtful and delicious homemade gift.
- Simple Pleasures:
- An Anytime Treat: Enjoy one on its own whenever you crave something a little special and comforting.
- With a Glass of Milk: A classic for a reason, especially if you want to temper the coffee flavor slightly for younger palates.
- Elevated Presentation:
- Dust with Powdered Sugar: A simple dusting right before serving adds a touch of elegance.
- Chocolate Drizzle or Dip: Dip one half of each cookie in melted dark, milk, or white chocolate for an extra layer of indulgence. You can add sprinkles or chopped nuts to the chocolate before it sets.
- Coffee Bean Garnish: For a truly on-theme presentation, place a single chocolate-covered coffee bean on top of each cookie (if drizzled with chocolate) or alongside.
Additional Tips
To ensure your Espresso Ricotta Shortbread cookies are a roaring success every time, consider these helpful tips:
- Use High-Quality Ingredients: The flavor of shortbread relies heavily on its simple components. Use good quality unsalted butter, pure vanilla extract, and fresh, high-quality instant espresso powder. The better the ingredients, the more delicious your cookies will be.
- Don’t Skip Draining the Ricotta: This is crucial. Excess moisture in the ricotta can make your dough too wet and sticky, leading to cookies that spread too much and have a less desirable texture. Take the time to drain it properly, even pressing gently in the sieve.
- Measure Flour Correctly: The most common baking mistake is mismeasuring flour. Use the “spoon and level” method: gently spoon flour into your measuring cup until it’s overflowing, then sweep off the excess with a straight edge. Scooping directly from the bag can compact the flour, resulting in too much flour and dry cookies.
- Chill, Chill, Chill: We can’t stress this enough. Chilling the dough before rolling and chilling the cut-out cookies before baking makes a huge difference. It helps the cookies maintain their shape, prevents excessive spreading, and results in a more tender texture.
- Adjust Espresso Intensity: The amount of espresso powder can be tailored to your preference. For a milder coffee note, use 2 tablespoons. For a more pronounced, robust flavor, go for 3 tablespoons. You can even experiment with different types of instant espresso for subtle flavor variations.
- Avoid Overmixing: Once you add the flour, mix only until it’s just combined. Overmixing develops gluten, which can make your shortbread tough instead of tender and crumbly.
- Uniform Thickness for Even Baking: When rolling out the dough, try to achieve a consistent thickness. If some cookies are thinner than others, they will bake faster and may burn while thicker ones remain underbaked. A rolling pin with thickness guides can be very helpful.
- Storing for Freshness: Store cooled Espresso Ricotta Shortbread in an airtight container at room temperature for up to 5 days. They can also be frozen for longer storage. Thaw at room temperature before serving. If they lose some crispness, you can refresh them in a 300°F (150°C) oven for a few minutes.
FAQ Section
Here are answers to some frequently asked questions about making Espresso Ricotta Shortbread:
- Q: Can I use regular brewed espresso or coffee instead of instant espresso powder?
A: It’s not recommended. Liquid coffee will add too much moisture to the dough, altering the texture significantly and potentially making the cookies cakey or causing them to spread excessively. Instant espresso powder provides concentrated coffee flavor without adding extra liquid. - Q: My ricotta still seems very wet after draining. What should I do?
A: If your ricotta is particularly moist, after the initial draining in a sieve, you can gently press it with the back of a spoon to release more liquid. Alternatively, you can wrap it in several layers of cheesecloth or a clean kitchen towel and gently squeeze out excess water. The goal is a fairly thick, spreadable consistency, not watery. - Q: Why did my shortbread cookies spread too much?
A: Several factors can cause this:- Butter too soft/melted: Ensure butter is softened, not melted.
- Insufficient chilling: The dough needs to be thoroughly chilled. Chilling the cut cookies again before baking also helps.
- Ricotta too wet: Excess moisture from undrained ricotta can contribute to spreading.
- Oven temperature too low: An oven that’s not hot enough allows the butter to melt and spread before the structure sets. Use an oven thermometer to verify your oven’s temperature.
- Q: Can I make this recipe gluten-free?
A: You can try substituting a good quality gluten-free all-purpose flour blend that includes xanthan gum (or add it if your blend doesn’t). The texture might be slightly different, potentially more crumbly, but it should still be delicious. Results can vary depending on the specific gluten-free flour used. - Q: Can I freeze the dough or the baked cookies?
A: Yes!- Dough: Wrap the dough discs tightly in plastic wrap and then place them in a freezer-safe bag or container. It can be frozen for up to 3 months. Thaw overnight in the refrigerator before rolling and baking.
- Baked Cookies: Once completely cooled, store them in an airtight, freezer-safe container, separating layers with parchment paper. They can be frozen for up to 3 months. Thaw at room temperature.
- Q: What if I don’t have cookie cutters?
A: No problem! You can shape the dough into logs (about 1.5-2 inches in diameter), wrap them in plastic wrap, and chill thoroughly. Then, simply slice the chilled logs into ¼ to ⅓ inch thick rounds (slice-and-bake style). Alternatively, you can press the dough into a square or rectangular pan, chill, score it, bake, and then cut along the scores while still warm. - Q: How strong is the coffee flavor in these cookies?
A: With 2 tablespoons of espresso powder, the coffee flavor is noticeable and pleasant, complementing the buttery shortbread. With 3 tablespoons, it becomes more pronounced and robust, ideal for true coffee lovers. You can start with 2 tablespoons if you’re unsure and adjust in future batches. - Q: Can I use salted butter instead of unsalted?
A: You can, but it’s best to reduce or omit the added salt in the recipe (the ½ teaspoon). Unsalted butter gives you more control over the total salt content. If using salted butter, the amount of salt can vary between brands, so taste the dough (if comfortable) to gauge if any additional salt is needed. Generally, reducing the added salt by ¼ to ½ teaspoon is a good starting point if using salted butter.

Espresso Ricotta Shortbread
Ingredients
Here’s what you’ll need to create these delightful Espresso Ricotta Shortbread cookies. Each ingredient plays a crucial role in achieving the perfect balance of flavor and texture.
- All-Purpose Flour (2 ½ cups / 300g): The structural backbone of the cookies. Standard all-purpose flour provides the right amount of gluten for a tender yet sturdy shortbread.
- Unsalted Butter (1 cup / 226g), softened: The star of any shortbread, providing unparalleled richness, flavor, and that classic melt-in-your-mouth texture. Ensure it’s softened to room temperature, not melted, for proper creaming.
- Granulated Sugar (¾ cup / 150g): Adds sweetness and contributes to the cookies’ crisp edges and tender interior. You can slightly adjust this based on your preference, but this amount balances the espresso’s bitterness well.
- Whole Milk Ricotta Cheese (½ cup / 125g), well-drained: The secret weapon! Ricotta adds a subtle tang, incredible moisture, and a uniquely tender crumb. Draining it well is key to prevent the dough from being too wet.
- Instant Espresso Powder (2 to 3 tablespoons): This provides the deep, robust coffee flavor. Use high-quality powder for the best taste. Adjust the amount based on how intense you want the coffee flavor to be.
- Large Egg Yolk (1): Enriches the dough, adds to the tenderness, and helps bind the ingredients. The fat in the yolk contributes to a softer crumb.
- Vanilla Extract (1 teaspoon): Enhances all the other flavors in the cookie, particularly the butter and espresso, adding a layer of aromatic warmth.
- Salt (½ teaspoon): Balances the sweetness and sharpens the other flavors. Don’t skip it, even in sweet baked goods!
- Optional: Powdered Sugar (for dusting): A light dusting after baking adds a touch of elegance and an extra hint of sweetness.
- Optional: Chocolate Drizzle (2 oz / 56g good quality dark chocolate, melted): For an extra decadent touch, a drizzle of dark chocolate complements the espresso beautifully.
Instructions
Follow these steps carefully to bake the perfect batch of Espresso Ricotta Shortbread. Precision in baking often leads to the best results!
- Prepare the Ricotta: If your ricotta seems watery, line a fine-mesh sieve with a coffee filter or a double layer of cheesecloth. Place the ricotta in the sieve set over a bowl and let it drain in the refrigerator for at least 30 minutes, or even an hour, to remove excess moisture. Press gently to extract more liquid if needed. This step is crucial for the right dough consistency.
- Combine Dry Ingredients: In a medium bowl, whisk together the all-purpose flour and salt. Set aside.
- Cream Butter and Sugar: In a large bowl, using a stand mixer fitted with the paddle attachment or a hand mixer, beat the softened unsalted butter and granulated sugar together on medium speed until light and fluffy. This usually takes about 3-4 minutes. Scrape down the sides of the bowl occasionally to ensure even mixing. This step incorporates air, which contributes to the cookie’s texture.
- Add Wet Ingredients: Add the well-drained ricotta cheese, instant espresso powder, egg yolk, and vanilla extract to the creamed butter and sugar mixture. Beat on low speed until just combined. Be careful not to overmix at this stage; you just want everything incorporated. The mixture might look slightly curdled due to the ricotta, which is normal.
- Incorporate Dry Ingredients: Gradually add the flour mixture to the wet ingredients in two or three additions. Mix on low speed until the flour is just incorporated and a soft dough forms. Again, avoid overmixing, as this can develop too much gluten and result in tough cookies. The dough will be soft but should not be overly sticky if the ricotta was well-drained.
- Chill the Dough (Crucial Step): Divide the dough in half. Shape each half into a flat disc, about 1-inch thick. Wrap each disc tightly in plastic wrap. Refrigerate for at least 2 hours, or preferably overnight. Chilling the dough is essential for several reasons: it allows the flour to hydrate, the flavors to meld, and most importantly, it solidifies the butter, which prevents the cookies from spreading too much during baking and makes the dough easier to handle.
- Preheat Oven and Prepare Baking Sheets: When ready to bake, preheat your oven to 350°F (175°C). Line two large baking sheets with parchment paper or silicone baking mats. This prevents sticking and helps with even baking.
- Roll and Cut: Lightly flour a clean work surface. Unwrap one disc of chilled dough (keep the other refrigerated). If the dough is very firm, let it sit at room temperature for 5-10 minutes to become slightly more pliable. Roll the dough out to approximately ¼ to ⅓ inch thickness. Use cookie cutters of your desired shape to cut out the shortbread. Reroll scraps gently and cut more cookies until all the dough is used. If the dough becomes too soft at any point, return it to the refrigerator for 15-20 minutes to firm up.
- Arrange on Baking Sheets: Carefully transfer the cut-out cookies to the prepared baking sheets, leaving about 1 inch of space between them as they will spread slightly.
- Chill Before Baking (Optional but Recommended): For extra sharp edges and to further prevent spreading, you can place the baking sheets with the cut-out cookies into the refrigerator or freezer for another 15-20 minutes before baking.
- Bake: Bake in the preheated oven for 12-16 minutes, or until the edges are lightly golden brown and the centers are set. Baking time will vary depending on the thickness of your cookies and your oven’s quirks. Keep a close eye on them, as shortbread can go from perfectly baked to overdone quickly.
- Cool: Let the cookies cool on the baking sheets for 5-10 minutes before carefully transferring them to a wire rack to cool completely. They will be delicate when warm but will firm up as they cool.
- Decorate (Optional): Once completely cooled, you can dust the cookies with powdered sugar or drizzle them with melted dark chocolate if desired. Let any chocolate set before storing.
Nutrition
- Serving Size: one normal portion
- Calories: 160
- Sugar: 7g
- Sodium: 60mg
- Fat: 9g
- Carbohydrates: 15g
- Protein: 2g


