


Oh, coffee jelly! For years, I’d seen it pop up in trendy cafes and on those aesthetically pleasing dessert menus, always intrigued but somehow never quite brave enough to try making it myself. It seemed a bit… complicated? Fancy? Turns out, I couldn’t have been more wrong. This Easy Coffee Jelly Dessert recipe is an absolute revelation. From start to finish, it’s incredibly straightforward, using ingredients you likely already have in your pantry. And the taste? Imagine a cool, refreshing, subtly sweet coffee treat that’s both satisfyingly jiggly and wonderfully invigorating. My family absolutely devoured it! Even my picky teenager, who usually turns his nose up at anything remotely “different,” went back for seconds. It’s become our go-to dessert for warm evenings, potlucks, and even just a little afternoon pick-me-up. If you’re looking for a dessert that’s easy to make, impressive to serve, and utterly delicious, you’ve absolutely come to the right place. Get ready to fall in love with the magic of coffee jelly!
Ingredients: Your Simple Path to Coffee Jelly Perfection
This recipe prides itself on its simplicity. You won’t need a long list of exotic ingredients, just a few pantry staples and your favorite coffee. Here’s what you’ll need to whip up this delightful dessert:
- 4 cups Strong Brewed Coffee: (Approximately 950ml) The heart and soul of our dessert! Use your favorite coffee beans and brew it a little stronger than you normally would for drinking. This will ensure a robust coffee flavor in the final jelly. Allow it to cool slightly before using.
- ½ cup Granulated Sugar: (Approximately 100g) Adds the perfect touch of sweetness to balance the coffee’s bitterness. Adjust the amount slightly to your preference, especially depending on the strength and roast of your coffee.
- 2 tablespoons Unflavored Gelatin Powder: (Approximately 14g) The magic ingredient that gives our dessert its signature jiggly texture. Unflavored gelatin is crucial to let the coffee flavor shine without any competing tastes.
- ½ cup Cold Water: (Approximately 120ml) Used to bloom or hydrate the gelatin. Cold water is essential for this step to prevent the gelatin from clumping and ensure it dissolves smoothly.
- Optional: Whipped Cream or Sweetened Condensed Milk for serving: These are delightful additions to enhance the dessert. Whipped cream adds a light and airy creaminess, while sweetened condensed milk provides a richer, sweeter touch.
Instructions: Crafting Your Coffee Jelly Masterpiece in Minutes
Making this Easy Coffee Jelly Dessert is surprisingly simple. Follow these step-by-step instructions, and you’ll be enjoying a refreshing treat in no time:
- Bloom the Gelatin: In a small bowl, sprinkle the 2 tablespoons of unflavored gelatin powder over ½ cup of cold water. Let it sit for about 5-10 minutes. This process, called “blooming,” allows the gelatin granules to absorb the water and soften, which is crucial for it to dissolve properly later. You’ll notice the mixture becoming thicker and more jelly-like. Don’t skip this step, as it ensures a smooth, lump-free jelly.
- Heat the Coffee and Sugar: Pour the 4 cups of strong brewed coffee into a saucepan. Place the saucepan over medium heat on your stovetop. Add ½ cup of granulated sugar to the coffee. Stir continuously until the sugar is completely dissolved and the coffee is heated through but not boiling. Boiling can sometimes affect the setting properties of gelatin, so aim for a gentle simmer. The aroma filling your kitchen at this point is absolutely divine!
- Dissolve the Gelatin: Once the sugar is dissolved and the coffee is heated, remove the saucepan from the heat. Add the bloomed gelatin mixture to the hot coffee. Stir gently but thoroughly until the gelatin is completely dissolved. This is important to ensure a uniform texture throughout the jelly. Continue stirring until you can no longer see any granules of gelatin in the coffee mixture. The warmth of the coffee will easily dissolve the bloomed gelatin.
- Pour into Serving Dishes: Carefully pour the coffee gelatin mixture into your desired serving dishes. You can use individual dessert cups, small bowls, or even a larger shallow dish if you plan to cut the jelly into cubes later. If using a large dish, ensure it is shallow enough for the jelly to set evenly and relatively quickly.
- Chill to Set: Cover the serving dishes with plastic wrap or lids to prevent a skin from forming on the surface of the jelly and to protect it from absorbing any refrigerator odors. Refrigerate for at least 4-6 hours, or preferably overnight, to allow the coffee jelly to set completely. The chilling time is crucial for the gelatin to work its magic and create that perfect jiggly texture. Patience is key here!
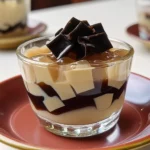
- Serve and Enjoy: Once the coffee jelly is firmly set, it’s ready to be served! You can enjoy it straight from the refrigerator for a refreshing treat. For an extra touch of indulgence, top each serving with a dollop of whipped cream or a drizzle of sweetened condensed milk just before serving. Garnish with a sprinkle of cocoa powder, chocolate shavings, or a few coffee beans for an elegant presentation. Prepare to be amazed by the simple yet sophisticated flavors and textures of your homemade Easy Coffee Jelly Dessert!
Nutrition Facts: A Light and Delightful Treat
This Easy Coffee Jelly Dessert is not only delicious but also relatively light, making it a guilt-free indulgence. Here’s a general nutritional overview per serving (assuming 6 servings per recipe and not including toppings like whipped cream or sweetened condensed milk):
- Servings: 6
- Calories per Serving: Approximately 80-100 kcal (Calories can vary slightly depending on the strength of the coffee and the exact amount of sugar used). This makes it a relatively low-calorie dessert option, especially compared to richer, cream-based desserts.
- Sugar: Approximately 15-20g per serving (Primarily from the granulated sugar). While it contains sugar, it’s a moderate amount for a dessert, and you can adjust it slightly to your preference.
- Caffeine: Varies depending on the strength of the coffee used. Expect a moderate caffeine content, similar to a cup of coffee, which can provide a gentle energy boost.
Important Note: These nutritional values are estimates and can vary based on specific ingredients and serving sizes. For precise nutritional information, use a nutrition calculator with the specific brands and quantities of ingredients you use. Remember, the addition of toppings like whipped cream or sweetened condensed milk will significantly increase the calorie and fat content.
Preparation Time: Quick and Easy Dessert Delight
One of the best things about this Easy Coffee Jelly Dessert is its minimal preparation time. It’s perfect for when you need a dessert quickly or want to impress without spending hours in the kitchen.
- Active Preparation Time: Approximately 15-20 minutes. This includes the time it takes to bloom the gelatin, heat the coffee and sugar, and dissolve the gelatin. Most of this time is hands-on, but the steps are very straightforward and require no special culinary skills.
- Chilling Time: Minimum 4-6 hours, ideally overnight. This is inactive time where the refrigerator does all the work! While the chilling time is significant, it requires no effort from your side. You can easily prepare this dessert in the evening and have it ready to enjoy the next day.
Total Time (excluding chilling): Under 20 minutes of active work! This recipe truly embodies the “easy” in its name. It’s a fantastic option for busy individuals or anyone who appreciates a delicious dessert without the fuss.
How to Serve: Elevating Your Coffee Jelly Experience
Coffee Jelly is wonderfully versatile and can be served in various ways to suit different occasions and preferences. Here are some delightful serving suggestions:
- Classic Style: Serve chilled in individual dessert cups or bowls. This is the simplest and most traditional way to enjoy coffee jelly. It’s refreshing and perfect on its own.
- With Whipped Cream: Top each serving with a generous dollop of freshly whipped cream. The creamy texture of the whipped cream beautifully complements the jiggly coffee jelly and adds a touch of richness.
- Drizzled with Sweetened Condensed Milk: For a sweeter and richer experience, drizzle sweetened condensed milk over the coffee jelly. This adds a luscious sweetness and a beautiful creamy texture that many find irresistible.
- Coffee Jelly Cubes in Milk: Cut the set coffee jelly into small cubes and serve them in a glass of cold milk (dairy or non-dairy). This is a popular way to enjoy coffee jelly in some Asian countries and offers a refreshing and textural drink-dessert hybrid.
- Layered Dessert Parfaits: Create elegant dessert parfaits by layering coffee jelly with whipped cream, crushed cookies (like biscotti or graham crackers), chocolate shavings, or fresh fruit like berries. This adds visual appeal and textural complexity.
- Alongside Ice Cream: Serve coffee jelly as a side with a scoop of vanilla, coffee, or chocolate ice cream. The contrasting temperatures and textures create a delightful dessert combination.
- In Coffee Drinks: Add small cubes of coffee jelly to iced coffee or coffee milkshakes for an extra coffee kick and a fun textural element. This is a trendy and refreshing way to incorporate coffee jelly into your beverages.
- Garnished with Chocolate: Sprinkle chocolate shavings, cocoa powder, or a drizzle of melted chocolate over the coffee jelly for a classic flavor pairing. The bitterness of dark chocolate complements the coffee beautifully.
Additional Tips: Mastering the Art of Coffee Jelly
While this recipe is incredibly easy, these additional tips will help you achieve coffee jelly perfection every time:
- Use Strong Coffee: Start with a strong brewed coffee. This is crucial to ensure a pronounced coffee flavor in the final jelly. If you use weak coffee, the flavor might be too subtle and get lost in the sweetness. Consider using a dark roast coffee for a bolder taste.
- Adjust Sugar to Taste: The ½ cup of sugar is a guideline. Taste your coffee mixture after dissolving the sugar and adjust the sweetness to your liking. If you prefer a less sweet dessert, start with less sugar and add more gradually. Consider the roast of your coffee – darker roasts might require a bit more sugar to balance the bitterness.
- Ensure Gelatin is Fully Dissolved: Stir the bloomed gelatin into the hot coffee until it is completely dissolved and no granules remain. Undissolved gelatin can result in a grainy or lumpy texture. Gentle but thorough stirring is key.
- Don’t Boil the Coffee After Adding Gelatin: Once you add the gelatin, avoid boiling the coffee mixture. High temperatures can weaken the setting properties of gelatin. Heat the coffee and sugar to dissolve the sugar, then remove from heat before adding the gelatin.
- Use Quality Gelatin: Opt for good quality unflavored gelatin powder. The quality of gelatin can affect the texture of the jelly. Fresh gelatin that hasn’t expired will yield the best results.
- Control the Set with Gelatin Quantity: For a firmer jelly, you can slightly increase the amount of gelatin (by ½ teaspoon or so). For a softer, more delicate jelly, you can slightly reduce it. Experiment to find your preferred texture.
- Chill Properly: Allow ample chilling time for the coffee jelly to set completely. At least 4-6 hours is recommended, but overnight chilling is even better. Rushing the chilling process can result in a jelly that is too soft or doesn’t hold its shape well.
- Get Creative with Flavors (Optional): While this recipe is for classic coffee jelly, you can experiment with subtle flavor additions. Try adding a pinch of cinnamon, a splash of vanilla extract, or a hint of coffee liqueur to the coffee mixture for a unique twist. Start with small amounts and taste as you go.
FAQ: Your Burning Coffee Jelly Questions Answered
Got questions about making coffee jelly? We’ve got answers! Here are some frequently asked questions to guide you on your coffee jelly journey:
Q1: Can I use instant coffee for this recipe?
A: Yes, you can use instant coffee, but for the best flavor, we highly recommend using freshly brewed coffee. If using instant coffee, dissolve it in hot water to make a strong coffee concentrate before proceeding with the recipe. Keep in mind that the flavor profile might be slightly different compared to brewed coffee.
Q2: Can I use flavored coffee?
A: Absolutely! Flavored coffees like vanilla, hazelnut, or caramel coffee can add a delightful twist to your coffee jelly. Just ensure the flavor complements the coffee base and isn’t overpowering. Experiment and find your favorite flavor combinations!
Q3: Can I make this recipe vegan?
A: To make this recipe vegan, you’ll need to substitute the gelatin, which is animal-derived. Agar-agar powder is a plant-based gelatin alternative derived from seaweed. You’ll need to follow the instructions on your agar-agar package as the usage ratio might differ from gelatin. Generally, you’ll use less agar-agar than gelatin.
Q4: How long does coffee jelly last in the refrigerator?
A: Properly stored in an airtight container in the refrigerator, coffee jelly will last for up to 3-4 days. It’s best enjoyed fresh for optimal texture and flavor. Over time, the jelly might start to weep slightly (release liquid), but it will still be safe to eat.
Q5: Can I freeze coffee jelly?
A: Freezing coffee jelly is not recommended. Freezing and thawing can significantly alter the texture of the jelly, making it watery and less appealing. It’s best to make coffee jelly fresh and enjoy it within a few days.
Q6: What if my coffee jelly doesn’t set?
A: If your coffee jelly doesn’t set, the most common reasons are either not using enough gelatin or not chilling it for long enough. Ensure you used the correct amount of gelatin as specified in the recipe and that you chilled it for at least 4-6 hours. If it’s still too soft, you can gently reheat the mixture (without boiling), dissolve a little more bloomed gelatin (about ½ to 1 teaspoon), and rechill.
Q7: Can I reduce the sugar in this recipe?
A: Yes, you can definitely reduce the sugar to your liking. Start with a smaller amount and taste as you go. You can also use sugar substitutes like stevia or erythritol, but be aware that they might slightly alter the texture and flavor of the jelly.
Q8: Can I make coffee jelly in advance for a party?
A: Absolutely! Coffee jelly is a fantastic make-ahead dessert. You can prepare it a day or two in advance and store it in the refrigerator. This makes it perfect for parties and gatherings, allowing you to focus on other preparations on the day of the event. Just remember to add toppings like whipped cream or sweetened condensed milk just before serving to maintain their freshness.
Easy Coffee Jelly Dessert
Ingredients
This recipe prides itself on its simplicity. You won’t need a long list of exotic ingredients, just a few pantry staples and your favorite coffee. Here’s what you’ll need to whip up this delightful dessert:
- 4 cups Strong Brewed Coffee: (Approximately 950ml) The heart and soul of our dessert! Use your favorite coffee beans and brew it a little stronger than you normally would for drinking. This will ensure a robust coffee flavor in the final jelly. Allow it to cool slightly before using.
- ½ cup Granulated Sugar: (Approximately 100g) Adds the perfect touch of sweetness to balance the coffee’s bitterness. Adjust the amount slightly to your preference, especially depending on the strength and roast of your coffee.
- 2 tablespoons Unflavored Gelatin Powder: (Approximately 14g) The magic ingredient that gives our dessert its signature jiggly texture. Unflavored gelatin is crucial to let the coffee flavor shine without any competing tastes.
- ½ cup Cold Water: (Approximately 120ml) Used to bloom or hydrate the gelatin. Cold water is essential for this step to prevent the gelatin from clumping and ensure it dissolves smoothly.
- Optional: Whipped Cream or Sweetened Condensed Milk for serving: These are delightful additions to enhance the dessert. Whipped cream adds a light and airy creaminess, while sweetened condensed milk provides a richer, sweeter touch.
Instructions
Making this Easy Coffee Jelly Dessert is surprisingly simple. Follow these step-by-step instructions, and you’ll be enjoying a refreshing treat in no time:
- Bloom the Gelatin: In a small bowl, sprinkle the 2 tablespoons of unflavored gelatin powder over ½ cup of cold water. Let it sit for about 5-10 minutes. This process, called “blooming,” allows the gelatin granules to absorb the water and soften, which is crucial for it to dissolve properly later. You’ll notice the mixture becoming thicker and more jelly-like. Don’t skip this step, as it ensures a smooth, lump-free jelly.
- Heat the Coffee and Sugar: Pour the 4 cups of strong brewed coffee into a saucepan. Place the saucepan over medium heat on your stovetop. Add ½ cup of granulated sugar to the coffee. Stir continuously until the sugar is completely dissolved and the coffee is heated through but not boiling. Boiling can sometimes affect the setting properties of gelatin, so aim for a gentle simmer. The aroma filling your kitchen at this point is absolutely divine!
- Dissolve the Gelatin: Once the sugar is dissolved and the coffee is heated, remove the saucepan from the heat. Add the bloomed gelatin mixture to the hot coffee. Stir gently but thoroughly until the gelatin is completely dissolved. This is important to ensure a uniform texture throughout the jelly. Continue stirring until you can no longer see any granules of gelatin in the coffee mixture. The warmth of the coffee will easily dissolve the bloomed gelatin.
- Pour into Serving Dishes: Carefully pour the coffee gelatin mixture into your desired serving dishes. You can use individual dessert cups, small bowls, or even a larger shallow dish if you plan to cut the jelly into cubes later. If using a large dish, ensure it is shallow enough for the jelly to set evenly and relatively quickly.
- Chill to Set: Cover the serving dishes with plastic wrap or lids to prevent a skin from forming on the surface of the jelly and to protect it from absorbing any refrigerator odors. Refrigerate for at least 4-6 hours, or preferably overnight, to allow the coffee jelly to set completely. The chilling time is crucial for the gelatin to work its magic and create that perfect jiggly texture. Patience is key here!
- Serve and Enjoy: Once the coffee jelly is firmly set, it’s ready to be served! You can enjoy it straight from the refrigerator for a refreshing treat. For an extra touch of indulgence, top each serving with a dollop of whipped cream or a drizzle of sweetened condensed milk just before serving. Garnish with a sprinkle of cocoa powder, chocolate shavings, or a few coffee beans for an elegant presentation. Prepare to be amazed by the simple yet sophisticated flavors and textures of your homemade Easy Coffee Jelly Dessert!
Nutrition
- Serving Size: one normal portion
- Calories: 100
- Sugar: 20g


