

Let me tell you about a recipe that has become an absolute staple in my household: Easy Chicken & Cheese Taquitos. The first time I made these, I was looking for something relatively quick, definitely cheesy, and appealing enough for both the adults and the pickiest little eater in our family. I wasn’t sure if the crispiness would hold up without deep frying, as I planned to bake them. Well, the results were spectacular! The aroma filling the kitchen as they baked was intoxicating – cheesy, savory, with a hint of spice. When I pulled the tray out, they were beautifully golden brown and sizzling gently. The real test came at the dinner table. My husband, usually reserved with praise, declared them “restaurant-worthy,” and my notoriously selective child devoured three before I could even sit down properly, asking when we could have them again. Since then, these taquitos have graced our table for busy weeknights, casual weekend lunches, game day gatherings, and even as appetizers for parties. They are incredibly versatile, surprisingly simple, and the combination of tender shredded chicken, gooey melted cheese, and creamy binders wrapped in a crispy tortilla shell is pure comfort food magic. They are forgiving, adaptable, and consistently deliver delicious results, making them a true winner in my recipe collection.
Ingredients
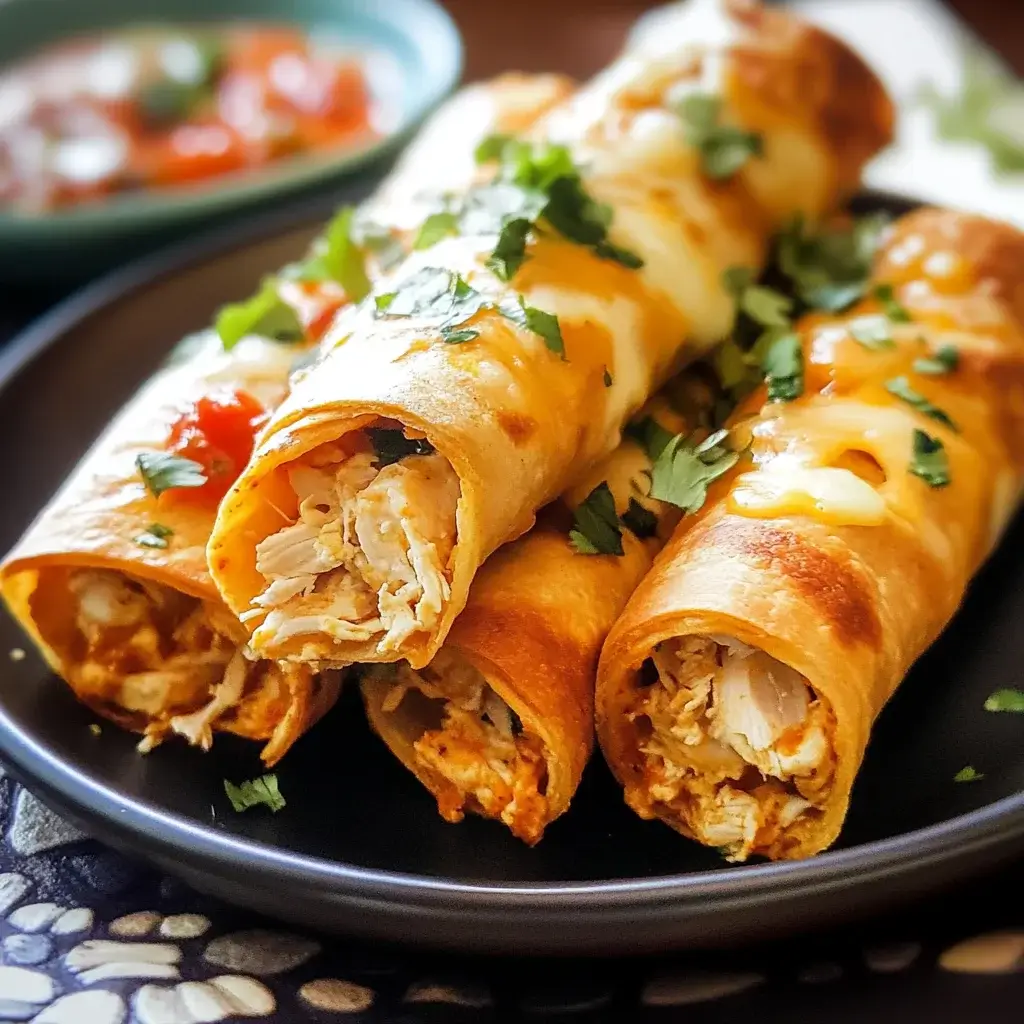
Here’s what you’ll need to create these delicious and easy chicken & cheese taquitos:
- Shredded Cooked Chicken (3 cups): The star protein. Using pre-cooked chicken, like rotisserie chicken or leftover baked/boiled chicken breasts, makes this recipe incredibly fast. Ensure it’s shredded into bite-sized pieces.
- Cream Cheese (8 ounces / 1 block): The creamy binder. Use full-fat cream cheese, softened to room temperature for easy mixing and a rich flavour.
- Shredded Cheese (1.5 cups): The gooey factor. A blend like Colby Jack, Monterey Jack, or a Mexican blend works wonderfully. Cheddar adds a sharper flavour. Shredding your own cheese often results in better melting than pre-shredded varieties (which contain anti-caking agents).
- Salsa Verde (1/4 cup): Adds moisture and a tangy, slightly spicy kick. Choose mild, medium, or hot based on your preference. You can also use red salsa if preferred.
- Taco Seasoning (1 tablespoon): Provides classic Tex-Mex flavour. Use a store-bought packet or your favourite homemade blend. Adjust amount to taste.
- Garlic Powder (1 teaspoon): Enhances the savoury notes.
- Onion Powder (1 teaspoon): Adds depth of flavour.
- Lime Juice (1 tablespoon, optional but recommended): Brightens the flavours and cuts through the richness of the cheese and cream cheese. Freshly squeezed is best.
- Chopped Cilantro (1/4 cup, optional): Adds a fresh, herbaceous element. Omit if you’re not a fan.
- Small Flour or Corn Tortillas (16-20): The vessel. Small “fajita size” (around 6 inches) works best for taquito shape. Flour tortillas are generally easier to roll without cracking, while corn tortillas offer a more traditional flavour (ensure they are very fresh and warmed properly to prevent cracking).
- Olive Oil or Melted Butter (2-3 tablespoons) or Cooking Spray: For brushing/spraying the taquitos before baking or air frying to achieve a crispy, golden exterior.
Instructions
Follow these steps for perfectly crispy and flavourful chicken taquitos:
- Preheat & Prepare: Preheat your oven to 400°F (200°C) or your air fryer to 380°F (190°C). If baking, line a large baking sheet with parchment paper or lightly grease it. This prevents sticking and makes cleanup easier.
- Mix the Filling: In a large bowl, combine the softened cream cheese, shredded cheese, salsa verde, taco seasoning, garlic powder, onion powder, and optional lime juice and cilantro. Stir vigorously until well combined and relatively smooth. It’s okay if there are small lumps of cream cheese initially.
- Add the Chicken: Add the shredded cooked chicken to the cheese mixture. Stir until the chicken is evenly coated with the creamy filling. Taste the mixture and adjust seasonings if necessary – perhaps more taco seasoning, a pinch of salt, or a dash of hot sauce if you like more heat.
- Warm the Tortillas: This step is crucial, especially if using corn tortillas, to prevent them from cracking when rolled.
- Microwave Method: Wrap a stack of 4-5 tortillas in damp paper towels. Microwave on high for 20-30 seconds, or until warm and pliable. Work in batches.
- Skillet Method: Briefly warm tortillas one by one in a dry skillet over medium heat for about 10-15 seconds per side until flexible.
- Assemble the Taquitos: Lay a warmed tortilla flat. Spoon about 2-3 tablespoons of the chicken and cheese filling in a line down the center of the tortilla, leaving a little space at the ends. Don’t overfill, or the filling will squeeze out. Roll the tortilla up tightly around the filling, like a cigar.
- Place on Baking Sheet/Air Fryer Basket: Place the rolled taquito seam-side down on the prepared baking sheet or in the air fryer basket. Placing them seam-side down helps prevent them from unrolling during cooking. Repeat with the remaining tortillas and filling, arranging them in a single layer without overcrowding. Leave a little space between taquitos for even cooking and crisping. You may need to cook in batches depending on the size of your oven or air fryer.
- Brush or Spray: Lightly brush the tops and sides of the taquitos with olive oil or melted butter, or generously spray them with cooking spray. This helps them get golden brown and crispy.
- Cook:
- Oven Baking: Bake at 400°F (200°C) for 15-20 minutes, or until the taquitos are golden brown, crispy, and the filling is heated through. You can flip them halfway through for maximum crispiness, but it’s often not necessary if they are well-brushed/sprayed.
- Air Frying: Air fry at 380°F (190°C) for 8-12 minutes, flipping halfway through, until golden brown and crispy. Air fryers cook faster, so keep an eye on them. Cook in batches if needed to avoid overcrowding the basket.
- Pan Frying (Optional): Heat about 1/2 inch of neutral oil (like vegetable or canola) in a large skillet over medium-high heat until shimmering. Carefully place a few taquitos seam-side down in the hot oil. Fry for 2-4 minutes per side, turning gently with tongs, until golden brown and crispy all over. Drain on a wire rack or paper towels. Note: This method uses more oil and requires careful handling.
- Serve: Let the taquitos cool for a few minutes before serving, as the filling will be very hot. Serve warm with your favourite dips and toppings.
Nutrition Facts
- Servings: This recipe typically makes 16-20 taquitos, serving approximately 4-6 people (assuming 3-4 taquitos per person as a main, or 2-3 as an appetizer).
- Calories Per Serving (Approximate): Roughly 350-450 kcal per serving (based on 4 taquitos per serving using flour tortillas and baking method). Disclaimer: Nutritional information is an estimate only and can vary significantly based on specific ingredients used (e.g., type of cheese, tortillas, cooking method, added oil) and portion size.
- Protein: A good source of protein, primarily from the chicken and cheese, essential for muscle building and satiety.
- Fat: Contains fat from the cheese, cream cheese, and any oil used for cooking. The type of fat varies (saturated from cheese, potentially healthier fats if using olive oil).
- Carbohydrates: Primarily from the tortillas. Choosing corn tortillas can slightly increase fiber content compared to flour.
Preparation Time
- Prep Time: Approximately 15-20 minutes (assuming chicken is pre-cooked and shredded). This includes mixing the filling and rolling the taquitos.
- Cook Time: 10-20 minutes, depending on the chosen cooking method (air frying is generally fastest, followed by baking).
- Total Time: Approximately 25-40 minutes from start to finish, making this a fantastic option for a relatively quick meal or appetizer.
How to Serve
These Easy Chicken & Cheese Taquitos are delicious on their own, but serving them with dips and toppings elevates the experience. Here are some ideas:
- Dipping Sauces (Essential!):
- Classic Salsa: A good quality store-bought or homemade red salsa (mild, medium, or hot).
- Salsa Verde: Complements the filling perfectly with its tangy flavour.
- Guacamole: Creamy, fresh avocado dip is a natural pairing.
- Sour Cream or Greek Yogurt: Provides a cool, creamy contrast to the crispy taquito. Add a squeeze of lime juice for extra zing.
- Queso Dip: For the ultimate cheesy indulgence, serve with warm, melty queso.
- Cilantro Lime Crema: A blend of sour cream/Greek yogurt, lime juice, cilantro, and a pinch of salt.
- Avocado Crema: Similar to cilantro lime crema but with blended avocado for extra creaminess.
- Chipotle Aioli or Cream: Adds a smoky, spicy kick (mix mayonnaise or sour cream with adobo sauce from canned chipotles and lime juice).
- Ranch Dressing: A kid-friendly favourite that surprisingly works well.
- Toppings:
- Shredded Lettuce: Adds freshness and a slight crunch. Iceberg or romaine works well.
- Diced Tomatoes: Fresh, juicy contrast.
- Diced Red Onion or Pickled Onions: Adds a sharp bite.
- Chopped Fresh Cilantro: Bright, herbaceous flavour.
- Crumbled Cotija Cheese or Queso Fresco: Salty, crumbly Mexican cheese adds another layer of flavour and texture.
- Sliced Jalapeños (fresh or pickled): For those who like extra heat.
- A Drizzle of Hot Sauce: Choose your favourite!
- Presentation:
- Arrange taquitos on a platter.
- Serve dips in small bowls alongside.
- Garnish the platter with cilantro sprigs, lime wedges, and a sprinkle of cotija cheese.
- For a meal, serve alongside Mexican rice, refried beans, or a simple side salad.
Additional Tips
Maximize your taquito success with these helpful tips:
- Don’t Skip Warming Tortillas: This is the #1 tip to prevent frustration. Cold or dry tortillas (especially corn) will crack when you try to roll them. Properly warming makes them pliable and easy to work with. Damp paper towels in the microwave are usually the quickest method.
- Cream Cheese Must Be Softened: Trying to mix cold, hard cream cheese is difficult and results in large clumps. Let it sit at room temperature for at least 30-60 minutes, or carefully microwave it in short bursts (15-20 seconds) until softened but not melted.
- Shred Your Own Cheese: While pre-shredded cheese is convenient, it contains cellulose and anti-caking agents that can prevent it from melting as smoothly. For the gooiest, meltiest filling, buy a block of cheese and shred it yourself.
- Avoid Watery Filling: Ensure your cooked chicken isn’t overly wet. Pat it dry if necessary. Also, drain any excess liquid from your salsa verde if it seems particularly thin. A filling that’s too wet can make the taquitos soggy.
- Roll Tightly & Seal Seam-Side Down: Roll the tortillas snugly around the filling to create a compact taquito. Placing them seam-side down on the baking sheet or air fryer basket is crucial to help them seal shut as they cook, preventing them from unravelling.
- Achieve Maximum Crispiness: Don’t skimp on brushing or spraying with oil/butter if baking or air frying. This is key to getting that desirable golden-brown, crispy exterior. Ensure adequate spacing between taquitos allows hot air to circulate. For ultra-crispiness, consider using the pan-frying method (though it adds more fat).
- Make-Ahead & Freezing Instructions:
- Make-Ahead: You can mix the filling up to 2 days in advance and store it covered in the refrigerator. You can also assemble the taquitos completely, place them on a baking sheet (not touching), cover tightly with plastic wrap, and refrigerate for up to 24 hours before baking/air frying (you might need to add a minute or two to the cooking time).
- Freezing: Assemble the taquitos but don’t bake them. Place them in a single layer on a baking sheet and freeze until solid (about 1-2 hours). Transfer the frozen taquitos to a zip-top freezer bag or airtight container. They can be stored for up to 3 months. Cook directly from frozen, adding 5-10 minutes to the baking/air frying time.
- Customize Your Filling: Feel free to get creative! Add a can of drained green chiles for extra flavour, some black beans or corn (drained well) for texture, different spices like cumin or chili powder, or use pepper jack cheese for more heat. You can also use leftover shredded beef or pork instead of chicken.
FAQ Section
Here are answers to some frequently asked questions about making Easy Chicken & Cheese Taquitos:
- Q: Can I use different types of cooked chicken?
- A: Absolutely! Rotisserie chicken is fantastic for convenience and flavour. Leftover grilled, baked, or boiled chicken works perfectly too. You can even use canned chicken, but make sure to drain it extremely well. The key is to have about 3 cups of shredded, cooked chicken.
- Q: What are the best cheeses to use?
- A: Monterey Jack, Colby Jack, and classic Cheddar (mild, medium, or sharp) are excellent choices for their melting properties and flavour. Pepper Jack adds a nice spicy kick. A Mexican blend often combines several of these. For a more authentic touch, Oaxaca cheese melts beautifully. Using a combination often yields the best results – good melt + good flavour.
- Q: Is baking, air frying, or pan-frying better?
- A: It depends on your preference!
- Baking: Easiest for large batches, uses less oil than pan-frying, results in reliably crispy taquitos if oiled/sprayed properly.
- Air Frying: Fastest cooking method, achieves excellent crispiness with minimal oil, great for smaller batches.
- Pan-Frying: Yields the most authentic, ultra-crispy result but uses the most oil, requires more active cooking time, and can be messy.
All methods produce delicious taquitos!
- A: It depends on your preference!
- Q: Can I make these taquitos ahead of time?
- A: Yes! You have a couple of options. You can prepare the filling up to 2 days ahead and store it, covered, in the fridge. You can also assemble the taquitos, place them on a baking sheet, cover tightly, and refrigerate for up to 24 hours before cooking. See Tip #7 for more details.
- Q: How do I freeze taquitos? Can I cook them from frozen?
- A: Yes, they freeze wonderfully! Assemble the taquitos, flash freeze them on a baking sheet until solid, then transfer to a freezer bag. To cook from frozen, place them directly onto the baking sheet or into the air fryer basket (don’t thaw). Add approximately 5-10 minutes to the original cooking time, ensuring they are heated through and crispy. See Tip #7.
- Q: Can I make these gluten-free?
- A: Yes, simply use certified gluten-free corn tortillas. Ensure your taco seasoning and other ingredients are also certified gluten-free. Corn tortillas are more prone to cracking, so warming them properly (Tip #1) is absolutely essential. Work gently when rolling.
- Q: How can I make the taquitos spicier or milder?
- Spicier: Use a hot salsa verde or red salsa, add a pinch of cayenne pepper or chipotle powder to the filling, mix in finely diced jalapeños (fresh or pickled), or use pepper jack cheese.
- Milder: Use a mild salsa, ensure your taco seasoning isn’t spicy, omit any extra hot peppers, and use mild cheeses like Monterey Jack or mild cheddar.
- Q: What’s the best way to reheat leftover taquitos?
- A: For the best results and to maintain crispiness, reheat leftover taquitos in the oven or air fryer. Preheat to around 350°F (175°C) and heat for 5-10 minutes until warmed through and crispy again. Avoid the microwave, as it will make the tortillas soft and potentially soggy.

Easy Chicken & Cheese Taquitos
Ingredients
Here’s what you’ll need to create these delicious and easy chicken & cheese taquitos:
- Shredded Cooked Chicken (3 cups): The star protein. Using pre-cooked chicken, like rotisserie chicken or leftover baked/boiled chicken breasts, makes this recipe incredibly fast. Ensure it’s shredded into bite-sized pieces.
- Cream Cheese (8 ounces / 1 block): The creamy binder. Use full-fat cream cheese, softened to room temperature for easy mixing and a rich flavour.
- Shredded Cheese (1.5 cups): The gooey factor. A blend like Colby Jack, Monterey Jack, or a Mexican blend works wonderfully. Cheddar adds a sharper flavour. Shredding your own cheese often results in better melting than pre-shredded varieties (which contain anti-caking agents).
- Salsa Verde (1/4 cup): Adds moisture and a tangy, slightly spicy kick. Choose mild, medium, or hot based on your preference. You can also use red salsa if preferred.
- Taco Seasoning (1 tablespoon): Provides classic Tex-Mex flavour. Use a store-bought packet or your favourite homemade blend. Adjust amount to taste.
- Garlic Powder (1 teaspoon): Enhances the savoury notes.
- Onion Powder (1 teaspoon): Adds depth of flavour.
- Lime Juice (1 tablespoon, optional but recommended): Brightens the flavours and cuts through the richness of the cheese and cream cheese. Freshly squeezed is best.
- Chopped Cilantro (1/4 cup, optional): Adds a fresh, herbaceous element. Omit if you’re not a fan.
- Small Flour or Corn Tortillas (16-20): The vessel. Small “fajita size” (around 6 inches) works best for taquito shape. Flour tortillas are generally easier to roll without cracking, while corn tortillas offer a more traditional flavour (ensure they are very fresh and warmed properly to prevent cracking).
- Olive Oil or Melted Butter (2-3 tablespoons) or Cooking Spray: For brushing/spraying the taquitos before baking or air frying to achieve a crispy, golden exterior.
Instructions
Follow these steps for perfectly crispy and flavourful chicken taquitos:
- Preheat & Prepare: Preheat your oven to 400°F (200°C) or your air fryer to 380°F (190°C). If baking, line a large baking sheet with parchment paper or lightly grease it. This prevents sticking and makes cleanup easier.
- Mix the Filling: In a large bowl, combine the softened cream cheese, shredded cheese, salsa verde, taco seasoning, garlic powder, onion powder, and optional lime juice and cilantro. Stir vigorously until well combined and relatively smooth. It’s okay if there are small lumps of cream cheese initially.
- Add the Chicken: Add the shredded cooked chicken to the cheese mixture. Stir until the chicken is evenly coated with the creamy filling. Taste the mixture and adjust seasonings if necessary – perhaps more taco seasoning, a pinch of salt, or a dash of hot sauce if you like more heat.
- Warm the Tortillas: This step is crucial, especially if using corn tortillas, to prevent them from cracking when rolled.
- Microwave Method: Wrap a stack of 4-5 tortillas in damp paper towels. Microwave on high for 20-30 seconds, or until warm and pliable. Work in batches.
- Skillet Method: Briefly warm tortillas one by one in a dry skillet over medium heat for about 10-15 seconds per side until flexible.
- Assemble the Taquitos: Lay a warmed tortilla flat. Spoon about 2-3 tablespoons of the chicken and cheese filling in a line down the center of the tortilla, leaving a little space at the ends. Don’t overfill, or the filling will squeeze out. Roll the tortilla up tightly around the filling, like a cigar.
- Place on Baking Sheet/Air Fryer Basket: Place the rolled taquito seam-side down on the prepared baking sheet or in the air fryer basket. Placing them seam-side down helps prevent them from unrolling during cooking. Repeat with the remaining tortillas and filling, arranging them in a single layer without overcrowding. Leave a little space between taquitos for even cooking and crisping. You may need to cook in batches depending on the size of your oven or air fryer.
- Brush or Spray: Lightly brush the tops and sides of the taquitos with olive oil or melted butter, or generously spray them with cooking spray. This helps them get golden brown and crispy.
- Cook:
- Oven Baking: Bake at 400°F (200°C) for 15-20 minutes, or until the taquitos are golden brown, crispy, and the filling is heated through. You can flip them halfway through for maximum crispiness, but it’s often not necessary if they are well-brushed/sprayed.
- Air Frying: Air fry at 380°F (190°C) for 8-12 minutes, flipping halfway through, until golden brown and crispy. Air fryers cook faster, so keep an eye on them. Cook in batches if needed to avoid overcrowding the basket.
- Pan Frying (Optional): Heat about 1/2 inch of neutral oil (like vegetable or canola) in a large skillet over medium-high heat until shimmering. Carefully place a few taquitos seam-side down in the hot oil. Fry for 2-4 minutes per side, turning gently with tongs, until golden brown and crispy all over. Drain on a wire rack or paper towels. Note: This method uses more oil and requires careful handling.
- Serve: Let the taquitos cool for a few minutes before serving, as the filling will be very hot. Serve warm with your favourite dips and toppings.
Nutrition
- Serving Size: one normal portion
- Calories: 450


