


There are certain recipes that become more than just a set of instructions; they become a part of your family’s story. For me, these Easy Almond Butter Cookies are exactly that. I still remember the first time I baked them. It was a dreary Tuesday afternoon, and the mood in the house was just as grey. I needed a quick pick-me-up, something simple but comforting. I spotted a jar of almond butter in the pantry and a memory sparked—a flourless cookie recipe a friend had raved about. With a healthy dose of skepticism (could a cookie with so few ingredients really be that good?), I got to work. In less than 30 minutes, the entire house was filled with the intoxicating aroma of toasted almonds and warm vanilla. My kids, who usually need to be bribed for a taste test, came running. The first bite was a revelation. The cookies were unbelievably chewy, intensely nutty, and had the most satisfyingly crisp edges. They weren’t just “good for a healthy cookie”; they were genuinely, undeniably delicious. Since that day, this recipe has become our go-to for everything: a last-minute school bake sale contribution, a comforting treat after a tough day, and the perfect homemade gift to share with neighbors. It’s the recipe that proved to me that the most wonderful things are often the most simple.
Ingredients
This recipe relies on a few high-quality ingredients to deliver its signature rich flavor and chewy texture. Each component plays a crucial role in creating the perfect cookie.
- 1 cup (250g) Creamy, Natural Almond Butter: This is the heart and soul of the recipe. Use a high-quality, natural almond butter where the only ingredients are almonds and maybe a pinch of salt. Avoid brands with added sugars or hydrogenated oils, as they can alter the cookie’s texture and make it greasy. The almond butter provides the fat, protein, and intense nutty flavor.
- ¾ cup (150g) Packed Brown Sugar: Light or dark brown sugar will work. The molasses content in brown sugar adds moisture, which is key to achieving that desirable chewy center. It also imparts a subtle caramel-like depth of flavor that complements the almonds beautifully.
- 1 large Egg: The egg acts as the primary binder, holding the dough together. It also contributes to the leavening, helping the cookies puff up slightly, and adds richness. For the best results, use an egg at room temperature.
- 1 teaspoon Pure Vanilla Extract: A non-negotiable for flavor enhancement. Vanilla doesn’t make the cookies taste like vanilla; instead, it elevates and rounds out the nutty flavor of the almond butter, making it taste more complex and delicious.
- ½ teaspoon Baking Soda: This is our leavening agent. It reacts with the slight acidity in the brown sugar to help the cookies spread and rise just the right amount, preventing them from being too dense.
- ¼ teaspoon Sea Salt: Even if your almond butter is salted, a little extra salt is essential. Salt is a flavor enhancer that balances the sweetness of the sugar and intensifies the almond flavor.
Instructions
Follow these detailed steps to ensure your almond butter cookies come out perfectly chewy and delicious every single time.
- Preheat and Prepare: Begin by preheating your oven to 350°F (175°C). Position a rack in the center of the oven for the most even baking. Line two large baking sheets with parchment paper. This is a crucial step that not only prevents the cookies from sticking but also promotes even browning on the bottom and makes cleanup a breeze.
- Combine Wet Ingredients: In a large mixing bowl, combine the creamy almond butter, packed brown sugar, the large egg, and the pure vanilla extract.
- Cream the Mixture: Using an electric hand mixer on medium speed or a stand mixer fitted with the paddle attachment, beat the ingredients together for about 2 minutes. The mixture should become smooth, creamy, and slightly lighter in color. This process, known as creaming, incorporates air into the dough, which is essential for a tender texture. If you don’t have an electric mixer, you can do this by hand with a whisk or a sturdy spatula; just be prepared for a good arm workout and mix vigorously for 3-4 minutes.
- Add Dry Ingredients: Sprinkle the baking soda and sea salt over the top of the creamed mixture. Continue to beat on low speed for another 30 seconds, or just until the baking soda and salt are fully incorporated. Be careful not to overmix at this stage. Overmixing can develop the gluten-like proteins, resulting in a tougher cookie.
- Scoop the Dough: The dough will be soft and slightly sticky. Using a 1.5-tablespoon cookie scoop (or two spoons), portion out balls of dough and place them about 2 inches apart on the prepared baking sheets. This spacing is important as the cookies will spread while baking.
- Create the Criss-Cross Pattern: This step is both classic and functional. Dip the tines of a fork into a small bowl of granulated sugar (this prevents sticking). Gently press the fork onto the top of each dough ball, then press again in the opposite direction to create the iconic criss-cross pattern. This not only looks beautiful but also helps to flatten the cookie slightly for more even baking.
- Bake to Perfection: Place the baking sheets in the preheated oven. Bake for 10-12 minutes. The exact time will depend on your oven. The cookies are done when the edges are set and have turned a light golden brown, but the centers still look slightly soft and underdone. They will continue to cook from the residual heat on the baking sheet. This is the secret to a chewy center.
- Cool Completely: Remove the baking sheets from the oven. Let the cookies cool on the baking sheet for a full 5 minutes. They will be very fragile when they first come out, and this rest time allows them to firm up. After 5 minutes, use a thin spatula to carefully transfer the cookies to a wire cooling rack to cool completely. Do not attempt to eat them while they are still hot, as the texture will not have set properly. The true chewy texture develops as they cool.
Nutrition Facts
This recipe makes approximately 24 cookies.
- Serving Size: 1 cookie
- Calories per serving: Approximately 110 kcal
- Healthy Fats (approx. 7g): The majority of the fat in these cookies comes from the almond butter, which is rich in monounsaturated fats. These are heart-healthy fats that can help reduce bad cholesterol levels.
- Protein (approx. 3g): Thanks to the almond butter and egg, each cookie provides a decent little boost of protein, which helps with satiety and keeps you feeling fuller for longer than a standard sugar cookie.
- Fiber (approx. 1.5g): Almonds are a good source of dietary fiber, which is important for digestive health and helps to moderate blood sugar absorption.
- Vitamin E: Almonds are one of the best natural sources of Vitamin E, a powerful antioxidant that helps protect your cells from oxidative damage.
- Magnesium: An essential mineral found in almonds that plays a vital role in over 300 bodily functions, including muscle and nerve function, blood sugar control, and blood pressure regulation.
Preparation Time
This is a wonderfully quick recipe, perfect for when a cookie craving strikes.
- Preparation Time: 10 minutes. This includes gathering your ingredients and mixing the dough.
- Cooking Time: 10-12 minutes per batch.
- Total Time: Approximately 22 minutes. This makes it an ideal recipe for busy weekdays or last-minute baking needs.
How to Serve
These versatile almond butter cookies can be enjoyed in many different ways, from a simple snack to a sophisticated dessert. Here are some of our favorite ways to serve them:
- The Classic Way
- With a Glass of Milk: The timeless combination of cookies and milk is a classic for a reason. The creamy milk perfectly balances the rich, nutty flavor of the cookies.
- As an Afternoon Snack: Pack one or two in a lunchbox or enjoy them with a piece of fruit for a satisfying and energy-boosting afternoon treat.
- For the Coffee or Tea Lover
- Alongside a Hot Beverage: The nutty, slightly salty flavor of these cookies is an incredible companion to a cup of hot coffee, a latte, or a strong black tea. Dunking is highly encouraged!
- As a Biscotti Alternative: Their sturdy texture makes them a wonderful, chewy alternative to crunchy biscotti for dipping into your morning cappuccino.
- Elevated Dessert Ideas
- Create Cookie Sandwiches: Spread a layer of your favorite chocolate-hazelnut spread, raspberry jam, or even more almond butter between two cookies for an indulgent sandwich treat.
- Make an Ice Cream Sandwich: Place a scoop of high-quality vanilla bean, chocolate, or salted caramel ice cream between two cookies. Roll the edges in mini chocolate chips or chopped almonds for a show-stopping dessert.
- Build a Cookie Sundae: Crumble a warm cookie into the bottom of a bowl, top with a scoop of ice cream, a drizzle of hot fudge or caramel sauce, a dollop of whipped cream, and a cherry on top.
- For Gifting and Sharing
- On a Cookie Platter: Their distinct criss-cross pattern makes them a beautiful addition to any holiday or party cookie platter.
- As a Homemade Gift: Stack them in a clear cellophane bag and tie it with a pretty ribbon, or arrange them in a decorative tin. They make a thoughtful and delicious homemade gift for teachers, neighbors, or friends.
Additional Tips
Unlock the full potential of this simple recipe with these eight expert tips for cookie perfection.
- The Almond Butter Matters Most: The type of almond butter you use is the single most important factor. For the best chewy texture, use a “natural” style creamy almond butter where the oil separates at the top. Stir it very well before measuring to reincorporate the oils. Avoid “no-stir” varieties that contain hydrogenated oils, as they create a drier, more crumbly cookie. If you prefer a bit of texture, you can use crunchy almond butter, but be aware the cookies might be slightly less uniform.
- Don’t Overmix the Dough: After you add the baking soda and salt, mix only until they are just combined. Overmixing at this final stage can lead to a tough, dense, and cakey cookie rather than the soft and chewy texture we’re aiming for. It’s better to have a few streaks of unincorporated dry ingredients than to over-beat the dough.
- Chill the Dough for Thicker Cookies: If you find your cookies are spreading too much, or if you simply prefer a thicker, chewier cookie, chilling the dough is your best friend. After mixing, cover the bowl with plastic wrap and refrigerate the dough for at least 30 minutes (or up to 3 days). Chilling solidifies the fat in the almond butter, which means the cookies will spread much more slowly in the oven.
- Embrace the Criss-Cross Technique: The classic fork pattern isn’t just for looks. This flourless dough doesn’t spread as much as traditional cookie dough. Pressing them down ensures they bake evenly from the edges to the center. To prevent the fork from sticking to the soft dough, dip it in a small amount of granulated sugar or cold water between each press.
- Experiment with Mix-ins: While delicious on their own, these cookies are a fantastic canvas for other flavors. Gently fold in about ½ cup of your favorite mix-ins after the dough is fully combined. Semi-sweet chocolate chips, dark chocolate chunks, white chocolate chips, chopped toasted almonds, or even toffee bits are all excellent additions.
- Vegan and Egg-Free Variation: You can easily make this recipe vegan! Simply substitute the chicken egg with a “flax egg.” To make a flax egg, mix 1 tablespoon of ground flaxseed with 3 tablespoons of water. Let the mixture sit for 5-10 minutes to thicken into a gel-like consistency, then use it in place of the regular egg. The texture will be slightly different but still incredibly delicious.
- How to Store for Lasting Freshness: Store the completely cooled cookies in an airtight container at room temperature. They will stay soft and chewy for up to 5 days. For longer storage, you can freeze them. Place the cookies in a single layer on a baking sheet and freeze until solid, then transfer them to a freezer-safe zip-top bag. They will keep for up to 3 months. Thaw at room temperature before enjoying.
- Don’t Be Afraid to Underbake (Slightly): The key to a perfectly chewy center is to pull the cookies from the oven when they look just a little bit underdone in the middle. The edges should be firm and golden, but the center should be puffy and soft. They will set up and finish baking on the hot pan as they cool. If you wait until the center looks completely cooked, you’ll end up with a dry, crunchy cookie.
FAQ Section
Here are answers to some of the most frequently asked questions about making these easy almond butter cookies.
1. Why did my cookies spread out and become too flat?
This is a common baking issue that usually has one of two causes. First, your almond butter might have been too runny or oily. Ensure you are using a well-stirred natural almond butter. Second, your ingredients, particularly the egg, might have been too warm, or your kitchen might be very hot. The solution for both issues is to chill the dough for at least 30 minutes before scooping and baking. This solidifies the fat and helps the cookies hold their shape much better in the oven.
2. Can I use a different nut or seed butter?
Absolutely! This recipe is very forgiving and works well with other butters. You can substitute the almond butter with an equal amount of natural peanut butter (for a classic peanut butter cookie), cashew butter (for a milder, sweeter flavor), or even sunflower seed butter for a nut-free option. Just be sure to use a natural, well-stirred variety for the best results, as textures can vary slightly between butters.
3. Is this recipe really gluten-free?
Yes, this recipe is naturally gluten-free as it contains no flour. The structure comes entirely from the almond butter and the egg. However, if you have a serious gluten allergy or celiac disease, it’s crucial to ensure that all your individual ingredients are certified gluten-free, particularly your vanilla extract and any mix-ins, to avoid cross-contamination.
4. How can I make these cookies low-carb or keto-friendly?
You can easily adapt this recipe for a low-carb or ketogenic diet. The main change is the sweetener. Simply replace the ¾ cup of brown sugar with an equal amount of a brown sugar substitute like Swerve Brown or Lakanto Golden Monkfruit Sweetener. These will provide sweetness without the carbs and sugar. The rest of the ingredients are naturally low-carb, making this a fantastic keto dessert option.
5. My dough seems too sticky or too crumbly. What went wrong?
The consistency of the dough is almost entirely dependent on the brand and type of almond butter you use. If your dough is excessively sticky, it’s likely your almond butter was on the runnier side. Chilling the dough for 30-60 minutes will make it much easier to handle. If the dough is dry and crumbly, your almond butter was likely too dry or you may have accidentally used a “no-stir” variety. You can try to fix this by adding a teaspoon or two of water or a neutral oil to bring it together.
6. Can I make the dough ahead of time and freeze it?
Yes, this dough freezes beautifully. You can freeze it in two ways. First, you can press the entire ball of dough into a disc, wrap it tightly in plastic wrap, and freeze it for up to 3 months. Thaw it in the refrigerator overnight before scooping and baking. For an even quicker treat, scoop the dough balls onto a parchment-lined baking sheet, press them with the fork, and then “flash freeze” them for an hour until solid. Transfer the frozen, pre-formed cookies to a freezer bag. You can bake them directly from frozen; just add 2-3 minutes to the total baking time.
7. Do I have to use the criss-cross pattern?
While iconic, the criss-cross pattern is not strictly necessary. Its main purpose is to gently flatten the thick dough to ensure it bakes evenly. If you prefer a different look, you can simply press the dough balls down slightly with the bottom of a glass dipped in sugar or even just with your palm to achieve a similar effect.
8. What’s the purpose of the baking soda in a flourless cookie?
Even without flour, a leavening agent is important for texture. The baking soda is alkaline and reacts with the acidic components in the brown sugar when heated in the oven. This reaction creates tiny bubbles of carbon dioxide gas, which causes the cookies to puff up and spread slightly. This prevents the cookies from being overly dense and heavy, giving them a lighter, chewier texture and helping them brown nicely.
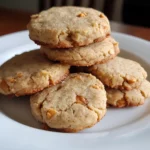
Easy Almond Butter Cookies
Ingredients
This recipe relies on a few high-quality ingredients to deliver its signature rich flavor and chewy texture. Each component plays a crucial role in creating the perfect cookie.
- 1 cup (250g) Creamy, Natural Almond Butter: This is the heart and soul of the recipe. Use a high-quality, natural almond butter where the only ingredients are almonds and maybe a pinch of salt. Avoid brands with added sugars or hydrogenated oils, as they can alter the cookie’s texture and make it greasy. The almond butter provides the fat, protein, and intense nutty flavor.
- ¾ cup (150g) Packed Brown Sugar: Light or dark brown sugar will work. The molasses content in brown sugar adds moisture, which is key to achieving that desirable chewy center. It also imparts a subtle caramel-like depth of flavor that complements the almonds beautifully.
- 1 large Egg: The egg acts as the primary binder, holding the dough together. It also contributes to the leavening, helping the cookies puff up slightly, and adds richness. For the best results, use an egg at room temperature.
- 1 teaspoon Pure Vanilla Extract: A non-negotiable for flavor enhancement. Vanilla doesn’t make the cookies taste like vanilla; instead, it elevates and rounds out the nutty flavor of the almond butter, making it taste more complex and delicious.
- ½ teaspoon Baking Soda: This is our leavening agent. It reacts with the slight acidity in the brown sugar to help the cookies spread and rise just the right amount, preventing them from being too dense.
- ¼ teaspoon Sea Salt: Even if your almond butter is salted, a little extra salt is essential. Salt is a flavor enhancer that balances the sweetness of the sugar and intensifies the almond flavor.
Instructions
Follow these detailed steps to ensure your almond butter cookies come out perfectly chewy and delicious every single time.
- Preheat and Prepare: Begin by preheating your oven to 350°F (175°C). Position a rack in the center of the oven for the most even baking. Line two large baking sheets with parchment paper. This is a crucial step that not only prevents the cookies from sticking but also promotes even browning on the bottom and makes cleanup a breeze.
- Combine Wet Ingredients: In a large mixing bowl, combine the creamy almond butter, packed brown sugar, the large egg, and the pure vanilla extract.
- Cream the Mixture: Using an electric hand mixer on medium speed or a stand mixer fitted with the paddle attachment, beat the ingredients together for about 2 minutes. The mixture should become smooth, creamy, and slightly lighter in color. This process, known as creaming, incorporates air into the dough, which is essential for a tender texture. If you don’t have an electric mixer, you can do this by hand with a whisk or a sturdy spatula; just be prepared for a good arm workout and mix vigorously for 3-4 minutes.
- Add Dry Ingredients: Sprinkle the baking soda and sea salt over the top of the creamed mixture. Continue to beat on low speed for another 30 seconds, or just until the baking soda and salt are fully incorporated. Be careful not to overmix at this stage. Overmixing can develop the gluten-like proteins, resulting in a tougher cookie.
- Scoop the Dough: The dough will be soft and slightly sticky. Using a 1.5-tablespoon cookie scoop (or two spoons), portion out balls of dough and place them about 2 inches apart on the prepared baking sheets. This spacing is important as the cookies will spread while baking.
- Create the Criss-Cross Pattern: This step is both classic and functional. Dip the tines of a fork into a small bowl of granulated sugar (this prevents sticking). Gently press the fork onto the top of each dough ball, then press again in the opposite direction to create the iconic criss-cross pattern. This not only looks beautiful but also helps to flatten the cookie slightly for more even baking.
- Bake to Perfection: Place the baking sheets in the preheated oven. Bake for 10-12 minutes. The exact time will depend on your oven. The cookies are done when the edges are set and have turned a light golden brown, but the centers still look slightly soft and underdone. They will continue to cook from the residual heat on the baking sheet. This is the secret to a chewy center.
- Cool Completely: Remove the baking sheets from the oven. Let the cookies cool on the baking sheet for a full 5 minutes. They will be very fragile when they first come out, and this rest time allows them to firm up. After 5 minutes, use a thin spatula to carefully transfer the cookies to a wire cooling rack to cool completely. Do not attempt to eat them while they are still hot, as the texture will not have set properly. The true chewy texture develops as they cool.
Nutrition
- Serving Size: one normal portion
- Calories: 110
- Fat: 7g
- Fiber: 1.5g
- Protein: 3g


