


Every Easter, our kitchen transforms into a haven of sweet aromas and vibrant colors, all thanks to one recipe that has become the cornerstone of our celebrations – the Easter Speckled Egg Cake. It’s more than just a dessert; it’s a tradition, a centerpiece that embodies the joy and renewal of spring. The first time I baked this cake, I was aiming for something visually stunning and delicious, and let me tell you, it exceeded all expectations. The moist, tender crumb of the vanilla cake paired perfectly with the sweet, creamy buttercream, and the speckled egg design? It was pure magic. My kids were absolutely mesmerized, not just by the look but by the taste too, declaring it the “best cake ever” (a high praise indeed from discerning little palates!). Since then, it’s become a must-have, requested year after year. This isn’t just a cake; it’s a memory maker, a conversation starter, and quite simply, a delicious way to celebrate Easter. Whether you’re a seasoned baker or just starting out, this recipe is surprisingly approachable, and the results are undeniably impressive. Get ready to create a show-stopping Easter centerpiece that will delight your family and friends!
Ingredients: What You’ll Need for Your Easter Masterpiece
- For the Cake:
- All-Purpose Flour: 3 cups – The foundation of our cake, providing structure and a tender crumb.
- Granulated Sugar: 2 cups – Adds sweetness and moisture, contributing to the cake’s perfect texture.
- Baking Powder: 4 teaspoons – Our leavening agent, ensuring a light and fluffy cake rise.
- Salt: 1 teaspoon – Enhances the flavors of all other ingredients, balancing the sweetness.
- Unsalted Butter: 1 cup (2 sticks), softened – Adds richness and moisture, crucial for a tender crumb.
- Eggs: 4 large – Binds the ingredients together, adds moisture, and contributes to the cake’s structure.
- Vanilla Extract: 2 teaspoons – Enhances the overall flavor profile, adding a warm, classic taste.
- Milk: 1 cup – Adds moisture and helps to create a smooth batter consistency.
- For the Buttercream Frosting:
- Unsalted Butter: 1 cup (2 sticks), softened – The creamy base of our frosting, delivering rich flavor and spreadability.
- Powdered Sugar: 4-5 cups – Sweetens and thickens the frosting to a perfect, pipeable consistency.
- Vanilla Extract: 1 teaspoon – Complements the cake flavor and adds a delicate sweetness to the frosting.
- Milk or Heavy Cream: 2-4 tablespoons – Adjusts the frosting consistency, making it smooth and easy to spread.
- For the Speckled Egg Decoration:
- Gel Food Coloring: Assorted colors (brown, black, blue, purple, pink, etc.) – For creating the speckled effect. Gel coloring is preferred for its vibrant color and minimal liquid content.
- Vodka or Lemon Extract (optional): A few drops – To thin the gel food coloring for easier speckling and faster drying.
- Small Paintbrush or Toothbrush: For applying the speckles.
- Candy Speckled Eggs: For topping and adding a final Easter touch.
Instructions: Baking Your Easter Speckled Egg Cake Step-by-Step
- Preheat the Oven and Prepare Cake Pans: Begin by preheating your oven to 350°F (175°C). Grease and flour two 9-inch round cake pans. For even easier removal, you can line the bottoms of the pans with parchment paper rounds. This prevents sticking and ensures your cake layers come out cleanly. Properly preparing your pans is a crucial first step to a successful cake.
- Combine Dry Ingredients: In a large mixing bowl, whisk together the all-purpose flour, granulated sugar, baking powder, and salt. Whisking ensures the baking powder and salt are evenly distributed throughout the flour, which is vital for consistent leavening and flavor in your cake. This step is about creating a homogenous dry mixture ready for the wet ingredients.
- Cream Butter and Sugar: In a separate large bowl, or the bowl of a stand mixer, cream together the softened butter and sugar until light and fluffy. This process incorporates air into the mixture, which is essential for a light and airy cake texture. Creaming should take several minutes, and you’ll notice the mixture becomes paler and significantly fluffier. Scrape down the sides of the bowl periodically to ensure everything is evenly combined.
- Incorporate Eggs and Vanilla: Beat in the eggs one at a time, mixing well after each addition. Make sure each egg is fully incorporated before adding the next. This helps to emulsify the mixture and prevents curdling. Then, stir in the vanilla extract. Vanilla enhances the overall flavor profile of the cake and complements the sweetness beautifully.
- Alternate Adding Dry and Wet Ingredients: Gradually add the dry ingredients to the wet ingredients, alternating with the milk. Begin and end with the dry ingredients. Start by adding about one-third of the dry mixture to the butter-sugar mixture, mixing on low speed until just combined. Then, add half of the milk and mix until combined. Repeat with another third of the dry ingredients, the remaining milk, and finally, the last of the dry ingredients. Mix until just combined – be careful not to overmix. Overmixing can develop the gluten in the flour, leading to a tougher cake. The goal is to combine everything until just smooth.
- Bake the Cakes: Divide the batter evenly between the prepared cake pans. Smooth the tops with a spatula. Bake for 30-35 minutes, or until a wooden skewer inserted into the center comes out clean. Baking time can vary slightly depending on your oven, so it’s important to check for doneness using a skewer. The cakes should also be lightly golden brown and spring back to the touch.
- Cool the Cakes: Let the cakes cool in the pans for 10-15 minutes before inverting them onto a wire rack to cool completely. Cooling in the pans allows the cake to set slightly and prevents it from breaking when you invert it. Make sure the cakes are completely cool before frosting, otherwise, the frosting will melt.
- Prepare the Buttercream Frosting: While the cakes are cooling, make the buttercream frosting. In a large bowl or the bowl of a stand mixer, beat the softened butter until smooth and creamy. Gradually add the powdered sugar, one cup at a time, beating well after each addition. Once all the powdered sugar is incorporated, add the vanilla extract and 2 tablespoons of milk or heavy cream. Beat on medium-high speed for 2-3 minutes, until the frosting is light and fluffy. If the frosting is too thick, add a little more milk or cream, one tablespoon at a time, until you reach your desired consistency. If it’s too thin, add more powdered sugar.
- Frost the Cake: Once the cakes are completely cool, place one cake layer on a serving plate or cake stand. Spread a generous layer of buttercream frosting evenly over the top. Carefully place the second cake layer on top. Frost the entire cake with the remaining buttercream, creating a smooth and even coating. You can use an offset spatula or a knife to achieve a professional-looking finish.
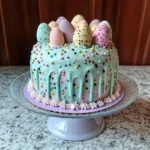
- Create the Speckled Effect: This is where the magic happens! In small bowls, mix a few drops of gel food coloring with a tiny drop of vodka or lemon extract (if using) to thin it slightly. You’ll want a range of colors for a realistic speckled egg look. Dip the bristles of a clean paintbrush or toothbrush into the thinned food coloring, and then gently flick the brush towards the frosted cake. Practice on a piece of parchment paper first to get the hang of it and control the speckle size and distribution. Vary the colors and intensity of speckles for a natural effect. Don’t overdo it – a little speckling goes a long way.
- Decorate with Candy Speckled Eggs: Finally, gently press candy speckled eggs around the base of the cake and/or on top for a festive Easter finish. You can arrange them randomly or create a more structured design. This final touch really brings the Easter theme to life and adds a delightful crunch and extra sweetness.
Nutrition Facts: A Sweet Treat in Moderation
(Please note: Nutritional values are estimates and can vary based on specific ingredient brands and portion sizes.)
- Servings: 12
- Calories per Serving: Approximately 450-550 calories
- Fat: 25-30g
This cake is a delicious treat to be enjoyed in moderation as part of a balanced diet.
Preparation Time: From Prep to Plate
- Prep Time: 45 minutes (This includes gathering ingredients, preparing pans, making batter and frosting)
- Bake Time: 30-35 minutes
- Cooling Time: 1-2 hours (Cakes need to cool completely before frosting)
- Frosting and Decoration Time: 30 minutes
- Total Time: Approximately 3-4 hours
While the total time might seem lengthy, much of it is passive cooling time. The active hands-on time is closer to 1.5-2 hours, making it a manageable project for a weekend bake. Planning ahead and breaking down the steps can also make the process feel less daunting.
How to Serve: Perfect Ways to Present Your Easter Cake
- Classic Dessert: Serve slices of the Easter Speckled Egg Cake as a delightful dessert after your Easter brunch or dinner. It’s a guaranteed crowd-pleaser.
- Coffee or Tea Time Treat: Pair a slice with a warm cup of coffee or tea for a lovely afternoon treat during Easter weekend gatherings.
- Easter Brunch Centerpiece: Place the cake on a decorative cake stand as the centerpiece of your Easter brunch table. Its visual appeal is as important as its taste!
- Gift Giving: Bake a smaller version (using smaller pans or cupcakes) and gift them to neighbors or friends as a thoughtful Easter gesture.
- Kids’ Party Delight: This cake is perfect for Easter-themed kids’ parties. The speckled egg design and candy eggs are especially appealing to children.
- With Fresh Berries: Serve slices alongside a bowl of fresh berries like strawberries, raspberries, or blueberries to add a touch of freshness and balance the sweetness of the cake.
- Ice Cream Pairing: For an extra indulgent dessert, serve a slice of warm cake with a scoop of vanilla ice cream or whipped cream.
- Make it a Layer Cake: For a more dramatic presentation, you can bake three thinner layers instead of two and create a taller, more impressive layer cake.
Additional Tips: Secrets to Baking Perfection
- Room Temperature Ingredients: Ensure your butter and eggs are at room temperature. This helps them emulsify properly, creating a smoother batter and a more tender cake. Room temperature butter creams more easily, and room temperature eggs incorporate better into the batter.
- Don’t Overmix the Batter: Overmixing develops gluten in the flour, resulting in a tough cake. Mix until just combined, and stop mixing as soon as the ingredients are incorporated. A few streaks of flour are okay; they will disappear during baking.
- Measure Flour Correctly: Too much flour can make the cake dry and dense. Spoon flour into your measuring cup and level it off with a straight edge. Avoid scooping flour directly from the bag, as this can compact it and lead to using too much.
- Use Gel Food Coloring for Speckling: Gel food coloring is more concentrated and less watery than liquid food coloring, which is ideal for speckling. It provides vibrant colors without thinning out your frosting too much.
- Practice Speckling Technique: Before speckling your cake, practice on a piece of parchment paper to get the hang of the flicking motion and the amount of color to use. This will help you achieve the desired speckled effect on your cake.
- Chill the Cake Before Speckling: Chilling the frosted cake in the refrigerator for about 30 minutes before speckling helps the frosting firm up, making the speckling process cleaner and preventing the colors from bleeding too much.
- Make Frosting Ahead of Time: Buttercream frosting can be made a day or two in advance and stored in an airtight container in the refrigerator. Bring it back to room temperature and re-whip it before frosting the cake. This can save time on baking day.
- Store Cake Properly: Store leftover cake in an airtight container at room temperature for up to 3 days or in the refrigerator for up to 5 days. Refrigerating the cake will keep it fresher longer, especially if your kitchen is warm. Bring refrigerated cake to room temperature before serving for the best texture.
FAQ: Your Easter Speckled Egg Cake Questions Answered
Q1: Can I make this cake ahead of time?
A: Yes, you can bake the cake layers a day or two ahead of time. Wrap them tightly in plastic wrap and store them at room temperature or in the refrigerator. You can also make the buttercream frosting ahead of time and store it in the refrigerator. Assemble and decorate the cake on the day you plan to serve it for the freshest results.
Q2: Can I use a different type of frosting?
A: Absolutely! While vanilla buttercream is classic and delicious, you can use other frostings like cream cheese frosting, lemon buttercream, or even chocolate buttercream. Choose a frosting that complements the vanilla cake flavor and your personal preference.
Q3: What if I don’t have gel food coloring for speckling?
A: If you don’t have gel food coloring, you can use liquid food coloring, but use it sparingly as it’s less concentrated and can make the mixture watery. Alternatively, you can use melted chocolate thinned with a bit of milk or cream for brown speckles, creating a more natural eggshell look.
Q4: Can I make this cake gluten-free?
A: Yes, you can adapt this recipe to be gluten-free by using a good quality gluten-free all-purpose flour blend. Ensure the blend is designed for baking and contains xanthan gum or another binder to provide structure. Follow the recipe instructions as usual.
Q5: How do I prevent my cake from sticking to the pan?
A: Properly greasing and flouring your cake pans is crucial. You can also use baking spray with flour or line the bottoms of the pans with parchment paper rounds. Make sure to let the cakes cool in the pans for a few minutes before inverting them.
Q6: My frosting is too thick/too thin. How do I fix it?
A: If your frosting is too thick, add milk or heavy cream one tablespoon at a time until you reach the desired consistency. If it’s too thin, add powdered sugar, a quarter cup at a time, until it thickens up. Beat well after each addition to ensure it’s fully incorporated.
Q7: Can I make cupcakes instead of a cake?
A: Yes, this recipe can easily be adapted to cupcakes. Fill cupcake liners about two-thirds full and bake for approximately 18-22 minutes, or until a toothpick inserted into the center comes out clean. Frost and decorate as you would the cake.
Q8: What’s the best way to transport this cake?
A: For transporting, use a cake carrier or a sturdy box that is slightly larger than the cake. Place the cake on a non-slip surface inside the carrier or box. If transporting in a car, place the box on a flat surface in the car, preferably in the passenger footwell or trunk, where it’s less likely to slide around. Drive carefully and avoid sudden stops or turns.
Easter Speckled Egg Cake
Ingredients
- For the Cake:
- All-Purpose Flour: 3 cups – The foundation of our cake, providing structure and a tender crumb.
- Granulated Sugar: 2 cups – Adds sweetness and moisture, contributing to the cake’s perfect texture.
- Baking Powder: 4 teaspoons – Our leavening agent, ensuring a light and fluffy cake rise.
- Salt: 1 teaspoon – Enhances the flavors of all other ingredients, balancing the sweetness.
- Unsalted Butter: 1 cup (2 sticks), softened – Adds richness and moisture, crucial for a tender crumb.
- Eggs: 4 large – Binds the ingredients together, adds moisture, and contributes to the cake’s structure.
- Vanilla Extract: 2 teaspoons – Enhances the overall flavor profile, adding a warm, classic taste.
- Milk: 1 cup – Adds moisture and helps to create a smooth batter consistency.
- For the Buttercream Frosting:
- Unsalted Butter: 1 cup (2 sticks), softened – The creamy base of our frosting, delivering rich flavor and spreadability.
- Powdered Sugar: 4-5 cups – Sweetens and thickens the frosting to a perfect, pipeable consistency.
- Vanilla Extract: 1 teaspoon – Complements the cake flavor and adds a delicate sweetness to the frosting.
- Milk or Heavy Cream: 2-4 tablespoons – Adjusts the frosting consistency, making it smooth and easy to spread.
- For the Speckled Egg Decoration:
- Gel Food Coloring: Assorted colors (brown, black, blue, purple, pink, etc.) – For creating the speckled effect. Gel coloring is preferred for its vibrant color and minimal liquid content.
- Vodka or Lemon Extract (optional): A few drops – To thin the gel food coloring for easier speckling and faster drying.
- Small Paintbrush or Toothbrush: For applying the speckles.
- Candy Speckled Eggs: For topping and adding a final Easter touch.
Instructions
- Preheat the Oven and Prepare Cake Pans: Begin by preheating your oven to 350°F (175°C). Grease and flour two 9-inch round cake pans. For even easier removal, you can line the bottoms of the pans with parchment paper rounds. This prevents sticking and ensures your cake layers come out cleanly. Properly preparing your pans is a crucial first step to a successful cake.
- Combine Dry Ingredients: In a large mixing bowl, whisk together the all-purpose flour, granulated sugar, baking powder, and salt. Whisking ensures the baking powder and salt are evenly distributed throughout the flour, which is vital for consistent leavening and flavor in your cake. This step is about creating a homogenous dry mixture ready for the wet ingredients.
- Cream Butter and Sugar: In a separate large bowl, or the bowl of a stand mixer, cream together the softened butter and sugar until light and fluffy. This process incorporates air into the mixture, which is essential for a light and airy cake texture. Creaming should take several minutes, and you’ll notice the mixture becomes paler and significantly fluffier. Scrape down the sides of the bowl periodically to ensure everything is evenly combined.
- Incorporate Eggs and Vanilla: Beat in the eggs one at a time, mixing well after each addition. Make sure each egg is fully incorporated before adding the next. This helps to emulsify the mixture and prevents curdling. Then, stir in the vanilla extract. Vanilla enhances the overall flavor profile of the cake and complements the sweetness beautifully.
- Alternate Adding Dry and Wet Ingredients: Gradually add the dry ingredients to the wet ingredients, alternating with the milk. Begin and end with the dry ingredients. Start by adding about one-third of the dry mixture to the butter-sugar mixture, mixing on low speed until just combined. Then, add half of the milk and mix until combined. Repeat with another third of the dry ingredients, the remaining milk, and finally, the last of the dry ingredients. Mix until just combined – be careful not to overmix. Overmixing can develop the gluten in the flour, leading to a tougher cake. The goal is to combine everything until just smooth.
- Bake the Cakes: Divide the batter evenly between the prepared cake pans. Smooth the tops with a spatula. Bake for 30-35 minutes, or until a wooden skewer inserted into the center comes out clean. Baking time can vary slightly depending on your oven, so it’s important to check for doneness using a skewer. The cakes should also be lightly golden brown and spring back to the touch.
- Cool the Cakes: Let the cakes cool in the pans for 10-15 minutes before inverting them onto a wire rack to cool completely. Cooling in the pans allows the cake to set slightly and prevents it from breaking when you invert it. Make sure the cakes are completely cool before frosting, otherwise, the frosting will melt.
- Prepare the Buttercream Frosting: While the cakes are cooling, make the buttercream frosting. In a large bowl or the bowl of a stand mixer, beat the softened butter until smooth and creamy. Gradually add the powdered sugar, one cup at a time, beating well after each addition. Once all the powdered sugar is incorporated, add the vanilla extract and 2 tablespoons of milk or heavy cream. Beat on medium-high speed for 2-3 minutes, until the frosting is light and fluffy. If the frosting is too thick, add a little more milk or cream, one tablespoon at a time, until you reach your desired consistency. If it’s too thin, add more powdered sugar.
- Frost the Cake: Once the cakes are completely cool, place one cake layer on a serving plate or cake stand. Spread a generous layer of buttercream frosting evenly over the top. Carefully place the second cake layer on top. Frost the entire cake with the remaining buttercream, creating a smooth and even coating. You can use an offset spatula or a knife to achieve a professional-looking finish.
- Create the Speckled Effect: This is where the magic happens! In small bowls, mix a few drops of gel food coloring with a tiny drop of vodka or lemon extract (if using) to thin it slightly. You’ll want a range of colors for a realistic speckled egg look. Dip the bristles of a clean paintbrush or toothbrush into the thinned food coloring, and then gently flick the brush towards the frosted cake. Practice on a piece of parchment paper first to get the hang of it and control the speckle size and distribution. Vary the colors and intensity of speckles for a natural effect. Don’t overdo it – a little speckling goes a long way.
- Decorate with Candy Speckled Eggs: Finally, gently press candy speckled eggs around the base of the cake and/or on top for a festive Easter finish. You can arrange them randomly or create a more structured design. This final touch really brings the Easter theme to life and adds a delightful crunch and extra sweetness.
Nutrition
- Serving Size: one normal portion
- Calories: 550
- Fat: 30g


