
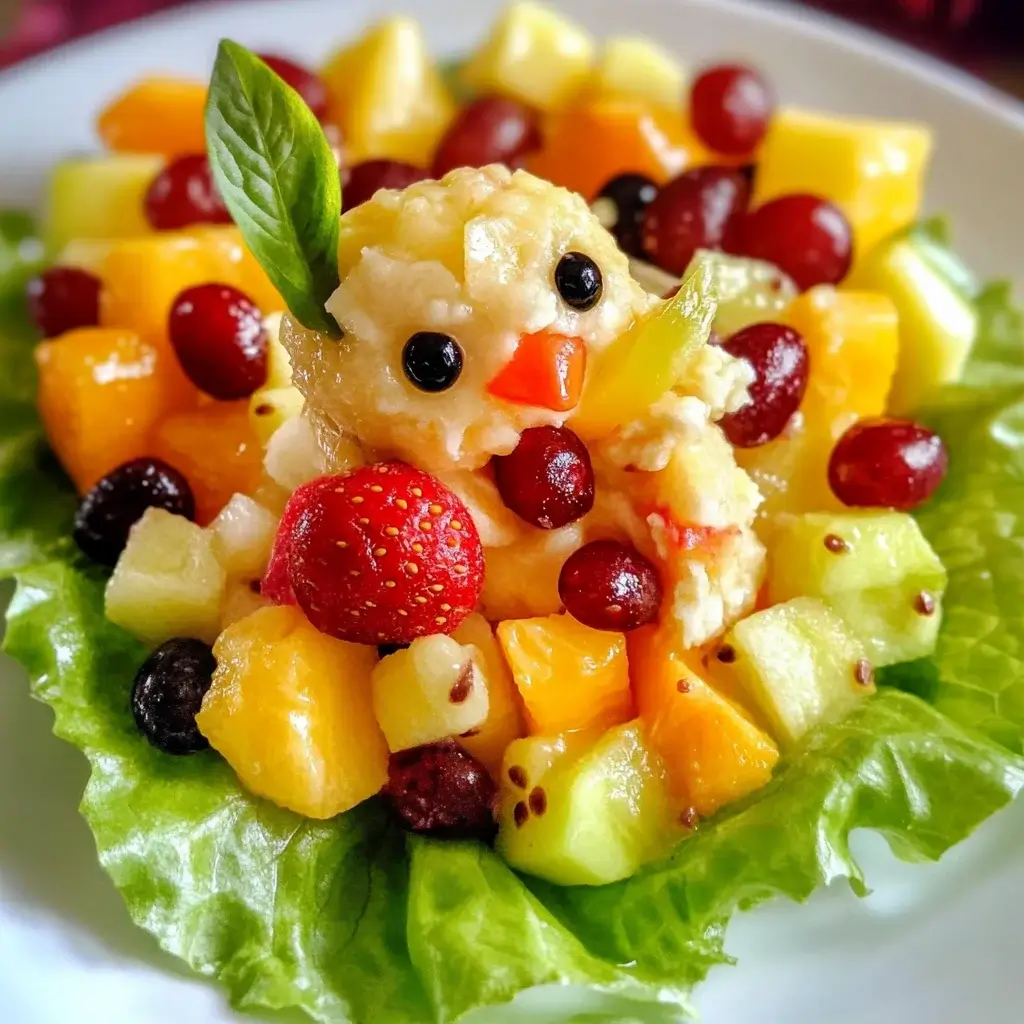

It was Easter Sunday a few years back, and I was on dessert duty for our family gathering. Tired of the usual heavy chocolate treats, I wanted something lighter, fresher, and definitely more festive. That’s when I stumbled upon the idea of an Easter Chick Fruit Salad. Let me tell you, it was an absolute hit! Not only was it incredibly easy and fun to make, even the kids got involved, but it was also a visual delight. The bright colors of the fruits, shaped into adorable little chicks, were perfect for the Easter theme. More importantly, it was delicious! The sweetness of the fruits was refreshing after a hearty meal, and everyone, from the youngest nephews to my grandparents, devoured it. This Easter Chick Fruit Salad is now a staple in our Easter celebrations, and I’m excited to share this recipe with you so you can bring a touch of springtime joy to your table too. Get ready for a recipe that’s both healthy, fun, and guaranteed to be a crowd-pleaser!
Ingredients: Your Basket of Springtime Goodness
To create these adorable Easter Chick Fruit Salads, you’ll need a vibrant array of fresh fruits and a few simple garnishes. Here’s a list of what you’ll need, keeping in mind that you can always adjust quantities based on how many servings you desire and the size of your serving bowls.
- Pineapple: About 1 whole fresh pineapple, or pre-cut chunks to save time. Pineapple forms the main body of our chick and provides a sweet and slightly tangy tropical flavor. Opt for a ripe pineapple that smells sweet at the base.
- Cantaloupe: 1 medium cantaloupe, for fruit balls or chunks. Cantaloupe adds a soft, sweet melon flavor and a beautiful orange hue which complements the yellow pineapple beautifully. Choose a cantaloupe that feels heavy for its size and has a fragrant aroma.
- Honeydew Melon: 1 medium honeydew melon, also for fruit balls or chunks. Honeydew provides a delicate sweetness and a refreshing flavor, along with a pale green color which adds variety to our fruit mix. Look for a honeydew that is firm and smooth, with a slightly waxy feel.
- Mango: 2 large ripe mangoes, peeled and cut into chunks. Mango adds a rich, tropical sweetness and a vibrant yellow-orange color, enhancing the chick’s appearance. Choose mangoes that are slightly soft to the touch and have a fragrant, fruity aroma.
- Strawberries: 1 pint of fresh strawberries, hulled and halved or quartered depending on size. Strawberries bring a burst of red color and a classic sweet-tart berry flavor. Select bright red, firm strawberries with fresh green caps.
- Blueberries: 1 pint of fresh blueberries. Blueberries are perfect for creating the chick’s eyes and add a pop of deep blue-purple color and a slightly tart, juicy flavor. Choose plump, firm blueberries with a silvery bloom.
- Kiwi: 2-3 ripe kiwis, peeled and sliced. Kiwi adds a vibrant green color and a tangy-sweet flavor, providing a nice contrast to the other fruits. Choose kiwis that yield slightly to gentle pressure but are not too soft.
- Orange Slices (for feet): 2 oranges, sliced into segments. Orange slices will be used to create the chick’s feet. They provide a citrusy flavor and a bright orange color. Choose oranges that feel heavy for their size and have a smooth, firm skin.
- Carrot (for beaks): 1 large carrot, peeled and cut into small triangles. Carrot triangles will serve as the chick’s beaks, adding a touch of crunch and a bright orange color. Select a firm, smooth carrot.
- Mini Chocolate Chips or Edible Candy Eyes (for eyes): A small handful. These will be used to create the chick’s eyes, bringing them to life. You can choose mini chocolate chips for a simple, edible option or opt for candy eyes for a more whimsical look.
- Optional – Shredded Coconut (for “nest”): Unsweetened shredded coconut can be used as a base to create a “nest” for the chick fruit salad, adding a subtle sweetness and texture.
- Optional – Fresh Mint Leaves (for garnish): A few sprigs of fresh mint can be used as a garnish to add a touch of freshness and visual appeal.
Instructions: Crafting Your Easter Chick Masterpiece
Creating this Easter Chick Fruit Salad is as fun as it is simple. Follow these step-by-step instructions to bring your adorable fruit chicks to life:
- Prepare the Fruits: Begin by thoroughly washing all of your fresh fruits. This is an important step to ensure cleanliness and remove any potential residues.
- Cut and Shape the Fruits:
- Melons (Cantaloupe and Honeydew): Cut the cantaloupe and honeydew melons in half, remove the seeds, and using a melon baller or a small spoon, scoop out melon balls. Alternatively, you can cut them into small, bite-sized cubes. Set aside.
- Pineapple: If using a whole pineapple, cut off the top and bottom. Stand the pineapple upright and slice off the rind from top to bottom, following the curve of the fruit. Remove any remaining “eyes”. Cut the pineapple into chunks or rings, depending on your preference. Pre-cut pineapple chunks can be used directly.
- Mangoes: Peel the mangoes and cut the flesh away from the large central seed. Cut the mango flesh into chunks.
- Strawberries: Hull the strawberries (remove the green tops). Depending on their size, halve or quarter them.
- Kiwi: Peel the kiwi and slice them into rounds or half-moons.
- Oranges: Peel the oranges and segment them. Set aside for making the chick’s feet later.
- Carrot: Peel the carrot and cut small triangles for the beaks. You can slice the carrot into thin rounds and then cut each round into triangles, or use a knife to carefully shape small triangles from the carrot.
- Assemble the Fruit Salad Base: In a large bowl, gently combine the pineapple chunks, cantaloupe balls or cubes, honeydew balls or cubes, mango chunks, strawberries, kiwi slices, and blueberries. Toss lightly to mix the fruits evenly.
- Chill the Fruit Salad (Optional but Recommended): For the best flavor and texture, cover the fruit salad and refrigerate it for at least 30 minutes to an hour before assembling the chicks. Chilling allows the flavors to meld together and the fruits to stay crisp and refreshing.
- Prepare the Serving Bowls: Choose individual bowls or plates for serving. If you are using shredded coconut for a “nest,” place a small bed of shredded coconut in the center of each serving bowl.
- Shape the Chick Bodies: Take scoops of the mixed fruit salad and gently mound them in the center of each serving bowl, on top of the coconut “nest” if used. Shape the mound slightly to resemble a round chick body. You can use your hands or a spoon to shape them.
- Add the Chick Features:
- Eyes: Press two mini chocolate chips or edible candy eyes onto each fruit mound to create the chick’s eyes. Place them towards the top of the mound, close together to give a cute chick expression.
- Beak: Insert a carrot triangle just below and between the eyes to form the chick’s beak. Angle the carrot triangle slightly upwards for a more realistic beak appearance.
- Feet: Place two orange segments at the base of each fruit mound to represent the chick’s feet. Arrange them to look like little feet extending outwards.
- Garnish (Optional): For an extra touch of freshness, garnish each fruit chick salad with a small sprig of fresh mint.
- Serve and Enjoy: Serve your adorable Easter Chick Fruit Salads immediately and watch the smiles bloom! If you prepared them in advance, keep them refrigerated until serving.
Nutrition Facts: A Healthy Easter Treat
This Easter Chick Fruit Salad is not only delicious and fun but also packed with nutrients. Here are some approximate nutrition facts per serving (serving size is roughly 1 cup), keeping in mind that these values can vary depending on the specific fruits used and portion sizes.
- Serving Size: Approximately 1 cup
- Calories: 120-150 kcal
- Total Fat: Less than 1g
- Vitamin C: High (from citrus fruits and strawberries)
- Vitamin A: Good source (from cantaloupe and mango)
- Potassium: Moderate source (from bananas, cantaloupe, and kiwi if included)
Important Note: These are estimated values. For precise nutritional information, you can use a nutrition calculator and input the exact quantities of each ingredient you use. This fruit salad is naturally low in fat and sodium, and a good source of vitamins, fiber, and antioxidants, making it a healthy and guilt-free Easter dessert option.
Preparation Time: Quick and Easy Easter Fun
The beauty of this Easter Chick Fruit Salad lies in its simplicity and speed. Here’s a breakdown of the preparation time:
- Prep Time (Cutting and Shaping Fruits): Approximately 20-30 minutes. This is the most time-consuming part, especially if you are using whole fruits and cutting them yourself. Using pre-cut fruits can significantly reduce this time.
- Chill Time (Optional): 30 minutes to 1 hour (recommended). While chilling is optional, it’s highly recommended to enhance the flavor and texture of the fruit salad.
- Assembly Time (Shaping chicks and adding features): 10-15 minutes. Assembling the chicks and adding the eyes, beaks, and feet is quick and fun, especially if you have kids helping!
Total Time (without chilling): Approximately 30-45 minutes.
Total Time (with chilling): Approximately 1 hour to 1 hour and 45 minutes.
Overall, this Easter Chick Fruit Salad is a relatively quick and easy recipe, perfect for busy Easter celebrations or when you want a healthy and refreshing dessert in a short amount of time. You can even prep the fruits in advance and assemble the chicks just before serving to save time on the day of your event.
How to Serve: Delightful Presentations for Every Occasion
The Easter Chick Fruit Salad is incredibly versatile and can be served in various delightful ways to suit your Easter celebrations or any springtime gathering. Here are some ideas on how to serve and present this charming dish:
- Individual Bowls: The most common and convenient way is to serve each Easter Chick Fruit Salad in individual bowls. This allows for easy portion control and a visually appealing presentation for each guest. Use small, colorful bowls to enhance the festive Easter theme.
- Platter of Chicks: For a more dramatic presentation, arrange several Easter Chick Fruit Salads on a large platter. You can create a “nest” of shredded coconut on the platter as a base for all the chicks. This is perfect for a buffet-style serving or as a centerpiece for your Easter brunch table.
- Edible “Nests”: Get creative with edible “nests”! Instead of shredded coconut, you can use crispy chow mein noodles or shredded phyllo dough, lightly sweetened and baked into nest shapes. Place the fruit chick inside each edible nest for a delightful and whimsical presentation.
- Mini Chick Cups: For a kid-friendly serving option, use clear plastic cups or small mason jars to layer the fruit salad. Top each cup with a smaller mound of fruit shaped into a chick face, complete with eyes and a beak. This is perfect for Easter egg hunts or children’s parties.
- Skewered Fruit Chicks: For a fun and portable option, create fruit skewers with the chick features. Thread chunks of pineapple, mango, and melon onto skewers. Use blueberries for eyes and small carrot triangles for beaks attached to the pineapple chunk at the top. Serve these fruit chick skewers as a light and playful dessert.
- With Yogurt or Honey: Offer a side of Greek yogurt, vanilla yogurt, or a drizzle of honey for those who prefer a creamier or sweeter touch with their fruit salad. This adds another layer of flavor and texture to the dish.
- As Part of a Brunch Buffet: Include the Easter Chick Fruit Salad as part of a larger Easter brunch buffet. It pairs beautifully with savory dishes and provides a refreshing and healthy counterpoint to richer brunch items.
- Garnished with Mint and Edible Flowers: Enhance the visual appeal by garnishing each serving with fresh mint leaves and edible flowers like pansies or violets. This adds a touch of elegance and springtime charm.
No matter how you choose to serve it, the Easter Chick Fruit Salad is guaranteed to bring smiles and a burst of freshness to your Easter celebration.
Additional Tips: Elevate Your Easter Chick Fruit Salad
To make your Easter Chick Fruit Salad even more delightful and ensure it’s a resounding success, here are eight additional tips:
- Use Ripe, Fresh Fruits: The key to a delicious fruit salad is using ripe, high-quality fruits. Choose fruits that are in season and at their peak ripeness for the best flavor and sweetness. Avoid fruits that are bruised, overripe, or underripe.
- Cut Fruits Uniformly: Try to cut the fruits into roughly uniform sizes. This not only looks more appealing but also ensures that each bite is balanced and enjoyable. Consistent sizes also help the chick shapes look neater.
- Don’t Overmix: When combining the fruits, toss them gently to avoid bruising or crushing them. Overmixing can make the fruit salad mushy and less appealing. A light hand is key!
- Chill Thoroughly: Chilling the fruit salad before serving is crucial for both flavor and texture. Cold fruit is more refreshing, and chilling allows the flavors to meld together beautifully. Aim for at least 30 minutes of chilling time, or even longer if possible.
- Assemble Just Before Serving: For the best presentation, assemble the chick features (eyes, beaks, and feet) just before serving. This prevents the chocolate chips or candy eyes from melting and the carrot beaks from drying out.
- Get Creative with Chick Features: Feel free to get creative with the chick features! Instead of carrot beaks, you can use candy corn, small orange gummy candies, or even pieces of dried apricot. For eyes, consider using mini M&Ms, chocolate sprinkles, or even tiny raisins.
- Add a Citrus Dressing (Optional): For an extra zing, you can lightly dress the fruit salad with a simple citrus dressing. Whisk together a tablespoon of fresh lemon or lime juice with a teaspoon of honey or maple syrup. Drizzle it over the fruit salad just before serving. This enhances the flavors and adds a touch of brightness.
- Make it Ahead (Partially): To save time on the day of your event, you can prepare the fruit salad base (cut and combine the fruits) up to a day in advance. Store it covered in the refrigerator. However, it’s best to add the chick features and assemble the final dish just before serving to maintain freshness and visual appeal.
By following these tips, you’ll be well on your way to creating an Easter Chick Fruit Salad that is not only adorable but also incredibly delicious and memorable!
FAQ: Your Easter Chick Fruit Salad Questions Answered
Got questions about making the perfect Easter Chick Fruit Salad? Here are answers to some frequently asked questions to help you along the way:
Q1: Can I make this fruit salad ahead of time?
A: Yes, you can prepare the fruit salad base (the mixed fruits) up to a day in advance. Store it covered in an airtight container in the refrigerator. However, it’s best to assemble the chick features (eyes, beaks, and feet) just before serving to ensure the freshest presentation and prevent the garnishes from becoming soggy.
Q2: What other fruits can I use in this salad?
A: This recipe is very versatile! You can use a wide variety of fruits based on your preferences and what’s in season. Great additions or substitutions include grapes (green or red), mandarin oranges, banana slices (add just before serving to prevent browning), raspberries, blackberries, and even starfruit for a unique shape.
Q3: Can I use canned fruit?
A: While fresh fruit is highly recommended for the best flavor and texture, you can use canned fruit in a pinch. If using canned fruit, make sure to drain it well and rinse it to reduce excess syrup. However, be aware that canned fruit may be softer and less visually appealing than fresh fruit.
Q4: How do I prevent the fruit from browning?
A: Certain fruits like apples and bananas tend to brown quickly when cut. This recipe primarily uses fruits that are less prone to browning. However, if you are using apples or bananas, you can toss them with a little lemon juice or pineapple juice to help prevent oxidation and browning.
Q5: Can I make this recipe vegan?
A: Yes, this recipe is naturally vegan as it consists entirely of fruits and plant-based garnishes. Just ensure that any candy eyes you use (if opting for candy eyes instead of chocolate chips) are also vegan, as some candy eyes may contain gelatin.
Q6: Is this recipe suitable for kids to help with?
A: Absolutely! This is a fantastic recipe for kids to help with. They can assist with washing fruits, scooping melon balls (with supervision), cutting softer fruits (with age-appropriate knives and supervision), and especially with assembling the chick faces and features. It’s a fun and engaging way to get kids involved in the kitchen.
Q7: Can I make this fruit salad less sweet?
A: Yes, the sweetness of this fruit salad comes naturally from the fruits themselves. To make it less sweet, choose fruits that are less ripe, or omit any very sweet fruits like mango if desired. You can also skip adding any additional sweeteners like honey or syrup.
Q8: What if I don’t have melon ballers?
A: No problem! If you don’t have melon ballers, you can simply cut the cantaloupe and honeydew melons into small, bite-sized cubes instead of balls. The taste will be the same, and it will still look beautiful in the fruit salad.
We hope these FAQs have answered your questions and given you the confidence to create your own delightful Easter Chick Fruit Salad! Enjoy the process and the delicious, healthy results!
Print
Easter Chick Fruit Salad
Ingredients
To create these adorable Easter Chick Fruit Salads, you’ll need a vibrant array of fresh fruits and a few simple garnishes. Here’s a list of what you’ll need, keeping in mind that you can always adjust quantities based on how many servings you desire and the size of your serving bowls.
- Pineapple: About 1 whole fresh pineapple, or pre-cut chunks to save time. Pineapple forms the main body of our chick and provides a sweet and slightly tangy tropical flavor. Opt for a ripe pineapple that smells sweet at the base.
- Cantaloupe: 1 medium cantaloupe, for fruit balls or chunks. Cantaloupe adds a soft, sweet melon flavor and a beautiful orange hue which complements the yellow pineapple beautifully. Choose a cantaloupe that feels heavy for its size and has a fragrant aroma.
- Honeydew Melon: 1 medium honeydew melon, also for fruit balls or chunks. Honeydew provides a delicate sweetness and a refreshing flavor, along with a pale green color which adds variety to our fruit mix. Look for a honeydew that is firm and smooth, with a slightly waxy feel.
- Mango: 2 large ripe mangoes, peeled and cut into chunks. Mango adds a rich, tropical sweetness and a vibrant yellow-orange color, enhancing the chick’s appearance. Choose mangoes that are slightly soft to the touch and have a fragrant, fruity aroma.
- Strawberries: 1 pint of fresh strawberries, hulled and halved or quartered depending on size. Strawberries bring a burst of red color and a classic sweet-tart berry flavor. Select bright red, firm strawberries with fresh green caps.
- Blueberries: 1 pint of fresh blueberries. Blueberries are perfect for creating the chick’s eyes and add a pop of deep blue-purple color and a slightly tart, juicy flavor. Choose plump, firm blueberries with a silvery bloom.
- Kiwi: 2-3 ripe kiwis, peeled and sliced. Kiwi adds a vibrant green color and a tangy-sweet flavor, providing a nice contrast to the other fruits. Choose kiwis that yield slightly to gentle pressure but are not too soft.
- Orange Slices (for feet): 2 oranges, sliced into segments. Orange slices will be used to create the chick’s feet. They provide a citrusy flavor and a bright orange color. Choose oranges that feel heavy for their size and have a smooth, firm skin.
- Carrot (for beaks): 1 large carrot, peeled and cut into small triangles. Carrot triangles will serve as the chick’s beaks, adding a touch of crunch and a bright orange color. Select a firm, smooth carrot.
- Mini Chocolate Chips or Edible Candy Eyes (for eyes): A small handful. These will be used to create the chick’s eyes, bringing them to life. You can choose mini chocolate chips for a simple, edible option or opt for candy eyes for a more whimsical look.
- Optional – Shredded Coconut (for “nest”): Unsweetened shredded coconut can be used as a base to create a “nest” for the chick fruit salad, adding a subtle sweetness and texture.
- Optional – Fresh Mint Leaves (for garnish): A few sprigs of fresh mint can be used as a garnish to add a touch of freshness and visual appeal.
Instructions
Creating this Easter Chick Fruit Salad is as fun as it is simple. Follow these step-by-step instructions to bring your adorable fruit chicks to life:
- Prepare the Fruits: Begin by thoroughly washing all of your fresh fruits. This is an important step to ensure cleanliness and remove any potential residues.
- Cut and Shape the Fruits:
- Melons (Cantaloupe and Honeydew): Cut the cantaloupe and honeydew melons in half, remove the seeds, and using a melon baller or a small spoon, scoop out melon balls. Alternatively, you can cut them into small, bite-sized cubes. Set aside.
- Pineapple: If using a whole pineapple, cut off the top and bottom. Stand the pineapple upright and slice off the rind from top to bottom, following the curve of the fruit. Remove any remaining “eyes”. Cut the pineapple into chunks or rings, depending on your preference. Pre-cut pineapple chunks can be used directly.
- Mangoes: Peel the mangoes and cut the flesh away from the large central seed. Cut the mango flesh into chunks.
- Strawberries: Hull the strawberries (remove the green tops). Depending on their size, halve or quarter them.
- Kiwi: Peel the kiwi and slice them into rounds or half-moons.
- Oranges: Peel the oranges and segment them. Set aside for making the chick’s feet later.
- Carrot: Peel the carrot and cut small triangles for the beaks. You can slice the carrot into thin rounds and then cut each round into triangles, or use a knife to carefully shape small triangles from the carrot.
- Assemble the Fruit Salad Base: In a large bowl, gently combine the pineapple chunks, cantaloupe balls or cubes, honeydew balls or cubes, mango chunks, strawberries, kiwi slices, and blueberries. Toss lightly to mix the fruits evenly.
- Chill the Fruit Salad (Optional but Recommended): For the best flavor and texture, cover the fruit salad and refrigerate it for at least 30 minutes to an hour before assembling the chicks. Chilling allows the flavors to meld together and the fruits to stay crisp and refreshing.
- Prepare the Serving Bowls: Choose individual bowls or plates for serving. If you are using shredded coconut for a “nest,” place a small bed of shredded coconut in the center of each serving bowl.
- Shape the Chick Bodies: Take scoops of the mixed fruit salad and gently mound them in the center of each serving bowl, on top of the coconut “nest” if used. Shape the mound slightly to resemble a round chick body. You can use your hands or a spoon to shape them.
- Add the Chick Features:
- Eyes: Press two mini chocolate chips or edible candy eyes onto each fruit mound to create the chick’s eyes. Place them towards the top of the mound, close together to give a cute chick expression.
- Beak: Insert a carrot triangle just below and between the eyes to form the chick’s beak. Angle the carrot triangle slightly upwards for a more realistic beak appearance.
- Feet: Place two orange segments at the base of each fruit mound to represent the chick’s feet. Arrange them to look like little feet extending outwards.
- Garnish (Optional): For an extra touch of freshness, garnish each fruit chick salad with a small sprig of fresh mint.
- Serve and Enjoy: Serve your adorable Easter Chick Fruit Salads immediately and watch the smiles bloom! If you prepared them in advance, keep them refrigerated until serving.
Nutrition
- Serving Size: one normal portion
- Calories: 150
- Fat: 1g


