
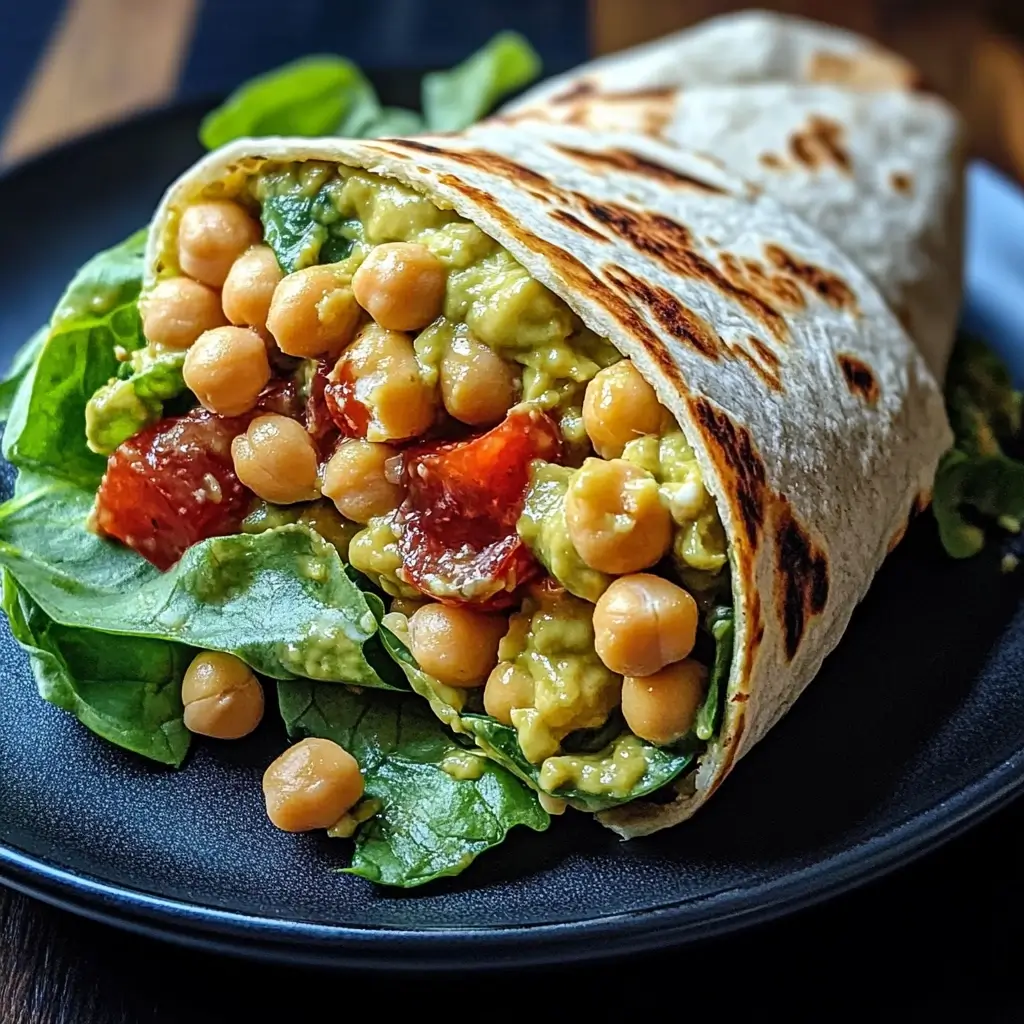

Of all the quick and easy lunch recipes that have graced my kitchen, none have become as much of a beloved staple as these Creamy Avocado Chickpea Wraps. I remember the first time I made them, I was in a classic midday slump, staring into the fridge with that familiar sense of “what on earth do I eat?” I needed something fast, something that wouldn’t require turning on the stove, but also something that would actually keep me full and energized for the rest of the afternoon. I saw a can of chickpeas, a perfectly ripe avocado, and a lonely lime. A lightbulb went off. Twenty minutes later, I was biting into the most surprisingly delicious wrap I’d ever made. The combination of the creamy, rich avocado with the hearty, textured chickpeas was a revelation. It had the satisfying mouthfeel of a classic tuna or chicken salad, but was entirely plant-based, vibrant, and packed with a zesty freshness from the lime and cilantro. When my partner, a notorious skeptic of “healthy lunches,” tried one, his eyes widened. “Okay,” he said, “you can make this again. Anytime.” And so, it became our go-to. It’s the meal we turn to for busy work-from-home lunches, the recipe we pack for picnics in the park, and the quick dinner we whip up when we’re too tired to cook. It’s endlessly customizable, incredibly forgiving, and proves that simple, whole-food ingredients can create something truly spectacular. This recipe isn’t just about food; it’s about a delicious solution to a daily problem, and I am so excited to share it with you.
Ingredients
Here is the simple, wholesome list of ingredients you’ll need to create this vibrant and satisfying meal. Each component plays a crucial role in building the perfect balance of flavor and texture.
- 1 (15-ounce) can chickpeas (garbanzo beans): This is the hearty, protein-packed base of our filling. You’ll want them rinsed and drained well to remove any of the canning liquid, which can have a briny taste.
- 2 large, ripe avocados: These are the key to the wrap’s signature creaminess. Look for avocados that yield to gentle pressure but aren’t mushy. They provide healthy fats that make this meal incredibly satisfying.
- 1/2 cup finely chopped red onion: This adds a much-needed sharp, crunchy contrast to the soft creaminess of the avocado and chickpeas. Its pungent flavor cuts through the richness beautifully.
- 1/2 cup chopped fresh cilantro: For a burst of bright, herbaceous freshness. If you’re not a fan of cilantro, fresh parsley or dill can be used as a substitute.
- 1 large lime, juiced (about 2 tablespoons): This is a non-negotiable ingredient! The acidity of the lime juice not only adds a zesty, tangy flavor that brightens everything up, but it also crucially prevents the avocado from browning too quickly.
- 1/2 teaspoon garlic powder: Adds a savory, aromatic depth of flavor that complements the other ingredients without the harshness of raw garlic.
- 1/2 teaspoon ground cumin: Provides a warm, earthy, and slightly smoky undertone that pairs wonderfully with chickpeas and avocado.
- 1/2 teaspoon sea salt (or to taste): Essential for bringing all the flavors together and making them pop.
- 1/4 teaspoon black pepper (or to taste): Adds a gentle hint of spice.
- 4-6 large tortillas or wraps: The vessel for our delicious filling. Whole wheat, spinach, sun-dried tomato, or gluten-free wraps all work wonderfully. Choose your favorite!
- Optional: 2 cups of fresh spinach or lettuce: A layer of greens not only adds extra nutrients and a fresh crunch but also acts as a brilliant moisture barrier, helping to prevent the tortilla from becoming soggy.
Instructions
Follow these simple, step-by-step instructions to assemble the perfect Creamy Avocado Chickpea Wraps. The process is quick, straightforward, and requires no cooking, making it ideal for a fast and fresh meal.
- Prepare the Chickpeas: The foundation of our wrap’s texture starts here. Open the can of chickpeas and pour them into a colander or fine-mesh sieve. Rinse them thoroughly under cold running water for at least 30 seconds. This step is important as it washes away the starchy, sometimes metallic-tasting liquid from the can (aquafaba) and reduces the sodium content. Shake the colander well to drain off as much water as possible.
- Mash the Chickpeas: Transfer the drained chickpeas to a medium-sized mixing bowl. Using a potato masher or the back of a fork, mash the chickpeas until they are partially broken down. You are not looking for a smooth paste like hummus. The goal is to have a varied texture—some chickpeas should be completely mashed, while others remain partially or fully whole. This textural contrast is what makes the filling so interesting and satisfying to eat.
- Add the Avocado and Mash Again: Slice the ripe avocados in half lengthwise and remove the pits. Scoop the green flesh out with a spoon and add it directly to the bowl with the mashed chickpeas. Now, continue to mash the ingredients together. The avocado will break down easily, coating the chickpeas and creating an incredibly creamy binder. Mash until you reach your desired consistency—I prefer it mostly creamy but with some noticeable chunks of both chickpea and avocado remaining.
- Incorporate the Flavorings: Add the finely chopped red onion, chopped fresh cilantro, fresh lime juice, garlic powder, and ground cumin to the bowl. The vibrant colors from the red onion and cilantro will immediately make the mixture look more appealing.
- Mix and Season: Using a spatula or spoon, gently fold all the ingredients together until everything is well combined. The sharp red onion should be evenly distributed, and the cilantro should be speckled throughout the creamy green mixture. Now it’s time for the most important step: tasting. Sprinkle in the sea salt and black pepper. Mix again, and then take a small taste. Does it need more salt to enhance the flavors? More lime juice for a brighter zest? A little more cumin for warmth? Adjust the seasonings until the flavor is perfectly balanced for your palate.
- Assemble the Wraps: Lay a tortilla flat on a clean surface. If you’re using leafy greens, this is the time to create your moisture barrier. Place a handful of spinach or lettuce in a line down the center of the tortilla, leaving about an inch of space at the top and bottom. Spoon a generous portion of the creamy avocado chickpea filling (about one-quarter of the mixture) onto the greens. Be careful not to overfill the wrap, as this can make it difficult to roll and prone to tearing.
- Roll it Up: To roll the wrap, first fold in the sides (the left and right edges) over the filling. Then, take the bottom edge (the one closest to you) and pull it up and over the filling, tucking it in tightly. Continue to roll the wrap away from you until it’s a secure, compact cylinder. The initial tight tuck is the secret to a wrap that holds together.
- Serve and Enjoy: You can serve the wrap whole or slice it in half on a diagonal for a more professional, deli-style presentation. Serve immediately and enjoy the fresh, creamy, and crunchy goodness.
Nutrition Facts
This recipe is as nourishing as it is delicious. The values below are an approximation for one wrap, assuming the recipe makes four large wraps.
- Servings: 4 Large Wraps
- Calories per Serving: Approximately 450-550 kcal (This can vary greatly depending on the size and type of tortilla used).
- Protein (Approx. 15g): The chickpeas are a fantastic source of plant-based protein, which is essential for muscle repair, immune function, and keeping you feeling full and satisfied long after your meal.
- Fiber (Approx. 14g): With significant contributions from both the chickpeas and avocado, this wrap is a fiber powerhouse. Dietary fiber is crucial for digestive health, regulating blood sugar levels, and promoting satiety.
- Healthy Fats (Approx. 25g): The majority of the fat content comes from the avocado in the form of monounsaturated fats. These are heart-healthy fats that can help reduce bad cholesterol levels and are beneficial for overall health.
- Vitamin C (Approx. 20% of DV): Thanks to the generous amount of fresh lime juice and cilantro, you get a solid dose of Vitamin C, a powerful antioxidant that supports your immune system and skin health.
Preparation Time
This recipe is the epitome of fast food made healthy. From start to finish, you can have these wraps ready in 15-20 minutes. The majority of this time is spent on simple prep work like chopping the onion and cilantro. The actual mashing and mixing process takes only about 5-7 minutes, and assembling the wraps takes another 5. It’s a true no-cook hero for any meal of the day.
How to Serve
While incredible on its own, this Creamy Avocado Chickpea filling is versatile. Here are several ways to serve and enjoy it:
- The Classic Wrap:
- Serve the rolled wrap whole for an easy grab-and-go lunch.
- Slice it in half diagonally and secure with a toothpick for a visually appealing presentation.
- Lightly grill the rolled wrap in a dry pan or a panini press for a few minutes on each side to create a warm, toasty exterior with a deliciously creamy interior.
- Deconstructed as a Salad or Bowl:
- For a low-carb or gluten-free option, skip the tortilla altogether.
- Serve a large scoop of the avocado chickpea mixture over a bed of mixed greens, quinoa, or brown rice.
- Top with extra veggies like cherry tomatoes, cucumber, and bell peppers to create a vibrant and filling “Buddha bowl.”
- As a Hearty Sandwich or Toast:
- Spread the filling generously between two slices of your favorite toasted bread (sourdough, whole wheat, or rye are excellent choices).
- Serve it open-faced on a thick slice of toasted artisan bread for a trendy and delicious avocado-chickpea toast.
- As a Dip or Appetizer:
- Serve the filling in a bowl as a chunky, creamy dip.
- Pair it with sturdy tortilla chips, pita bread, or a platter of fresh vegetable sticks like carrots, cucumbers, and bell peppers.
- Stuffed Veggies:
- For a fun and crunchy alternative, use the filling to stuff hollowed-out bell peppers or large, ripe tomatoes.
Additional Tips
Elevate your wrap-making game with these eight expert tips to ensure perfect results every single time.
- Texture is Everything: The key to a great filling is avoiding a completely smooth, mushy texture. Mash the chickpeas first to your desired level of chunkiness before adding the soft avocado. This preserves some of the chickpeas’ integrity and gives the final product a more satisfying, varied bite.
- Toast Your Tortillas: Before assembling, warm your tortillas for 15-20 seconds per side in a dry, hot skillet. This makes them more pliable and less likely to crack when you roll them. It also adds a subtle, toasty flavor that enhances the overall experience.
- The Green Barrier Method: To prevent the dreaded soggy wrap (especially if you’re making it ahead of time), use large, crisp lettuce leaves (like romaine or iceberg) or a dense layer of spinach as a barrier. Place the greens on the tortilla first, then add the filling on top. This shields the tortilla from the filling’s moisture.
- Flavor Boosters and Variations: Don’t be afraid to customize! For a spicy kick, add a finely minced jalapeño or a dash of hot sauce. For extra crunch, mix in some chopped celery or sunflower seeds. For a different flavor profile, try swapping the cilantro for fresh dill and adding a bit of vegan mayonnaise for extra creaminess.
- Mastering the Meal Prep: If you want to prep this for lunches, it’s best to store the avocado-chickpea filling in an airtight container separate from the tortillas and greens. The lime juice will help keep it fresh for 2-3 days. When you’re ready to eat, just assemble the wrap on the spot.
- “Cheesy” Vegan Flavor Hack: For a savory, cheesy flavor without any dairy, mix in one or two tablespoons of nutritional yeast. It has a nutty, umami-rich taste that beautifully complements the creaminess of the avocado.
- Picking the Perfect Avocado: Your avocado’s ripeness is crucial. It should be firm but yield to gentle pressure. If it’s too hard, it won’t mash well; if it’s too soft or has dark spots, it may have a sour taste. To speed up ripening, place a hard avocado in a paper bag with a banana for a day or two.
- Don’t Skimp on the Acid: The lime juice is more than a flavor enhancer; it’s a preservative. The acid significantly slows down the oxidation process that turns avocados brown. If you don’t have a lime, lemon juice will work in a pinch. Be generous with it for the best flavor and color retention.
Frequently Asked Questions (FAQ)
Here are answers to some of the most common questions about making Creamy Avocado Chickpea Wraps.
1. How do I keep my wraps from getting soggy for my work lunch?
The best method is to pack the components separately. Store the avocado-chickpea filling in a small airtight container and pack your tortilla and leafy greens in a separate bag or container. It only takes two minutes to assemble at your desk, ensuring a fresh, crisp wrap every time. If you must assemble it in the morning, use the “Green Barrier Method” (Tip #3) and wrap it tightly in foil or plastic wrap.
2. Can I make the avocado-chickpea filling ahead of time? Will it turn brown?
Yes, you can make the filling ahead of time. Thanks to the generous amount of lime juice, it will stay surprisingly green. To store it, press a piece of plastic wrap directly onto the surface of the filling before putting the lid on your container. This minimizes air contact and can keep it fresh and green in the refrigerator for up to 3 days. The color might slightly dull, but the taste will still be great.
3. Is this recipe vegan and gluten-free?
The filling itself is naturally vegan and gluten-free. To keep the entire meal compliant, simply choose certified gluten-free tortillas or wraps. All other ingredients are plant-based and free from gluten.
4. I don’t like cilantro. What can I use instead?
No problem! Cilantro has a strong, distinct flavor that not everyone enjoys. You can easily substitute it with an equal amount of finely chopped fresh parsley for a clean, green flavor. Fresh dill is another fantastic option that will give the filling a zesty, almost ranch-like flavor profile.
5. My filling tastes a bit bland. How can I fix it?
Blandness in this recipe is almost always due to under-seasoning. The two most important fixes are salt and acid. Add another pinch of salt and another squeeze of lime juice, mix, and taste again. You’ll be amazed at how much those two ingredients make the other flavors pop. You can also add more cumin, a pinch of smoked paprika, or a dash of your favorite hot sauce.
6. Can I use dried chickpeas instead of canned?
Absolutely! Using dried chickpeas that you’ve cooked yourself will often result in a better flavor and texture. You’ll need about 1.5 cups of cooked chickpeas to equal one 15-ounce can. Simply soak the dried chickpeas overnight, then simmer them in water until tender (usually 1-2 hours). Let them cool completely before using them in the recipe.
7. How long will the prepared filling last in the refrigerator?
When stored properly in an airtight container (with plastic wrap pressed to the surface), the avocado-chickpea filling will last for 2-3 days in the refrigerator. The texture may soften slightly, and the color might lose some of its vibrancy after the first day, but it will remain safe and delicious to eat.
8. What are some other creative ways to use this chickpea filling?
This filling is incredibly versatile! Beyond wraps and sandwiches, you can use it as a topping for baked potatoes or sweet potatoes, stuff it into hollowed-out mini bell peppers for a party appetizer, serve it on crackers, or mix it with cooked pasta and cherry tomatoes for a quick and creamy pasta salad. It’s a fantastic multi-purpose recipe to have in your arsenal.
Creamy Avocado Chickpea Wraps
Ingredients
Here is the simple, wholesome list of ingredients you’ll need to create this vibrant and satisfying meal. Each component plays a crucial role in building the perfect balance of flavor and texture.
- 1 (15-ounce) can chickpeas (garbanzo beans): This is the hearty, protein-packed base of our filling. You’ll want them rinsed and drained well to remove any of the canning liquid, which can have a briny taste.
- 2 large, ripe avocados: These are the key to the wrap’s signature creaminess. Look for avocados that yield to gentle pressure but aren’t mushy. They provide healthy fats that make this meal incredibly satisfying.
- 1/2 cup finely chopped red onion: This adds a much-needed sharp, crunchy contrast to the soft creaminess of the avocado and chickpeas. Its pungent flavor cuts through the richness beautifully.
- 1/2 cup chopped fresh cilantro: For a burst of bright, herbaceous freshness. If you’re not a fan of cilantro, fresh parsley or dill can be used as a substitute.
- 1 large lime, juiced (about 2 tablespoons): This is a non-negotiable ingredient! The acidity of the lime juice not only adds a zesty, tangy flavor that brightens everything up, but it also crucially prevents the avocado from browning too quickly.
- 1/2 teaspoon garlic powder: Adds a savory, aromatic depth of flavor that complements the other ingredients without the harshness of raw garlic.
- 1/2 teaspoon ground cumin: Provides a warm, earthy, and slightly smoky undertone that pairs wonderfully with chickpeas and avocado.
- 1/2 teaspoon sea salt (or to taste): Essential for bringing all the flavors together and making them pop.
- 1/4 teaspoon black pepper (or to taste): Adds a gentle hint of spice.
- 4–6 large tortillas or wraps: The vessel for our delicious filling. Whole wheat, spinach, sun-dried tomato, or gluten-free wraps all work wonderfully. Choose your favorite!
- Optional: 2 cups of fresh spinach or lettuce: A layer of greens not only adds extra nutrients and a fresh crunch but also acts as a brilliant moisture barrier, helping to prevent the tortilla from becoming soggy.
Instructions
Follow these simple, step-by-step instructions to assemble the perfect Creamy Avocado Chickpea Wraps. The process is quick, straightforward, and requires no cooking, making it ideal for a fast and fresh meal.
- Prepare the Chickpeas: The foundation of our wrap’s texture starts here. Open the can of chickpeas and pour them into a colander or fine-mesh sieve. Rinse them thoroughly under cold running water for at least 30 seconds. This step is important as it washes away the starchy, sometimes metallic-tasting liquid from the can (aquafaba) and reduces the sodium content. Shake the colander well to drain off as much water as possible.
- Mash the Chickpeas: Transfer the drained chickpeas to a medium-sized mixing bowl. Using a potato masher or the back of a fork, mash the chickpeas until they are partially broken down. You are not looking for a smooth paste like hummus. The goal is to have a varied texture—some chickpeas should be completely mashed, while others remain partially or fully whole. This textural contrast is what makes the filling so interesting and satisfying to eat.
- Add the Avocado and Mash Again: Slice the ripe avocados in half lengthwise and remove the pits. Scoop the green flesh out with a spoon and add it directly to the bowl with the mashed chickpeas. Now, continue to mash the ingredients together. The avocado will break down easily, coating the chickpeas and creating an incredibly creamy binder. Mash until you reach your desired consistency—I prefer it mostly creamy but with some noticeable chunks of both chickpea and avocado remaining.
- Incorporate the Flavorings: Add the finely chopped red onion, chopped fresh cilantro, fresh lime juice, garlic powder, and ground cumin to the bowl. The vibrant colors from the red onion and cilantro will immediately make the mixture look more appealing.
- Mix and Season: Using a spatula or spoon, gently fold all the ingredients together until everything is well combined. The sharp red onion should be evenly distributed, and the cilantro should be speckled throughout the creamy green mixture. Now it’s time for the most important step: tasting. Sprinkle in the sea salt and black pepper. Mix again, and then take a small taste. Does it need more salt to enhance the flavors? More lime juice for a brighter zest? A little more cumin for warmth? Adjust the seasonings until the flavor is perfectly balanced for your palate.
- Assemble the Wraps: Lay a tortilla flat on a clean surface. If you’re using leafy greens, this is the time to create your moisture barrier. Place a handful of spinach or lettuce in a line down the center of the tortilla, leaving about an inch of space at the top and bottom. Spoon a generous portion of the creamy avocado chickpea filling (about one-quarter of the mixture) onto the greens. Be careful not to overfill the wrap, as this can make it difficult to roll and prone to tearing.
- Roll it Up: To roll the wrap, first fold in the sides (the left and right edges) over the filling. Then, take the bottom edge (the one closest to you) and pull it up and over the filling, tucking it in tightly. Continue to roll the wrap away from you until it’s a secure, compact cylinder. The initial tight tuck is the secret to a wrap that holds together.
- Serve and Enjoy: You can serve the wrap whole or slice it in half on a diagonal for a more professional, deli-style presentation. Serve immediately and enjoy the fresh, creamy, and crunchy goodness.
Nutrition
- Serving Size: one normal portion
- Calories: 550
- Fat: 25g
- Fiber: 14g
- Protein: 15g


