
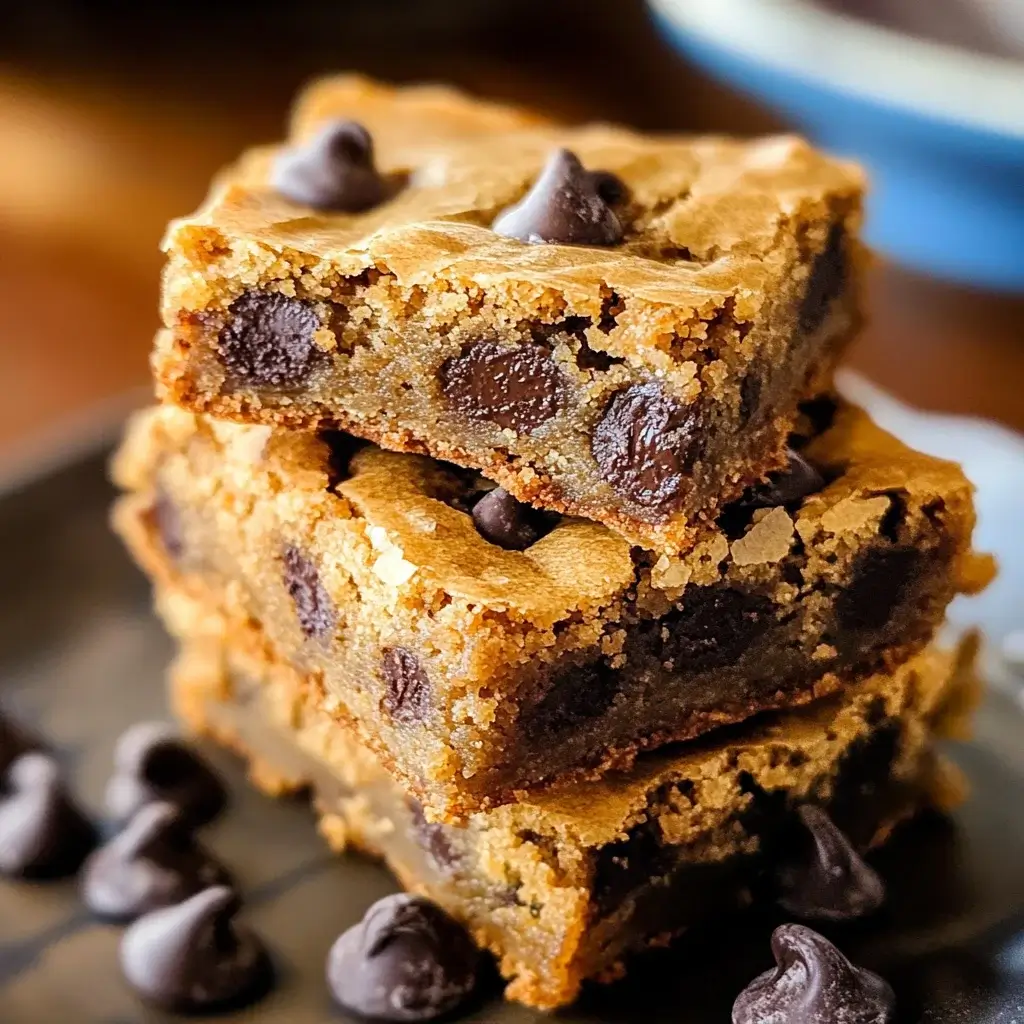

There are some smells that just instantly transport you back to pure comfort, and for me, the aroma of butter, brown sugar, and vanilla baking together is right at the top of that list. It’s the smell of anticipation, of something wonderfully simple yet utterly satisfying being created. I remember the first time I perfected this specific Chocolate Chip Blondie recipe. It was a rainy Sunday afternoon, the kind that begs for baking. I’d tried countless blondie recipes before – some too cakey, some too dry, some just… lacking. But this one? This one was different. The moment they came out of the oven, golden brown around the edges, slightly puffed in the center, studded generously with molten chocolate chips, I knew I’d found it. The true test, however, came when my family descended upon the cooling rack. My kids, usually picky eaters, devoured square after square, their faces smeared with chocolate. My partner, a self-proclaimed brownie loyalist, declared them “dangerously addictive” and possibly even better than their chocolatey counterparts (a statement I never thought I’d hear!). Since that day, these Chocolate Chip Blondies have become our go-to treat for potlucks, lazy weekends, after-school snacks, and simple celebrations. They strike that perfect balance: deeply caramel-like from the brown sugar, rich with buttery notes, soft and chewy in the middle with slightly crisp edges, and packed with enough chocolate chips to satisfy any craving. They are, quite simply, sunshine in a square, and I’m so excited to share the recipe that finally cracked the code for perfect, easy, and incredibly delicious homemade blondies. Prepare for these to become a staple in your kitchen, too!
Ingredients for the Ultimate Chocolate Chip Blondies
Gather these simple pantry staples to create the most delectable blondies you’ve ever tasted. Using quality ingredients makes a noticeable difference in the final flavour and texture.
- 1 cup (2 sticks or 226g) Unsalted Butter, melted: Provides richness, moisture, and that essential chewy texture. Melting it ensures a denser, fudgier blondie rather than a cakey one.
- 1 ¾ cups (350g) Light Brown Sugar, packed: The star ingredient! It delivers moisture, chewiness, and that signature deep molasses/caramel flavour unique to blondies. Make sure it’s packed firmly into the measuring cup.
- ½ cup (100g) Granulated Sugar: Adds sweetness and contributes to the slightly crisp edges and tender crumb.
- 2 Large Eggs, room temperature: Act as binders, add richness, and contribute to the structure. Room temperature eggs incorporate more easily and create a smoother batter.
- 1 Tablespoon Pure Vanilla Extract: Essential for enhancing all the other flavours, especially the brown sugar and butter. Use pure extract for the best taste.
- 2 ½ cups (300g) All-Purpose Flour: Provides the structure for the blondies. Be sure to measure it correctly (spoon and level method recommended) to avoid dry blondies.
- 1 teaspoon Baking Powder: Gives the blondies a slight lift, preventing them from being overly dense.
- ½ teaspoon Baking Soda: Reacts with the brown sugar (which is acidic) to provide further leavening and contribute to browning.
- 1 teaspoon Salt: Crucial for balancing the sweetness and enhancing the butter and vanilla flavours. Don’t skip it!
- 2 cups (340-350g) Semi-Sweet Chocolate Chips: The classic choice! Provides pockets of rich, melted chocolate throughout. Feel free to use milk, dark, or a combination.
Step-by-Step Instructions for Baking Perfect Blondies
Follow these detailed steps carefully for guaranteed blondie success. The process is straightforward, making this a great recipe for bakers of all levels.
- Preheat and Prepare: Preheat your oven to 350°F (175°C). Grease a 9×13 inch baking pan thoroughly with butter or non-stick cooking spray. For easier removal and cleanup, line the pan with parchment paper, leaving an overhang on two opposite sides to act as handles. Grease the parchment paper as well. This ensures the blondies won’t stick and can be lifted out cleanly once cooled.
- Melt the Butter: In a medium saucepan, melt the unsalted butter over medium-low heat. Alternatively, you can melt it in a large microwave-safe bowl in short bursts. Allow the melted butter to cool slightly for a few minutes – you don’t want it piping hot, as it could scramble the eggs.
- Combine Wet Ingredients: Pour the slightly cooled melted butter into a large mixing bowl. Add the packed light brown sugar and granulated sugar to the butter. Whisk vigorously by hand or using an electric mixer on low speed until the mixture is well combined and smooth. It should look glossy and slightly grainy.
- Add Eggs and Vanilla: Add the room temperature large eggs one at a time, whisking well after each addition until fully incorporated. The mixture should become lighter in colour and slightly thicker. Stir in the pure vanilla extract until combined. Whisking the eggs and sugars thoroughly helps create that desirable crackly top.
- Combine Dry Ingredients: In a separate medium bowl, whisk together the all-purpose flour, baking powder, baking soda, and salt. Whisking ensures the leavening agents and salt are evenly distributed throughout the flour, preventing pockets of saltiness or uneven rising.
- Combine Wet and Dry: Gradually add the dry ingredient mixture to the wet ingredient mixture. Using a rubber spatula or wooden spoon, mix just until the flour streaks mostly disappear. Be very careful not to overmix at this stage! Overmixing develops the gluten in the flour, resulting in tough, cakey blondies instead of chewy ones. A few small lumps are perfectly fine.
- Fold in Chocolate Chips: Gently fold in the semi-sweet chocolate chips until they are evenly distributed throughout the batter. If you’re using any other mix-ins (like nuts or different types of chips), add them now as well. Again, avoid overmixing.
- Spread Batter: Pour the thick blondie batter into the prepared 9×13 inch baking pan. Use an offset spatula or the back of a spoon to spread the batter evenly into all corners. The batter will be quite thick, so take your time to ensure an even layer for consistent baking.
- Bake: Place the pan in the preheated oven on the center rack. Bake for 25-30 minutes. The exact baking time can vary depending on your oven. Start checking around the 25-minute mark.
- Check for Doneness: The blondies are done when the edges are set and lightly golden brown, and the center appears mostly set but still slightly soft. A wooden skewer or toothpick inserted into the center should come out with a few moist crumbs attached, but no wet batter. If it comes out completely clean, they might be slightly overbaked (though still delicious!). For fudgier centers, err on the side of slightly underbaking.
- Cool Completely: This step is crucial! Remove the pan from the oven and place it on a wire cooling rack. Let the blondies cool completely in the pan before attempting to lift them out or cut them. This usually takes at least 1-2 hours, sometimes longer. Cooling allows them to finish setting up, developing their signature chewy texture and making them much easier to cut cleanly. Cutting them while warm will result in messy, gooey squares.
- Cut and Serve: Once completely cool, use the parchment paper overhangs to lift the entire blondie slab out of the pan onto a cutting board. Use a sharp knife to cut them into squares or bars. The size is up to you – typically 16, 20, or 24 squares depending on how large you want the servings.
Nutrition Facts (Approximate Per Serving)
Please note that these values are estimates based on a serving size of 1/16th of the batch (one square from a 9×13 pan cut into 16). Actual nutrition will vary based on specific ingredients used and final serving size.
- Servings: 16 squares
- Calories: Approximately 350-400 kcal per square
- Total Fat: Around 18-22g (Significant portion from butter and chocolate chips, contributing to richness)
- Carbohydrates: Approximately 45-50g (Mainly from sugars and flour, providing energy and sweetness)
- Sugars: Approximately 30-35g (Primarily from brown and granulated sugars, key for flavour and texture)
- Protein: Around 3-4g (From eggs and flour)
Disclaimer: These nutritional facts are estimates calculated using standard ingredient databases and should be used as a general guideline only.
Quick & Easy Preparation Time
These Chocolate Chip Blondies are relatively quick to whip up, making them perfect for weeknight cravings or last-minute gatherings.
- Preparation Time: Approximately 15-20 minutes (Gathering ingredients, melting butter, mixing the batter)
- Baking Time: Approximately 25-30 minutes
- Cooling Time: Approximately 1-2 hours (Essential for texture and cutting)
- Total Time (excluding cooling): Around 40-50 minutes
Creative Ways to Serve Your Chocolate Chip Blondies
While absolutely delicious on their own, these blondies can be elevated further with simple additions. Here are some serving suggestions:
- Classic & Simple: Enjoy a square exactly as it is, perhaps slightly warmed, alongside a cold glass of milk or a hot cup of coffee or tea. The pure flavour is often all you need.
- A La Mode: Serve a slightly warmed blondie square topped with a generous scoop of vanilla bean ice cream. The contrast between the warm, chewy blondie and the cold, creamy ice cream is heavenly.
- Sauce Drizzle: Elevate the presentation and flavour by drizzling warm caramel sauce, hot fudge sauce, or even a fruit coulis (like raspberry) over the top.
- Whipped Cream & Berries: Top a blondie square with a dollop of freshly whipped cream and a few fresh berries (raspberries, strawberries, or blueberries work well) for a lighter, fresher take.
- Blondie Sundae Bar: Cut the blondies into smaller, bite-sized pieces and set up a sundae bar! Offer various ice cream flavours, sauces (caramel, chocolate, butterscotch), whipped cream, sprinkles, chopped nuts, cherries, and let everyone build their own custom blondie sundae. Perfect for parties!
- Crumble Topping: Crumble leftover or slightly stale blondies over yogurt, oatmeal, or even use them as a base for a fruit crisp topping for added texture and flavour.
- Gift Giving: Package cooled blondies attractively in cellophane bags tied with ribbon or in decorative boxes. They make wonderful homemade gifts for neighbours, teachers, or friends.
Pro Tips for Blondie Baking Success
Achieve blondie perfection every time with these helpful tips gathered from experience:
- Measure Flour Correctly: This is perhaps the most crucial tip for texture. Do not scoop the flour directly out of the bag with your measuring cup. Instead, use a spoon to fluff up the flour in its container, then spoon it lightly into the measuring cup until it’s overflowing. Level off the excess with the straight edge of a knife. Scooping compacts the flour, leading to too much flour in the batter and dry, dense blondies.
- Don’t Overmix the Batter: Once you combine the wet and dry ingredients, mix only until the flour is just incorporated. Overmixing develops gluten, resulting in tough, cakey blondies instead of the desired soft, chewy texture. Stop mixing as soon as you no longer see large streaks of flour. Gently fold in the chocolate chips.
- Use Room Temperature Eggs: Cold eggs don’t incorporate as easily into the batter, potentially affecting the texture. Let your eggs sit out on the counter for about 30 minutes before you start baking, or place them in a bowl of warm (not hot) water for 5-10 minutes to speed up the process.
- Embrace Brown Sugar: Blondies rely heavily on brown sugar for their characteristic flavour and chewiness. Ensure your brown sugar is fresh and moist. If it’s hardened, you can soften it quickly by placing a damp paper towel in the container for a short time or microwaving it briefly with a small dish of water. Packed light brown sugar is generally preferred for the classic flavour, but dark brown sugar can be used for an even deeper molasses taste.
- Don’t Overbake: Keep a close eye on the blondies towards the end of the baking time. Ovens vary, so rely on visual cues (set edges, slightly soft center) and the toothpick test (moist crumbs, not wet batter). Pulling them out slightly early ensures a fudgier center. They will continue to cook slightly from residual heat as they cool in the pan.
- Cool Completely Before Cutting: Patience is key! Warm blondies are too soft and gooey to cut cleanly. Letting them cool completely in the pan allows them to set fully, developing the perfect chewy texture and making slicing much easier. Resist the temptation to cut them early.
- Parchment Paper is Your Friend: Lining the pan with parchment paper, with an overhang, makes cleanup a breeze and allows you to lift the entire slab out for easy cutting on a flat surface. Don’t forget to grease the parchment too!
- Customize Your Mix-Ins: While classic semi-sweet chocolate chips are fantastic, feel free to get creative! Try using dark chocolate chunks, milk chocolate chips, white chocolate chips, butterscotch chips, peanut butter chips, chopped pecans, walnuts, or even dried cranberries or shredded coconut. Just keep the total amount of mix-ins roughly the same (around 2 cups).
Frequently Asked Questions (FAQ) About Chocolate Chip Blondies
Here are answers to some common questions about making and enjoying these delightful treats:
- Q: What’s the difference between a blondie and a brownie?
A: The primary difference lies in the flavour base and the type of sugar used. Brownies rely on cocoa powder or melted chocolate for their intense chocolate flavour. Blondies, on the other hand, get their signature taste from brown sugar, butter, and vanilla, resulting in a rich caramel or butterscotch-like flavour profile. While both can contain chocolate chips, the base flavour is distinct. Blondies are essentially “blonde brownies.” - Q: My blondies came out too cakey. What did I do wrong?
A: Cakey blondies are usually the result of either overmixing the batter after adding the flour (which develops too much gluten) or measuring the flour incorrectly (adding too much flour). Ensure you mix only until combined and use the spoon-and-level method for measuring flour. Using melted butter also contributes to a denser, chewier texture compared to creamed butter. - Q: Can I use dark brown sugar instead of light brown sugar?
A: Yes, absolutely! Using dark brown sugar will result in a blondie with a deeper, more intense molasses flavour and potentially a slightly darker colour and moister texture due to the higher molasses content. It’s a delicious variation if you enjoy that richer taste. - Q: How should I store leftover blondies?
A: Store completely cooled blondies in an airtight container at room temperature. They are best enjoyed within 3-4 days for optimal freshness and texture. Storing them in the refrigerator can sometimes dry them out, but if your kitchen is very warm, it might be necessary. - Q: Can I freeze chocolate chip blondies?
A: Yes, blondies freeze very well! Once completely cooled, cut them into squares. You can wrap individual squares tightly in plastic wrap and then place them in a freezer-safe bag or container, or you can place layers of blondies separated by parchment paper in an airtight container. They can be frozen for up to 3 months. Thaw at room temperature before serving. You can even gently warm thawed blondies in the microwave for a few seconds. - Q: Can I double this recipe?
A: Yes, you can double the recipe. However, you will need a larger baking pan, likely a 18×13 inch half-sheet pan. The baking time might need slight adjustment (potentially a few minutes longer), so keep an eye on them and use the toothpick test to check for doneness. Alternatively, you could bake two separate 9×13 inch pans. - Q: Why are my blondies greasy?
A: A slightly greasy texture can sometimes happen if the butter separates. This might occur if the butter was too hot when mixed with the sugars and eggs, or sometimes if the quality of butter used has a higher water content. Ensure your melted butter has cooled slightly before mixing. Also, make sure all ingredients are well incorporated, but without overmixing. A little bit of buttery richness is normal, but excessively greasy usually points to a mixing or temperature issue. - Q: Can I make these blondies gluten-free?
A: Yes, you likely can make these gluten-free by substituting the all-purpose flour with a good quality measure-for-measure gluten-free flour blend that contains xanthan gum. Ensure the blend you choose is recommended for cookies and bars. Baking times and texture might vary slightly, so watch them closely during baking.

Chocolate Chip Blondies
Ingredients
Gather these simple pantry staples to create the most delectable blondies you’ve ever tasted. Using quality ingredients makes a noticeable difference in the final flavour and texture.
- 1 cup (2 sticks or 226g) Unsalted Butter, melted: Provides richness, moisture, and that essential chewy texture. Melting it ensures a denser, fudgier blondie rather than a cakey one.
- 1 ¾ cups (350g) Light Brown Sugar, packed: The star ingredient! It delivers moisture, chewiness, and that signature deep molasses/caramel flavour unique to blondies. Make sure it’s packed firmly into the measuring cup.
- ½ cup (100g) Granulated Sugar: Adds sweetness and contributes to the slightly crisp edges and tender crumb.
- 2 Large Eggs, room temperature: Act as binders, add richness, and contribute to the structure. Room temperature eggs incorporate more easily and create a smoother batter.
- 1 Tablespoon Pure Vanilla Extract: Essential for enhancing all the other flavours, especially the brown sugar and butter. Use pure extract for the best taste.
- 2 ½ cups (300g) All-Purpose Flour: Provides the structure for the blondies. Be sure to measure it correctly (spoon and level method recommended) to avoid dry blondies.
- 1 teaspoon Baking Powder: Gives the blondies a slight lift, preventing them from being overly dense.
- ½ teaspoon Baking Soda: Reacts with the brown sugar (which is acidic) to provide further leavening and contribute to browning.
- 1 teaspoon Salt: Crucial for balancing the sweetness and enhancing the butter and vanilla flavours. Don’t skip it!
- 2 cups (340-350g) Semi-Sweet Chocolate Chips: The classic choice! Provides pockets of rich, melted chocolate throughout. Feel free to use milk, dark, or a combination.
Instructions
Follow these detailed steps carefully for guaranteed blondie success. The process is straightforward, making this a great recipe for bakers of all levels.
- Preheat and Prepare: Preheat your oven to 350°F (175°C). Grease a 9×13 inch baking pan thoroughly with butter or non-stick cooking spray. For easier removal and cleanup, line the pan with parchment paper, leaving an overhang on two opposite sides to act as handles. Grease the parchment paper as well. This ensures the blondies won’t stick and can be lifted out cleanly once cooled.
- Melt the Butter: In a medium saucepan, melt the unsalted butter over medium-low heat. Alternatively, you can melt it in a large microwave-safe bowl in short bursts. Allow the melted butter to cool slightly for a few minutes – you don’t want it piping hot, as it could scramble the eggs.
- Combine Wet Ingredients: Pour the slightly cooled melted butter into a large mixing bowl. Add the packed light brown sugar and granulated sugar to the butter. Whisk vigorously by hand or using an electric mixer on low speed until the mixture is well combined and smooth. It should look glossy and slightly grainy.
- Add Eggs and Vanilla: Add the room temperature large eggs one at a time, whisking well after each addition until fully incorporated. The mixture should become lighter in colour and slightly thicker. Stir in the pure vanilla extract until combined. Whisking the eggs and sugars thoroughly helps create that desirable crackly top.
- Combine Dry Ingredients: In a separate medium bowl, whisk together the all-purpose flour, baking powder, baking soda, and salt. Whisking ensures the leavening agents and salt are evenly distributed throughout the flour, preventing pockets of saltiness or uneven rising.
- Combine Wet and Dry: Gradually add the dry ingredient mixture to the wet ingredient mixture. Using a rubber spatula or wooden spoon, mix just until the flour streaks mostly disappear. Be very careful not to overmix at this stage! Overmixing develops the gluten in the flour, resulting in tough, cakey blondies instead of chewy ones. A few small lumps are perfectly fine.
- Fold in Chocolate Chips: Gently fold in the semi-sweet chocolate chips until they are evenly distributed throughout the batter. If you’re using any other mix-ins (like nuts or different types of chips), add them now as well. Again, avoid overmixing.
- Spread Batter: Pour the thick blondie batter into the prepared 9×13 inch baking pan. Use an offset spatula or the back of a spoon to spread the batter evenly into all corners. The batter will be quite thick, so take your time to ensure an even layer for consistent baking.
- Bake: Place the pan in the preheated oven on the center rack. Bake for 25-30 minutes. The exact baking time can vary depending on your oven. Start checking around the 25-minute mark.
- Check for Doneness: The blondies are done when the edges are set and lightly golden brown, and the center appears mostly set but still slightly soft. A wooden skewer or toothpick inserted into the center should come out with a few moist crumbs attached, but no wet batter. If it comes out completely clean, they might be slightly overbaked (though still delicious!). For fudgier centers, err on the side of slightly underbaking.
- Cool Completely: This step is crucial! Remove the pan from the oven and place it on a wire cooling rack. Let the blondies cool completely in the pan before attempting to lift them out or cut them. This usually takes at least 1-2 hours, sometimes longer. Cooling allows them to finish setting up, developing their signature chewy texture and making them much easier to cut cleanly. Cutting them while warm will result in messy, gooey squares.
- Cut and Serve: Once completely cool, use the parchment paper overhangs to lift the entire blondie slab out of the pan onto a cutting board. Use a sharp knife to cut them into squares or bars. The size is up to you – typically 16, 20, or 24 squares depending on how large you want the servings.
Nutrition
- Serving Size: one normal portion
- Calories: 400
- Sugar: 35g
- Carbohydrates: 50g
- Protein: 4g


