


The first time I stumbled upon the idea of Chocolate Banana Sushi, I was skeptical. Sushi, in my mind, was savory, filled with fish and rice. But the playful name and the promise of chocolate and banana – two of my all-time favorite comfort flavors – were too tempting to ignore. I decided to give it a whirl one Saturday afternoon when my nieces were over, thinking it would be a fun, messy activity. Little did I know it would become an instant sensation in our household! The girls were absolutely ecstatic, not just about eating it, but about making it. Their little hands, sticky with peanut butter and chocolate, carefully rolling up the tortillas and then giggling with delight as they sprinkled on their favorite toppings. The “oohs” and “aahs” when I sliced the rolls to reveal the perfect spiral were priceless. It wasn’t just a snack; it was an experience. Since then, Chocolate Banana Sushi has become our go-to for a quick dessert, a fun party treat, and even a surprisingly satisfying breakfast on rushed mornings. It’s incredibly simple, requires no baking, and the combination of creamy peanut butter, sweet banana, rich chocolate, and the slight chewiness of the tortilla is just divine. It’s one of those rare recipes that’s both kid-approved and adult-pleasing, and the sheer joy it brings to my family every time we make it is why it holds such a special place in my recipe collection. It’s more than just food; it’s a memory-maker.
Ingredients
- Large Tortillas (Whole Wheat or Plain): 4 (These act as our “nori” or seaweed wrapper, providing a sturdy base for the roll. Whole wheat adds a nice nutty flavor and extra fiber.)
- Ripe but Firm Bananas: 4 medium (The star of our sushi! They should be sweet and flavorful but firm enough to hold their shape when sliced.)
- Creamy Peanut Butter (or Almond/SunButter): 1 cup (This is the delicious “glue” that holds everything together and adds a rich, nutty flavor and protein. Feel free to use your favorite nut or seed butter.)
- Chocolate Spread (e.g., Nutella or a dairy-free alternative): 1/2 cup (For that irresistible chocolatey goodness. You can also use melted chocolate chips.)
- Toppings (Optional but Highly Recommended):
- Mini Chocolate Chips: 1/4 cup (For extra chocolate bursts and texture.)
- Shredded Coconut (Sweetened or Unsweetened): 1/4 cup (Adds a lovely tropical flavor and chewy texture.)
- Rainbow or Chocolate Sprinkles: 1/4 cup (For a fun, festive touch, especially loved by kids.)
- Chopped Nuts (e.g., Peanuts, Almonds, Walnuts): 1/4 cup (For added crunch and nutty flavor.)
- Cocoa Powder or Powdered Sugar: For dusting (A simple, elegant finish.)
Instructions
- Prepare Your Workspace: Lay out a clean cutting board or parchment paper. This will make assembly and cleanup much easier. Gather all your ingredients so they are within easy reach.
- Warm the Tortillas (Optional but Recommended): Gently warm the tortillas for about 10-15 seconds in the microwave or a dry skillet. This makes them more pliable and less likely to crack when rolling. Be careful not to overheat them, or they might become too soft or crispy.
- Spread the Goodness: Lay one tortilla flat. Spread a generous, even layer of peanut butter (about 1/4 cup) over the entire surface of the tortilla, leaving a small 1/2-inch border along one edge. This un-spread edge will help seal the roll.
- Add the Chocolate Layer: Over the peanut butter, spread a thinner, even layer of chocolate spread (about 2 tablespoons). You can swirl it into the peanut butter or keep it as a distinct layer.
- Position the Banana: Peel one banana. If the banana is longer than the width of your tortilla, you can trim the ends slightly. Place the whole banana along one edge of the tortilla, on top of the spreads.
- Roll It Up: Carefully and tightly roll the tortilla around the banana, starting from the edge with the banana. The un-spread border you left earlier should help the roll seal. If it’s not sticking well, you can dab a tiny bit more peanut butter on the edge to act as glue.
- Coat with Toppings (Optional): If you’re using external toppings like shredded coconut or sprinkles, now is the time to apply them. You can either:
- Spread a very thin layer of extra peanut butter or chocolate spread on the outside of the roll to help toppings stick, then roll it in your chosen toppings laid out on a plate.
- Or, if your inner spreads are peeking out a bit, you might be able to roll it directly in the toppings.
- Chill for Firmness (Crucial Step!): Wrap each banana sushi roll tightly in plastic wrap or parchment paper. This helps it hold its shape. Place the wrapped rolls in the refrigerator for at least 30 minutes, or in the freezer for 10-15 minutes. Chilling is essential for making clean slices and preventing the roll from squishing.
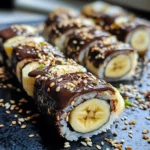
- Slice and Serve: Once chilled and firm, unwrap the rolls. Using a sharp knife, slice each roll into 1/2-inch to 3/4-inch thick “sushi” pieces. Wipe the knife clean between slices if it gets too sticky to ensure neat cuts.
- Garnish and Enjoy: Arrange your chocolate banana sushi pieces on a platter. If desired, dust with cocoa powder or powdered sugar, or drizzle with a little extra melted chocolate. Serve immediately and watch them disappear!
Nutrition Facts
- Servings: This recipe makes 4 rolls, and each roll can be sliced into approximately 6-8 pieces. Let’s consider 1 roll (6-8 pieces) as one serving.
- Calories per Serving (1 roll, estimated): Approximately 450-550 calories, depending on the specific brands of tortillas, spreads, and amount of toppings used.
- Key Nutrition Highlights (per estimated serving):
- Potassium: Bananas are a fantastic source of potassium, which is vital for heart health, blood pressure regulation, and muscle function.
- Healthy Fats & Protein: Peanut butter (or other nut/seed butters) provides heart-healthy monounsaturated fats and a good amount of plant-based protein, contributing to satiety.
- Fiber: Whole wheat tortillas and bananas contribute dietary fiber, which aids digestion and helps maintain stable blood sugar levels.
- Carbohydrates for Energy: Bananas and tortillas provide carbohydrates, the body’s primary source of energy, making this a great snack for a quick boost.
- Magnesium: Found in bananas, nuts, and whole grains, magnesium plays a role in over 300 enzymatic reactions in the body, including muscle and nerve function.
(Note: These are estimates. Actual nutritional values will vary based on specific ingredients and quantities used.)
Preparation Time
- Total Active Preparation Time: Approximately 15-20 minutes. This includes spreading, rolling, and applying toppings.
- Chilling Time: Minimum 30 minutes in the refrigerator (or 10-15 minutes in the freezer). This is crucial for easy slicing and the best texture.
- Overall Time (Prep + Chill): Roughly 45-50 minutes before they are ready to be sliced and served. However, the hands-on time is quite minimal, making it a quick treat to assemble.
This Chocolate Banana Sushi is a wonderfully quick and easy treat to prepare. Most of the “waiting” time is just the chilling period, during which you can clean up or prepare other things. The active assembly is swift, especially once you get into a rhythm of spreading and rolling. It’s perfect for when you need a delicious snack or dessert without spending hours in the kitchen.
How to Serve
Chocolate Banana Sushi is versatile and can be served in many fun and appealing ways. Here are some ideas:
- As an After-School Snack:
- Arrange a few pieces on a small plate.
- Serve with a glass of milk or a plant-based alternative.
- Kids love the bite-sized nature and familiar flavors.
- For Kids’ Parties or Playdates:
- Create a colorful platter with different toppings on different rolls.
- Serve with kid-friendly chopsticks for an authentic “sushi” experience (you can find training chopsticks).
- Set up a “DIY Banana Sushi Bar” where kids can choose their own internal spreads (if you offer variety) and external toppings to roll onto pre-sliced pieces or even help assemble their own rolls (with supervision).
- As a Light Dessert:
- Serve 2-3 pieces per person after a meal.
- Drizzle with a little extra melted dark chocolate or a fruit coulis (like raspberry) for a more elegant presentation.
- A light dusting of powdered sugar or cocoa powder can elevate its look.
- For a Fun Brunch Addition:
- Add them to a brunch spread alongside pancakes, waffles, and fruit salads. They offer a unique and sweet surprise.
- Movie Night Treat:
- Prepare a platter and let everyone grab pieces while enjoying a movie. It’s less messy than popcorn sometimes!
- Presentation Tips:
- Platter Power: Arrange the slices neatly on a platter, alternating types if you’ve made variations with different toppings.
- Chopsticks: Provide chopsticks (even decorative ones) to enhance the “sushi” theme.
- Dipping Sauces (Optional): While delicious on their own, you could offer small bowls of:
- Extra chocolate sauce
- Strawberry or raspberry puree
- A dollop of yogurt or whipped cream
- Garnish: A few fresh mint leaves or berries on the platter can add a pop of color and freshness.
- Individual Portions: For grab-and-go, you can place a few slices in cupcake liners.
Additional Tips
- Banana Selection is Key: Use bananas that are ripe (sweet) but still firm. Overripe, mushy bananas will make the rolls difficult to slice and can result in a less appealing texture. If your bananas are slightly underripe, they might lack sweetness.
- Tortilla Temperature Matters: Slightly warming the tortillas makes them more pliable and prevents cracking when you roll them. Don’t overheat, or they’ll become stiff or too soft. Just 10-15 seconds in the microwave is usually perfect.
- Spread Evenly, Not Too Thickly: A consistent layer of your chosen spreads ensures every bite is delicious, but overfilling can make the rolls messy and difficult to seal and slice. Aim for good coverage without excessive bulk.
- Don’t Skip the Chill: This is arguably the most important tip for success. Chilling the rolls in the refrigerator or freezer firms up the spreads and the banana, allowing for clean, neat slices. Without chilling, they can be squishy and messy.
- Use a Sharp Knife: A sharp, thin-bladed knife will give you the cleanest cuts. Wipe the blade with a damp cloth between slices if it accumulates too much spread, which can help prevent dragging and tearing.
- Customize Your Spreads and Toppings: This recipe is incredibly adaptable.
- Spreads: Try almond butter, cashew butter, sunflower seed butter (for nut-free), cream cheese (for a tangy twist), or even a thin layer of jam along with the peanut butter.
- Toppings: Think beyond the list – crushed pretzels for salty-sweet, chia seeds or hemp seeds for a nutritional boost, finely chopped dried fruit, or even edible glitter for a party.
- Make it a Fun Activity: Get kids involved! They can help spread the fillings, place the banana, and (with supervision) roll up the tortillas. They’ll love “decorating” their rolls with various toppings. This turns snack time into a creative and engaging experience.
- Storage Savvy: Chocolate Banana Sushi is best enjoyed fresh, ideally within a few hours of making, as the bananas can brown and the tortillas can become soggy over time. If you have leftovers, store them in an airtight container in the refrigerator for up to 24 hours. The texture might change slightly, but they’ll still be tasty.
FAQ Section
Q1: Can I make Chocolate Banana Sushi gluten-free?
A1: Absolutely! Simply use your favorite brand of gluten-free tortillas. Ensure your chocolate spread and other toppings are also certified gluten-free if cross-contamination is a concern. The rest of the core ingredients are naturally gluten-free.
Q2: How can I make this recipe nut-free?
A2: To make it nut-free, substitute the peanut butter with a seed-based butter like sunflower seed butter (SunButter) or tahini. Also, ensure your chocolate spread is nut-free (some chocolate spreads contain hazelnuts) and use nut-free toppings like shredded coconut, sprinkles, or seeds.
Q3: Can I prepare Chocolate Banana Sushi ahead of time?
A3: While they are best enjoyed fresh on the day they are made, you can assemble the rolls (spread tortilla, add banana, roll up) and wrap them tightly in plastic wrap. Store them in the refrigerator for a few hours before you plan to slice and serve. Avoid slicing too far in advance, as the banana ends can brown. For best results, chill, slice, and serve within a few hours.
Q4: How do I store leftovers?
A4: Store any leftover Chocolate Banana Sushi slices in an airtight container in the refrigerator. They are best consumed within 24 hours. The banana may brown slightly, and the tortilla can soften over time, but they will still be enjoyable.
Q5: Is this recipe kid-friendly to make?
A5: Yes, extremely! Kids love spreading the peanut butter and chocolate, placing the banana, and rolling them up. Applying toppings is also a favorite step. Adult supervision is recommended, especially if warming tortillas or using sharp knives for slicing, but the assembly is very hands-on and fun for children.
Q6: Can I make a vegan version of Chocolate Banana Sushi?
A6: Easily! Ensure your tortillas are vegan (most plain ones are, but check labels). Use a vegan chocolate spread (many dark chocolate spreads or homemade avocado-chocolate mousse work well) or melted dairy-free chocolate chips. Peanut butter and bananas are naturally vegan. Double-check that your chosen toppings (like sprinkles) are also vegan.
Q7: My banana sushi is falling apart when I slice it. What am I doing wrong?
A7: This is usually due to one of three things:
1. Not chilled enough: The rolls need to be firm from chilling for clean slices.
2. Dull knife: A sharp knife is crucial. A dull knife will crush rather than slice.
3. Overfilled or loosely rolled: Too much filling or a loose roll can make it unstable. Roll tightly and don’t overdo the spreads.
Wiping the knife clean between slices also helps.
Q8: Can I use other fruits besides bananas?
A8: While bananas are ideal for their shape and texture, you could experiment. Strawberries (hulled and lined up) could work, but they might release more moisture and won’t fill the roll as uniformly as a banana. Apple slices (thinly cut and perhaps pre-cooked slightly to soften) could also be an option. The key is to choose fruits that are relatively firm and won’t make the tortilla too soggy quickly. The “sushi” concept works best with a cylindrical fruit like a banana.
Chocolate Banana Sushi
Ingredients
- Large Tortillas (Whole Wheat or Plain): 4 (These act as our “nori” or seaweed wrapper, providing a sturdy base for the roll. Whole wheat adds a nice nutty flavor and extra fiber.)
- Ripe but Firm Bananas: 4 medium (The star of our sushi! They should be sweet and flavorful but firm enough to hold their shape when sliced.)
- Creamy Peanut Butter (or Almond/SunButter): 1 cup (This is the delicious “glue” that holds everything together and adds a rich, nutty flavor and protein. Feel free to use your favorite nut or seed butter.)
- Chocolate Spread (e.g., Nutella or a dairy-free alternative): 1/2 cup (For that irresistible chocolatey goodness. You can also use melted chocolate chips.)
- Toppings (Optional but Highly Recommended):
- Mini Chocolate Chips: 1/4 cup (For extra chocolate bursts and texture.)
- Shredded Coconut (Sweetened or Unsweetened): 1/4 cup (Adds a lovely tropical flavor and chewy texture.)
- Rainbow or Chocolate Sprinkles: 1/4 cup (For a fun, festive touch, especially loved by kids.)
- Chopped Nuts (e.g., Peanuts, Almonds, Walnuts): 1/4 cup (For added crunch and nutty flavor.)
- Cocoa Powder or Powdered Sugar: For dusting (A simple, elegant finish.)
Instructions
- Prepare Your Workspace: Lay out a clean cutting board or parchment paper. This will make assembly and cleanup much easier. Gather all your ingredients so they are within easy reach.
- Warm the Tortillas (Optional but Recommended): Gently warm the tortillas for about 10-15 seconds in the microwave or a dry skillet. This makes them more pliable and less likely to crack when rolling. Be careful not to overheat them, or they might become too soft or crispy.
- Spread the Goodness: Lay one tortilla flat. Spread a generous, even layer of peanut butter (about 1/4 cup) over the entire surface of the tortilla, leaving a small 1/2-inch border along one edge. This un-spread edge will help seal the roll.
- Add the Chocolate Layer: Over the peanut butter, spread a thinner, even layer of chocolate spread (about 2 tablespoons). You can swirl it into the peanut butter or keep it as a distinct layer.
- Position the Banana: Peel one banana. If the banana is longer than the width of your tortilla, you can trim the ends slightly. Place the whole banana along one edge of the tortilla, on top of the spreads.
- Roll It Up: Carefully and tightly roll the tortilla around the banana, starting from the edge with the banana. The un-spread border you left earlier should help the roll seal. If it’s not sticking well, you can dab a tiny bit more peanut butter on the edge to act as glue.
- Coat with Toppings (Optional): If you’re using external toppings like shredded coconut or sprinkles, now is the time to apply them. You can either:
- Spread a very thin layer of extra peanut butter or chocolate spread on the outside of the roll to help toppings stick, then roll it in your chosen toppings laid out on a plate.
- Or, if your inner spreads are peeking out a bit, you might be able to roll it directly in the toppings.
- Chill for Firmness (Crucial Step!): Wrap each banana sushi roll tightly in plastic wrap or parchment paper. This helps it hold its shape. Place the wrapped rolls in the refrigerator for at least 30 minutes, or in the freezer for 10-15 minutes. Chilling is essential for making clean slices and preventing the roll from squishing.
- Slice and Serve: Once chilled and firm, unwrap the rolls. Using a sharp knife, slice each roll into 1/2-inch to 3/4-inch thick “sushi” pieces. Wipe the knife clean between slices if it gets too sticky to ensure neat cuts.
- Garnish and Enjoy: Arrange your chocolate banana sushi pieces on a platter. If desired, dust with cocoa powder or powdered sugar, or drizzle with a little extra melted chocolate. Serve immediately and watch them disappear!
Nutrition
- Serving Size: one normal portion
- Calories: 550


