


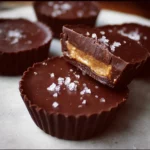
Of all the treats that have ever graced my kitchen counter, few have disappeared as quickly or with as much universal acclaim as these homemade Chocolate Almond Butter Cups. I first whipped them up on a whim, looking for a healthier alternative to the store-bought peanut butter cups my family adores. We have a few mild sensitivities in the house, and almond butter is always a crowd-pleaser. I wasn’t expecting a revolution, just a simple, satisfying dessert. What I got was pure magic. The moment my husband bit into one, his eyes widened. “This is better than the real thing,” he declared, a statement I’ve since heard echoed by friends, neighbors, and even my harshest critics—my children. The magic lies in the contrast: the satisfying snap of the rich, dark chocolate shell giving way to a luxuriously creamy, slightly salty, and deeply nutty almond butter filling. They are decadent yet wholesome, simple yet sophisticated. This recipe has become my go-to for everything from a quick after-dinner sweet to a contribution for a potluck, always eliciting oohs and aahs. They are proof that you don’t need a long list of artificial ingredients to create a truly unforgettable treat. Prepare to be amazed; this isn’t just a recipe, it’s an upgrade.
Ingredients
- Dark Chocolate Chips (2 cups / 340g): The foundation of our cups. Use a high-quality chocolate (60-75% cacao) for a deep, rich flavor that perfectly balances the sweetness of the filling.
- Refined Coconut Oil (2 tablespoons, divided): This is our secret weapon. One tablespoon is melted with the chocolate for a glossy finish and smooth texture, and the other helps create a perfectly creamy, set filling.
- Creamy Almond Butter (1 cup / 250g): The star of the filling. Opt for a natural, creamy almond butter where the only ingredients are almonds and maybe a little salt. This ensures the purest flavor.
- Maple Syrup (3 tablespoons): Our natural sweetener. It adds a subtle, caramel-like sweetness to the filling without being overpowering. You can adjust the amount to your personal taste.
- Vanilla Extract (1 teaspoon): A crucial flavor enhancer that adds depth and warmth to the almond butter filling, making it taste more complex and dessert-like.
- Fine Sea Salt (¼ teaspoon): Don’t skip this! A small amount of salt is essential to balance the sweetness and intensify the chocolate and almond flavors.
- Flaky Sea Salt (for topping, optional): A final flourish that adds a gourmet touch, a delightful crunch, and an extra pop of flavor that cuts through the richness.
Instructions
- Prepare Your Workstation: Begin by lining a standard 12-cup muffin tin with paper or silicone liners. This is a crucial first step to ensure your cups don’t stick and are easy to handle later. Set the prepared tin aside.
- Melt the Chocolate for the Base: In a medium-sized microwave-safe bowl, combine 1 cup of the dark chocolate chips and 1 tablespoon of the refined coconut oil. Microwave in 30-second intervals, stirring well after each interval. Continue this process until the chocolate is completely melted and glossy. Be careful not to overheat it, as this can cause the chocolate to become grainy or “seize.” Alternatively, you can use a double boiler method by placing the bowl over a saucepan of simmering water, stirring until melted.
- Create the First Chocolate Layer: Carefully spoon about 1 to 1.5 tablespoons of the melted chocolate into the bottom of each muffin liner. Use the back of the spoon to gently push the chocolate up the sides of the liner, creating a small cup or shell. You want to aim for about a third of the way up the liner. The goal is to create a solid base and walls to hold the delicious filling.
- First Chill: Place the entire muffin tin into the freezer for 10-15 minutes. This step is vital as it quickly hardens the chocolate shells, creating a firm base for the almond butter filling and preventing the layers from mixing.
- Prepare the Almond Butter Filling: While the chocolate bases are chilling, prepare the filling. In a separate bowl, combine the 1 cup of creamy almond butter, 3 tablespoons of maple syrup, 1 teaspoon of vanilla extract, the remaining 1 tablespoon of melted coconut oil, and the ¼ teaspoon of fine sea salt. Stir vigorously with a spoon or spatula until the mixture is smooth, well-combined, and has a thick but spreadable consistency.
- Fill the Chocolate Cups: Remove the muffin tin from the freezer. The chocolate shells should be firm to the touch. Spoon about 1 tablespoon of the almond butter filling into the center of each chocolate cup. Use the back of your spoon to gently spread the filling into an even, flat layer, leaving a small border of chocolate visible around the edge. This will allow the top layer of chocolate to completely seal the cup.
- Melt the Remaining Chocolate: Using the same method as before (microwave or double boiler), melt the remaining 1 cup of chocolate chips. If your first batch of chocolate has started to firm up, you can gently reheat it until it’s liquid and pourable again.
- Create the Top Chocolate Layer: Carefully spoon the remaining melted chocolate over the almond butter filling in each cup. Ensure the filling is completely covered, sealing it in. Gently tilt and swirl the muffin tin or tap it on the counter a few times. This helps the chocolate settle into a smooth, even top layer and removes any air bubbles.
- Add the Finishing Touch: If you’re using flaky sea salt, now is the time to sprinkle a tiny pinch over the top of each cup while the chocolate is still wet. This not only adds flavor and texture but also gives them a beautiful, professional appearance.
- Final Chill: Place the muffin tin back into the refrigerator (not the freezer this time) for at least 30-45 minutes, or until the chocolate is completely firm. The slower chill in the refrigerator helps prevent the chocolate from cracking.
- Serve and Store: Once fully set, your Chocolate Almond Butter Cups are ready! You can easily peel away the liner and enjoy. Store any leftovers in an airtight container in the refrigerator for the best texture and freshness.
Nutrition Facts
Servings: 12 cups | Calories per serving: Approx. 280 kcal
- Healthy Fats (Approx. 22g): A significant portion of the calories comes from heart-healthy monounsaturated and polyunsaturated fats from the almond butter and coconut oil. These fats are crucial for brain function, hormone production, and providing long-lasting energy.
- Protein (Approx. 6g): Each cup provides a decent boost of plant-based protein, thanks to the almond butter. Protein is essential for muscle repair and helps in making these treats surprisingly satisfying and filling.
- Fiber (Approx. 4g): With contributions from both the dark chocolate and the almonds, these cups contain dietary fiber, which aids in digestion and helps to stabilize blood sugar levels, preventing the sharp spike and crash associated with many other sweets.
- Lower in Sugar (Approx. 12g): By using high-cacao dark chocolate and a controlled amount of maple syrup, these cups are significantly lower in refined sugar than their commercial counterparts, making them a more mindful indulgence.
- Iron (Approx. 15% DV): Dark chocolate is a surprisingly good source of iron, an essential mineral that helps transport oxygen in the blood and prevent fatigue.
Preparation Time
This recipe is wonderfully quick and requires no baking. The total time is mostly hands-off chilling time.
- Active Preparation Time: Approximately 20-25 minutes. This includes melting the chocolate, mixing the filling, and assembling the cups.
- Chilling Time: Approximately 45-60 minutes total. This is divided between the initial chill for the base layer and the final setting time for the completed cups.
How to Serve
These Chocolate Almond Butter Cups are a versatile delight. While they are perfect on their own, here are some creative ways to serve and enjoy them:
- The Classic Treat:
- Serve chilled, straight from the refrigerator, for the ultimate snappy chocolate and firm filling experience.
- Enjoy with a tall glass of cold milk or a plant-based alternative like almond or oat milk.
- Pair with a hot cup of coffee or black tea for a perfect afternoon pick-me-up.
- For Entertaining and Dessert Platters:
- Arrange them on a beautiful platter alongside fresh berries like raspberries and strawberries, whose tartness cuts through the richness of the chocolate.
- Create a “deconstructed” dessert board with the cups, extra almond butter for dipping, various chopped nuts, and sliced bananas.
- Cut them into quarters and serve as part of a selection of petit fours for a more elegant presentation.
- As a Decadent Topping:
- Chop a cup into small chunks and sprinkle it over a bowl of vanilla or chocolate ice cream for an instant upgrade.
- Crumble one over your morning bowl of oatmeal or a Greek yogurt parfait to add a touch of indulgence and flavor.
- Use them as a surprise ingredient in a “freakshake” or a blended milkshake for a truly decadent experience.
- Gifting and Special Occasions:
- Place them in a decorative box or tin, tied with a ribbon, for a thoughtful and delicious homemade gift.
- Make a batch for holiday cookie exchanges or as a potluck dessert—they are always one of the first things to disappear!
Additional Tips
- Choose Your Chocolate Wisely: The quality of your chocolate makes a huge difference. For a classic, rich flavor, a semi-sweet or dark chocolate in the 60-70% cacao range is perfect. For a more intense, less sweet version, go for 75% or even 85% cacao. Chocolate wafers or feves melt more evenly than chips, but good quality chips work perfectly well.
- Master the Creamy Filling: If your natural almond butter is very thick, you might find the filling a bit stiff. You can add another teaspoon of melted coconut oil to make it creamier and more spreadable. Conversely, if your almond butter is particularly runny, you can add a tablespoon of coconut flour or almond flour to help it thicken and set properly.
- The Importance of the Double Chill: Don’t be tempted to skip the initial 10-minute freeze of the bottom chocolate layer. This step is what creates the distinct, separate layers. Without it, the heavier almond butter filling can sink into the bottom layer of chocolate, resulting in a muddled, less professional-looking cup.
- Embrace Different Molds: While a standard muffin tin is perfect, you can easily change the size and shape. Use a mini-muffin tin for bite-sized cups (be sure to adjust the filling and chocolate amounts accordingly). Fun silicone molds in shapes like hearts or stars can also be used for festive occasions. Silicone molds are especially great as they make releasing the cups incredibly easy.
- Perfecting the Smooth Top: The secret to a perfectly smooth, glossy top layer is to tap the tin. After you’ve added the final layer of chocolate, gently but firmly tap the entire muffin tin on your countertop several times. This action forces any trapped air bubbles to the surface and helps the chocolate self-level into a flawless finish.
- Customize Your Filling: This recipe is a fantastic base for experimentation. Add a half teaspoon of cinnamon or a pinch of cayenne pepper to the almond butter for a warm, spicy kick. You can also mix in finely chopped almonds, toasted coconut flakes, or mini chocolate chips to the filling for added texture and crunch.
- Proper Storage is Key: To maintain that signature snap and prevent the coconut oil from softening too much, these cups must be stored in the refrigerator. Keep them in an airtight container to prevent them from absorbing any other fridge odors. They will last for up to two weeks in the fridge, or they can be frozen for up to 3 months for a longer-term treat.
- The Salt Secret: Don’t underestimate the power of salt in this recipe. The fine sea salt within the filling is non-negotiable; it balances the sweetness and brings out the nutty flavor. The flaky sea salt on top is optional but highly recommended. It provides a textural contrast and a burst of flavor that elevates the entire experience from a simple treat to a gourmet confection.
FAQ Section
1. Can I use peanut butter or another nut/seed butter instead of almond butter?
Absolutely! This recipe is incredibly versatile. You can make a classic version with creamy peanut butter, or try cashew butter for an even richer, creamier texture. For a nut-free alternative, sunflower seed butter or tahini are excellent choices. Just be aware that the flavor profile will change, and you may need to slightly adjust the sweetener, as some butters (like tahini) can be more bitter. Always use a creamy, well-stirred butter for the best results.
2. Why did my chocolate turn white and chalky after it set?
This phenomenon is called “chocolate bloom.” It can be either fat bloom (from the cocoa butter separating) or sugar bloom (from moisture). It’s usually caused by temperature fluctuations, such as overheating the chocolate during melting or cooling it too rapidly. To prevent this, melt your chocolate gently and slowly, and use the refrigerator (not the freezer) for the final chill. While bloomed chocolate is perfectly safe to eat, it just doesn’t look as appealing. Adding the tablespoon of coconut oil helps stabilize the chocolate and reduce the chances of bloom.
3. Are these Chocolate Almond Butter Cups vegan and dairy-free?
Yes, as written, this recipe is naturally vegan and dairy-free! The key is to ensure you use dark chocolate chips that do not contain any milk or milk fat. Most high-quality dark chocolates (over 60% cacao) are dairy-free, but it’s always essential to check the ingredients label to be certain. All other ingredients—almond butter, coconut oil, maple syrup, and vanilla—are plant-based.
4. How can I make this recipe keto or low-carb?
It’s very easy to adapt this recipe for a ketogenic diet. First, use a high-quality sugar-free chocolate, such as one sweetened with stevia, erythritol, or monk fruit (brands like Lily’s are popular). Second, swap the maple syrup in the filling for a liquid keto-friendly sweetener of your choice. Start with a smaller amount and taste as you go, as their sweetness levels can vary. With these two simple swaps, you can enjoy a delicious, low-carb treat.
5. My almond butter filling seems too runny or too thick. How can I fix it?
The consistency of natural almond butter can vary greatly between brands. If your filling is too runny and you’re worried it will ooze out, add 1-2 teaspoons of coconut flour. Coconut flour is highly absorbent and will thicken the mixture without altering the flavor much. If the filling is too thick and difficult to spread, simply mix in an extra teaspoon of melted coconut oil or a tiny splash of almond milk until you reach a smoother, more manageable consistency.
6. Do I have to use coconut oil? Is there a substitute?
The coconut oil serves two purposes: it helps the chocolate melt smoothly and gives it a nice shine, and it helps the filling set to a firm, fudgy texture. For melting the chocolate, you could omit it, but the result might be less glossy. For the filling, it’s more crucial for the final texture. If you must substitute it, you could try using a small amount of cacao butter or a neutral-flavored vegetable shortening, but refined coconut oil provides the best results for both flavor and texture in this recipe.
7. How long will these homemade almond butter cups last?
When stored properly in an airtight container in the refrigerator, these cups will stay fresh and delicious for up to 2 weeks. The cool temperature is essential to keep the chocolate hard and the filling firm. For longer storage, you can freeze them. Place them in a single layer on a baking sheet to freeze solid, then transfer them to a freezer-safe bag or container. They will last for up to 3 months in the freezer. You can enjoy them straight from the freezer for a firmer, icier treat or let them thaw for a few minutes.
8. What’s the easiest way to get the cups out of the muffin tin without breaking them?
If you’ve used paper liners, it’s as simple as lifting them out and peeling the paper away. If you’ve used silicone liners, they should pop right out with a gentle push from the bottom. If you greased a metal tin directly (not recommended), it can be tricky. The best method is to ensure they are completely firm. You can run a thin, sharp knife around the edge of each cup to loosen it before gently trying to lift it out with the tip of the knife. Using liners from the start is the best way to guarantee easy removal and a perfect shape every time.
Chocolate Almond Butter Cups
Ingredients
- Dark Chocolate Chips (2 cups / 340g): The foundation of our cups. Use a high-quality chocolate (60-75% cacao) for a deep, rich flavor that perfectly balances the sweetness of the filling.
- Refined Coconut Oil (2 tablespoons, divided): This is our secret weapon. One tablespoon is melted with the chocolate for a glossy finish and smooth texture, and the other helps create a perfectly creamy, set filling.
- Creamy Almond Butter (1 cup / 250g): The star of the filling. Opt for a natural, creamy almond butter where the only ingredients are almonds and maybe a little salt. This ensures the purest flavor.
- Maple Syrup (3 tablespoons): Our natural sweetener. It adds a subtle, caramel-like sweetness to the filling without being overpowering. You can adjust the amount to your personal taste.
- Vanilla Extract (1 teaspoon): A crucial flavor enhancer that adds depth and warmth to the almond butter filling, making it taste more complex and dessert-like.
- Fine Sea Salt (¼ teaspoon): Don’t skip this! A small amount of salt is essential to balance the sweetness and intensify the chocolate and almond flavors.
- Flaky Sea Salt (for topping, optional): A final flourish that adds a gourmet touch, a delightful crunch, and an extra pop of flavor that cuts through the richness.
Instructions
- Prepare Your Workstation: Begin by lining a standard 12-cup muffin tin with paper or silicone liners. This is a crucial first step to ensure your cups don’t stick and are easy to handle later. Set the prepared tin aside.
- Melt the Chocolate for the Base: In a medium-sized microwave-safe bowl, combine 1 cup of the dark chocolate chips and 1 tablespoon of the refined coconut oil. Microwave in 30-second intervals, stirring well after each interval. Continue this process until the chocolate is completely melted and glossy. Be careful not to overheat it, as this can cause the chocolate to become grainy or “seize.” Alternatively, you can use a double boiler method by placing the bowl over a saucepan of simmering water, stirring until melted.
- Create the First Chocolate Layer: Carefully spoon about 1 to 1.5 tablespoons of the melted chocolate into the bottom of each muffin liner. Use the back of the spoon to gently push the chocolate up the sides of the liner, creating a small cup or shell. You want to aim for about a third of the way up the liner. The goal is to create a solid base and walls to hold the delicious filling.
- First Chill: Place the entire muffin tin into the freezer for 10-15 minutes. This step is vital as it quickly hardens the chocolate shells, creating a firm base for the almond butter filling and preventing the layers from mixing.
- Prepare the Almond Butter Filling: While the chocolate bases are chilling, prepare the filling. In a separate bowl, combine the 1 cup of creamy almond butter, 3 tablespoons of maple syrup, 1 teaspoon of vanilla extract, the remaining 1 tablespoon of melted coconut oil, and the ¼ teaspoon of fine sea salt. Stir vigorously with a spoon or spatula until the mixture is smooth, well-combined, and has a thick but spreadable consistency.
- Fill the Chocolate Cups: Remove the muffin tin from the freezer. The chocolate shells should be firm to the touch. Spoon about 1 tablespoon of the almond butter filling into the center of each chocolate cup. Use the back of your spoon to gently spread the filling into an even, flat layer, leaving a small border of chocolate visible around the edge. This will allow the top layer of chocolate to completely seal the cup.
- Melt the Remaining Chocolate: Using the same method as before (microwave or double boiler), melt the remaining 1 cup of chocolate chips. If your first batch of chocolate has started to firm up, you can gently reheat it until it’s liquid and pourable again.
- Create the Top Chocolate Layer: Carefully spoon the remaining melted chocolate over the almond butter filling in each cup. Ensure the filling is completely covered, sealing it in. Gently tilt and swirl the muffin tin or tap it on the counter a few times. This helps the chocolate settle into a smooth, even top layer and removes any air bubbles.
- Add the Finishing Touch: If you’re using flaky sea salt, now is the time to sprinkle a tiny pinch over the top of each cup while the chocolate is still wet. This not only adds flavor and texture but also gives them a beautiful, professional appearance.
- Final Chill: Place the muffin tin back into the refrigerator (not the freezer this time) for at least 30-45 minutes, or until the chocolate is completely firm. The slower chill in the refrigerator helps prevent the chocolate from cracking.
- Serve and Store: Once fully set, your Chocolate Almond Butter Cups are ready! You can easily peel away the liner and enjoy. Store any leftovers in an airtight container in the refrigerator for the best texture and freshness.
Nutrition
- Serving Size: one normal portion
- Calories: 280
- Sugar: 12g
- Fat: 22g
- Fiber: 4g
- Protein: 6g


